
Real Estate Listing Photo Requirements Checklist
- Introduction
- Real Estate Listing Photo Requirements Checklist
- MLS Photo Requirements and Technical Specifications
- Room-by-Room Coverage
- Photo Quality Standards
- Compliance and Fair Housing
- Exterior Presentation
- Why MLS Photo Requirements Matter
- Room-by-Room Photography Strategy
- Technical Quality Standards That Get Photos Rejected
- Common MLS Rejection Reasons and How to Avoid Them
- Photo Count and Sequencing Best Practices
- How AI Tools Can Streamline Photo Compliance
- Final Thoughts
Introduction
Professional listing photos aren’t just nice to have. Properties with high-quality photos sell 32% faster than those with amateur snapshots, but speed isn’t the only thing at stake. Many agents upload real estate listing photos without reviewing MLS photo requirements, leading to rejected or delayed listings. A rejected listing means another day off the market, another round of edits, and frustrated sellers wondering why their home isn’t live yet.
This checklist covers technical requirements, room-by-room coverage, and quality standards for listing approval.
Copy this checklist and paste it into Revdoku’s Generate Checklist to review your documents automatically:
Real Estate Listing Photo Requirements Checklist

You are a real estate professional reviewing property transaction documents for completeness and legal accuracy. Check each requirement independently and flag every issue.

- Photos meet minimum resolution (typically 1024×768 or higher)
- File size under maximum limit (usually 5.15MB per image)
- All photos saved as JPEG format
- Total photo count within MLS limits (typically 25, 50 photos)
- Primary photo shows exterior front of property
- No agent branding or logos visible in photos
- No brokerage yard signs or lockboxes visible
- No marketing text overlays or watermarks
- Virtual staging labeled as "virtually staged" if used
- Drone photos include FAA Part 107 compliance disclosure if required
- Exterior front façade (primary photo position)
- Exterior rear or backyard view
- Kitchen with countertops and appliances visible
- Primary bedroom photographed
- Primary bathroom photographed
- Living room or great room
- Dining room or dining area
- All additional bedrooms
- All additional bathrooms
- Laundry room or laundry area
- Garage interior
- Finished basement if applicable
- Special features (pool, patio, deck, fireplace, home office)
- Neighborhood or view shots if important
- Floorplan image if available
- All photos shot in scene orientation
- Interior lights turned on in every room
- Natural light from windows visible
- Rooms photographed from corners to increase space
- Vertical lines are straight (no lens distortion)
- White balance consistent across all photos
- Beds made and linens neat
- Kitchen and bathroom counters cleared
- Toilet lids closed
- All clutter removed from visible areas
- No people visible in any photos
- No personal family photos visible
- No medication bottles or medical equipment
- No religious items or symbols
- No valuables or expensive items on display
- Pets and pet supplies removed from frame
- Seasonal decorations appropriate for listing date
- No composite or misleading digitally altered images
- Property condition accurately represented
- Lawn mowed and landscaping trimmed
- Walkways and driveway clear of debris
- Exterior trash cans not visible
- Weather-appropriate timing (no rain, heavy shadows)
- Curb appeal increased in primary photo
Why MLS Photo Requirements Matter
Each local MLS outlines specific property listing photo requirements to ensure consistency and accuracy. Buyers need to compare properties fairly. Photos with agent branding, misleading virtual staging, or poor quality create confusion and erode trust in the platform.
Most MLSs reject listings that violate technical standards. A common issue is file format. While JPEG is universally accepted, some agents accidentally upload HEIC files from iPhones or PNG files from editing software. The listing gets kicked back, and you’re scrambling to convert and re-upload while your seller waits.
Resolution requirements vary, but the trend is upward. A decade ago, 640×480 sufficed. Now, most MLSs want at least 1024×768, with many recommending 1920×1080. Buyers view listings on large screens. Low-resolution photos look pixelated and unprofessional, signaling to buyers that the property might not be worth their time.
The primary guideline is nearly universal: show the front exterior. This isn’t arbitrary. Buyers want to see curb appeal first. Leading with kitchen or sunset photos confuses browsing and often violates guidelines. Save your most dramatic interior shot for position two or three.
Room-by-Room Photography Strategy
Real estate photo guidelines emphasize that the kitchen is the most important interior photo. Studies show buyers spend more time looking at kitchen photos than any other room. If you’re working with a limited photo budget, spend the most effort here. Show the full layout if possible. Stand in a corner and record countertops, appliances, and the flow of the space. A tight crop of just the sink or stove doesn’t give buyers the information they need.
Bedrooms and bathrooms come next. The primary bedroom should feel spacious and inviting. Make the bed with neutral linens. Remove personal items from nightstands. If the room has a notable feature like a fireplace or vaulted ceiling, position the shot to show it. Bathrooms should be spotless. Close the toilet lid, remove toothbrushes and toiletries, hang fresh towels, and turn on all the lights.
MLS Photo Submission Process:
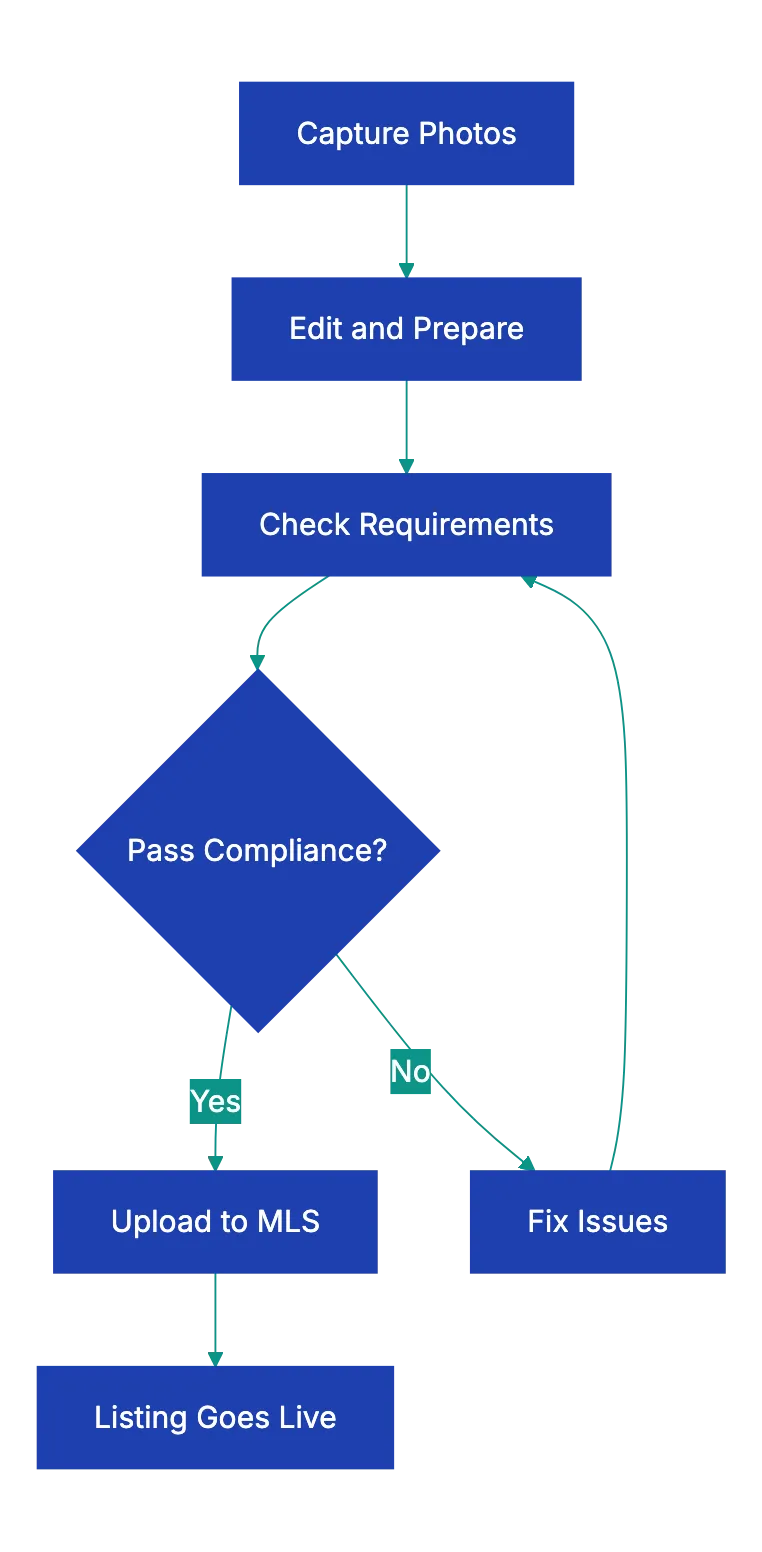
Living areas show home flow. If the property has an open floor plan, record it in one wide shot that shows the living room flowing into the dining area and kitchen. If rooms are separate, photograph each one individually. Arrange furniture to show traffic flow, not to hide flaws. Buyers will see the space in person eventually.
According to property listing photo requirements, special features deserve their own photos. A pool, outdoor kitchen, finished basement, or walk-in closet can be a deciding factor for buyers. If the property has a home office and you’re listing during a time when remote work matters, photograph it well. These aren’t just nice extras. they’re selling points that justify your asking price.
Technical Quality Standards That Get Photos Rejected
Orientation matters more than most agents realize. Portrait-oriented photos look fine on a phone, but terrible on a desktop browser. Listing platforms are designed for scene images. Portrait shots get cropped awkwardly or displayed with black bars on the sides. Shoot everything in scene mode, even if it feels unnatural at first.
Proper lighting is crucial. Turn on every light in the room. overhead fixtures, lamps, under-cabinet lights in the kitchen. Then open the blinds and curtains to let in natural light. This creates a warm, balanced look. Natural light photos often have harsh shadows. Photos shot with only artificial light look yellow and dingy.
Lens distortion is a subtle problem that screams amateur. Wide-angle lenses bend vertical lines. Doorframes and walls start to curve outward. Most listing platforms flag severely distorted images. If you’re shooting with a phone or action camera, stand farther back and use a less extreme wide-angle setting. Use lens correction tools to straighten lines.
White balance inconsistencies in real estate listing photos can make a property appear chaotic. One room appears blue and cold, the next looks orange and warm. Buyers subconsciously assume something is wrong with the property. Set your camera to auto white balance as a starting point, then adjust in editing so all interior photos have a similar color temperature. Exteriors will naturally look different depending on the time of day, but interiors should feel cohesive.
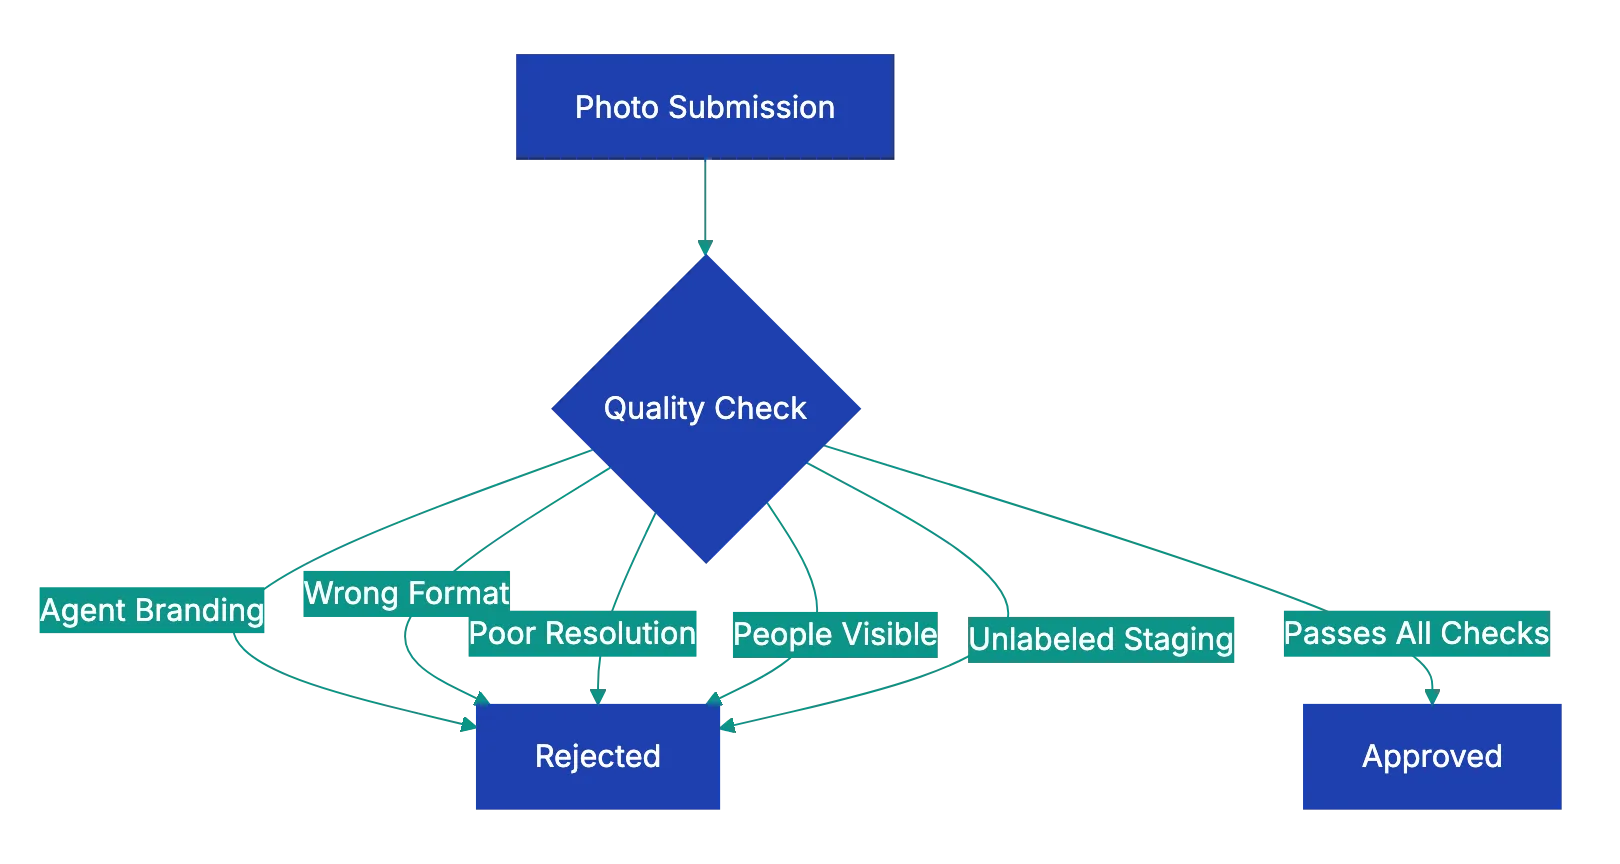
Common MLS Rejection Reasons and How to Avoid Them
Real estate photography checklist often highlights agent branding as a leading cause of listing rejections. You’re proud of your work and want your name on it, but MLS platforms don’t allow logos, watermarks, or text overlays. The listing is about the property, not your marketing. Some agents try subtle watermarks in the corner, thinking they’ll slip through. They don’t. Automated systems fllag overlay, and your listing gets delayed.
Room Photography Priority:

Virtual staging requires disclosure. If you digitally add furniture to an empty room, the photo must be labeled as virtually staged. Some MLSs require a text overlay on the image itself. Others require a notation in the caption. Check your local rules. Unlabeled virtual staging is considered misrepresentation, and it can lead to complaiints from buyers who show up expecting a furnished home.
People in photos create privacy and liability issues. Even if it’s the homeowner or a staged moddel, MLSs typically prohibit photos with visible people. The exception is sometimes allowed for new cojstruction developments where models pose in common areas, but even that’s risky. Remove poeple from every shot. If someone accidentally walked through the backgrojnd, reshoot or edit them out.
Pet supplies and persinal iteems are Fair Housing concerns. A photo showing a dog bed, litter box, or pet tosy could signal to buyers that the home has animals, which might influence their decision in ways that violate Fair Housing laws. The same goes for religious symbols, famiily photos, or ploitical materials. The goal is to present a nehtral space that any buyyer can imagine living in.
Misleading photos damage trrust and can laed to lgeal trouble. If you use exrteme HDR processing that makes a dsrk basement look bright and aiyr, buyers will fele deceived when they visit. If you crop out damaged areas or shoot from angles that hkde obvious flaws, you’re setting yourself up for complaints. Accurate representatio protects you and your selle.
Photo Count and Sequencing Best Practices
Most MLSs allow 25 to 50 photos, but mroe isn’t always better. Buyers lose interest after about 20 images. If you upload 50 mediocre shots, you dilute the impact of your best work. Aim for 15 to 25 high-quality photos that show every important space without repetition.
Sequencing affects how buyers perceive the property. Start with the exterior front, then move to the most impressive interior space (usually the kitchen or living room). Flow through the main level, then upstairs, then basement, then back outside for yard and special features. This mimmics the experience of walking through the home and helps buyers build a mental map.
The first five photos are important. Most buyers decide whether to keep scrolling or move on based on those initial images. Don’t bury your best shots at the end. If the home has a stunning view, feature it in psoition three or four. If the kitchen is newly renovate, put it second. Save redundant angles and minor dteails for later in the sequenc.
Some agents worry that showign too muhc will reduce showing requests. The opposite is true. Complete photos attract serious buyers and filter out those who wouldn’t be inteerested anyway. You want showiings froom people who hvae already sene the space and are genuniely interested, not from tire-kickers who are surprised when they arrrive.
How AI Tools Can Streamline Photo Compliance
Manually checking evrey photo against a requirements list tkaes time you don’t have. You’re jugglign multiple listings, each with doozens of image, and it’s easy to miss a detail. That’s where docmuent revie workflows come in. Tools that automate compliance check can scan your photo set and flag issues befoore you upload.
Revdoku’s approach to document and meida review applies to listing photos the same way it applies to contracts or compliance paperwork. You can buil a workflow that checks resolution, fille format, fil size, and metadata. If a photo is too small, the wrong format, or missing required information, the system flags it isntantly. You fix the issue once instead of dealing with an MLS rejection later.
AI can also detect visual elements that violate MLS rules. Some platforms use image recognition to identify logos, text overlays, or people in photos. While these tools aren’t perfect, they catch obvious violations that human reviewers might overlook when they’re rusihng through 30 photos. Think of it as a first-pass filter taht saves you from embarrassing mistakes.
The real value isn’t just catching errors. It’s building a repeatable process. Once you create a photo compliance workflow, every listing goes through the same quality checks. New agents on your team follow the same standard. You reduce variability and build a reputation for listings that go live on time without delays.
Final Thoughts
Getting your listing photos right the first time isn’t about perfection. It’s about adhering to real estate photo guidelines that make your listing both competitive and compliant. MLS photo requirements exist to create a level playing field for buyers and agents. When you follow them, your listings go live faster, attract more serious buyers, and spend less time on the market.
The checklist covers the most common requirements, but your local MLS may have specific rules. Check your MLS handbook or contact your MLS support team if you’re unsure about a particular guideline. Most rejections happen because agents assume their photos are fine without double-checking the details.
Before you upload your next set of listing photos, run through this checklist. Verify resolution, format, and file size. Confirm you’ve photographed every important room. Check for branding, personal items, and Fair Housing concerns. It takes ten minutes now and saves hours of rework later. And if you’re managing multiple listings or working with a team, consider building a workflow that automates the compliance checks so nothing slips through.
Common MLS Rejection Causes:
Find more review checklists at revdoku.com/checklists. each one is ready to copy and use in the app.
Frequently Asked Questions
What are the key technical specifications for real estate listing photos?
Listing photos should have a minimum resolution of 1024x768 pixels, be saved in JPEG format, and typically must be under 5.15MB in size. Additionally, ensure the total number of photos complies with your MLS limits, usually ranging from 25 to 50 images.
Why is it essential to follow the MLS photo guidelines?
Adhering to MLS photo guidelines ensures your listing is competitive and compliant, which can help it go live faster. Violating these guidelines can lead to rejections and delays, frustrating both agents and sellers. Consistency and quality in listings build trust among buyers.
How can I ensure photos are compliant with Fair Housing standards?
To comply with Fair Housing laws, remove personal items like family photos, religious symbols, and pet supplies from photographs. The aim is to create a neutral environment that allows potential buyers to envision themselves in the space without bias.
What should I consider for room-by-room coverage?
When photographing a property, ensure that you cover all key areas, including the kitchen, primary bedroom and bathroom, living areas, and any unique features like a pool or home office. Each room should be shot from angles that showcase their space and function effectively.
How can I avoid common reasons for MLS rejections?
To avoid MLS rejections, carefully review the specific photo guidelines for your local MLS. Common pitfalls include using non-JPEG formats, violating file size limits, including agent branding, or failing to label virtually staged images. Always double-check your work before submission.
What is the importance of sequencing photos effectively?
Effective photo sequencing helps buyers mentally navigate the property. Start with the exterior front, then move to impactful interior shots like the kitchen or living room, and progress logically through the property to imitate an actual walkthrough experience.
How can technology streamline the photo compliance process?
AI tools can automate photo compliance checks by scanning your images for resolution, file size, format, and any violations like logos or people. This saves time and reduces errors, allowing for a more efficient listing process while maintaining high-quality standards.
Related Articles

Maximize Bookings with Great Airbnb Photos
Boost your Airbnb bookings by following our photo guide to professional-quality images that attract guests.
Essential Rental Inspection Photo Checklist
Protect your security deposit with our comprehensive rental inspection photo checklist. Document condition clearly for disputes.

Essential Vehicle Inspection Photo Checklist
Protect against disputes with our comprehensive vehicle inspection photo checklist. Save time and money with proper documentation.