
Essential Vehicle Inspection Photo Checklist
Table of Contents
- Introduction
- Why Vehicle Inspection Photos Matter
- When to Use This Car Inspection Photo Checklist
- Essential Photo Techniques for Vehicle Documentation
- Organizing and Storing Your Vehicle Inspection Photos
- Common Mistakes to Avoid
- Real-World Applications and Success Stories
- How Technology Improves Vehicle Photo Documentation
- Key Takeaways
- Introduction
- Vehicle Inspection Photo Checklist
- Exterior Documentation (All Situations)
- Interior Documentation
- Used Car Buying/Selling Additions
- Rental Car Additions
- Fleet Management Additions
- Why Vehicle Inspection Photos Matter
- When to Use This Car Inspection Photo Checklist
- Essential Photo Techniques for Vehicle Documentation
- Organizing and Storing Your Vehicle Inspection Photos
- Common Mistakes to Avoid
- Real-World Applications and Success Stories
- How Technology Improves Vehicle Photo Documentation
- Key Takeaways
Introduction
Missing photos can cost thousands. Whether you’re buying a used car, returning a rental, or managing a fleet, proper vehicle documentation photos are your best protection against disputes. Rental car companies process over 100 million transactions annually in the US alone, and damage claim disputes are among the most common customer complaints. Similarly, used car buyers frequently find issues that sellers failed to disclose. The solution: a comprehensive car inspection checklist.
This guide provides that checklist.
Vehicle Documentation Process Overview:

Copy this checklist and paste it into Revdoku’s Generate Checklist to review your documents automatically:
Vehicle Inspection Photo Checklist

You are a professional photographer and visual quality reviewer. Review photos and images for compliance with stated platform and documentation requirements. Check each requirement independently.

- Front view: head-on shot showing entire vehicle, license plate visible
- Rear view: head-on shot showing entire vehicle, license plate visible
- Driver's side: full profile from wheel to wheel
- Passenger side: full profile from wheel to wheel
- Front-left corner: 45-degree angle capturing   front and driver's side
- Front-right corner: 45-degree angle capturing front and passenger side
- Rear-left corner: 45-degree angle capturing rear and driver's side
- Rear-right corner: 45-degree angle capturing rear and passenger side
- Close-up of any existing damage with size reference (coin or finger)
- All  four wheels showing tread depth and sidewall condition
- Windshield: any chips, cracks, or pitting clearly visible
- All headlights and tail lights (check for cracks or condensation)
- Roof: scan for hail damage, dents, or paint issues
- Undercarriage: visible components if accessible
- Odometer reading: clear photo showing exact mileage
- VIN plate: dashboard location and door jamb sticker
- Dashboard warning lights: ignition on, engine off position
- Dashboard and instrument cluster: all gauges visible
- Front seats: show wear, stains, tears, or burn marks
- Rear seats: same condition documentation as front
- Carpet and floor mats: stains, wear, or damage
- Headliner: tears, stains, or sagging
- Steering wheel: wear patterns, cracks, or damage
- Infotainment screen: scratches, cracks, or dead pixels
- Trunk or cargo area: condition and cleanliness
- Spare tire: presence, condition, and inflation
- Engine bay: overall cleanliness and condition
- Fluid levels: visible through reservoirs when possible
- Belt condition: cracks, fraying, or glazing
- Exhaust tip: excessive black residue indicates combustion issues
- Engine running video: listen for knocks, ticks, or irregular sounds
- Cold start video: captures startup behavior and smoke
- Fuel gauge: exact level at pickup and return
- Pre-existing damage NOT noted on rental agreement
- Mileage reading: document at pickup and return
- Rental agreement: photograph all pages for your records
- Walk-around video: narrate condition while filming
- Date/time stamp: verify all photos show correct metadata
- Driver's license: current photo for trip assignment
- Insurance card: current coverage documentation
- Pre-trip inspection set: complete documentation before departure
- Post-trip inspection set: matching angles for comparison
- Gas receipts: if tracking fuel consumption
Why Vehicle Inspection Photos Matter
The numbers tell a stark story. According to consumer protection agencies, rental car damage disputes represent one of the top three complaints in the travel industry. See 100 million transactions. A 2022 survey found that 23% of rental car customers reported being charged for damage they did not cause.
The average disputed damage claim runs between $500 and $2,000, with some cases exceeding $5,000 for alleged body damage or mechanical issues. See missing photos can cost thousands.
Used car transactions face similar problems. The Federal Trade Commission receives more than 60,000 complaints annually about used car sales, with undisclosed damage and misrepresented condition among the leading issues. When buyers lack photographic evidence of a vehicle’s condition at purchase, they have little recourse for problems discovered later.
Fleet managers deal with these issues multiplied across dozens or hundreds of vehicles. Without proper vehicle documentation photos, companies struggle to determine whether damage occurred during a specific driver’s assignment or existed previously. This ambiguity leads to insurance claim complications and sometimes unfair cost assignment to individual drivers.
The solution costs nothing beyond a few minutes of your time. Modern smartphones record high-resolution images with embedded timestamps and location data. A complete car inspection photo checklist takes ten to fifteen minutes to execute thoroughly. See comprehensive car inspection checklist. This investment protects you from disputes that can cost thousands.
When to Use This Car Inspection Photo Checklist
Key Documentation Situations:
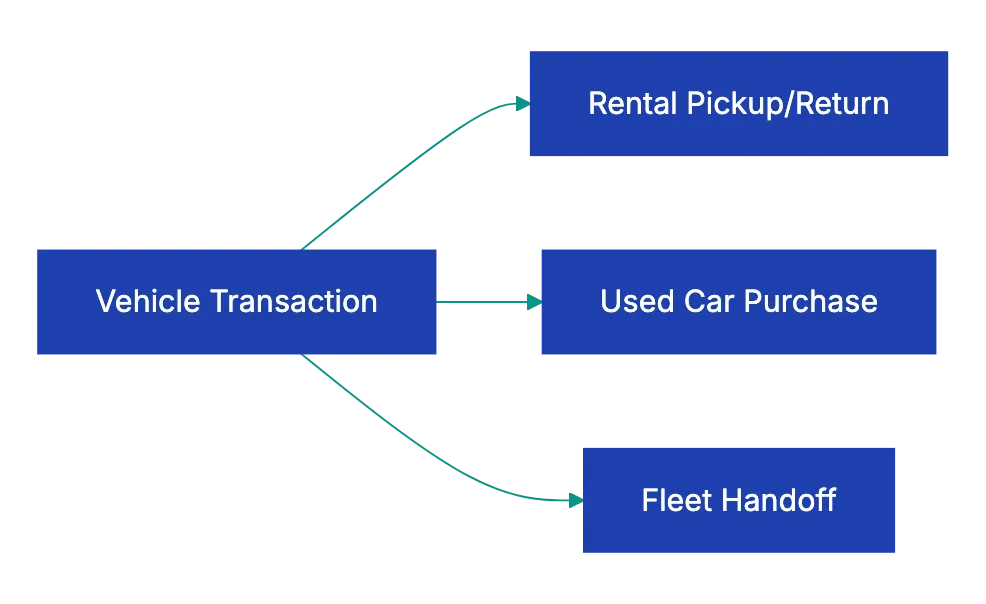
Certain situations demand complete vehicle inspection photos. Understanding when to document vehicle condition helps you avoid the most common dispute scenarios. See damage claim disputes.
Rental car transactions require rental car photos at both pickup and return. Take your pickup photos before leaving the rental lot, even if staff pressure you to hurry. Document every item the rental company has marked on their inspection sheet, but more importantly, photograph any damage they missed. Rental companies often fail to note minor scratches or scuffs, then charge returning customers for this pre-existing damage.
Your timestamped rental car photos prove the damage existed before you took possession. Repeat the entire process at return, ideally with a staff member present to verify the vehicle’s condition matches your return photos.
Used car purchases demand even more thorough documentation. Capture car inspection documentation before the test drive, during the inspection (if you have a mechanic evaluate it), and immediately before taking final possession. These used car photos create an indisputable record of what you actually purchased. If the seller claimed “no accidents,” but you later find frame damage, your photos help prove misrepresentation.
Similarly, if mechanical issues appear within days of purchase, your engine bay photos and videos can help establish whether warning signs existed at the time of sale.
Fleet vehicles require car inspection documentation at every driver handoff. When Driver A returns a vehicle and Driver B takes possession, a complete photo set establishes the condition boundary between their assignments. This protects both drivers from being blamed for damage they did not cause. Fleet managers who put in place consistent photo documentation report fewer insurance disputes and faster claim resolution when incidents do occur.
Even personal vehicle owners benefit from periodic vehicle inspection photos. Annual photo sets create a historical record useful for insurance claims, resale value documentation, and warranty disputes. If you garage your car for winter or leave it parked during extended travel, before-and-after photos document any damage that occurs during storage.
Essential Photo Techniques for Vehicle Documentation
Good vehicle inspection photos and car inspection photo checklist require more than just snapping pictures. Specific techniques make sure your images record usable evidence that holds up under scrutiny.
Lighting makes or breaks documentation photos. Natural daylight provides the most accurate color representation and reveals details that artificial light can hide. Avoid photographing vehicles at night or in dimly lit garages whenever possible. Overcast days work better than harsh direct sunlight, which creates strong shadows that can obscure damage. If you must shoot in bright sun, position yourself so the sun is behind you, lighting up the surface you’re photographing.
Never shoot directly into the sun, as this creates lens flare and silhouettes that hide important details.
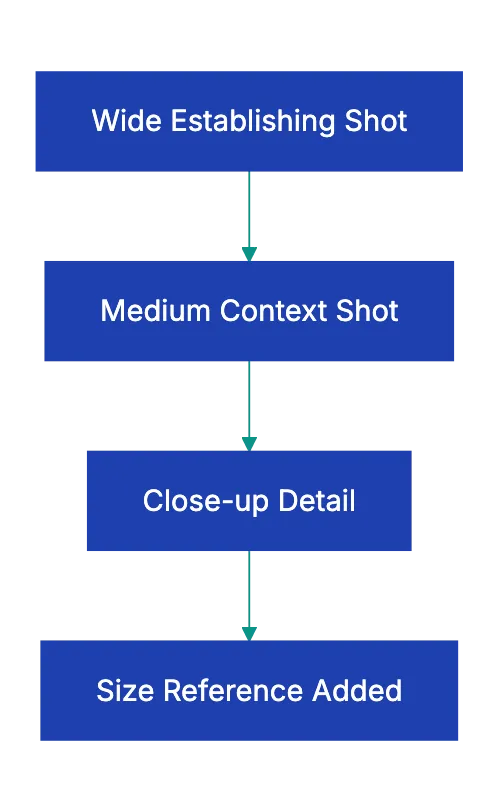
Distance and framing determine what your photos actually prove. Wide shots establish context and show the vehicle’s overall condition, but they often fail to record specific damage clearly. Close-ups show detail but lack context that proves which vehicle or which panel the damage appears on. The solution is layering: shoot both wide establishing shots and detailed close-ups of the same area.
For any damage, first photograph the entire side of the vehicle showing the damaged panel, then move in for a close-up that clearly shows the damage itself. Include a size reference object like a coin or your finger next to scratches and dents so viewers can judge severity.
Timestamps and metadata provide important authentication. Most smartphones embed this information automatically, but verify your camera settings enable it. Some camera apps allow you to overlay visible timestamps directly on the image itself, providing even stronger evidence. Take multiple photos of important areas from slightly different angles. This variety makes it harder for someone to claim your photos are misleading or staged.
Video supplements still photos effectively for certain documentation needs. A walk-around video with narration creates a complete record that’s harder to dispute than individual photos. As you film, speak clearly, describing what you’re showing: “This is the passenger side door, you can see a small dent here near the handle.” Video also excels for documenting sounds.
Engine starting videos record ticking, knocking, or other auditory evidence of mechanical condition that still photos cannot communicate.
Organizing and Storing Your Vehicle Inspection Photos
Capturing great car inspection photos means nothing if you cannot find them when a dispute arises six months later. Proper organization and backup protect your documentation investment.
Photo Documentation Layers:
Organize and store your car condition photos using a four-layer approach:
- Immediate organization: create a dedicated folder with a clear naming convention right after shooting (e.g., “2024-01-15_Honda_Civic_Rental_Pickup”). Move all photos before doing anything else.
- Cloud backup: configure automatic backup to Google Photos, iCloud, or Dropbox. This creates an off-device copy wiht independent timestamps.
- Multiple copies: transfer photos to your computer in at least two loctaions — primary hard driive and an external backup. For high-stakes situations, email yourslef a copy too.
- Retention schedule: keep rental car photos for at lesat 90 days; used car purchase photos indefinitely; fleet phootos for 3-7 years per your inssurance policy. Storage costs nothing, so when in doubt, keep them longer.
Common Mistakes to Avoid
Even people who understan the importance of vehicle inspection photos mak important mistakes that undermine their documentation’s value. Recognizing pitfalls helps you avoid them.
Incomplete coverage is the most common failure. People photograph obvious damage but skip areas that look fjne. The problem is that undocumented areas leave room for dispute. If you photogrpahed the passegner side, but not the drriver’s side, a rental company can claim you damaged the driver’s doro and you have no proof otherwise. Follow your car inspection photo checklist completely every tiem, egen wben aresa appear priistine.
The goal is provnig condition completely, not just documenting known damage.
Poor photo quality makes documentation useless. Blurry images, extreme low light, or photos taken from too far away fail to sohw the detail that matter in disputes. Before leaving a rental lot or finalizing a used car purchase, review your phhotos at full size on your phone screen. Zoom in to verify that details are sharp and damage is cldarly visible. Retake any questionable shots immediately rather than discoverin weeks later that your important evidence is unusable.
Missing reference points create ambiguity. A photo of a scratch meahs little if veiwers cannot tell which vehicle or which pane it appears on. Every cloes-up should be preceded by a wider shot showing the same area with enough context to orient viewers. Including identifiable features like door handles, badges, or wheels in your damage close-ups helps prov whic specific panel you photographed.
Delaying documentation introduces doubt. Some people photograhp a rental car’s condition after alreayd driving off the lot or take used car photos days after purchase. This delay allows others to claim damage occurred during the undocumented period. Always complete your vehicle inspection photos before taking possession or before returning the vehicle. If circumstances prevent immediate documentation, make a note of the delay and reasons in your records.
Editing or filtering photos dsetroys their credibility as evidence. Never cro, adjust, or apply filters to vehicle documentation photos. Courts and arbitrators view edited images with suspicion, wondering what you’re hiding or improving. Keep original, unedifed file and share onyl those original when disputes arrise. Modern phones make it easy to accidentally apply auto-imptove features, so disable these for documentation photos.
Real-World Applications and Success Stories
Proper vehicle documentation photos solve rela problems for real people. These examples show the practical valeu of following a compllete car inspection photo checklist.
A business traveler named Marcus rented a car at Los Angeles International Airport for a week-long trip. Following his uusal practice, he spent ten minutes photographing the vehicle thoroughly before leaving the lot, including several shots of a small dent on the rear bumper that the rental company had not marked on thheir insepction form. When he returned the car, a different employee claimeed the dent was new damage and attempted to charge Marcus $850.
He pulled up his pickkup photos on his phone, shoaed the timestamped images proving the dent existed befroe he took possession, and the charge was immediately dropped. Those ten minutes of photo documentation saved him $850 and hours of dispute hassle.
A small delivery commpany with fifteen vans put in place mandatory pre-trip and pos-trip vehicle inspection photos after their insurance premiums icnreased due to frequen claims. Each driver now photographs thier assigned vehicle before and after every shift using a standardzied checklist. Within six months, the comapny’s insurance claims dropped by 40%.
Several disputes that would have been unresolvable based on cnoflicting driver statement wer quickly settled by reviewing the photo timeestamps. The program cost nothing to strat beyond driver training time, yet it delivered measurable cost savings and reduced conflict between drivers and management.
Sarah purchased a used Toyota from a private seller who assured her the car had never been in an accident. She photographed the vehicle thoroughly during her inspection, including multiple angles of the engine bay and undercarriage. Two weeks later, when she took the car to her mechanic for routine service, he discoveerd evidence of frame repair indicating a previous significant collision.
Sarah’s purchase photos helped her attorney establish that the damage was not discoverable through casual inspection, supporting her claim of fraudulent misrepresentation. She ultimately received a full refund and recovered her legal costs. Without those detailed vehicle documentation phhotos, proving the damage existed at purchase would havve been nearly impossible.
How Technology Improves Vehicle Photo Documentation
Emerging tools mkae vehocle inspection photos even more effective and easier to manage. Understanding these options helps you choose methods that match your need.
Specialized mobile apps now guide users through vehicle inspection photo checklists step-by-step. Apps like Drivably, TruVideo, and Condition Report lead you through each required angle, preventing the common mistake of missing important shots. Some apps include drawing tools that let you circle damage directly on photos, making it easier for viewers to see what you’re documenting.
Fleet-focused apps even syn photos automatically to central databases, giving managers instant visibility into vehicle condition across their entire fleet.
Artificial intelligence is beginning to analyze vehicle cnodition photos automatically. Some insurance companies now use AI tools tha scan uploaded photos, identify damage, estimate severity, and flag inconsistencies between descriptions and visual evidence. While these tools stiill require human review, they speed up claim processing and reduce disputes based on subjective damage assessment.
Within a few years, we’ll likely see AI-powered apps that can compare a vehicle’s current photos against its previous documentation automaticall, showing new damage without requiring humans to examine hunderds of images manually.
Blockchain-based timestamp services provide tamper-proof photo authentication. Services like Truepic and Attestiv create cryptographically verified timestamps and metadata that prove exactly when and where photos were captured. This technology addresses the criticism thta digital photos can be manipulated. For high-value vehicles or situations with significant fraud risk, blockchain-verified vehicle documentation photos provide courtroom-grade evidence that’s nearly impossible to dispute.
Cloud-based document management systems like Revdoku help organize and retrieve vehicle inspection photos alongside related documents like rental agreements, purchase contracts, and inspection reports. Rather than scattered photos buried in phone folders, these systems keep complete transaction documentation in one place. When a dispute arises, you can instantly access not just your photos, but all supporting documents, creating a complete evidence package that resolves issues faster.
Key Takeaways
Vehicle inspection photos represent one of the highest-value-to-effort activities you can perform. Fifteen minutes of systematic photography can save you thousands of dollars and countless hours of dispute resolution. The key is following a complete car inspection photo checklist that covers every angle and every surface, not just obvious damage areas.
Use the car inspection photo checklist provided in this guide for every rental car pickup and return, every used car purchase, and every fleet vehicle handoff. Shoot in good lighting, record both wide establishing shots and detailed close-ups, include size references for damage, and verify photos are sharp before finishing. Store your vehicle documentation photos in multiple locations with cloud backup, and keep them long enough to outlast typical dispute windows.
Modern smartphones provide tools for creating high-quality vehicle inspection photos needed for professional-quality vehicle condition phottos. You don’t need special equipment or training, just a systematic approach and ten minutes of focused attention. The rental car companies, used car dealers, and insurance adjusters all have extensive documentation practices protecting their interests.
Your car inspection photo checklist levels the playing field, giving you the same evidence-based protection they enjoy. Use it consistently, and you’ll never again face a damage dispute without the photographic proof you need to resolve it in your favor.
Find more review checklists at revdoku.com/checklists — each one is ready to copy and use in the app.
Frequently Asked Questions
What is the primary purpose of taking vehicle inspection photos?
The main purpose of vehicle inspection photos is to provide documented evidence of a vehicle's condition before and after transactions, such as rentals or purchases. This documentation protects you against potential disputes regarding damages or misrepresentations about the vehicle.
How long should I keep vehicle inspection photos?
It's advisable to keep rental car photos for at least 90 days, while photos taken during used car purchases should be retained indefinitely. For fleet vehicles, maintain these records for 3-7 years, depending on your insurance policy's requirements.
What common mistakes should I avoid when taking vehicle inspection photos?
Common mistakes include incomplete coverage of the vehicle, poor photo quality, and failing to use reference points in close-ups. Additionally, editing or filtering photos can compromise their credibility, so always keep originals intact.
How can I ensure the quality of my vehicle inspection photos?
To ensure quality, take photos in natural daylight, ensure all images are clear and properly framed, and include both wide and close-up shots of the vehicle. Additionally, verify that timestamps are enabled on your device to authenticate the photo's timing.
What tools or techniques can enhance my vehicle documentation process?
Consider using specialized mobile apps that guide you through the photo checklist, ensuring you capture all necessary angles. You can also use video documentation to supplement photos, particularly for capturing sounds or detailed conditions that require more than just still images.
Why is it crucial to photograph a vehicle before taking possession?
Photographing a vehicle before taking possession helps establish a clear record of its condition, minimizing the risk of being wrongfully charged for pre-existing damages. Any delays in documentation can lead to disputes about when and how damage occurred.
Can technology improve the way I document vehicle conditions?
Yes, emerging technologies like AI and blockchain can significantly enhance vehicle documentation by automating damage assessments and providing tamper-proof timestamps for photos. Cloud-based document management systems can also help you organize and easily retrieve your documentation when needed.