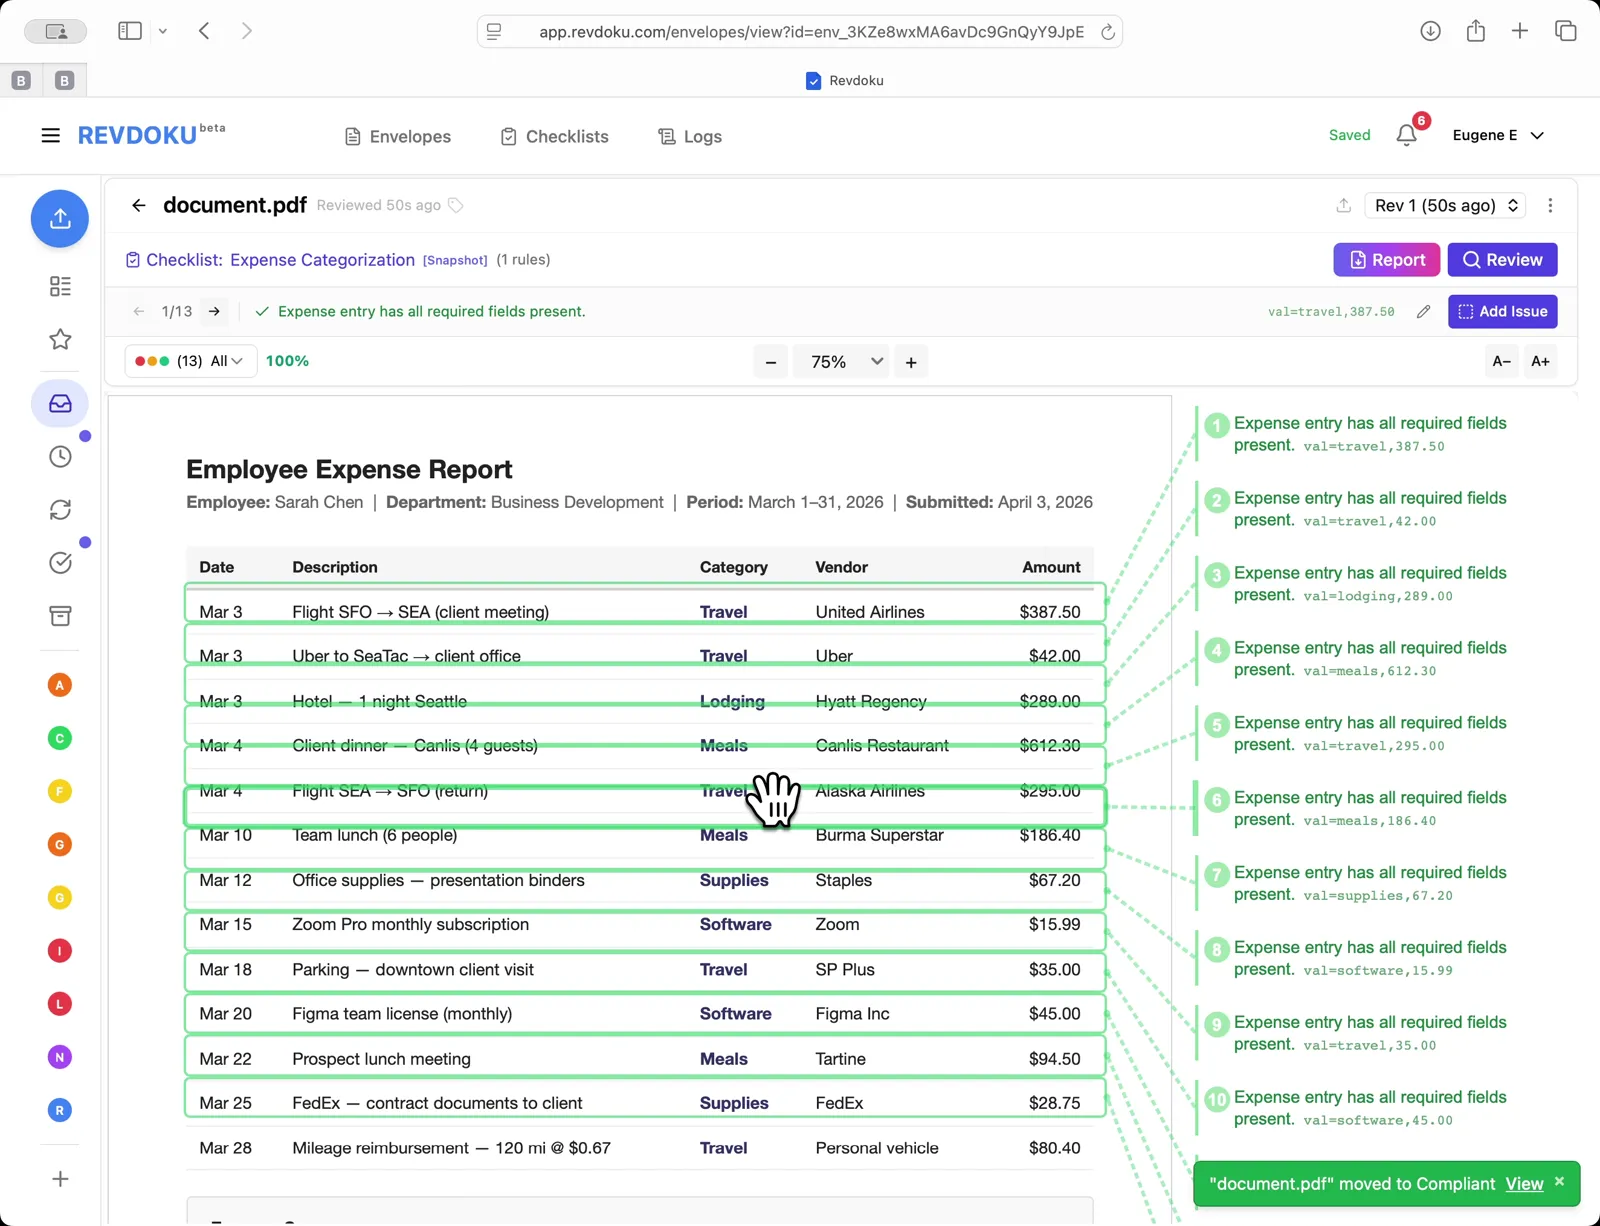
` pair (e.g. `val:travel,387.50`) and the document moves to **Compliant**.
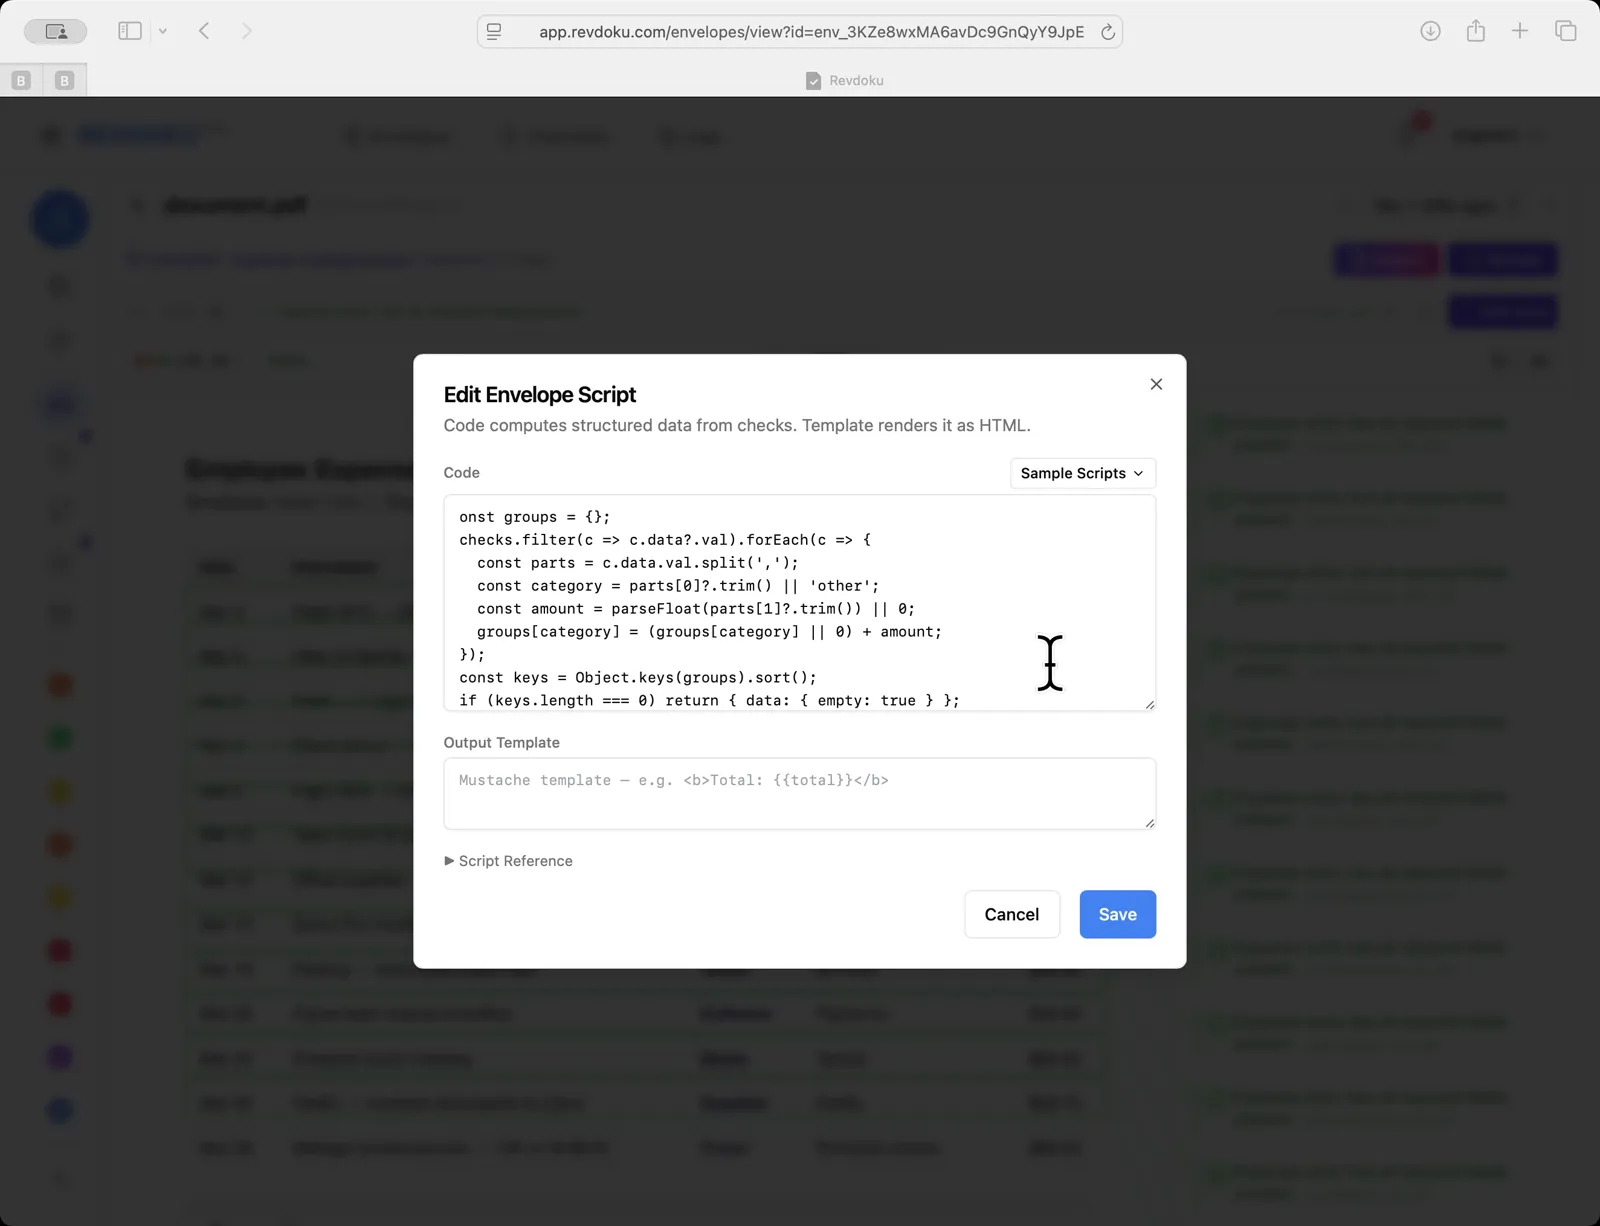
## 7. Open the script editor
Open **Edit Envelope Script**. The dialog has two fields: **Code** (computes structured data from the checks) and **Output Template** (renders it as HTML).

## 8. Add the rollup code
Paste a snippet that filters checks with a `val` field, splits each on the comma into `category` and `amount`, and accumulates totals per category.
## 9. Saving without a template fails
Saving with an empty template surfaces an `Error: Unexpected identifier groups` banner above the table. Click the pencil icon to reopen the editor.

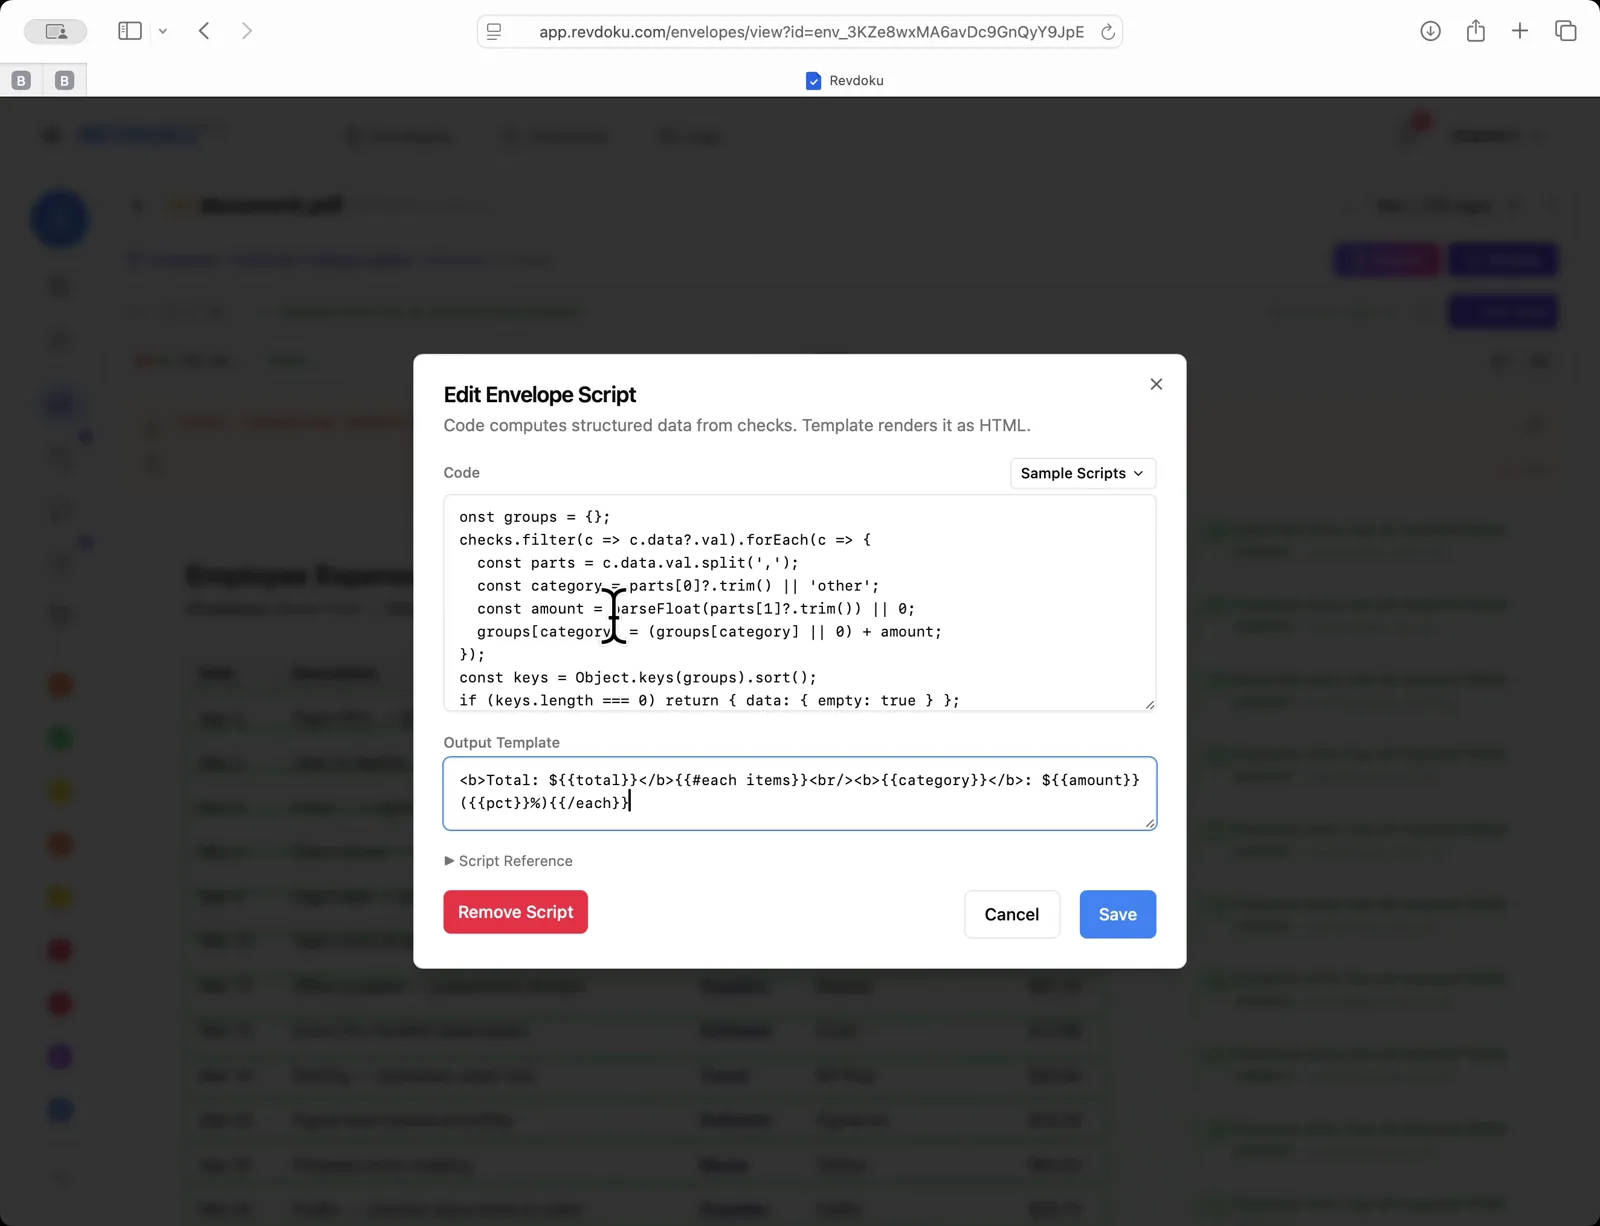
## 10. Add the output template
Fill the **Output Template** with a Mustache template that prints the total and iterates each category:
```mustache
Total: ${{total}}{{#each items}}
{{category}}: ${{amount}} ({{{pct}}}%){{/each}}
```
## 11. View the rolled-up summary
The script runs and a summary box replaces the error:
- **Total:** $2179.04
- lodging $289.00 (13.3%)
- meals $893.20 (41.0%)
- software $60.99 (2.8%)
- supplies $95.95 (4.4%)
- travel $839.90 (38.5%)

## Conclusion
In this tutorial it was demonstrated how to use Revdoku for categorizing an expense report. The following steps were shown:
- Open the inbox
- Load the expense report
- Start the review
- AI analyzes the pages
- Checks run
- Review complete
- Open the script editor
- Add the rollup code
- Saving without a template fails
- Add the output template
- View the rolled-up summary
---
## What You Learned
This case showed how Revdoku can take a document, apply a structured checklist, and surface specific findings. all in under a minute. No manual line-by-line reading required.
Cloud
Self-host (open-source)
More use cases
Disclosure: Sample documents in this use case were generated using AI and contain intentional errors for demonstration purposes. All names, companies, and details are fictional.
### Use Case: Detect Changes Between Document Revisions
URL: https://revdoku.com/cases/document-change-detection/
Description: Automatically detects field-level changes between invoice revisions: payment terms (Net 30 to Net 15), line items, tax, total, and bank account number modifications.
Published: 2026-04-11
Updated: 2026-04-14
Keywords: document change detection, invoice revision, field-level diff, version comparison, Revdoku
# Detect Changes Between Document Revisions
This use case demonstrates how to detect changes between document revisions. You will upload an original invoice, run **Review** with a checklist, then upload a revised version and let Revdoku surface every field-level change. terms, amounts, dates, and account numbers.
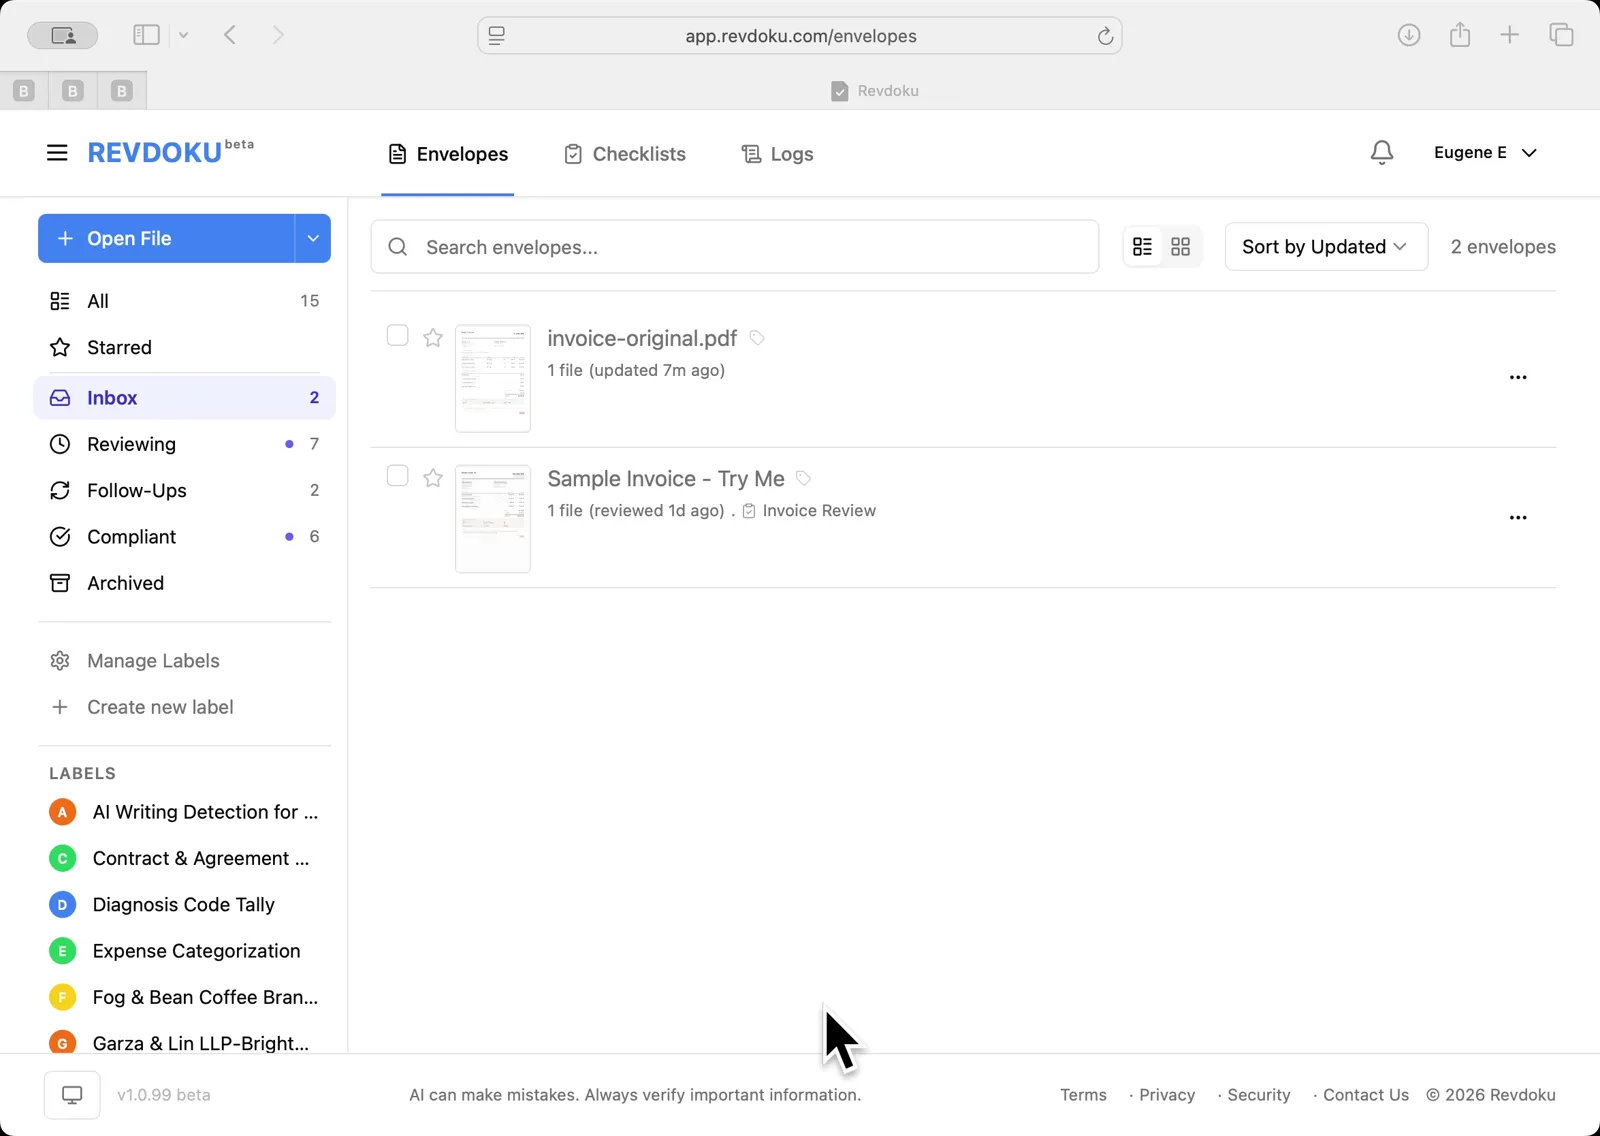
## Step 1: Revdoku Envelopes inbox.
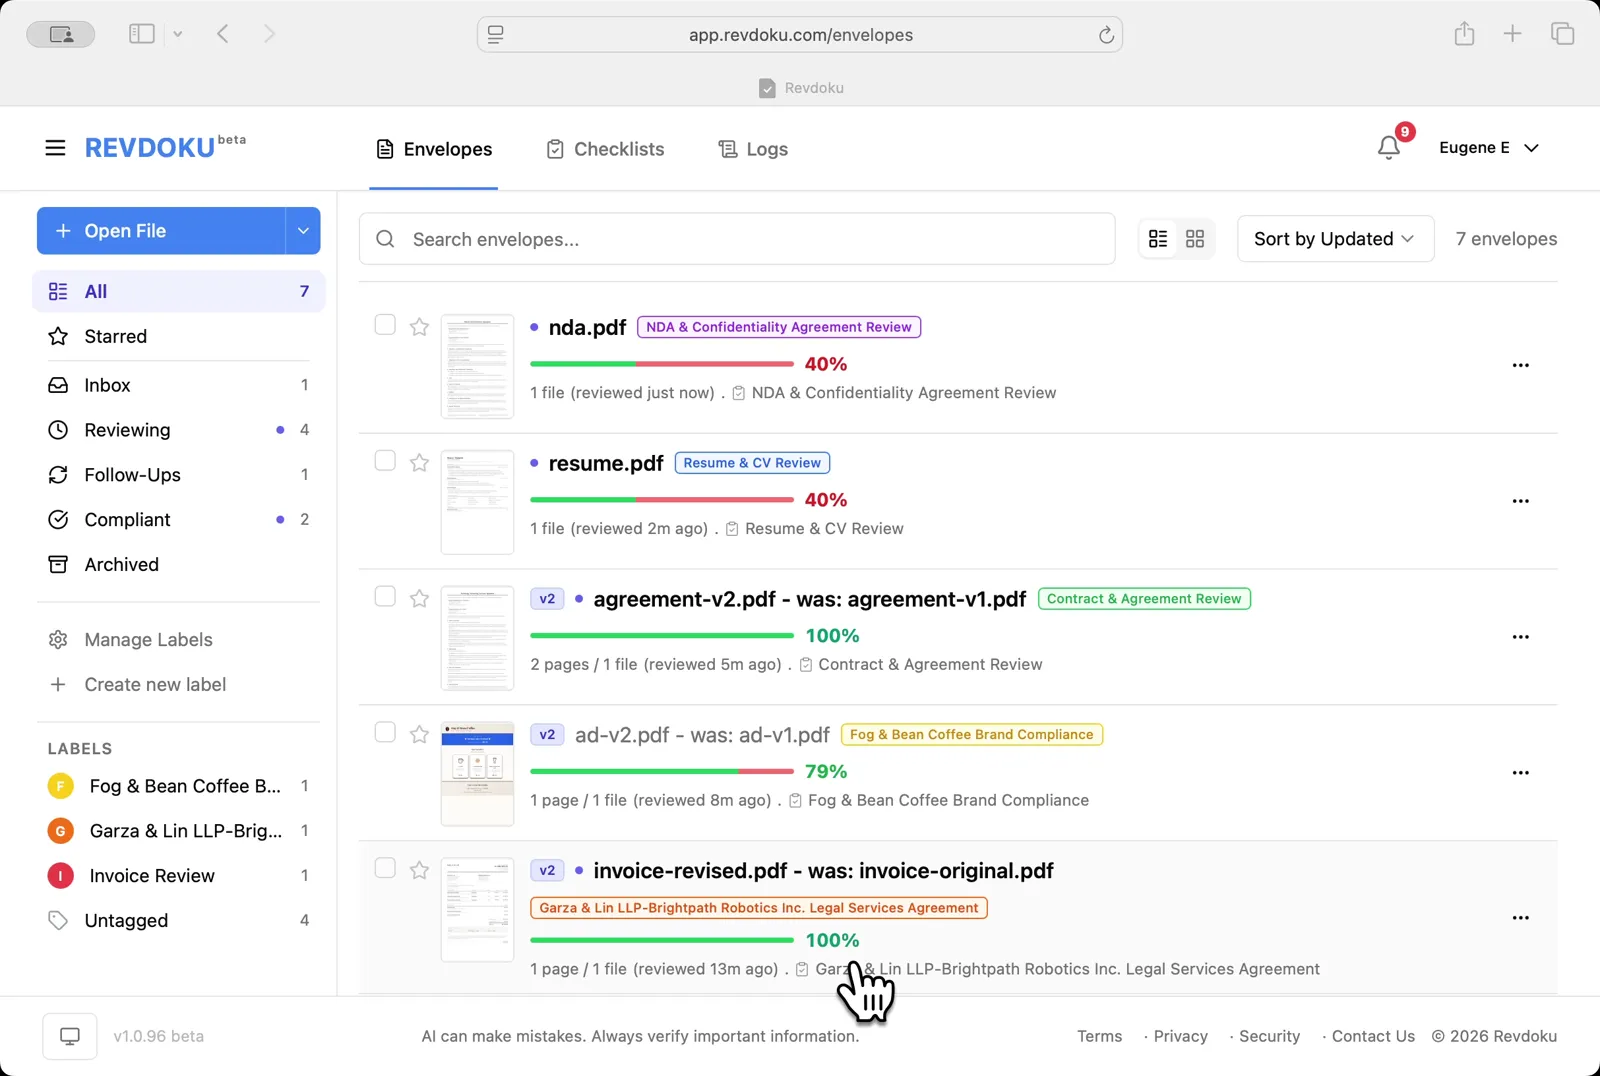
Revdoku Envelopes inbox. invoice-original.pdf and Sample Invoice are listed.
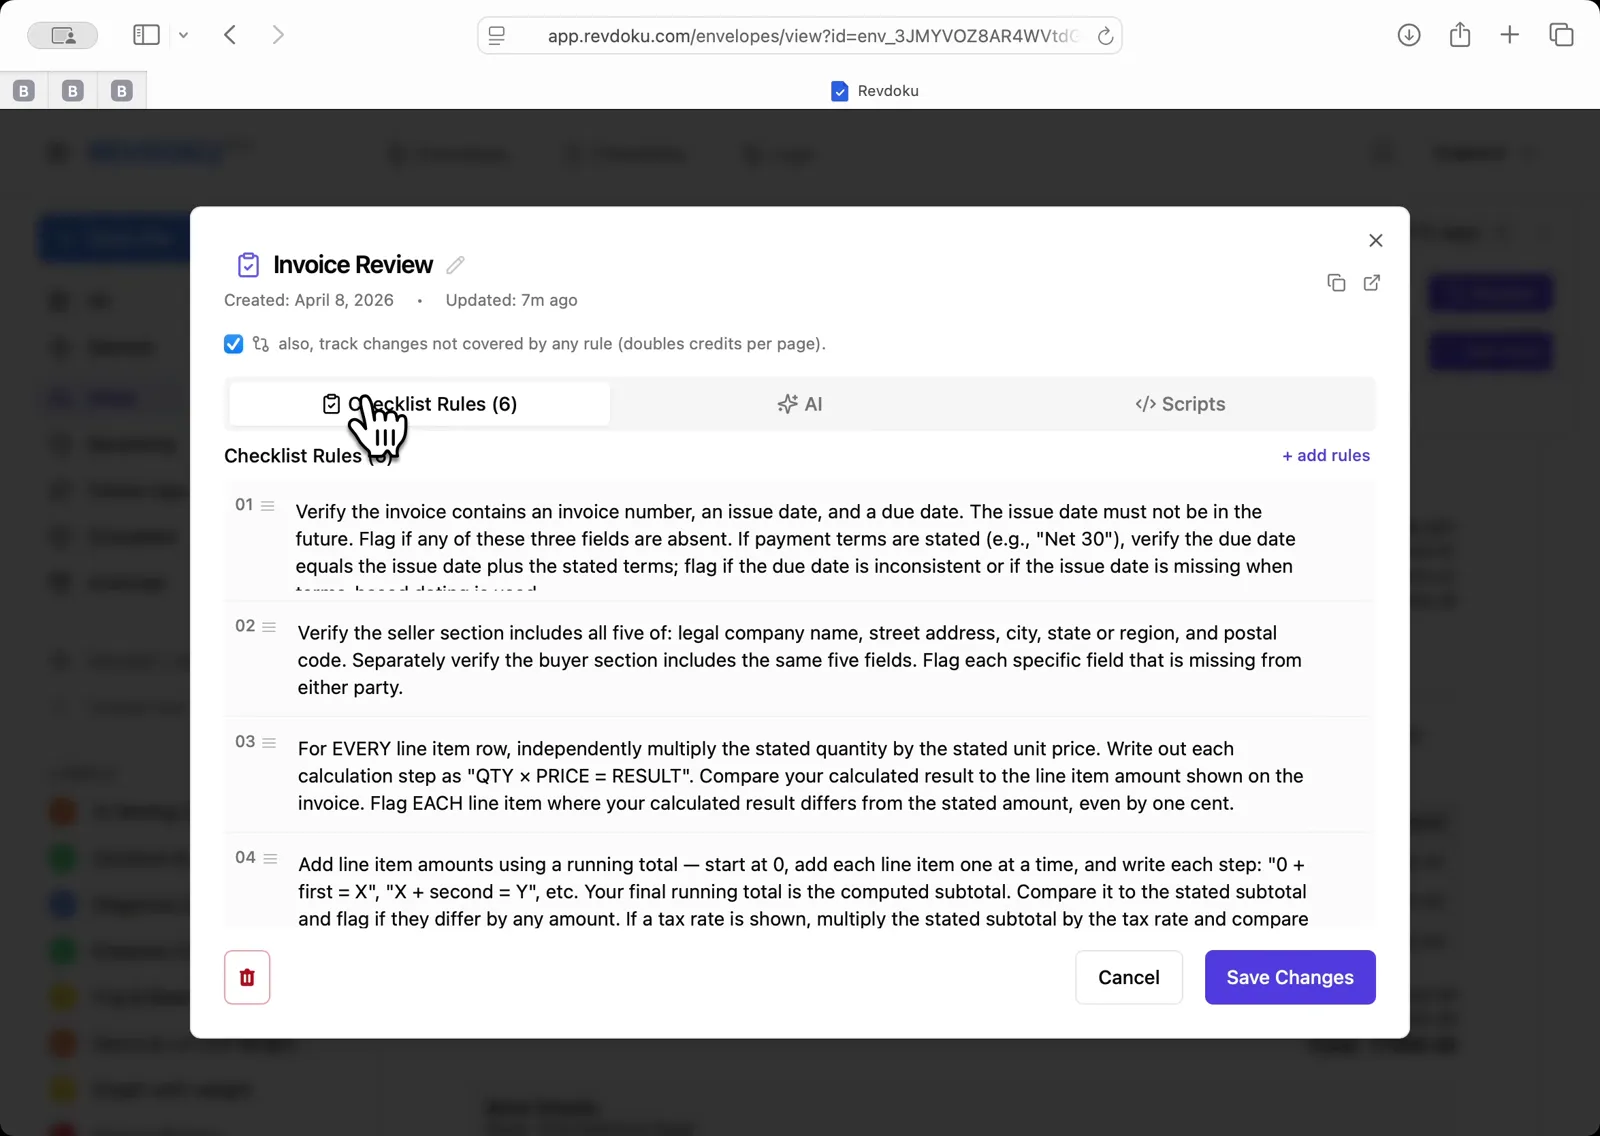
## Step 2: Open the Invoice Review checklist.
The checklist shows 6 rules and the track-changes option enabled
Open the Invoice Review checklist showing 6 rules and the track-changes option enabled.
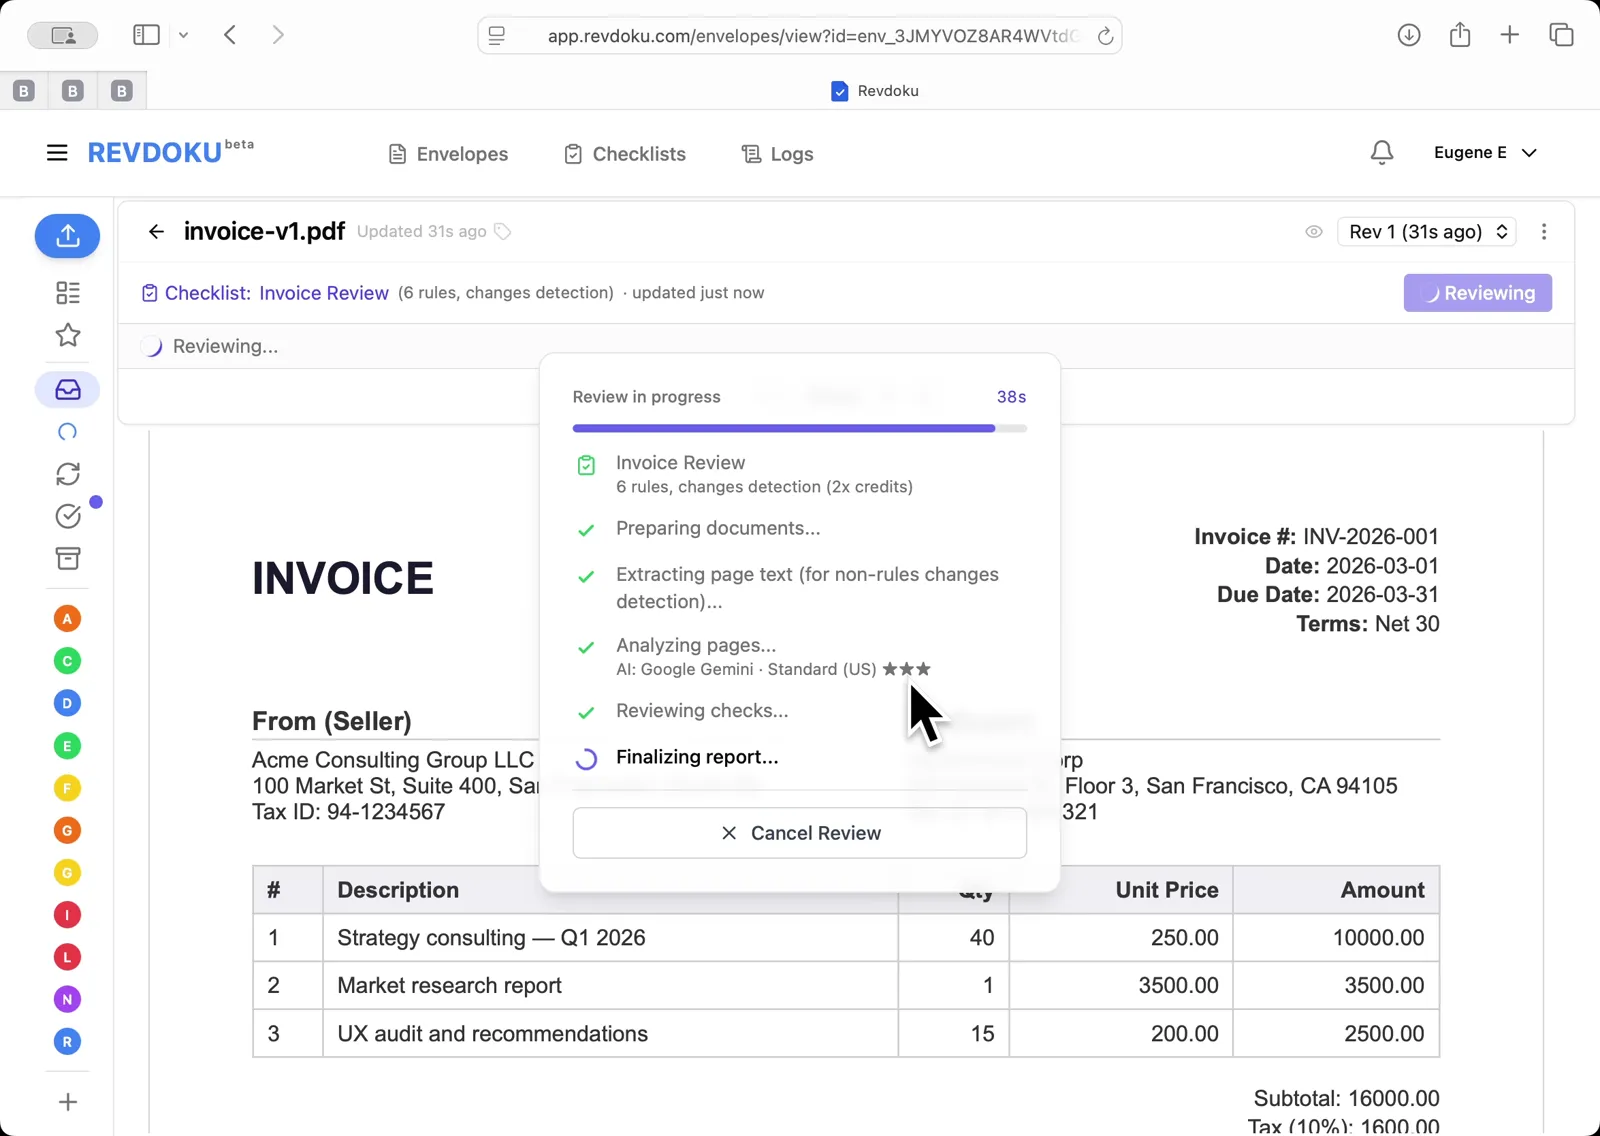
## Step 3: Run the AI review on invoice-v1.pdf.
Run the AI review on invoice-v1.pdf. Revdoku prepares the document and extracts page text.
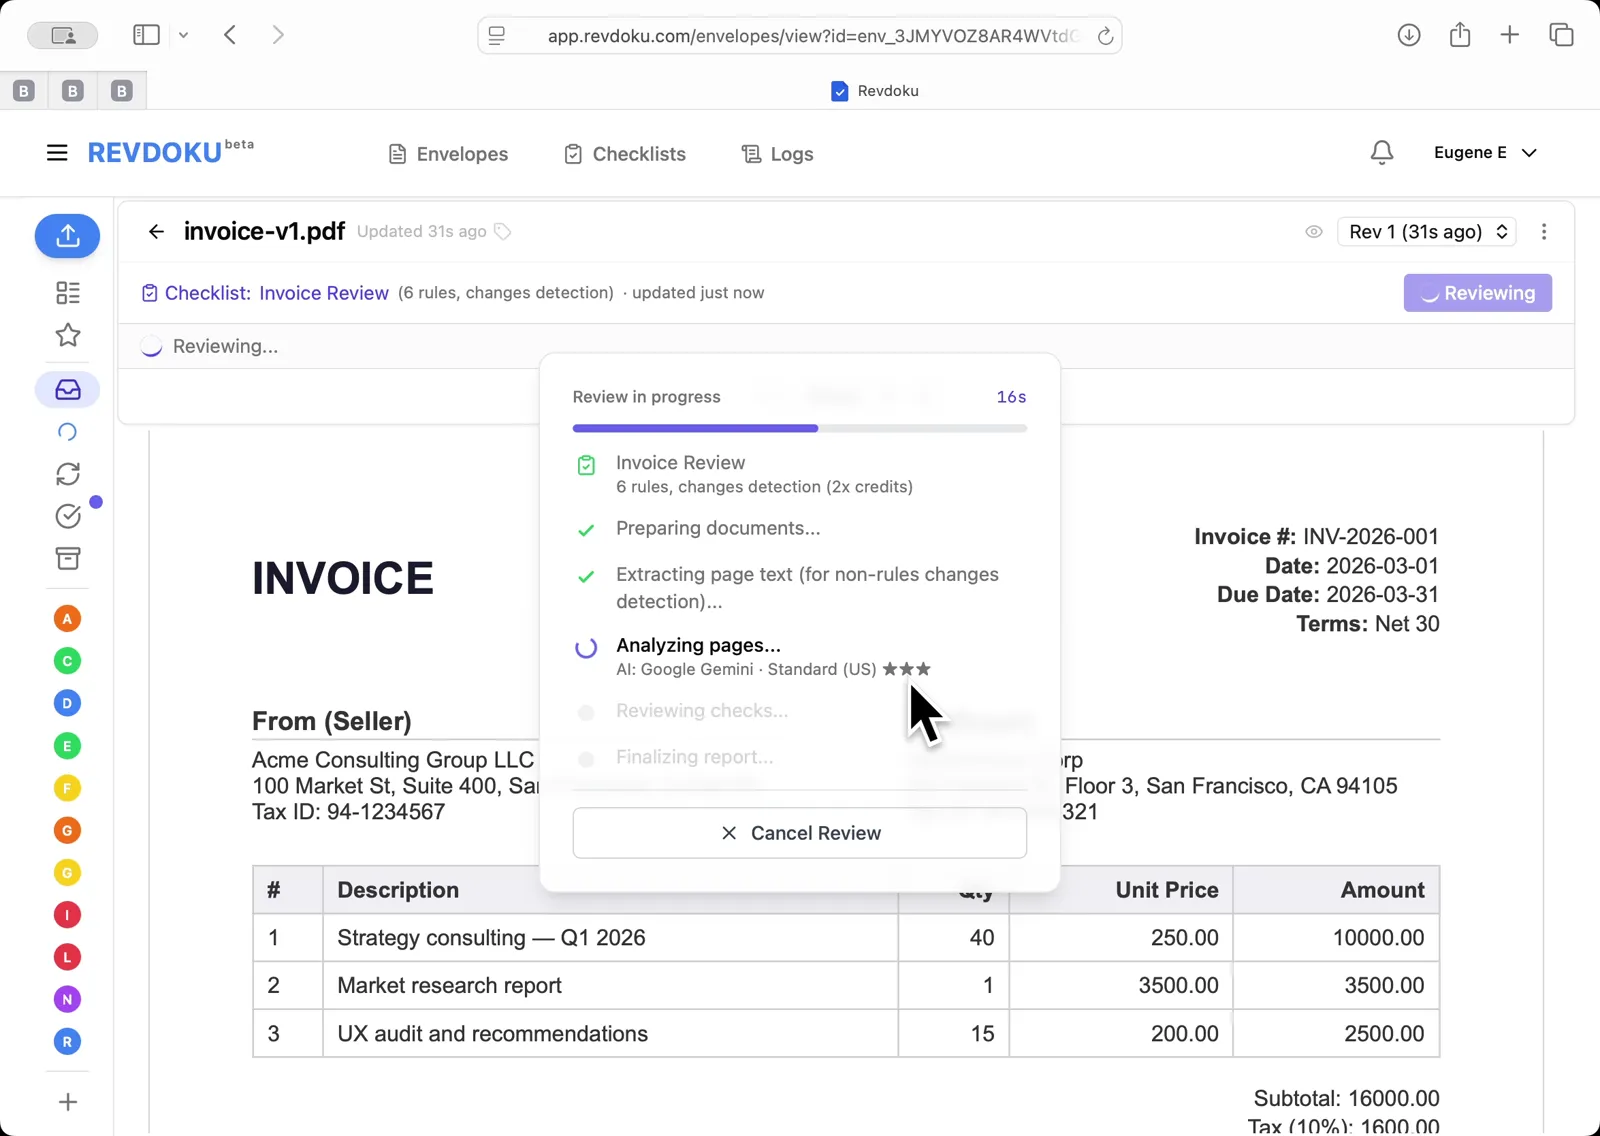
## Step 4: AI analyzes the pages.
Google Gemini reviews checks and finalizes the report
AI analyzes pages with Google Gemini, then reviews checks and finalizes the report.
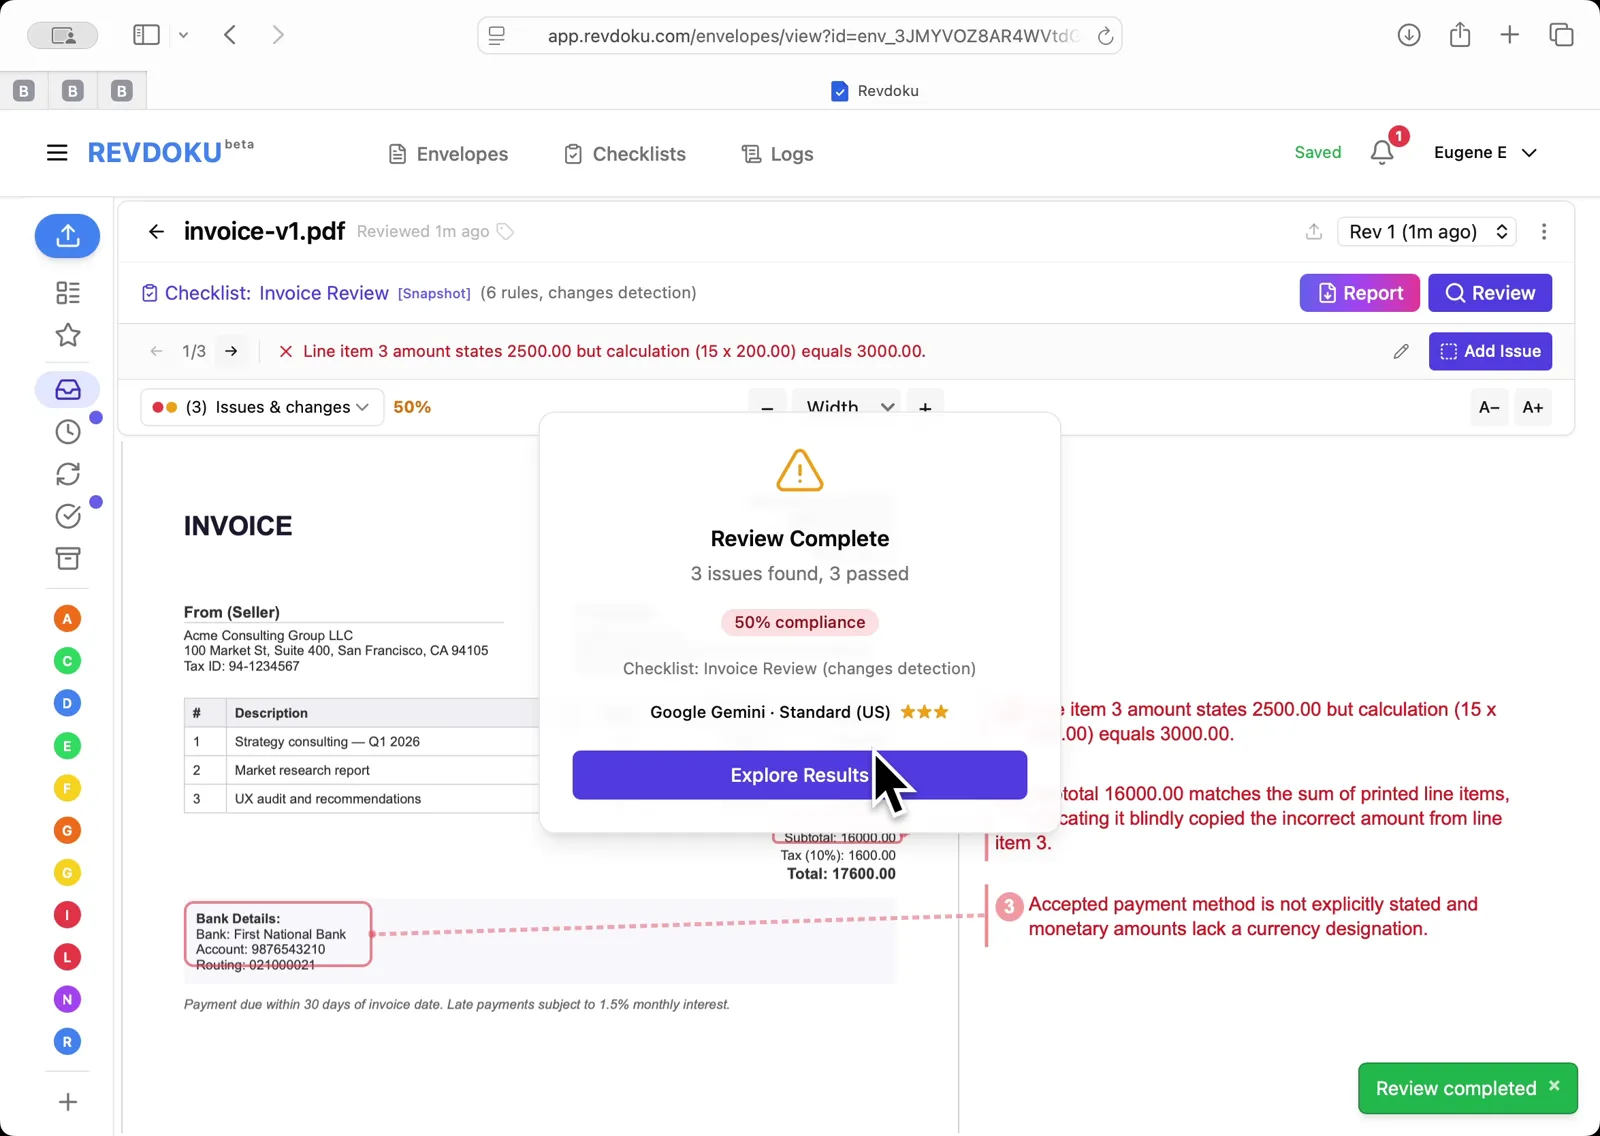
## Step 5: Review Complete: 3 issues found, 3 passed, 50% compliance.
Review Complete: 3 issues found, 3 passed, 50% compliance. issues annotated directly on the invoice.
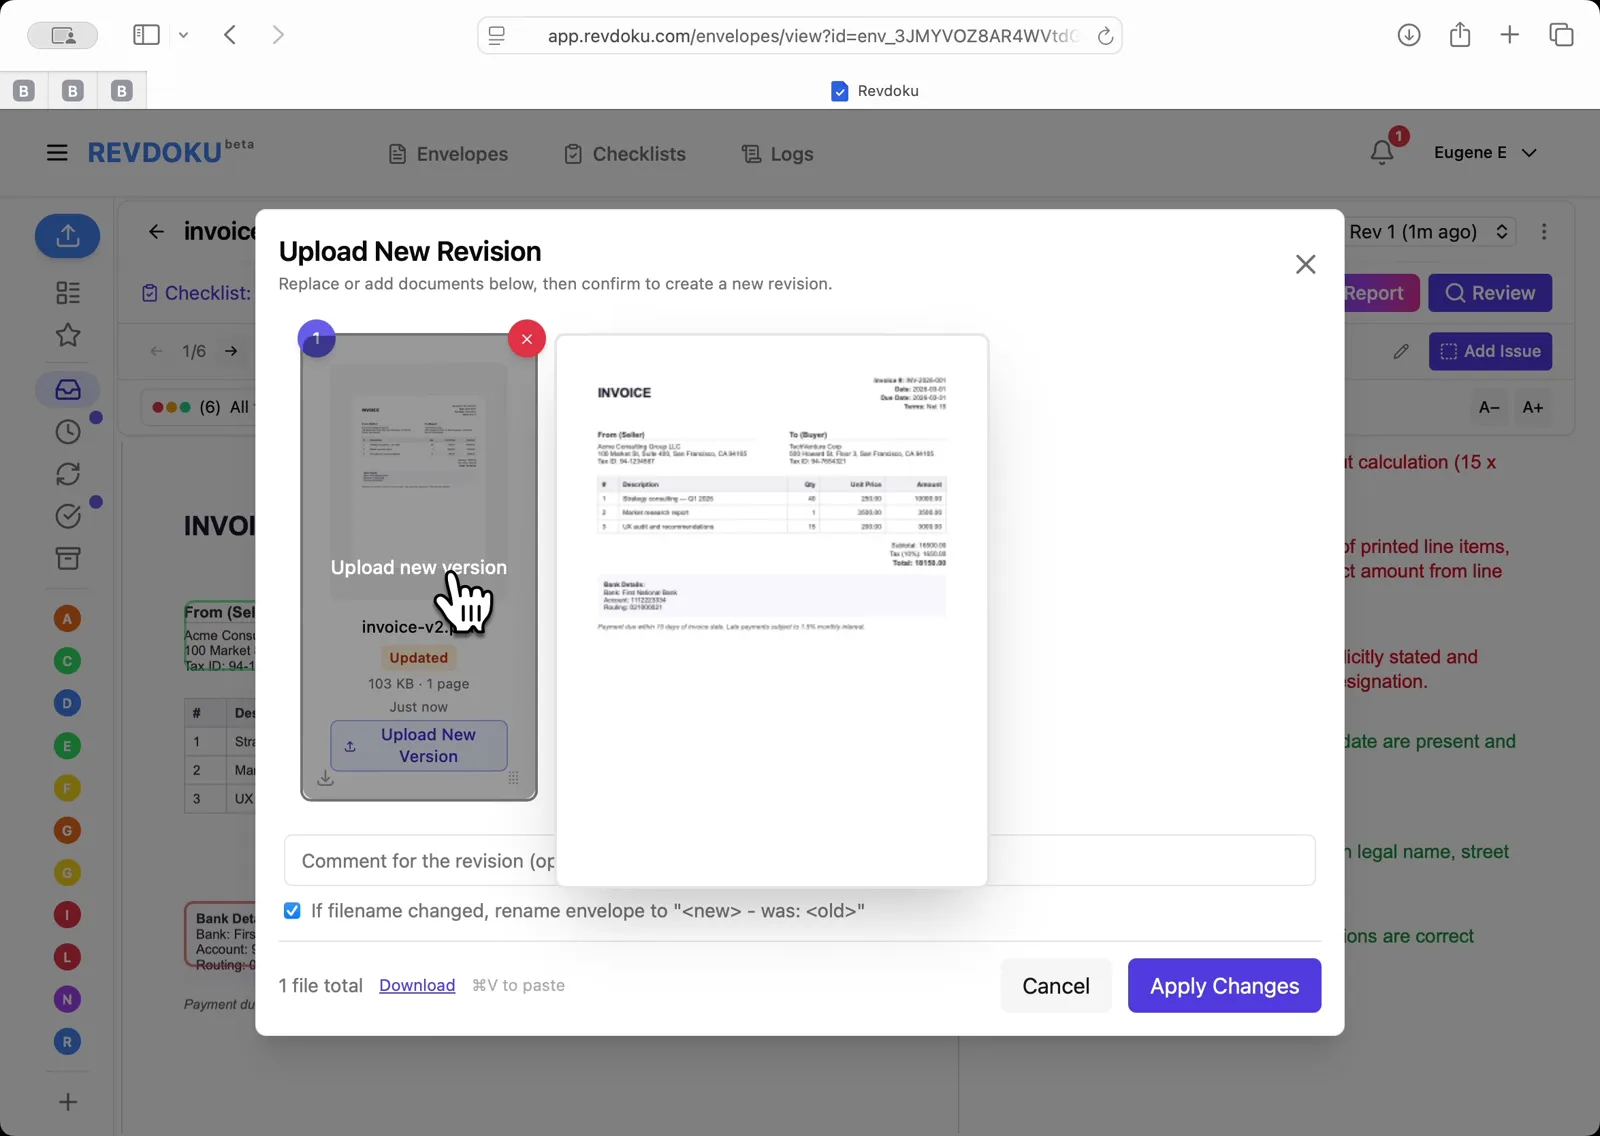
## Step 6: Upload New Revision dialog.
Upload New Revision dialog. drag invoice-v2.pdf in to replace v1.
## Step 7: v2 created.
v2 created. new review starts, re-checking 3 prior issues and verifying 3 prior passes.

## Step 8: Analyzing pages and reviewing checks on the new revision
Analyzing pages and reviewing checks on the new revision.

## Step 9: Finalizing the v2 report
Finalizing the v2 report.

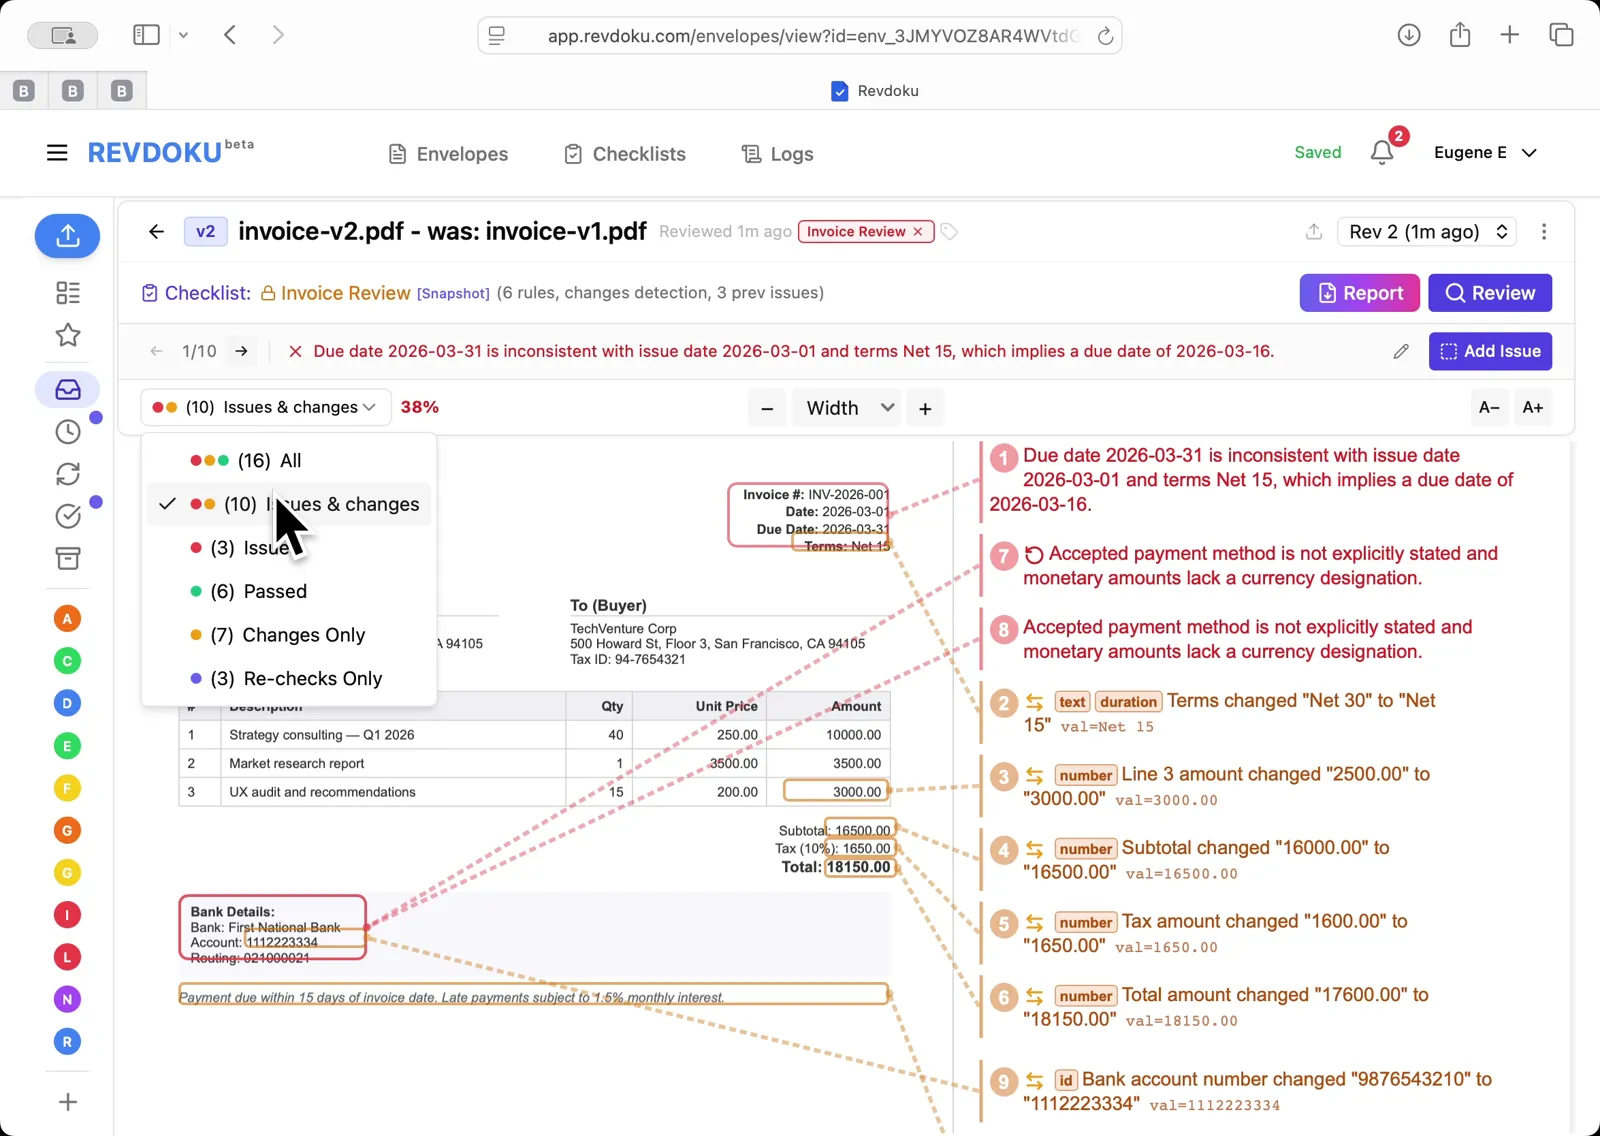
## Step 10: Results filter.
Results filter. All / Issues & changes / Issues / Passed / Changes Only / Re-checks Only. 10 issues & changes surfaced.
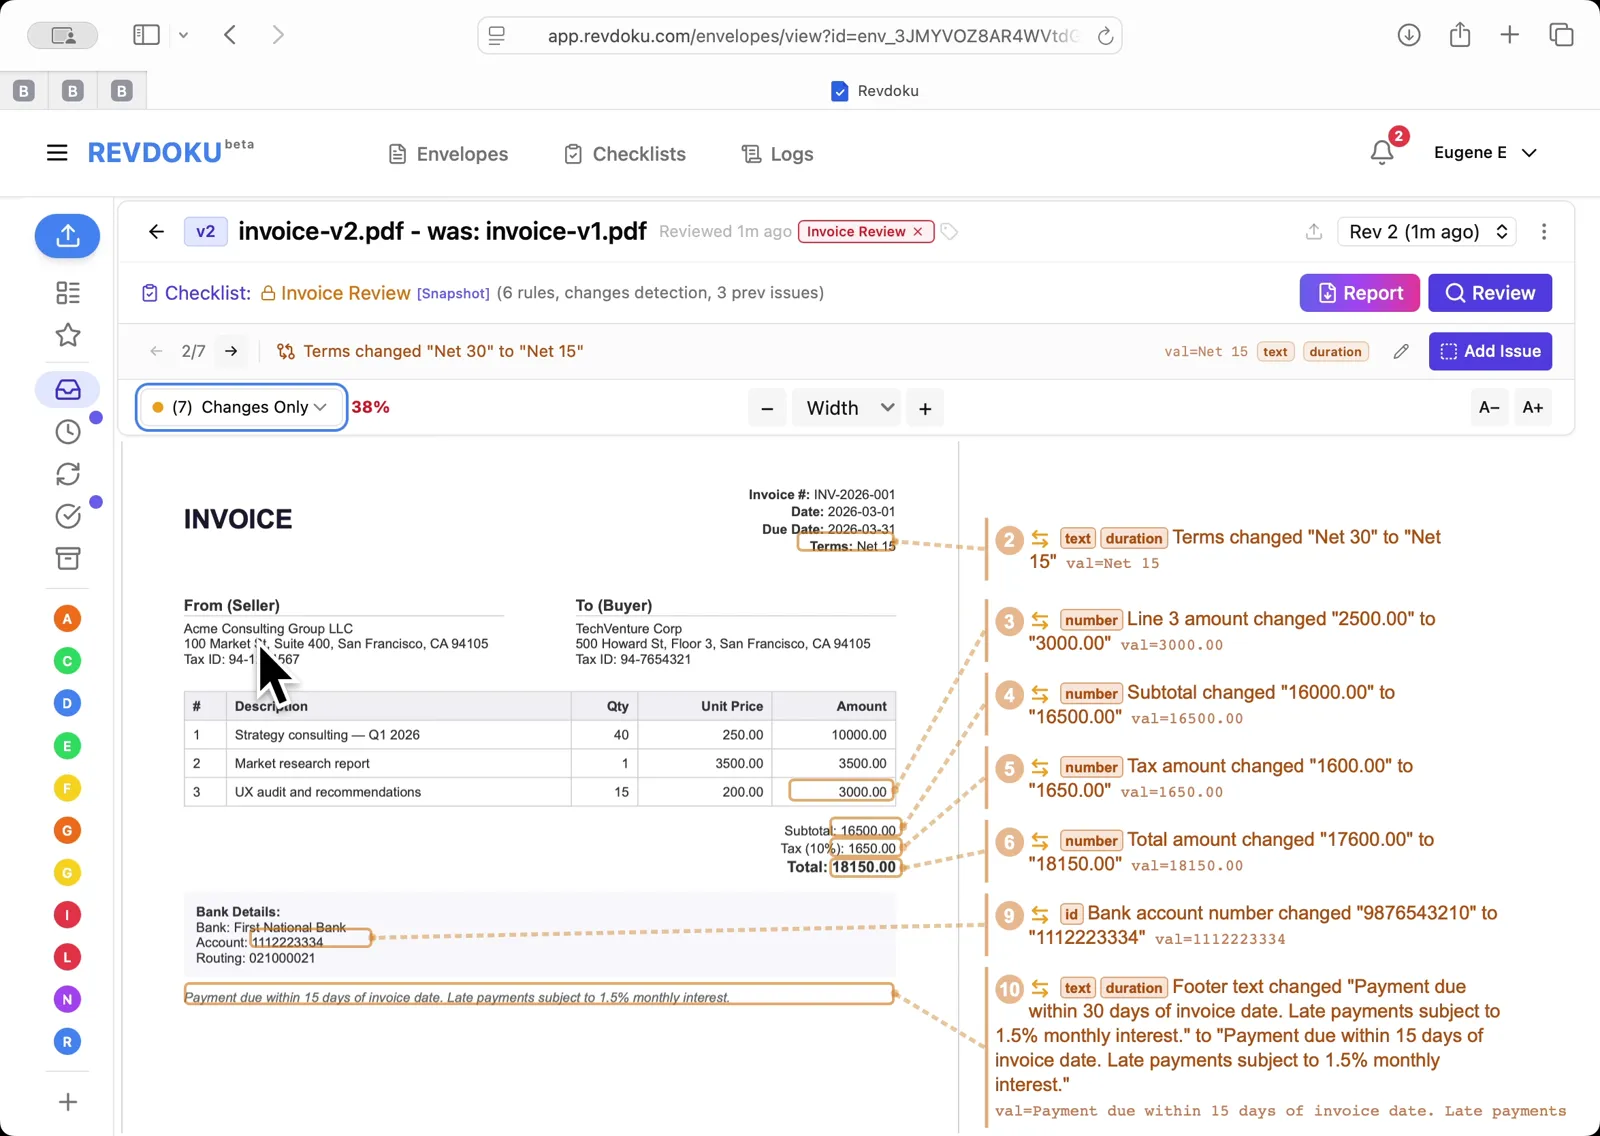
## Step 11: Final Report view.
Final Report view. every field-level change annotated: Net 30 to Net 15, line item, subtotal, tax, total, and bank account number.
## Conclusion
In this tutorial it was demonstrated how to use Revdoku for detecting changes between document revisions. The following steps were shown:
- Revdoku Envelopes inbox. invoice-original.pdf and Sample Invoice are listed
- Open the Invoice Review checklist showing 6 rules and the track-changes option enabled
- Run the AI review on invoice-v1.pdf. Revdoku prepares the document and extracts page text
- AI analyzes pages with Google Gemini, then reviews checks and finalizes the report
- Review Complete: 3 issues found, 3 passed, 50% compliance. issues annotated directly on the invoice
- Upload New Revision dialog. drag invoice-v2.pdf in to replace v1
- v2 created. new review starts, re-checking 3 prior issues and verifying 3 prior passes
- Analyzing pages and reviewing checks on the new revision
- Finalizing the v2 report
- Results filter. All / Issues & changes / Issues / Passed / Changes Only / Re-checks Only. 10 issues & changes surfaced
- Final Report view. every field-level change annotated: Net 30 to Net 15, line item, subtotal, tax, total, and bank account number
---
## What You Learned
This case showed how Revdoku can take a document, apply a structured checklist, and surface specific findings. all in under a minute. No manual line-by-line reading required.
Cloud
Self-host (open-source)
More use cases
Disclosure: Sample documents in this use case were generated using AI and contain intentional errors for demonstration purposes. All names, companies, and details are fictional.
### Use Case: Check an Ad Against Brand Guidelines
URL: https://revdoku.com/cases/brand-compliance-ad-review/
Description: A coffee shop ad checked against 14 brand guidelines. Catches typography violations, a misspelled tagline (ROASTRS), and an off-palette banner color across two revisions.
Published: 2026-04-11
Updated: 2026-04-14
Keywords: brand compliance, ad review, brand guidelines, marketing review, Revdoku
# Check an Ad Against Brand Guidelines
This use case demonstrates how to check an advertisement against brand guidelines. You will paste your brand guide into Revdoku to generate a compliance checklist, run **Review** on the ad, then upload a revised version and let Revdoku re-check the prior issues automatically.
## Step 1: Open the Envelopes inbox in Revdoku.
Open the Envelopes inbox in Revdoku. The inbox lists the documents you can review.
## Step 2: Paste the brand guide.
Paste the brand guide. In the **Add Checklist** dialog, paste the typography, brand name, and tagline rules into the *Paste text or describe what to check* field.
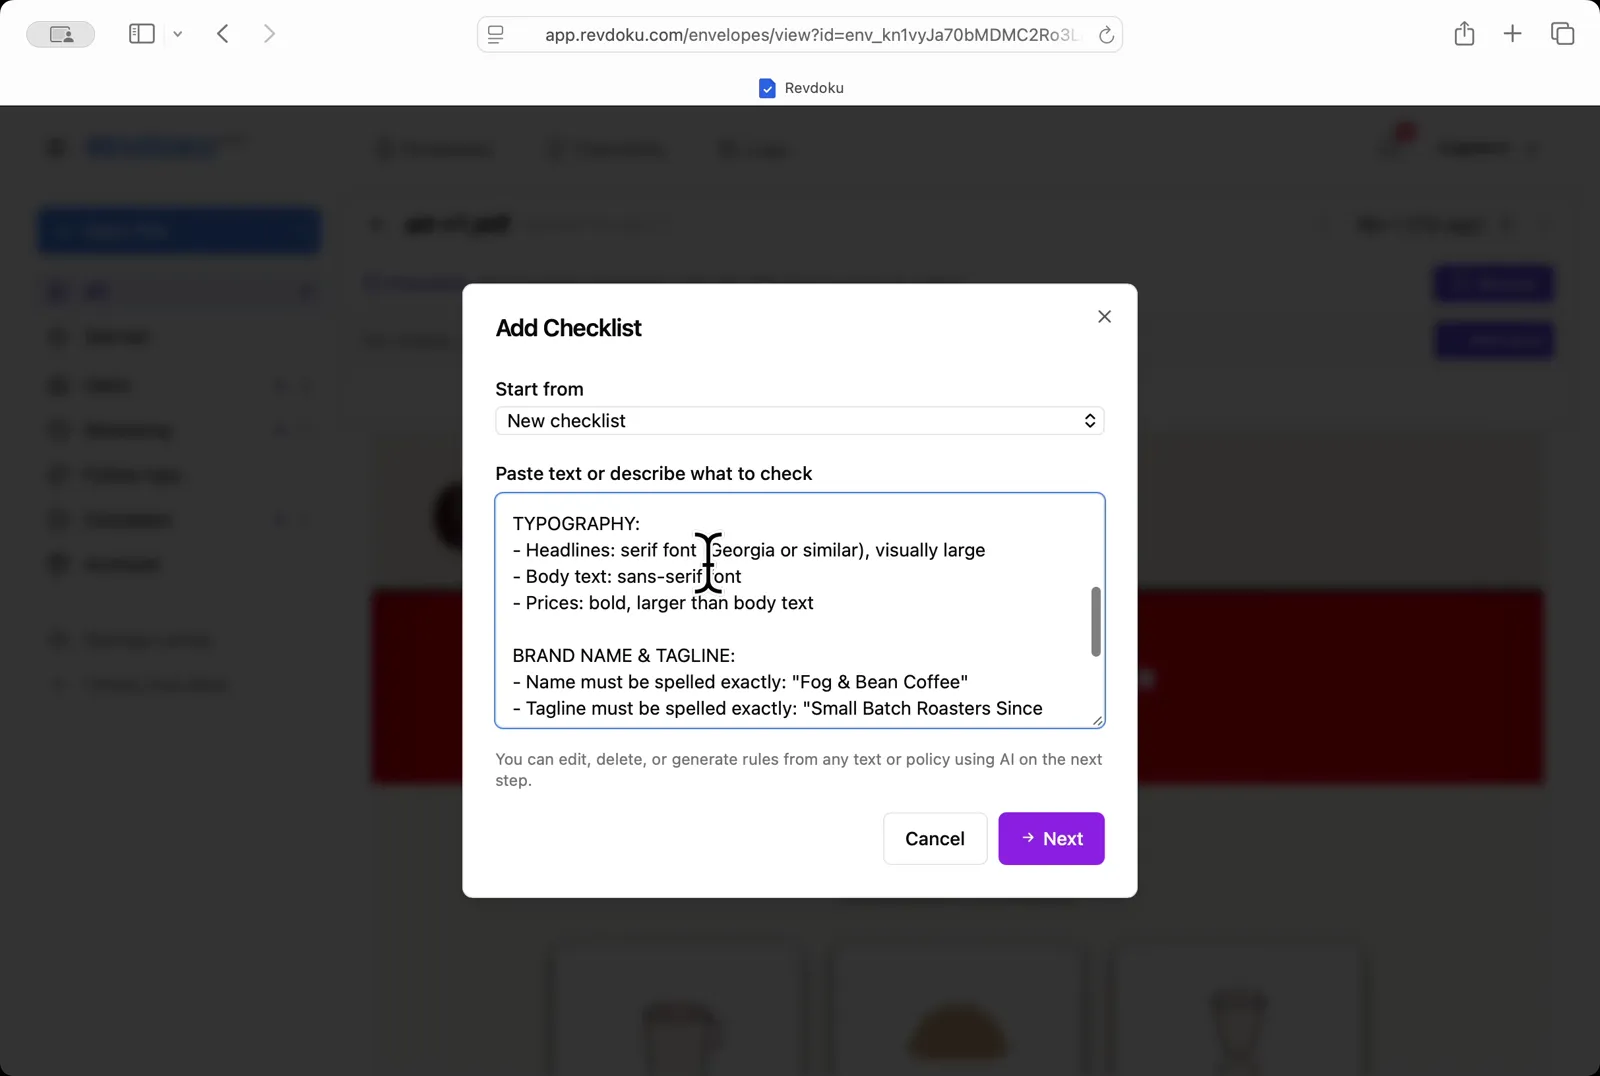
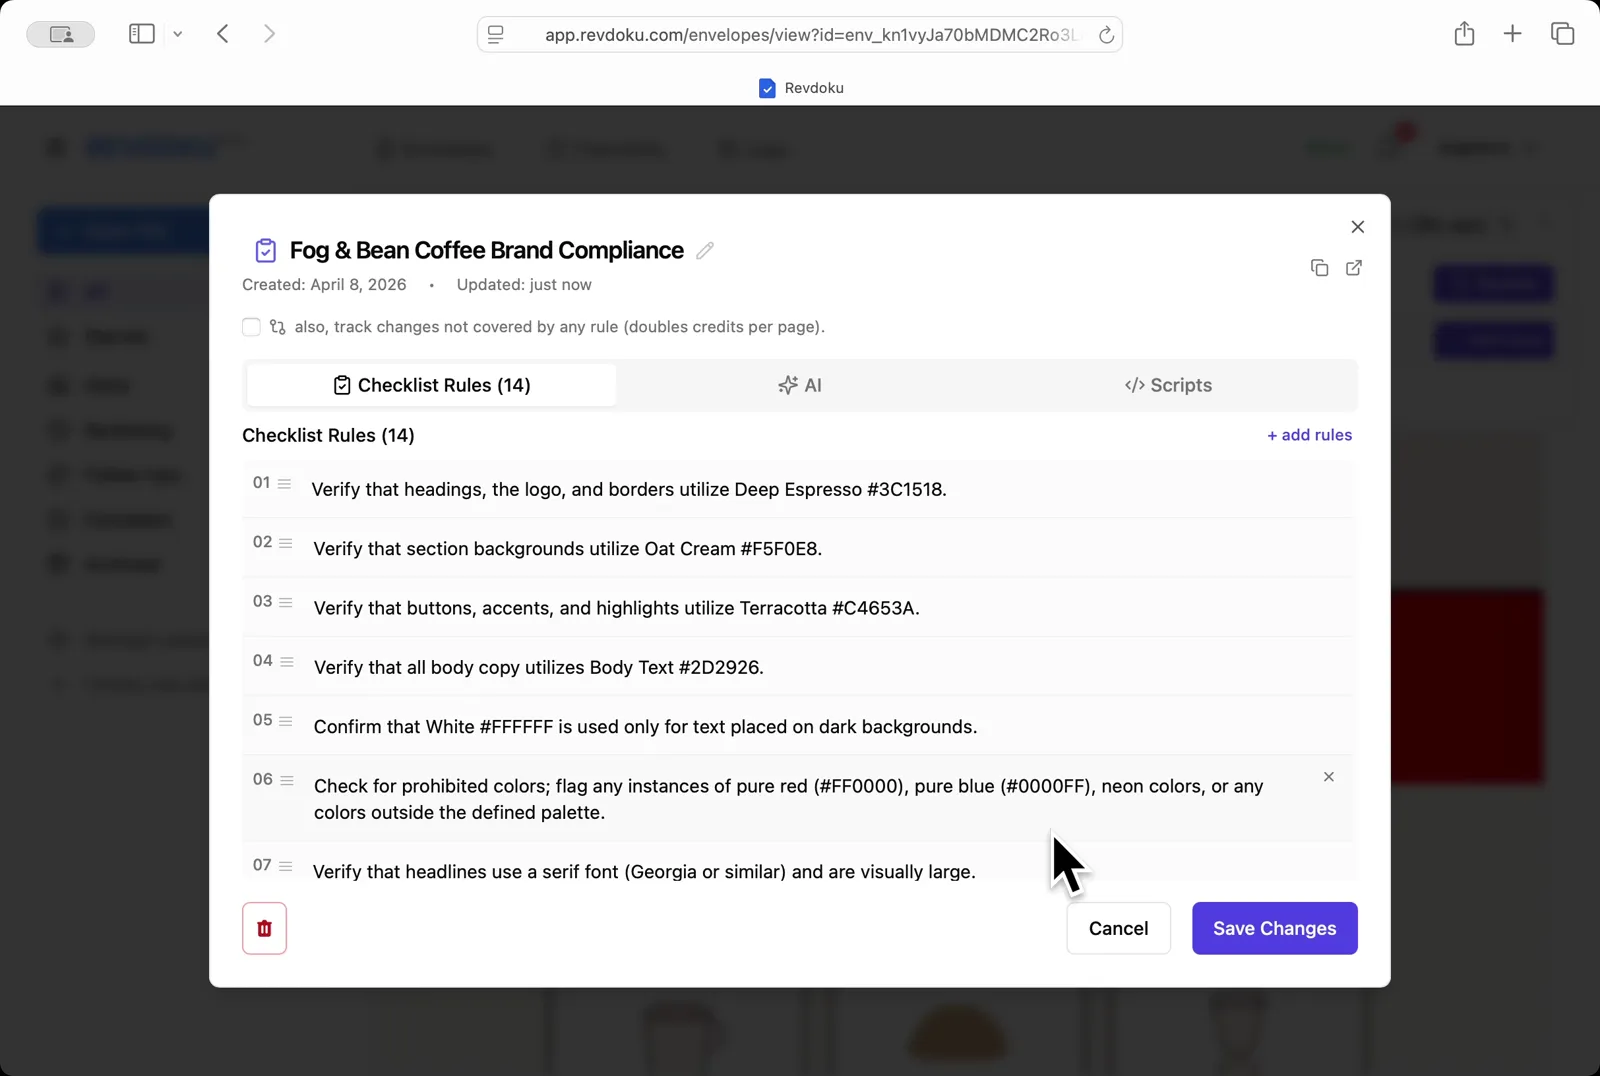
## Step 3: Generate the rules.
Generate the rules. Revdoku turns the pasted brand guide into a 14-rule **Fog & Bean Coffee Brand Compliance** checklist. Each rule is editable.
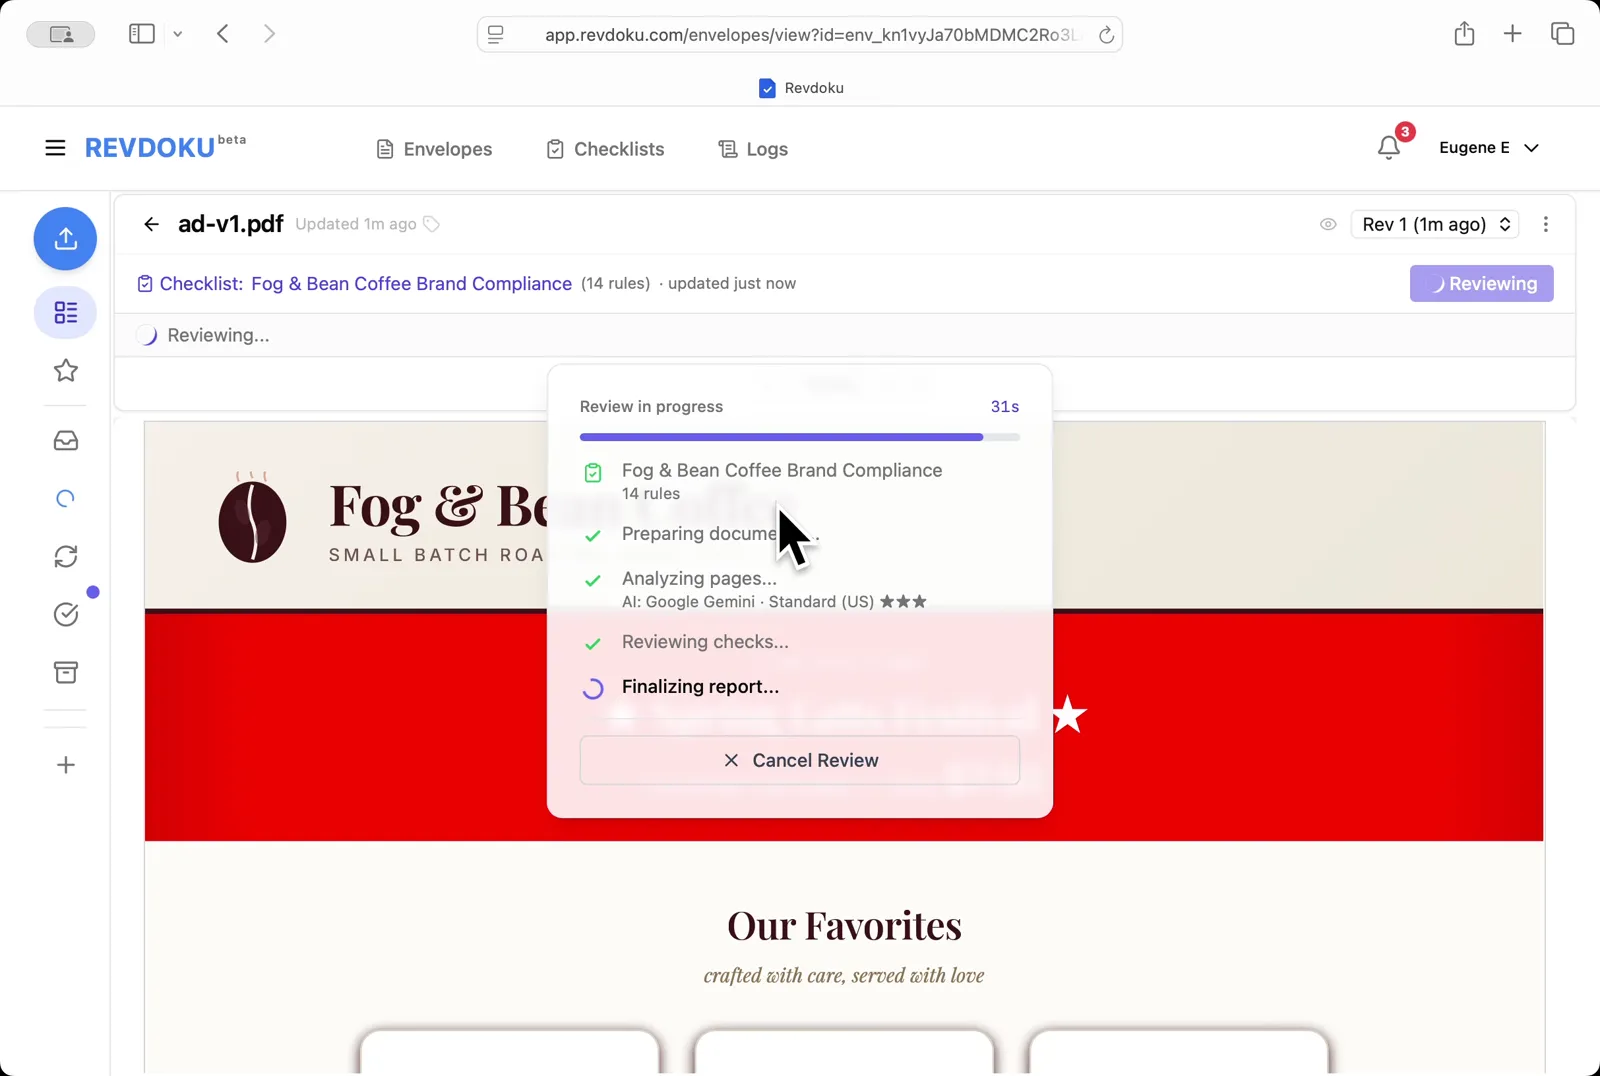
## Step 4: Review ad-v1.pdf.
Review ad-v1.pdf. Click **Review** and Revdoku analyzes the ad against the 14 rules with Google Gemini.

## Step 5: Wait for the report to finalize.
Wait for the report to finalize. Revdoku finishes the checks and writes the report.
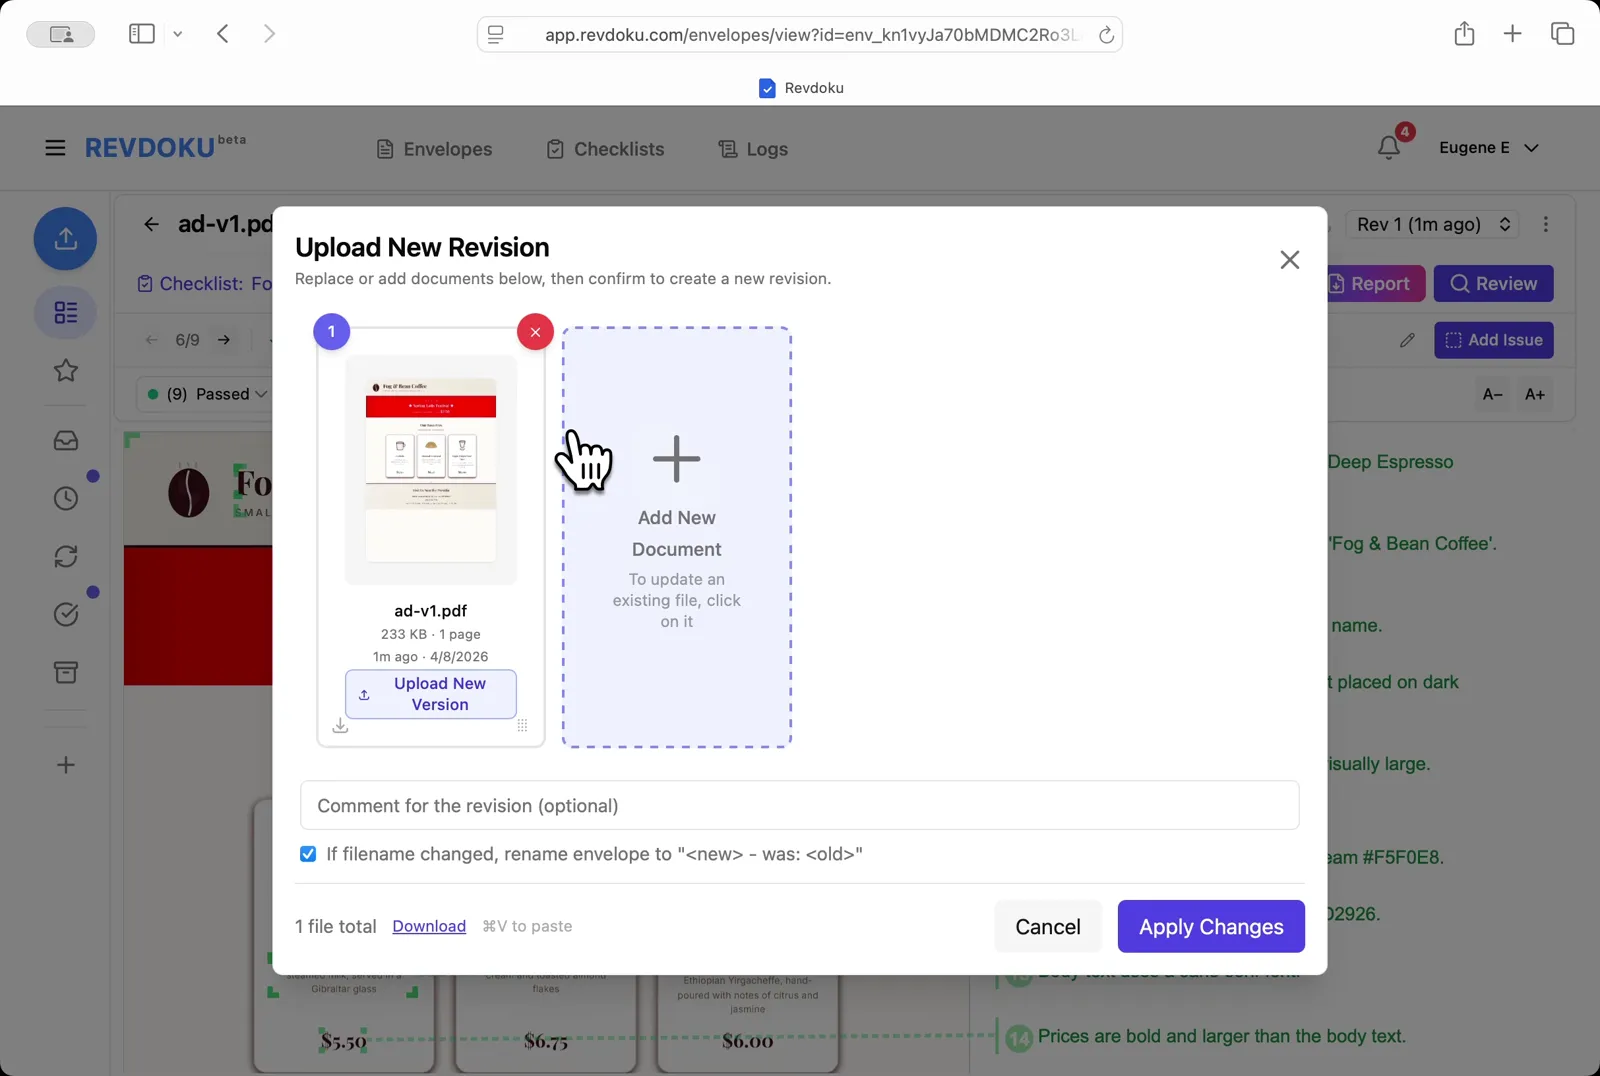
## Step 6: Upload a new revision.
Upload a new revision. Click **Upload New Version** and drop **ad-v2.pdf** into the dialog to replace ad-v1.
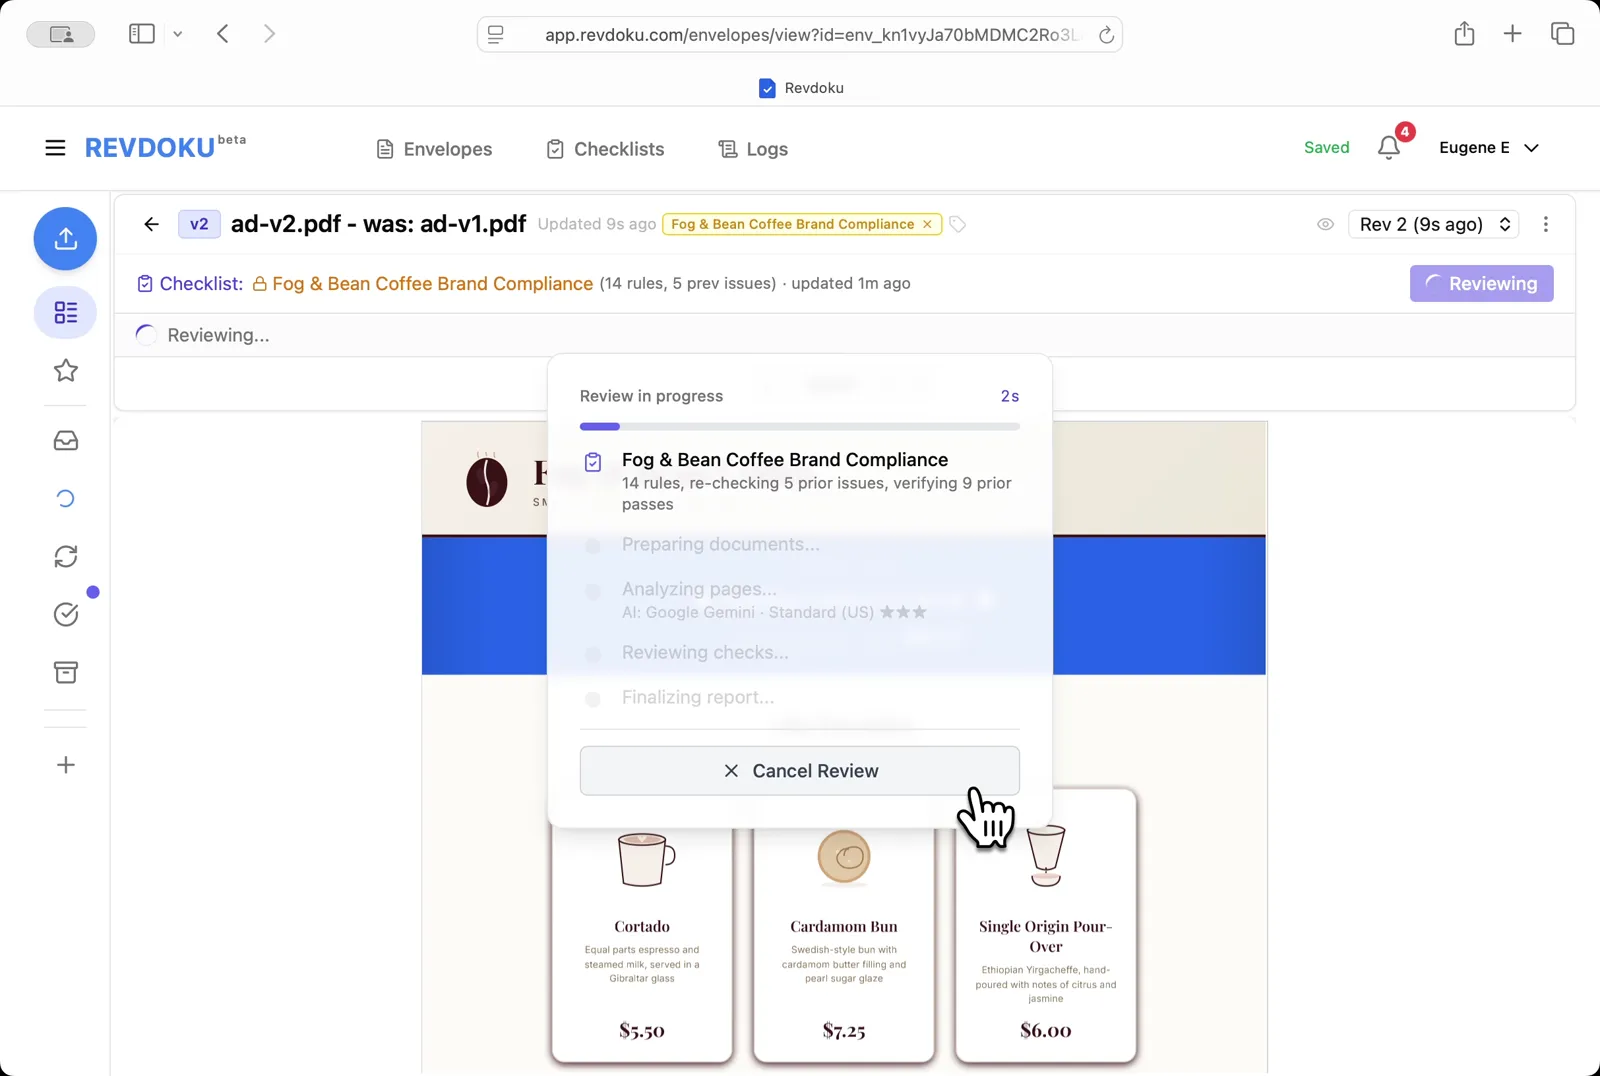
## Step 7: Re-review the new revision.
Re-review the new revision. Revdoku starts a fresh review on ad-v2.pdf, re-checking the 5 prior issues and verifying the 9 prior passes.
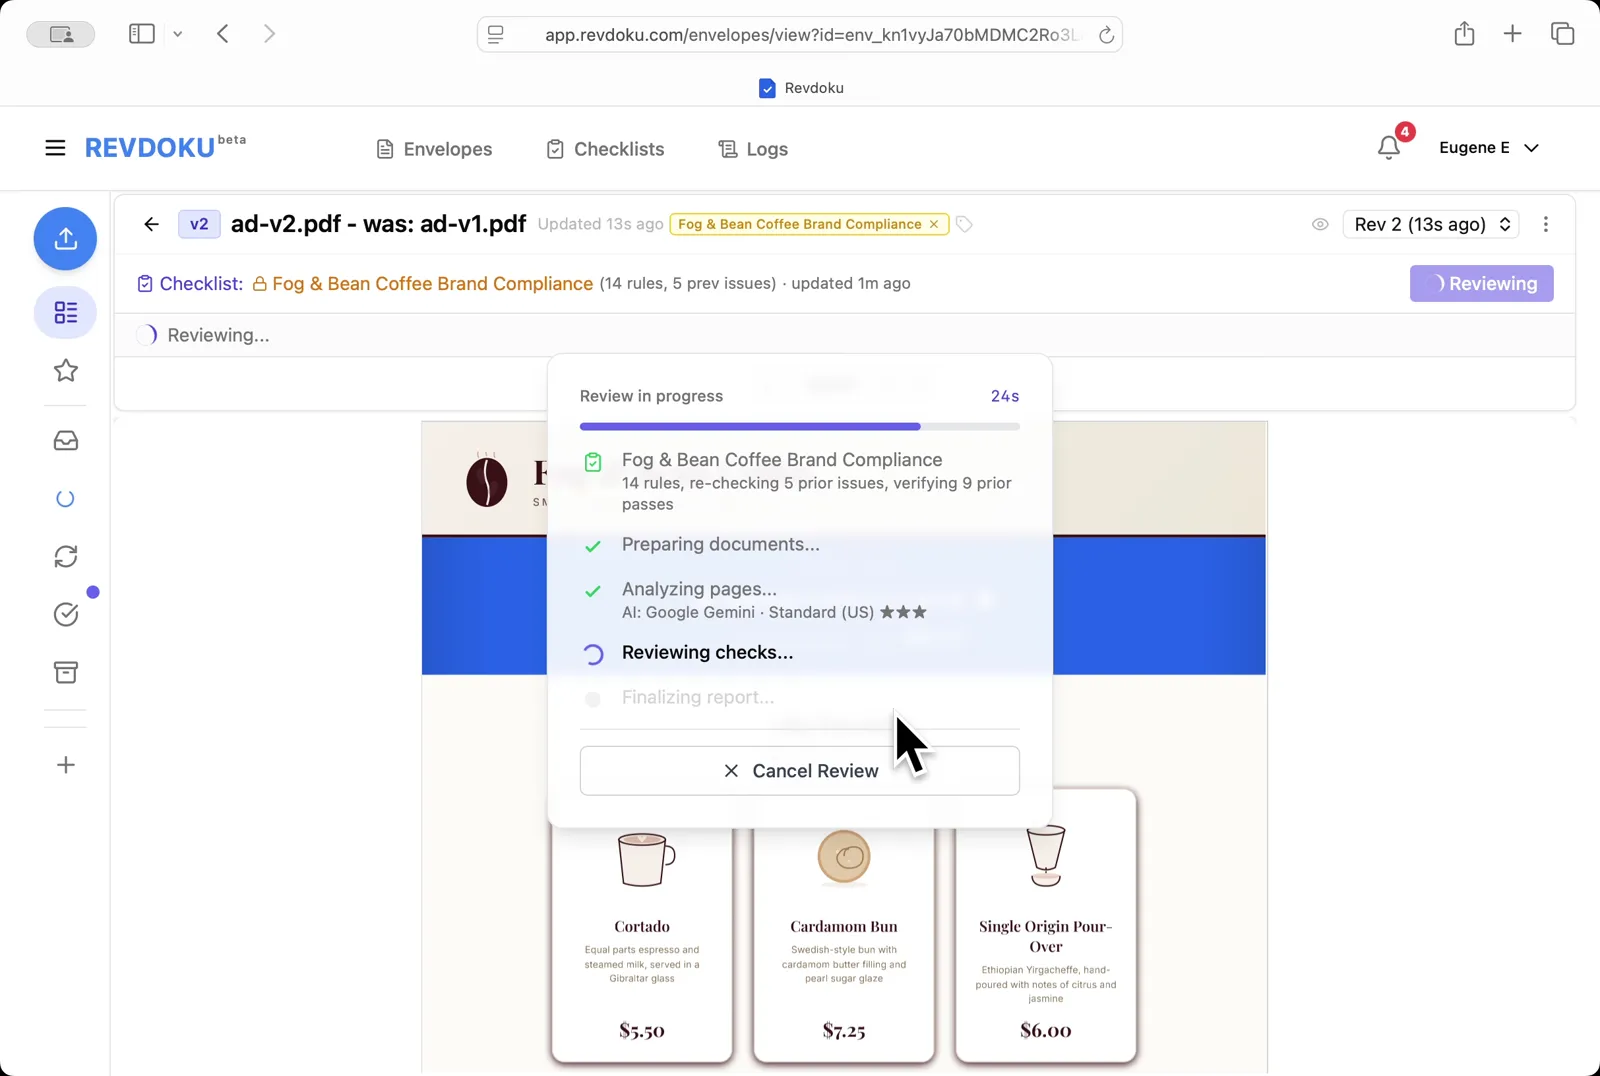
## Step 8: Wait for the v2 checks to run.
Wait for the v2 checks to run. The Reviewing checks stage compares v2 against the same 14 rules.
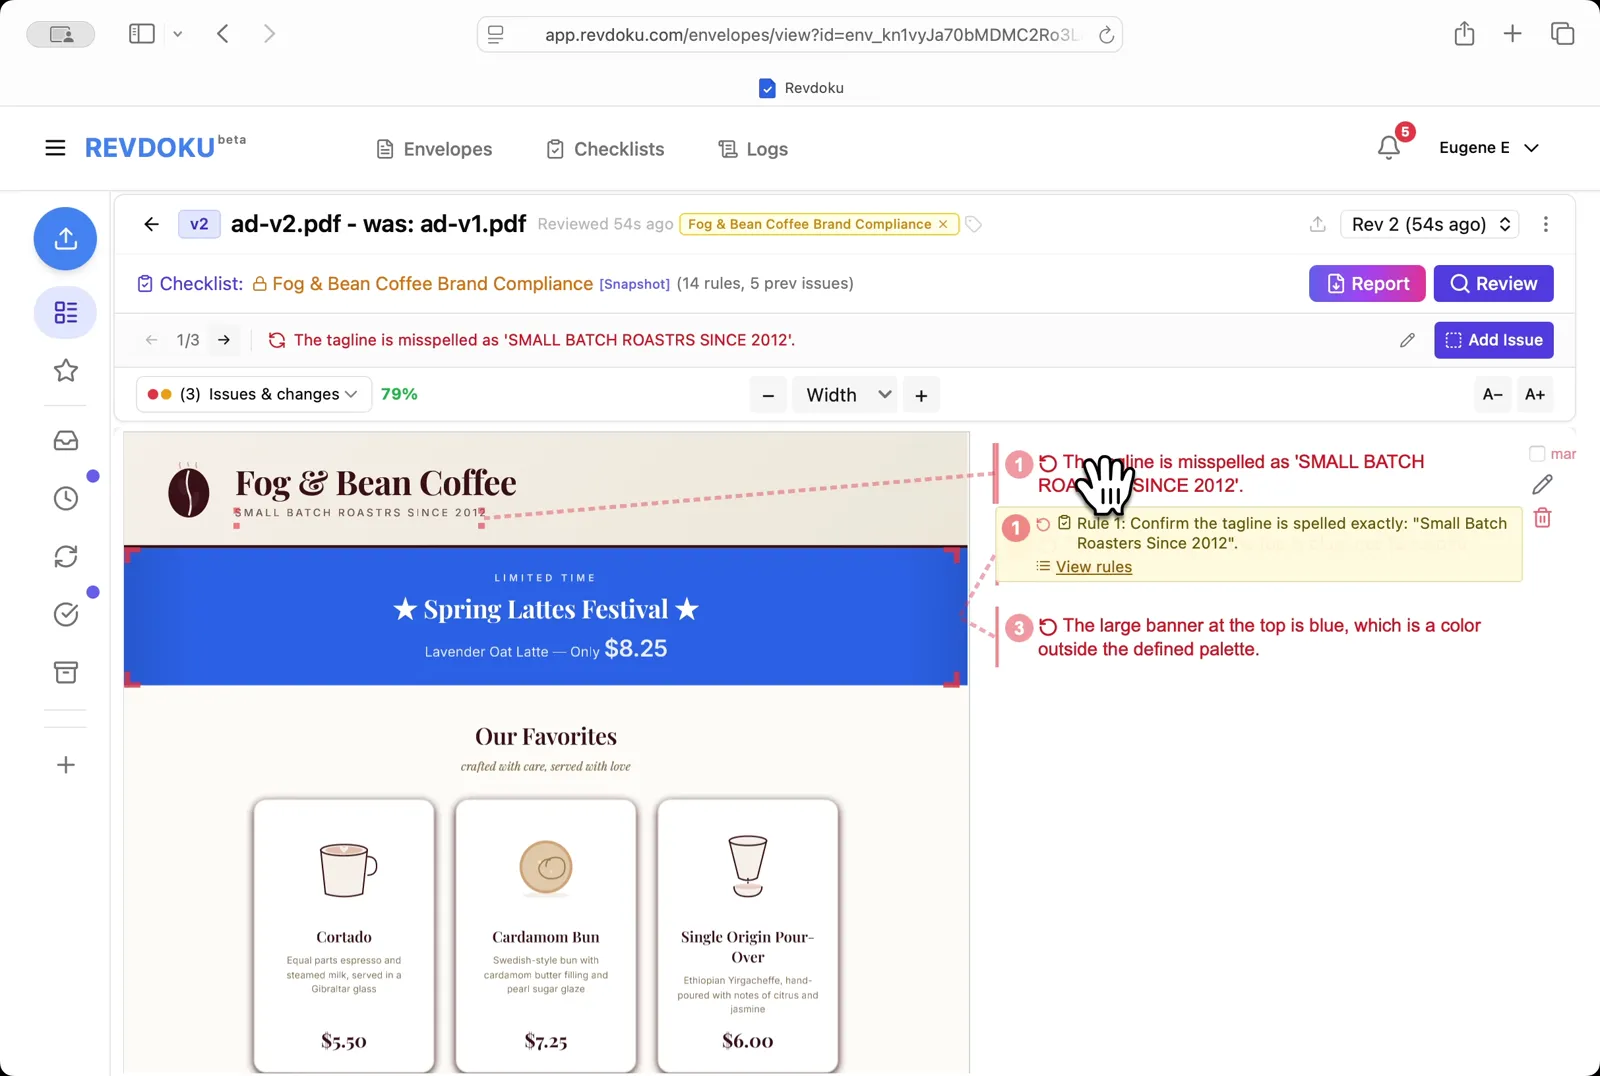
## Step 9: Read the issues on v2.
Read the issues on v2. The ad now shows three new issues, including a misspelled tagline (*SMALL BATCH ROASTRS SINCE 2012*) and a banner color outside the palette.
## Step 10: Filter to re-checks only.
Filter to re-checks only. Pick **Re-checks Only** in the dropdown to see only the 5 checks that changed between v1 and v2.
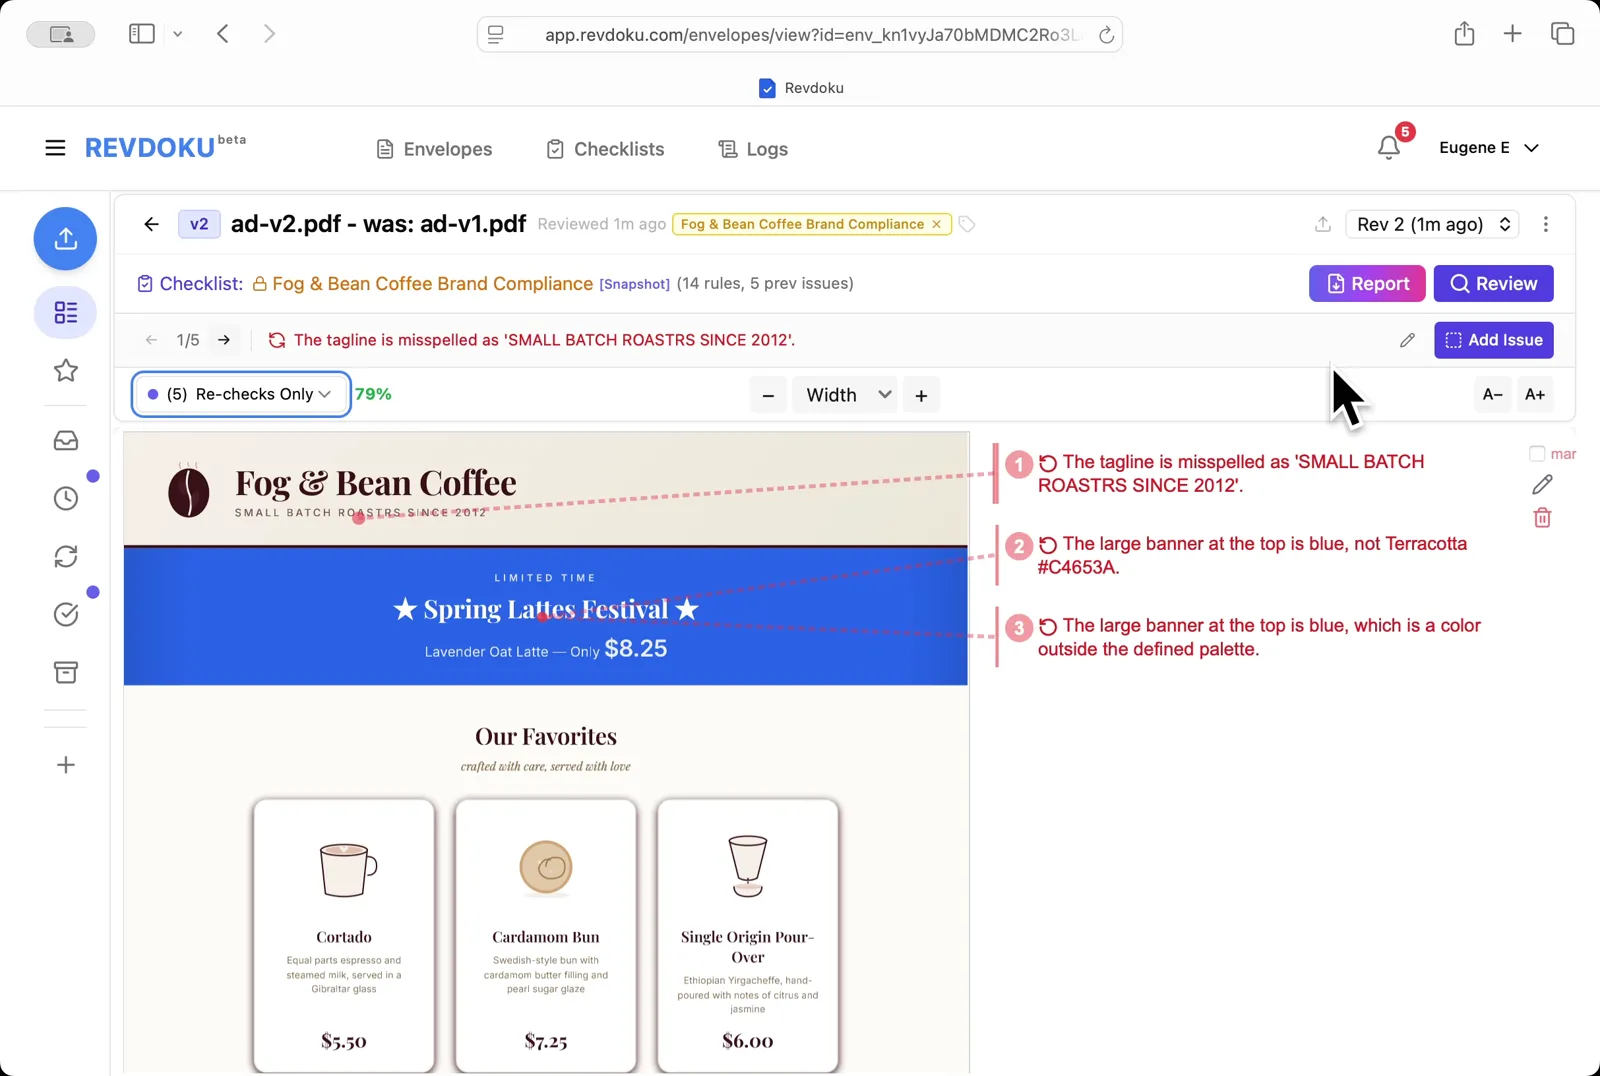
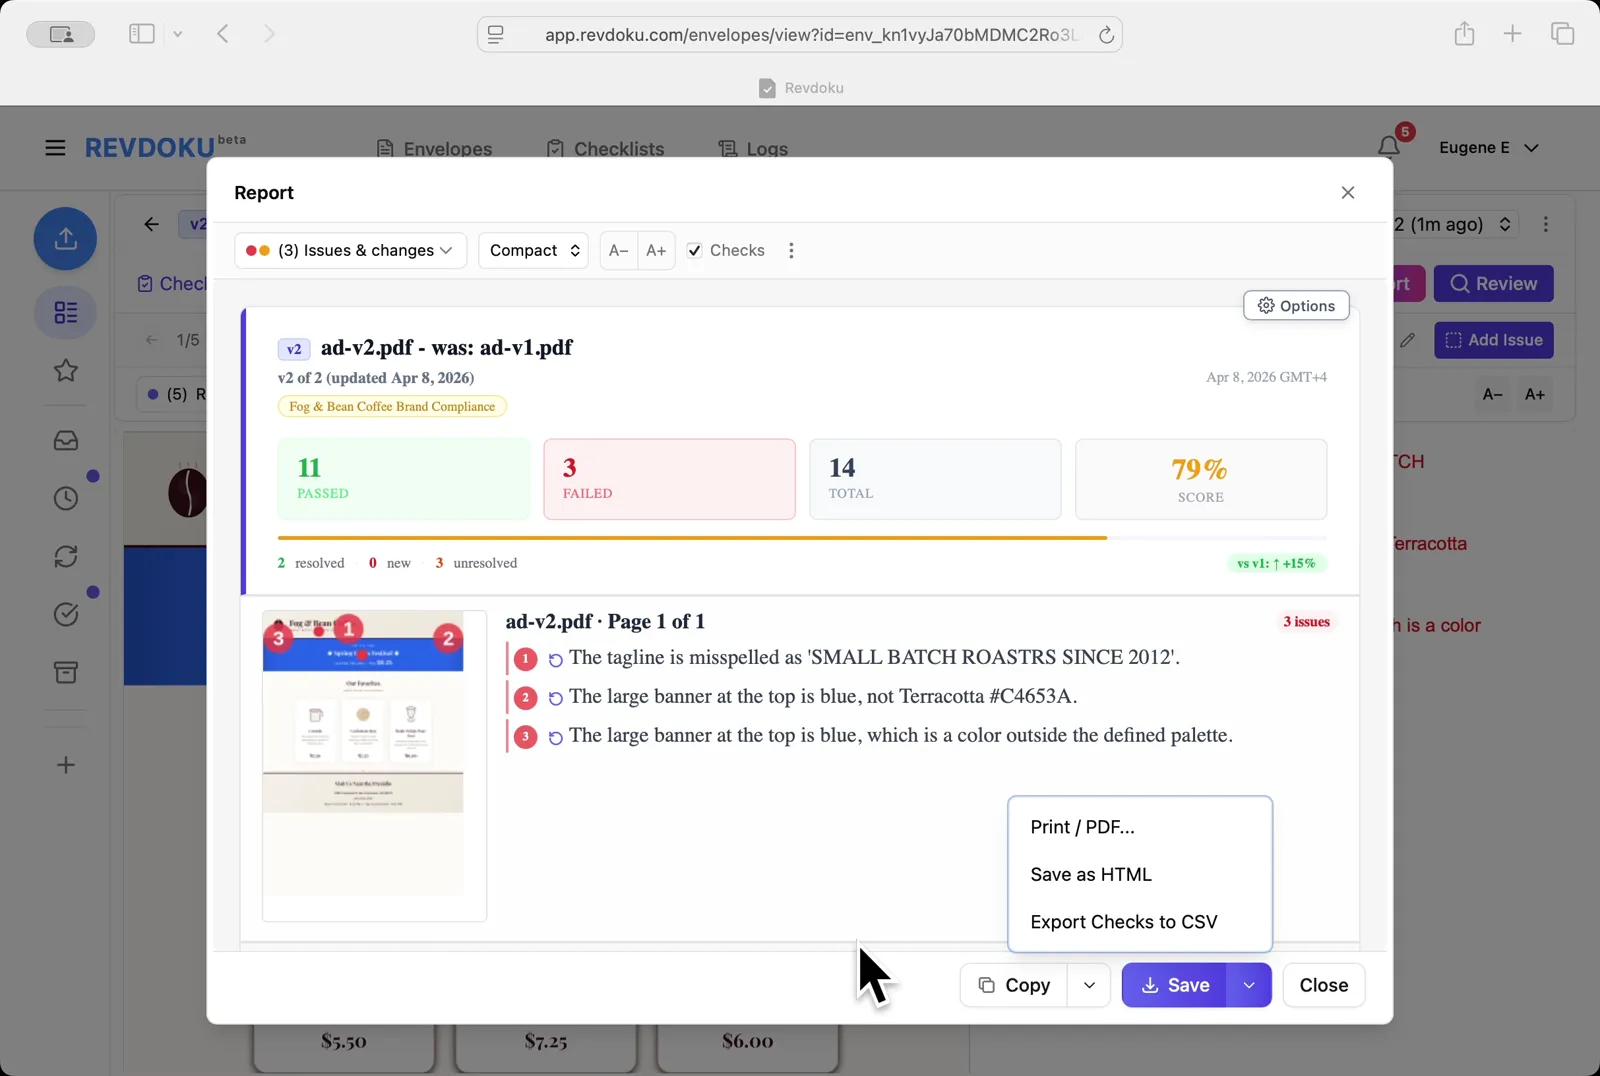
## Step 11: Read the v2 report.
Read the v2 report. Revdoku scores ad-v2.pdf at **79%** (11 passed, 3 failed, +15% vs v1) and lists 2 resolved and 3 unresolved findings.
## Conclusion
In this tutorial it was demonstrated how to use Revdoku for checking an ad against brand guidelines. The following steps were shown:
- Open the Envelopes inbox in Revdoku
- Paste the brand guide
- Generate the rules
- Review ad-v1.pdf
- Wait for the report to finalize
- Upload a new revision
- Re-review the new revision
- Wait for the v2 checks to run
- Read the issues on v2
- Filter to re-checks only
- Read the v2 report
---
## What You Learned
This case showed how Revdoku can take a document, apply a structured checklist, and surface specific findings. all in under a minute. No manual line-by-line reading required.
Cloud
Self-host (open-source)
More use cases
Disclosure: Sample documents in this use case were generated using AI and contain intentional errors for demonstration purposes. All names, companies, and details are fictional.
### Use Case: Review a Mutual NDA
URL: https://revdoku.com/cases/nda-confidentiality-review/
Description: A mutual NDA reviewed for completeness. Finds ambiguous party designations, missing exclusion for independently developed information, and no confidentiality duration.
Published: 2026-04-11
Updated: 2026-04-14
Keywords: NDA, mutual NDA, confidentiality review, non-disclosure agreement, legal, Revdoku
# Review a Mutual NDA
This use case demonstrates how to review a mutual NDA for completeness. You will upload the NDA into Revdoku, attach the NDA & Confidentiality Agreement Review checklist, run **Review** with Google Gemini, and read the resulting issues and report.
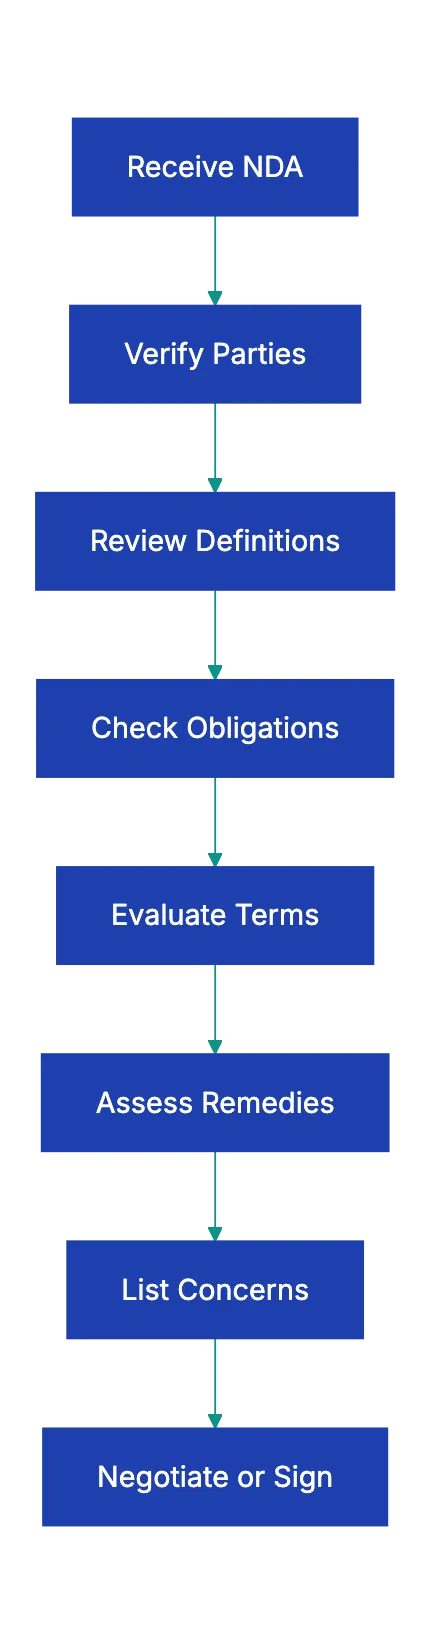
## Step 1: Open the Envelopes inbox.
Open the Envelopes inbox. The inbox lists every document available for review.

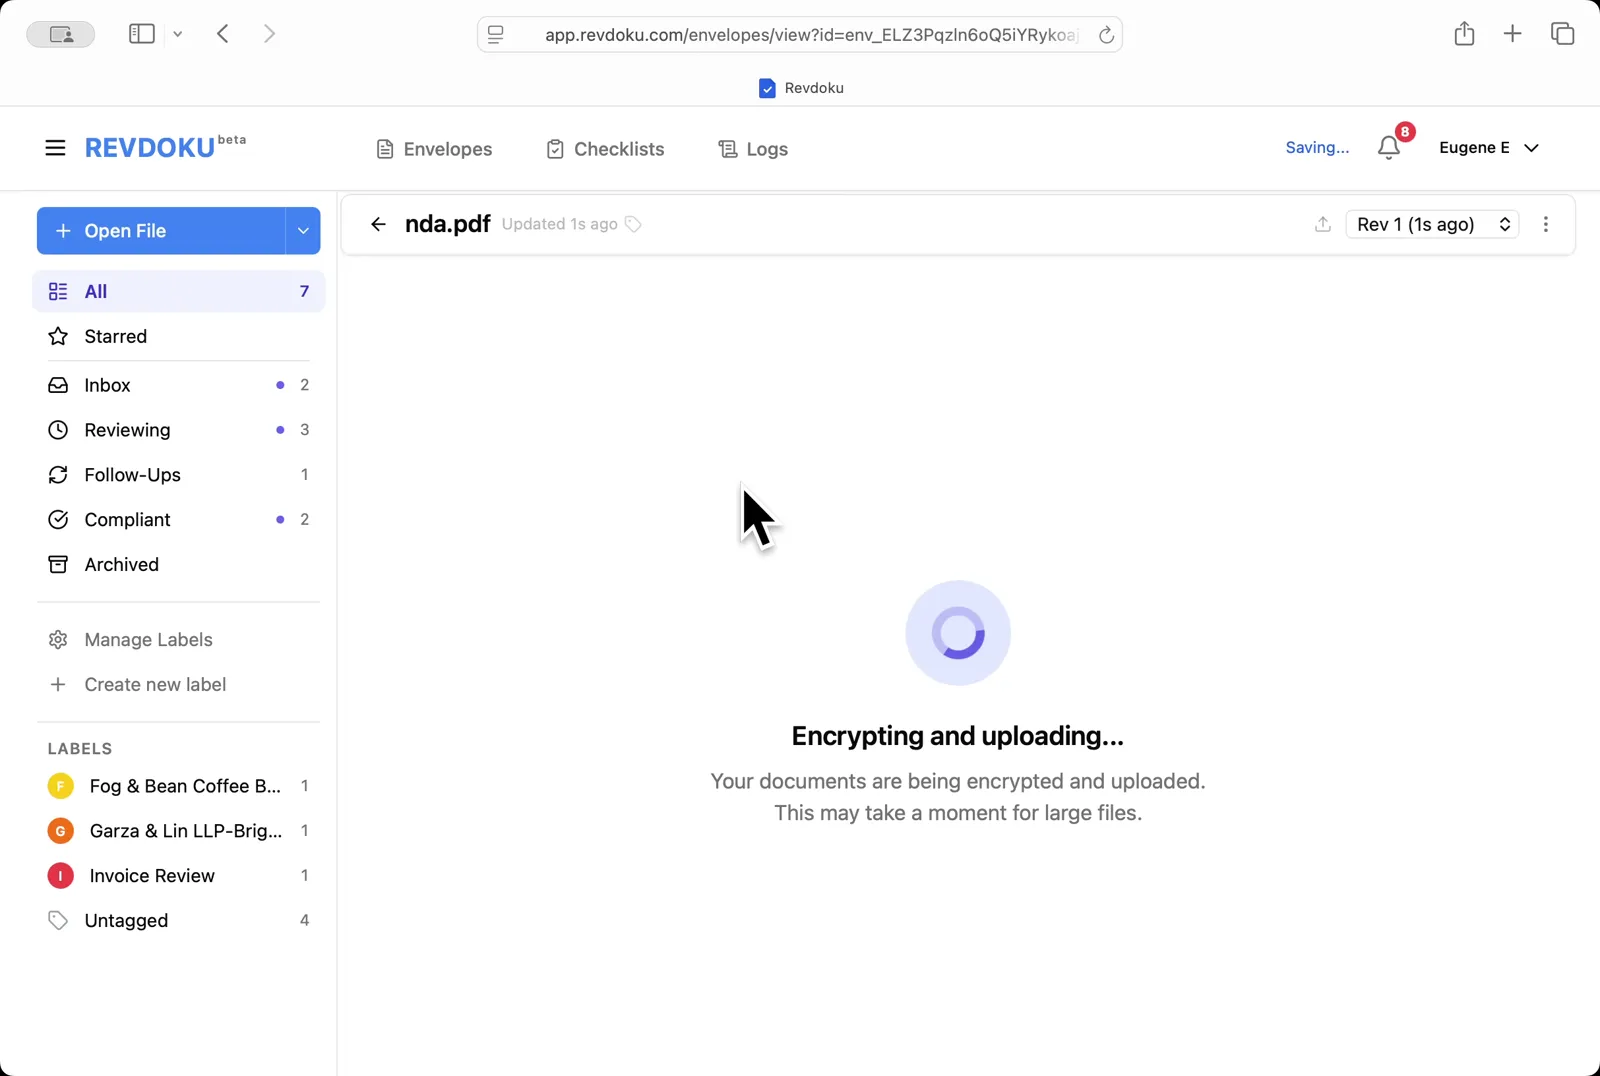
## Step 2: Upload the NDA.
Upload the NDA. Drop **nda.pdf** onto the inbox; Revdoku encrypts and uploads it before opening.
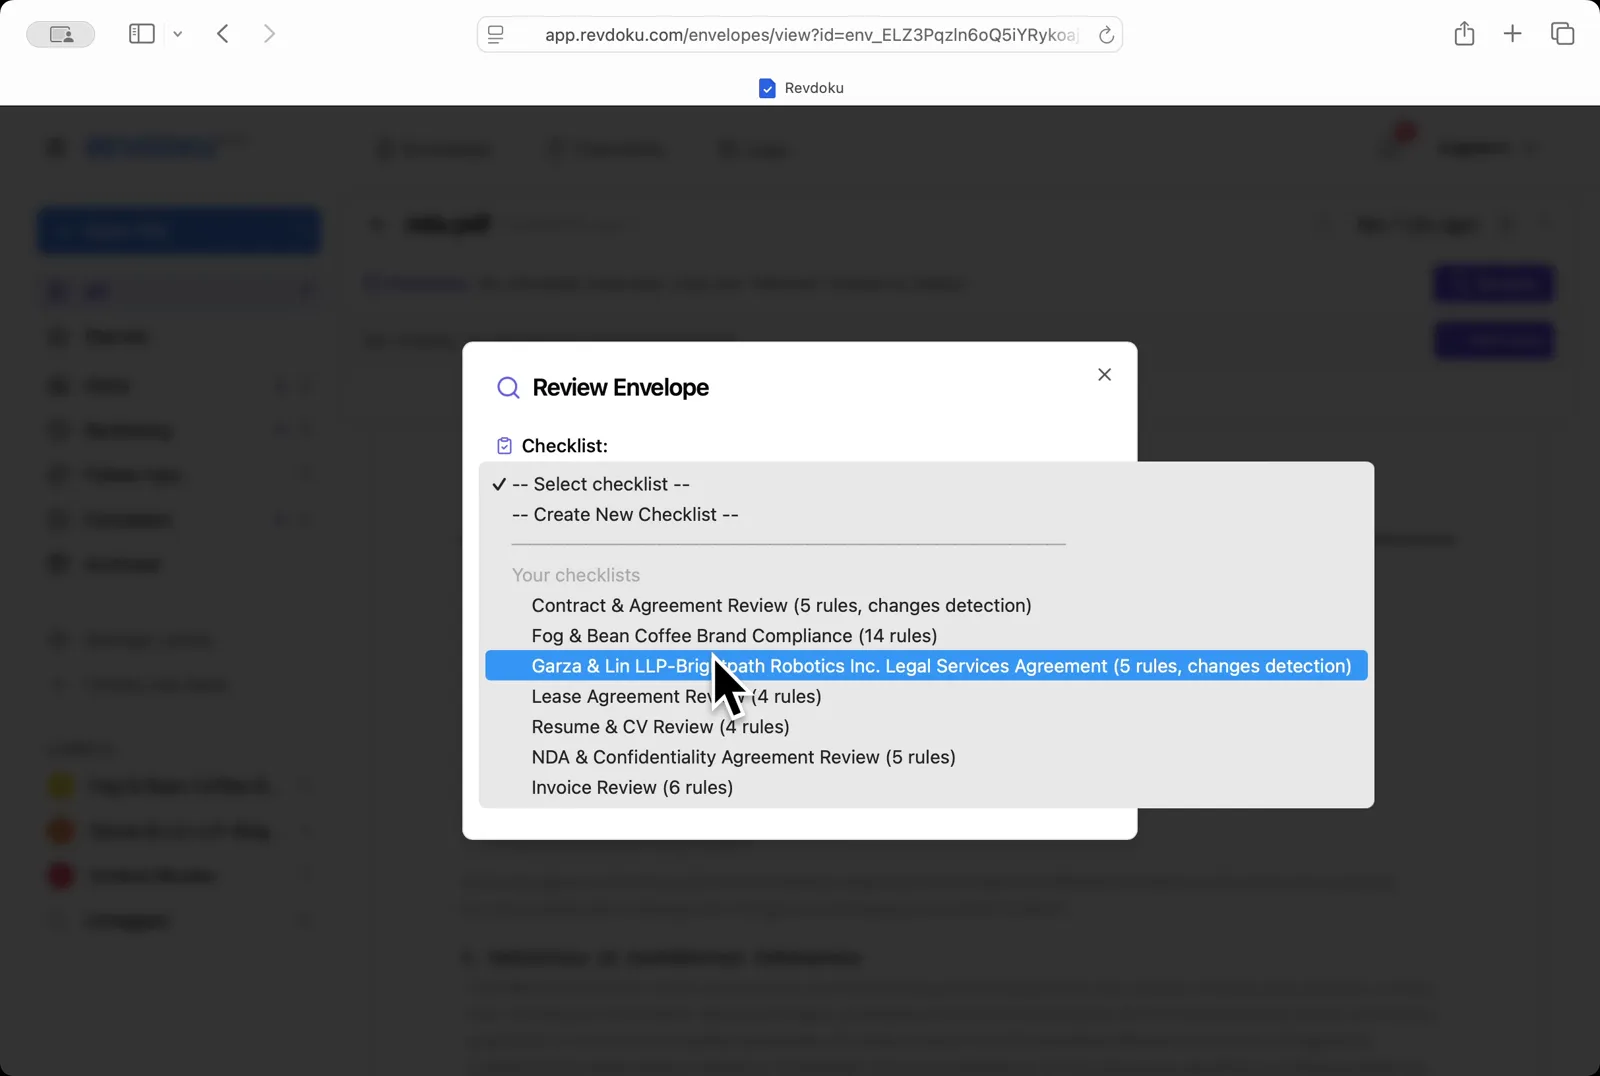
## Step 3: Pick the NDA checklist.
Pick the NDA checklist. In the **Review Envelope** dialog open the checklist dropdown and choose **NDA & Confidentiality Agreement Review (5 rules)**.
## Step 4: Start the review.
Start the review. Revdoku begins with the *Preparing documents* step.
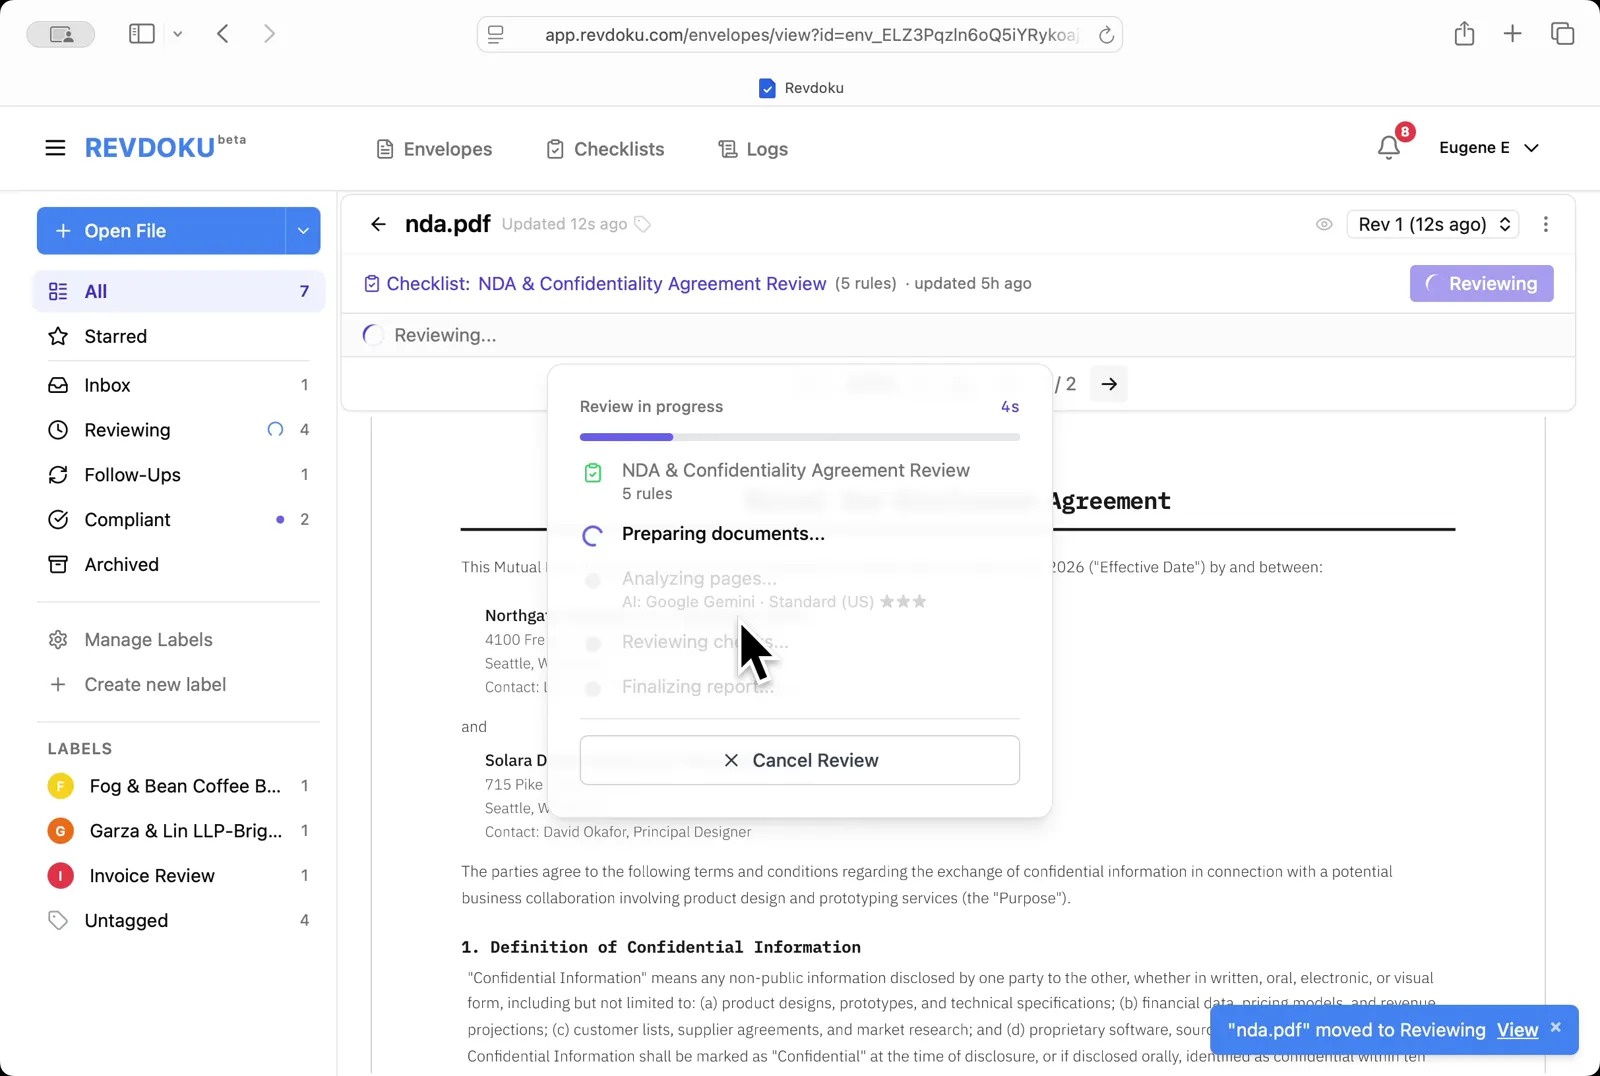
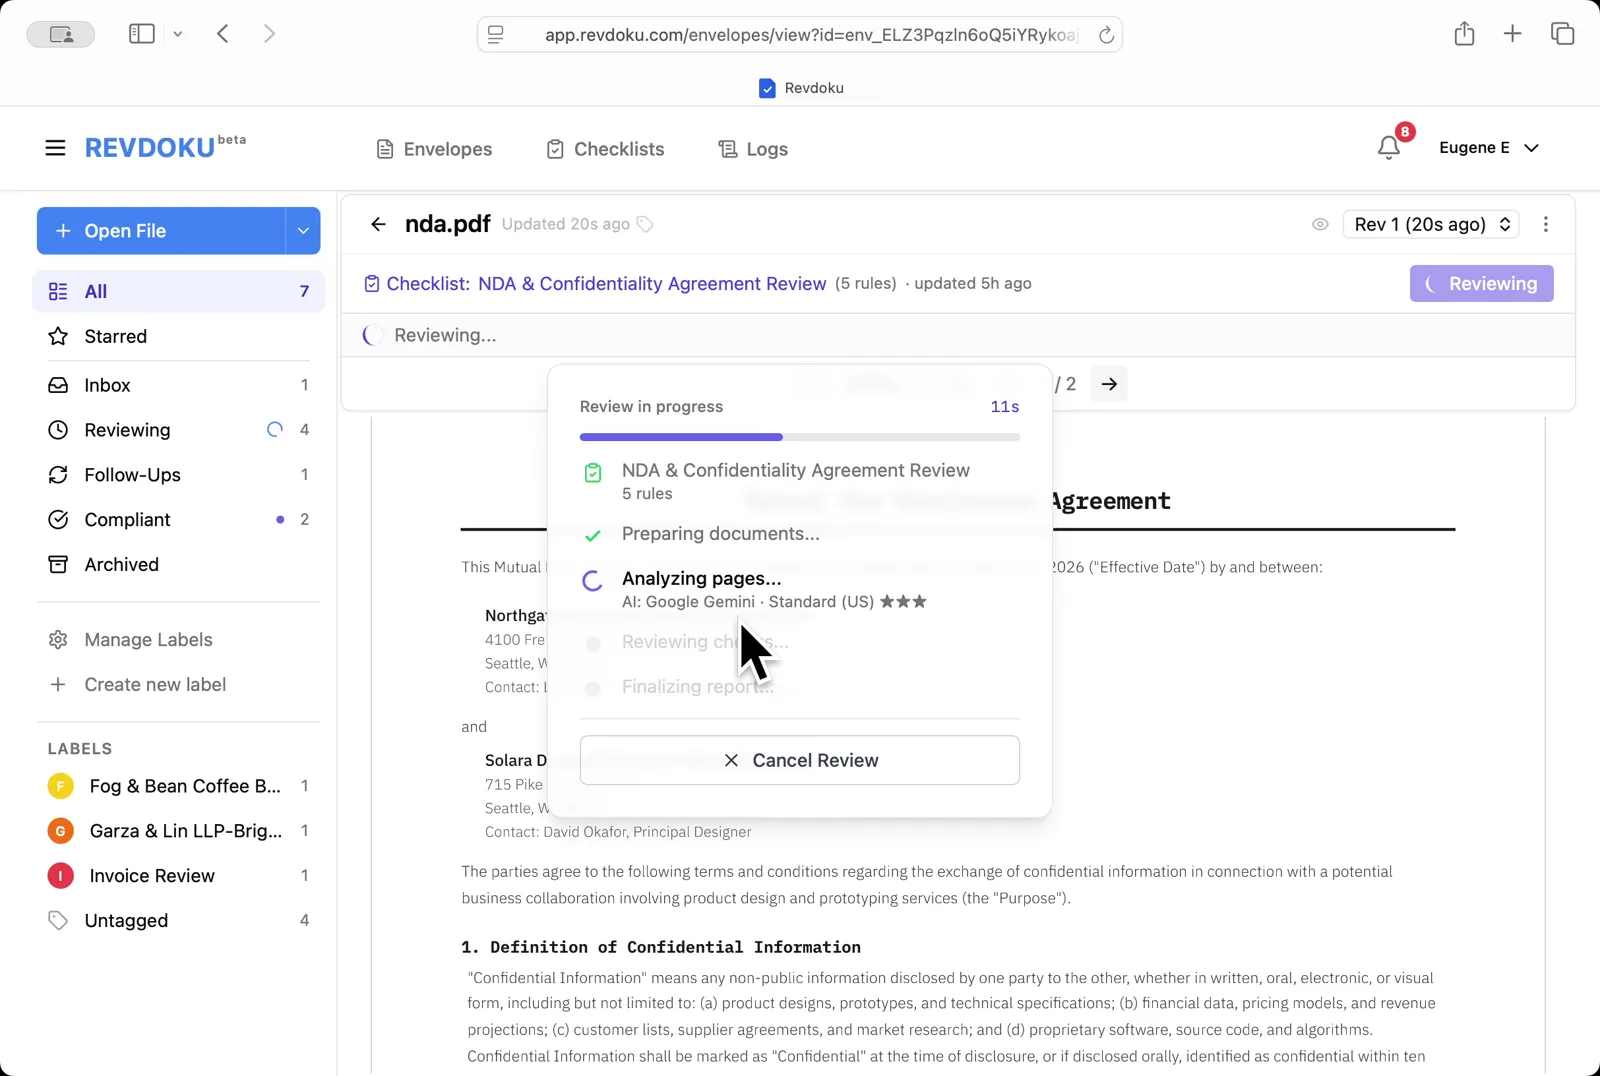
## Step 5: Revdoku analyzes the NDA.
Revdoku analyzes the NDA. It extracts the page text and runs each of the five rules with **Google Gemini · Standard (US)**.
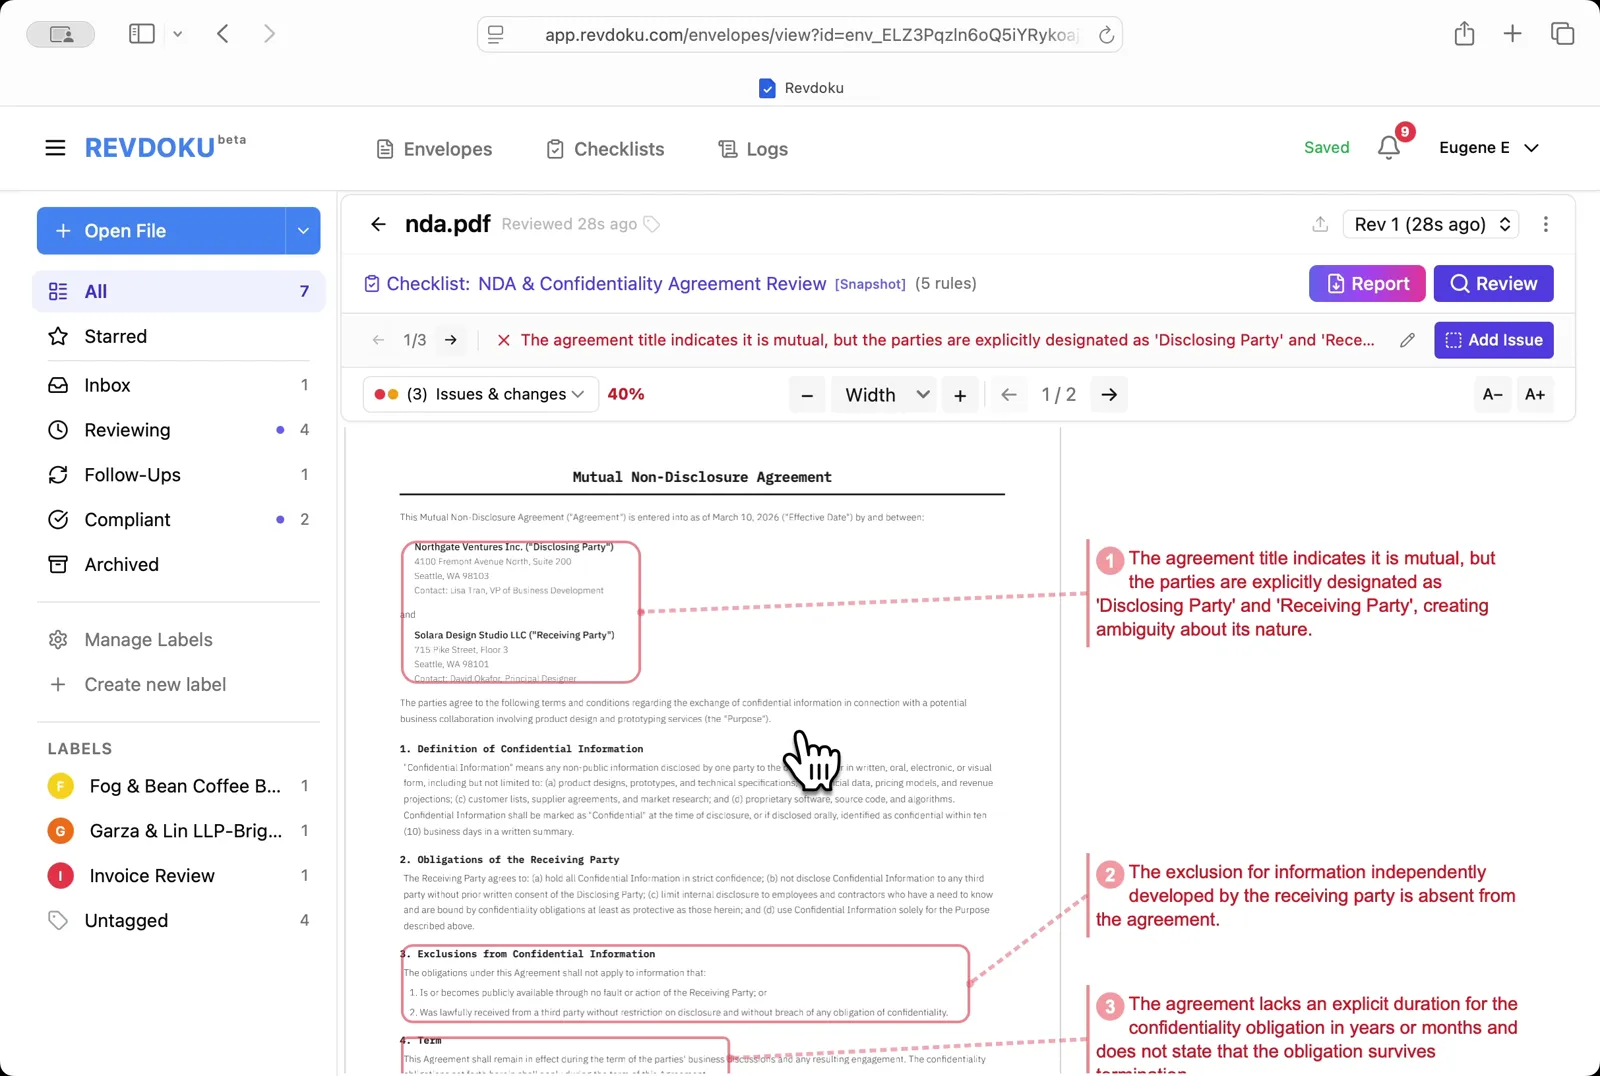
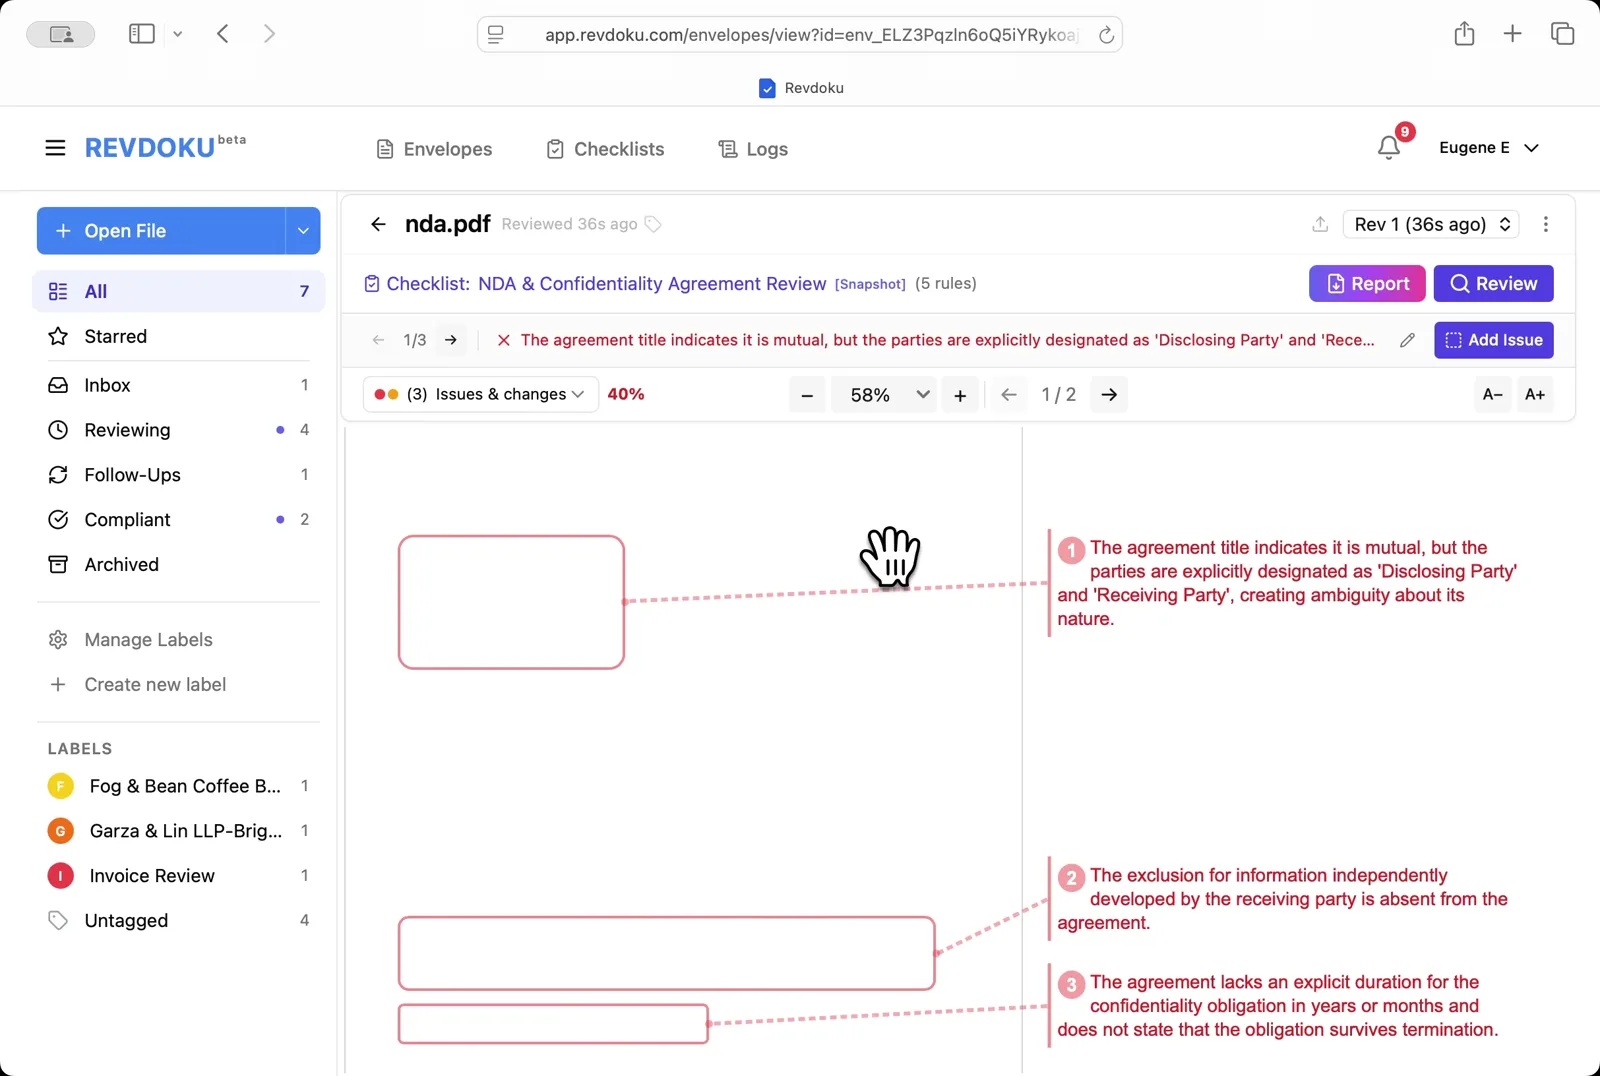
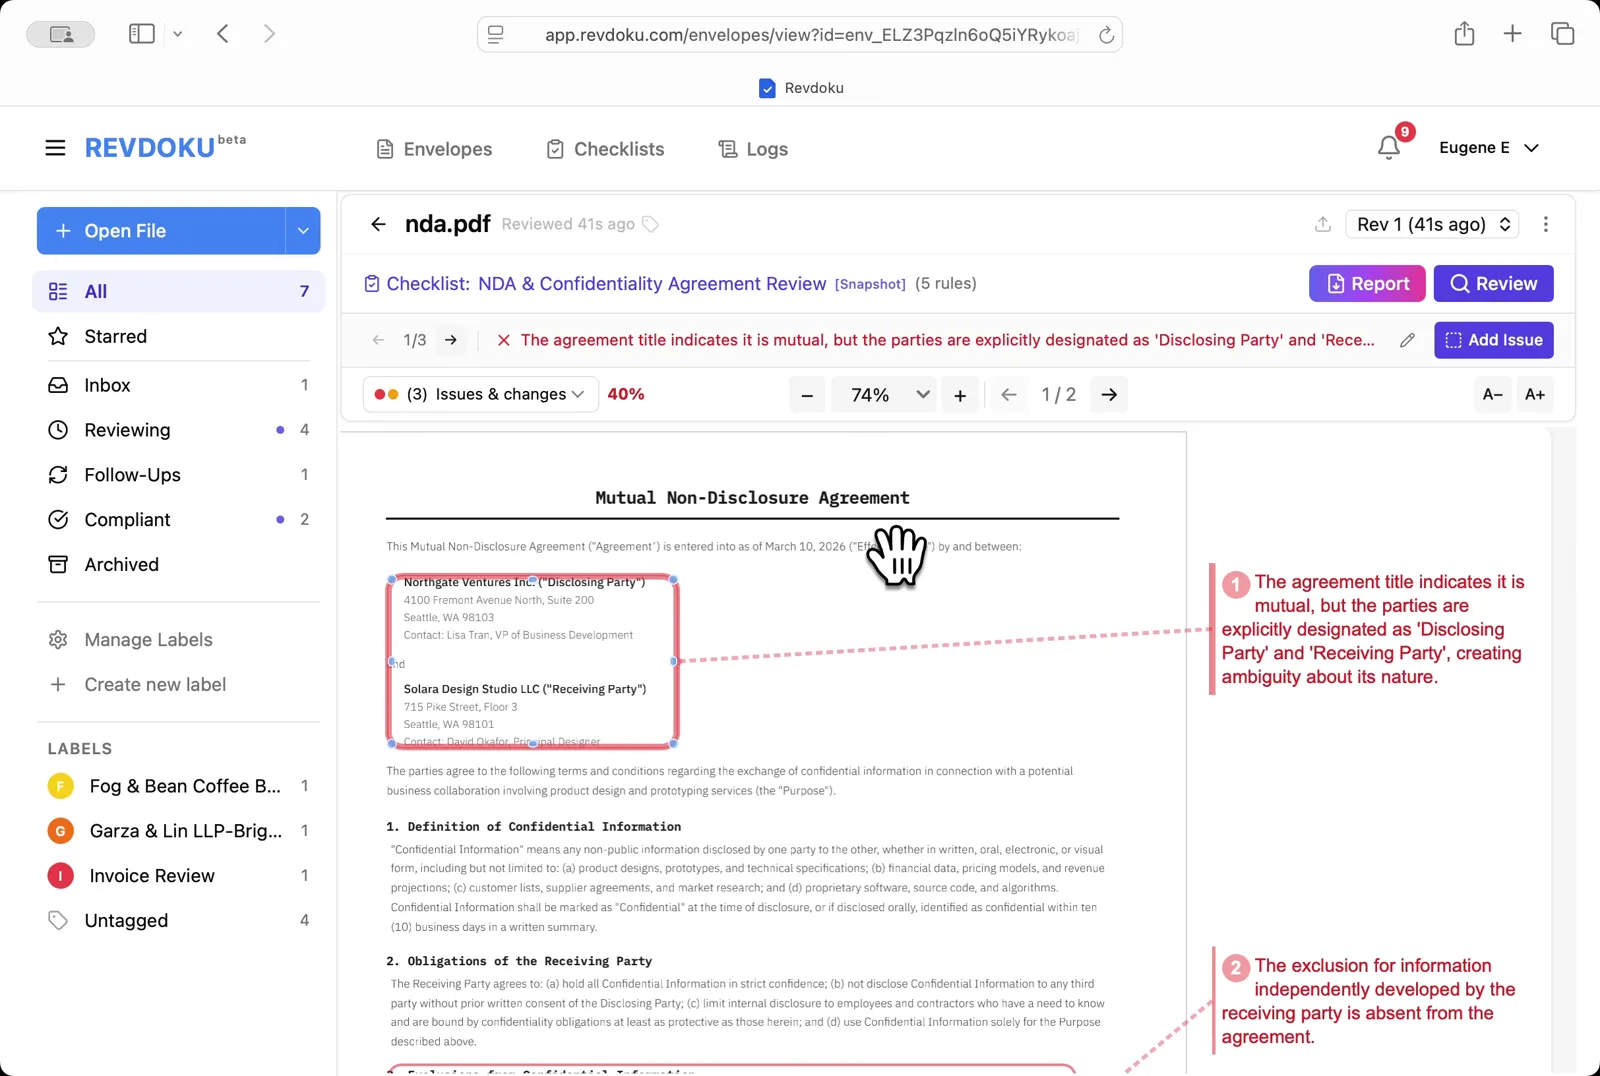
## Step 6: Read the issues on page 1.
Read the issues on page 1. Three failures are annotated: the agreement is titled *Mutual* but the parties are explicitly labeled *Disclosing* and *Receiving* (creating ambiguity), the standard exclusion for independently developed information is missing, and the confidentiality duration is not specified.
## Step 7: See all issues at once.
See all issues at once. Zoom out to **58%** to view the three flagged areas alongside their annotations.
## Step 8: Inspect the parties block.
Inspect the parties block. Zoom in to **74%** to verify how the parties are labeled in the upper-left of page 1.
## Step 9: Open the Report.
Open the Report. The summary shows **2 passed, 3 failed, 40% score**, with the first issue annotated on the page preview.

## Step 10: Read the issue list.
Read the issue list. The **Issues (3)** section lists the ambiguous *Disclosing/Receiving* labels, the missing exclusion clause, and the missing confidentiality duration; page 2 is marked **No issues**.
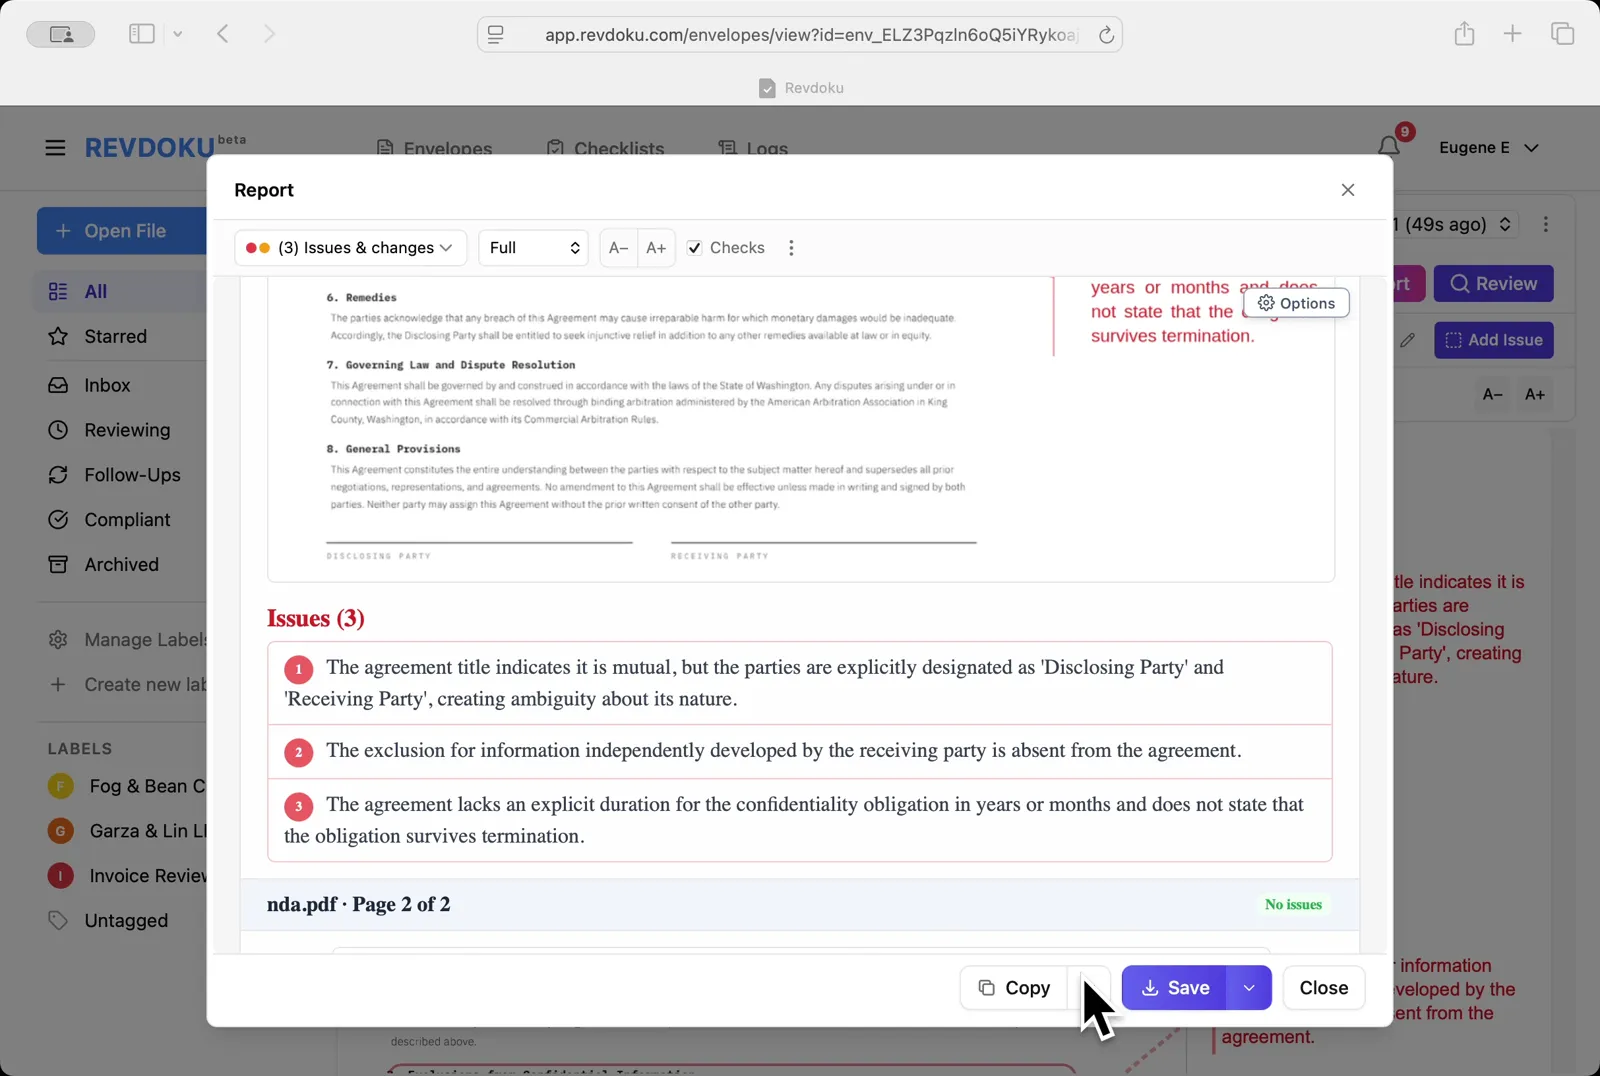
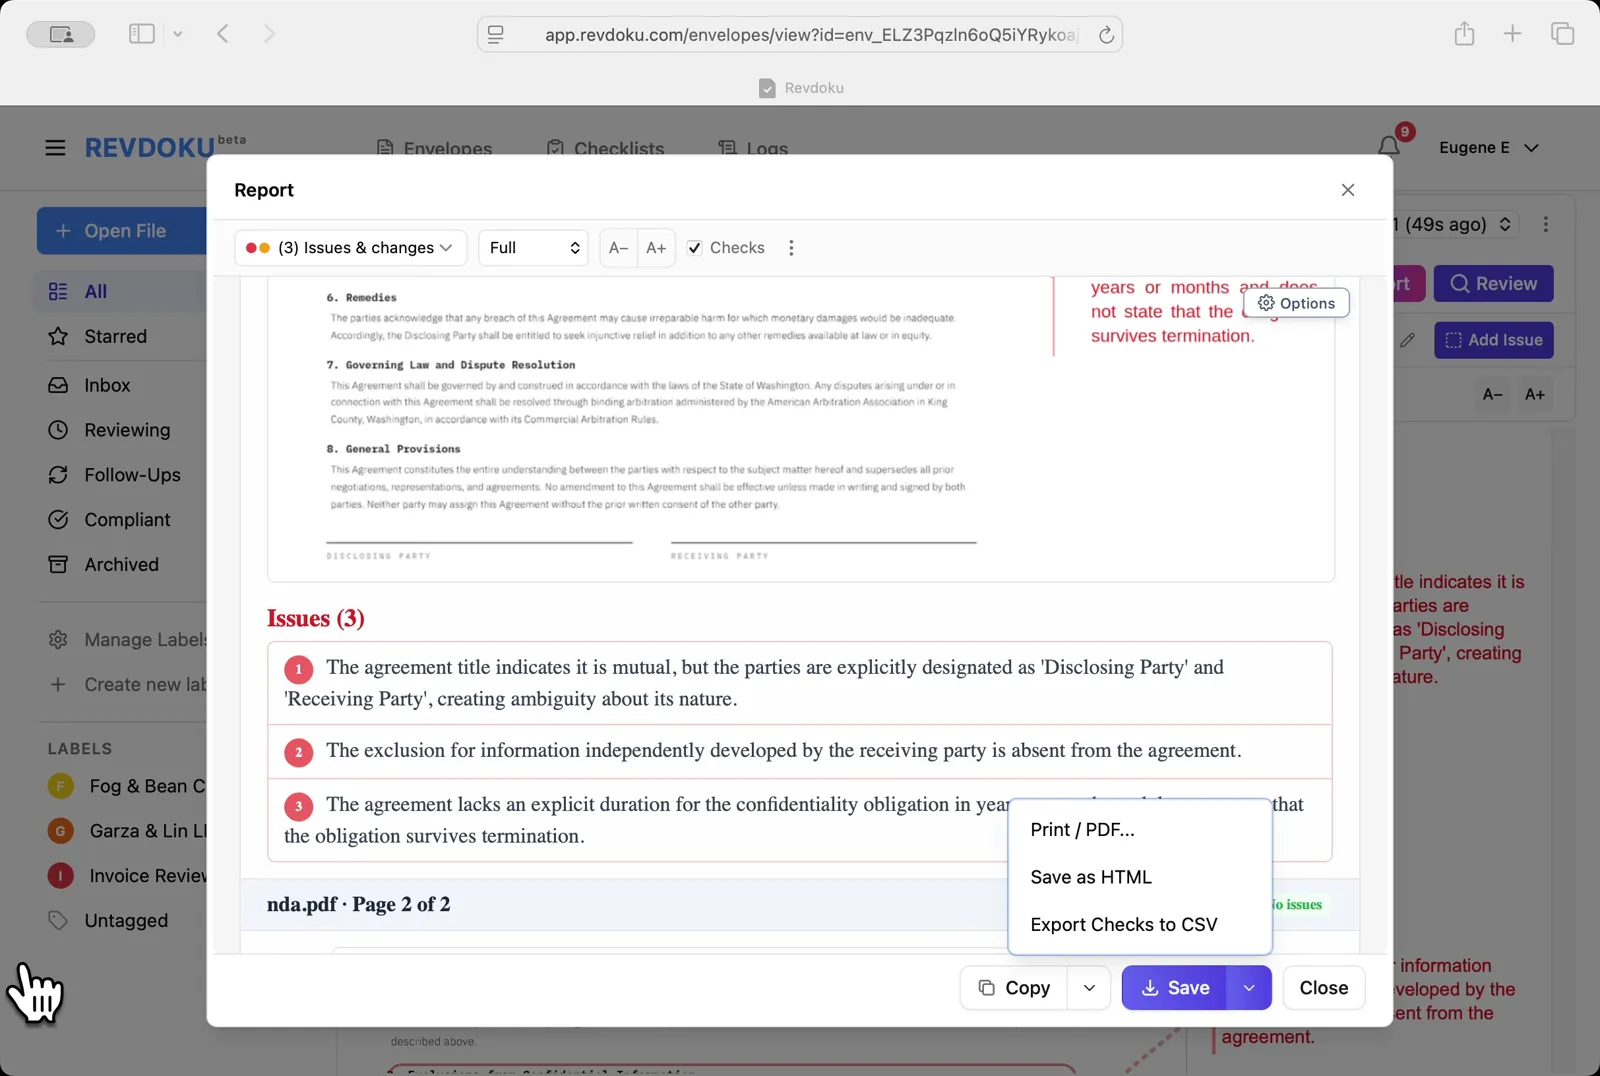
## Step 11: Save the report.
Save the report. The **Save** dropdown offers **Print / PDF**, **Save as HTML**, and **Export Checks to CSV**.
## Conclusion
In this tutorial it was demonstrated how to use Revdoku for reviewing a mutual NDA. The following steps were shown:
- Open the Envelopes inbox
- Upload the NDA
- Pick the NDA checklist
- Start the review
- Revdoku analyzes the NDA
- Read the issues on page 1
- See all issues at once
- Inspect the parties block
- Open the Report
- Read the issue list
- Save the report
---
## What You Learned
This case showed how Revdoku can take a document, apply a structured checklist, and surface specific findings. all in under a minute. No manual line-by-line reading required.
Cloud
Self-host (open-source)
More use cases
Disclosure: Sample documents in this use case were generated using AI and contain intentional errors for demonstration purposes. All names, companies, and details are fictional.
### Use Case: Review a Residential Lease
URL: https://revdoku.com/cases/lease-agreement-review/
Description: A residential lease checked for enforceability. Identifies missing payment methods, late-fee terms, deposit return conditions, and missing signature lines.
Published: 2026-04-11
Updated: 2026-04-14
Keywords: lease agreement, residential lease, lease review, real estate, legal, Revdoku
# Review a Residential Lease
This use case demonstrates how to review a residential lease. You will upload a lease PDF into Revdoku, attach the Lease Agreement Review checklist, run **Review** with Google Gemini, and read the issues, passes, and final report.
## Step 1: Open the Envelopes inbox.
Open the Envelopes inbox. The inbox lists every document available for review.
## Step 2: Open the lease.
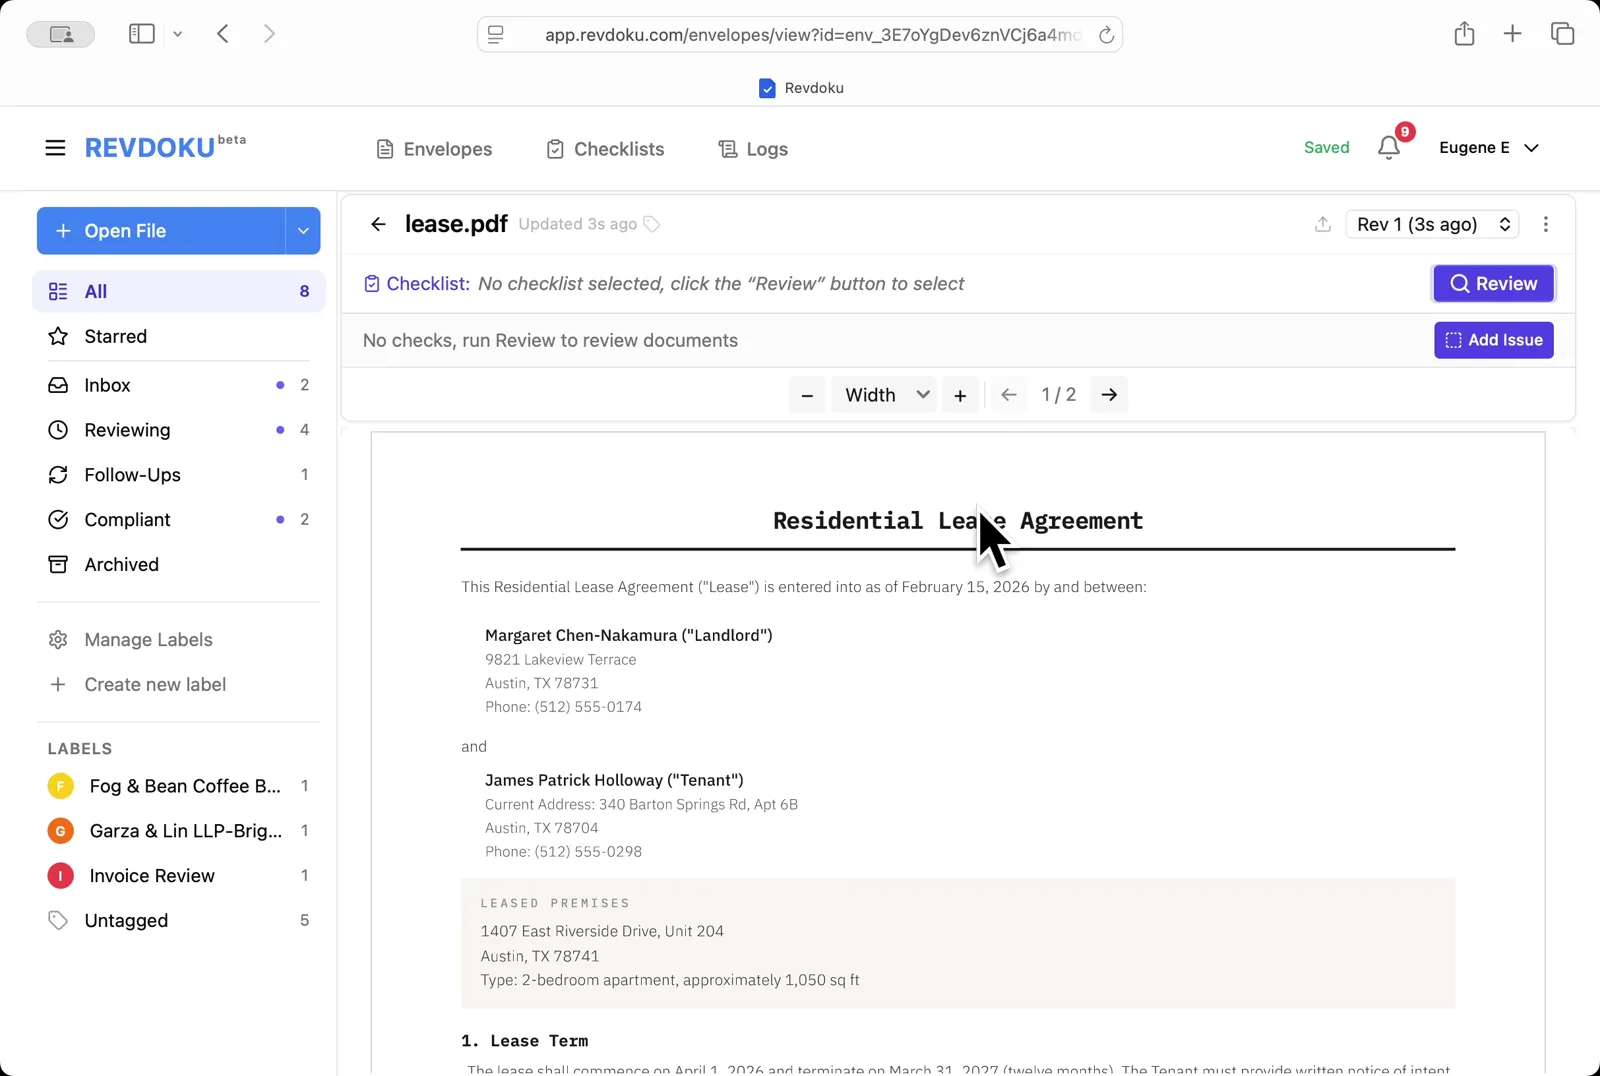
Open the lease. **lease.pdf** opens in the viewer. a 2-page Residential Lease Agreement between landlord Margaret Chen-Nakamura and tenant James Patrick Holloway.
## Step 3: Pick the checklist.
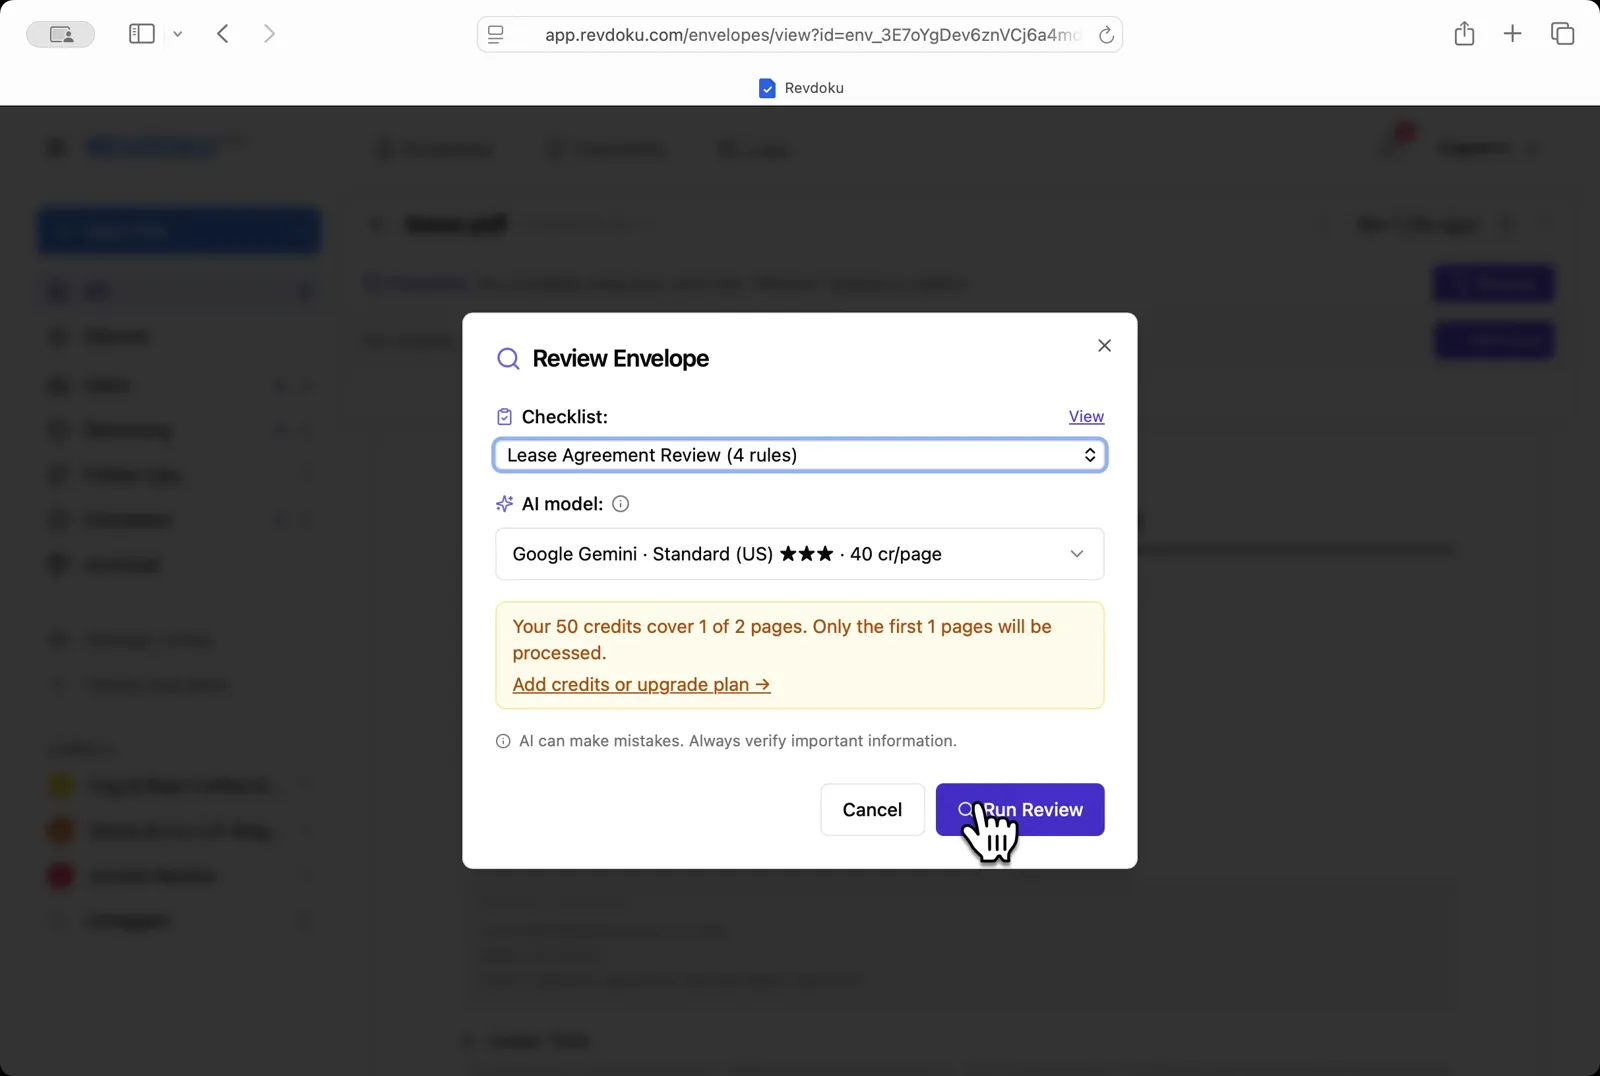
Pick the checklist. In the **Review Envelope** dialog choose **Lease Agreement Review (4 rules)** with **Google Gemini · Standard (US)**, then click **Run Review**.
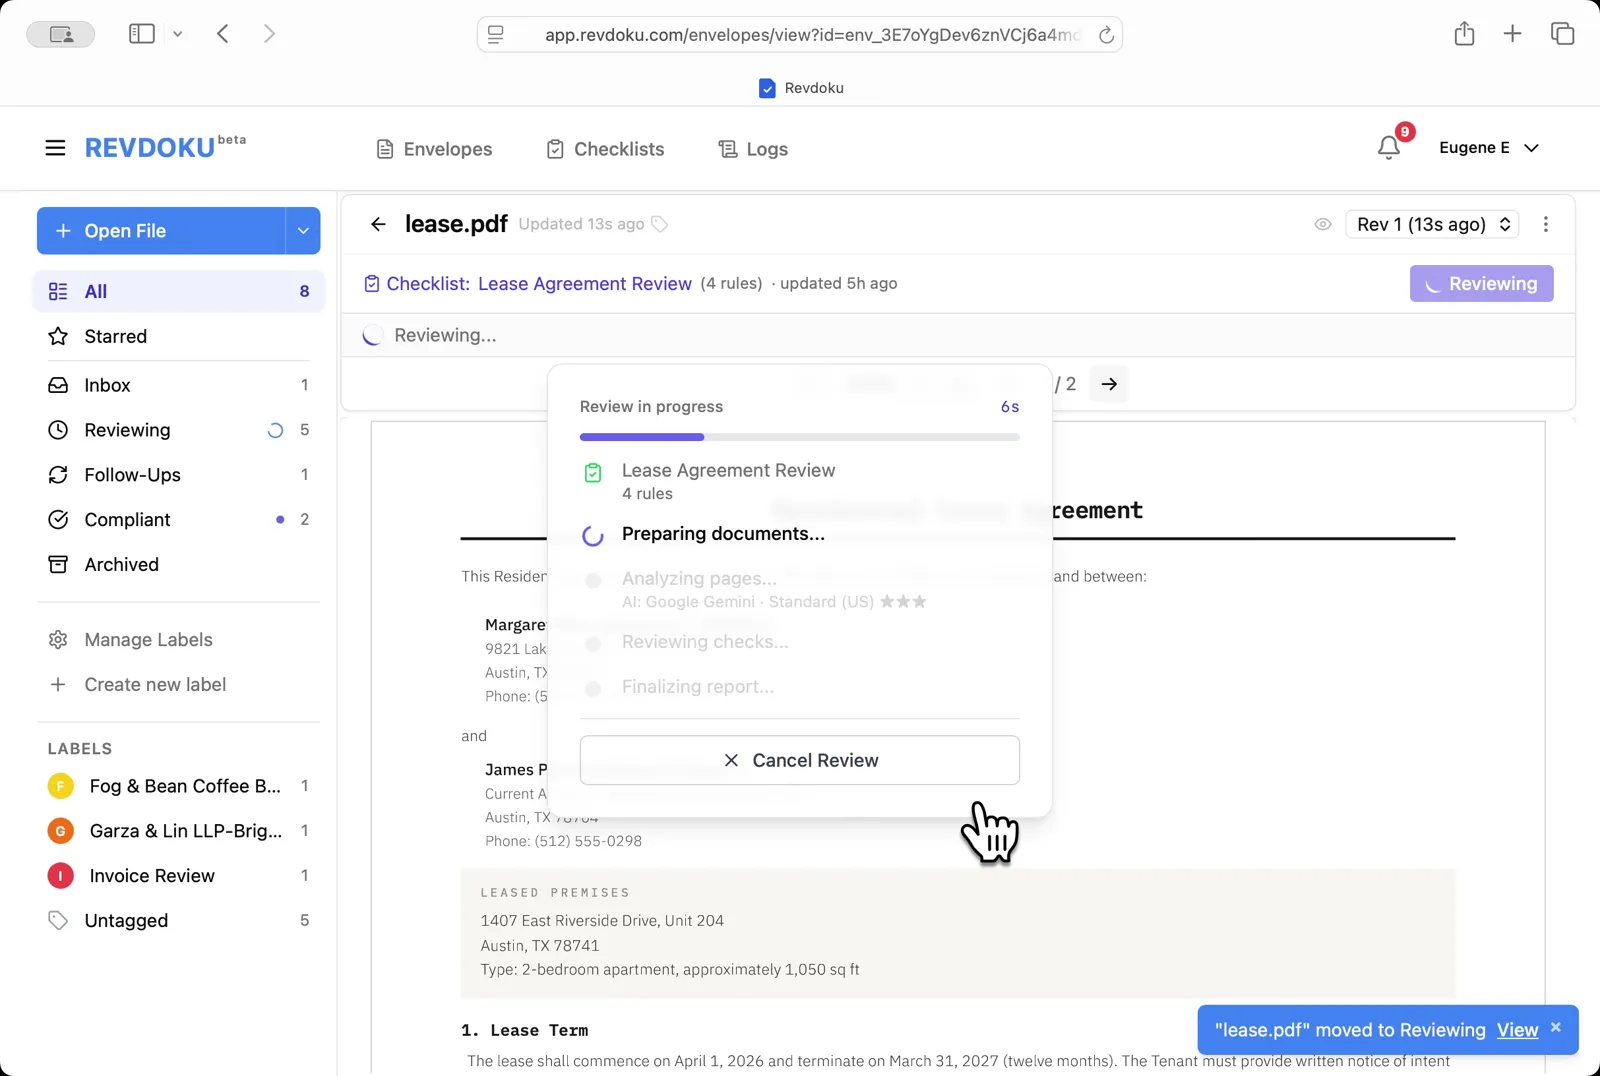
## Step 4: Start the review.
Start the review. Revdoku begins with the *Preparing documents* step.
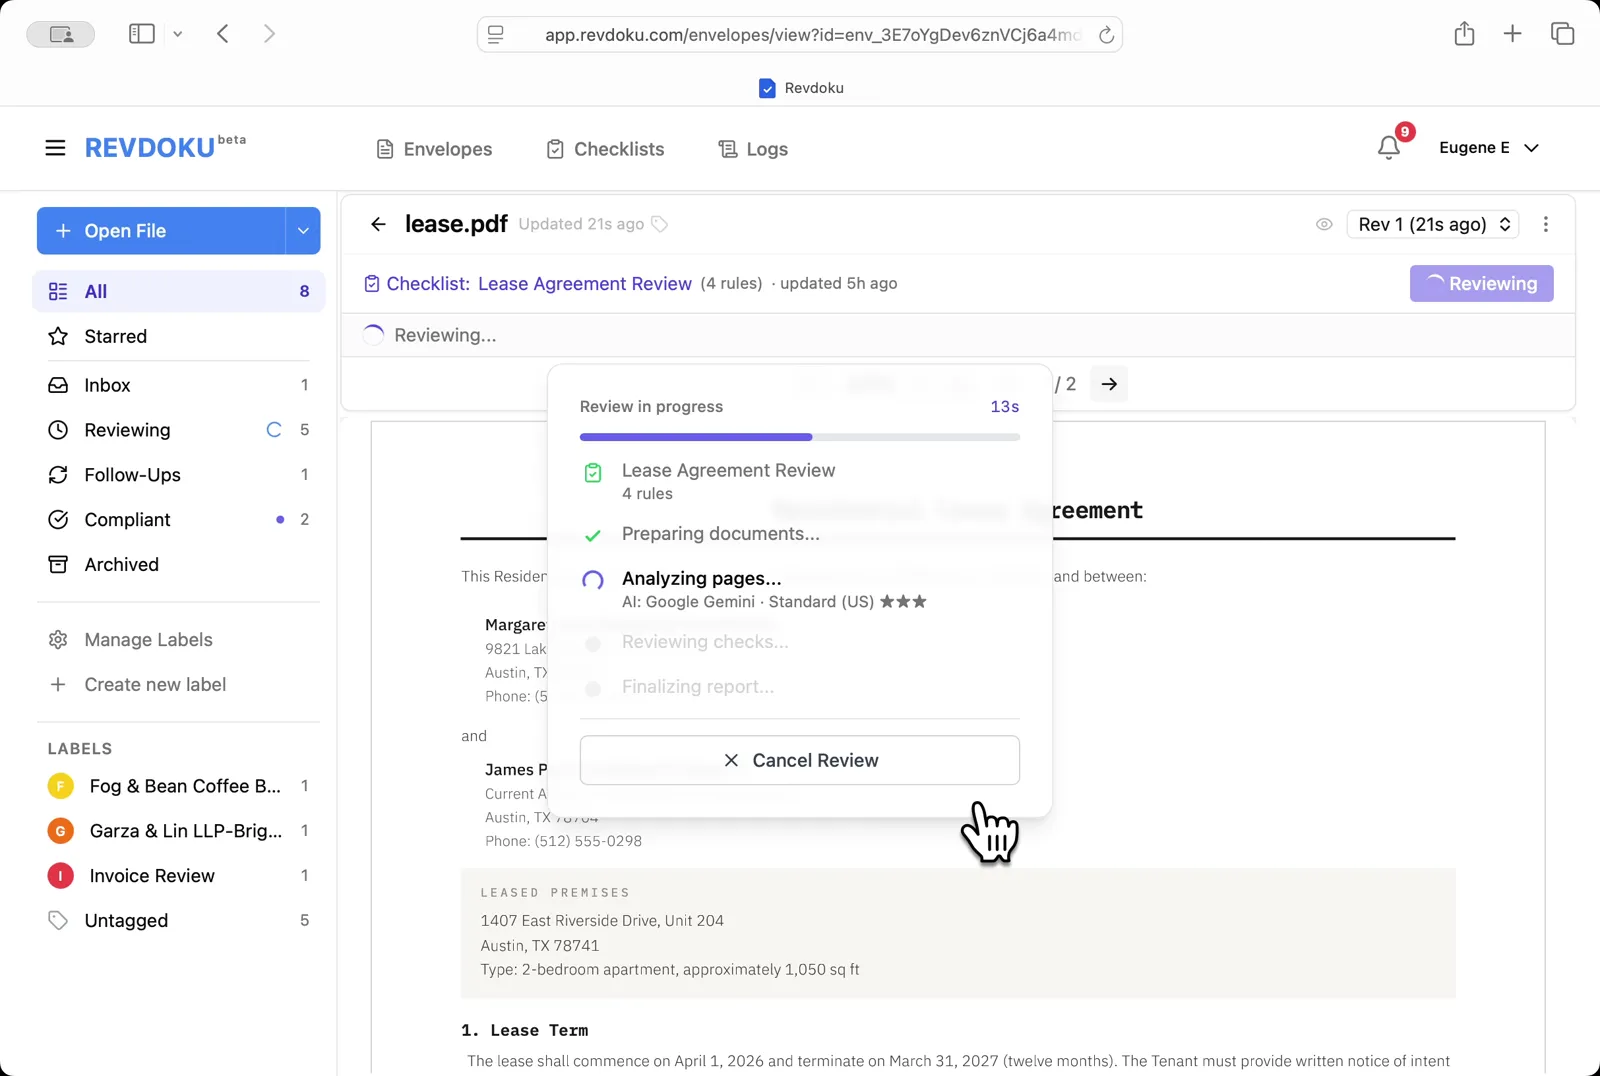
## Step 5: Revdoku analyzes the pages.
Revdoku analyzes the pages. It extracts the page text and runs each of the four checks against it.
## Step 6: The checks finish running.
The checks finish running. Revdoku writes the report and matches each finding to a place on the page.
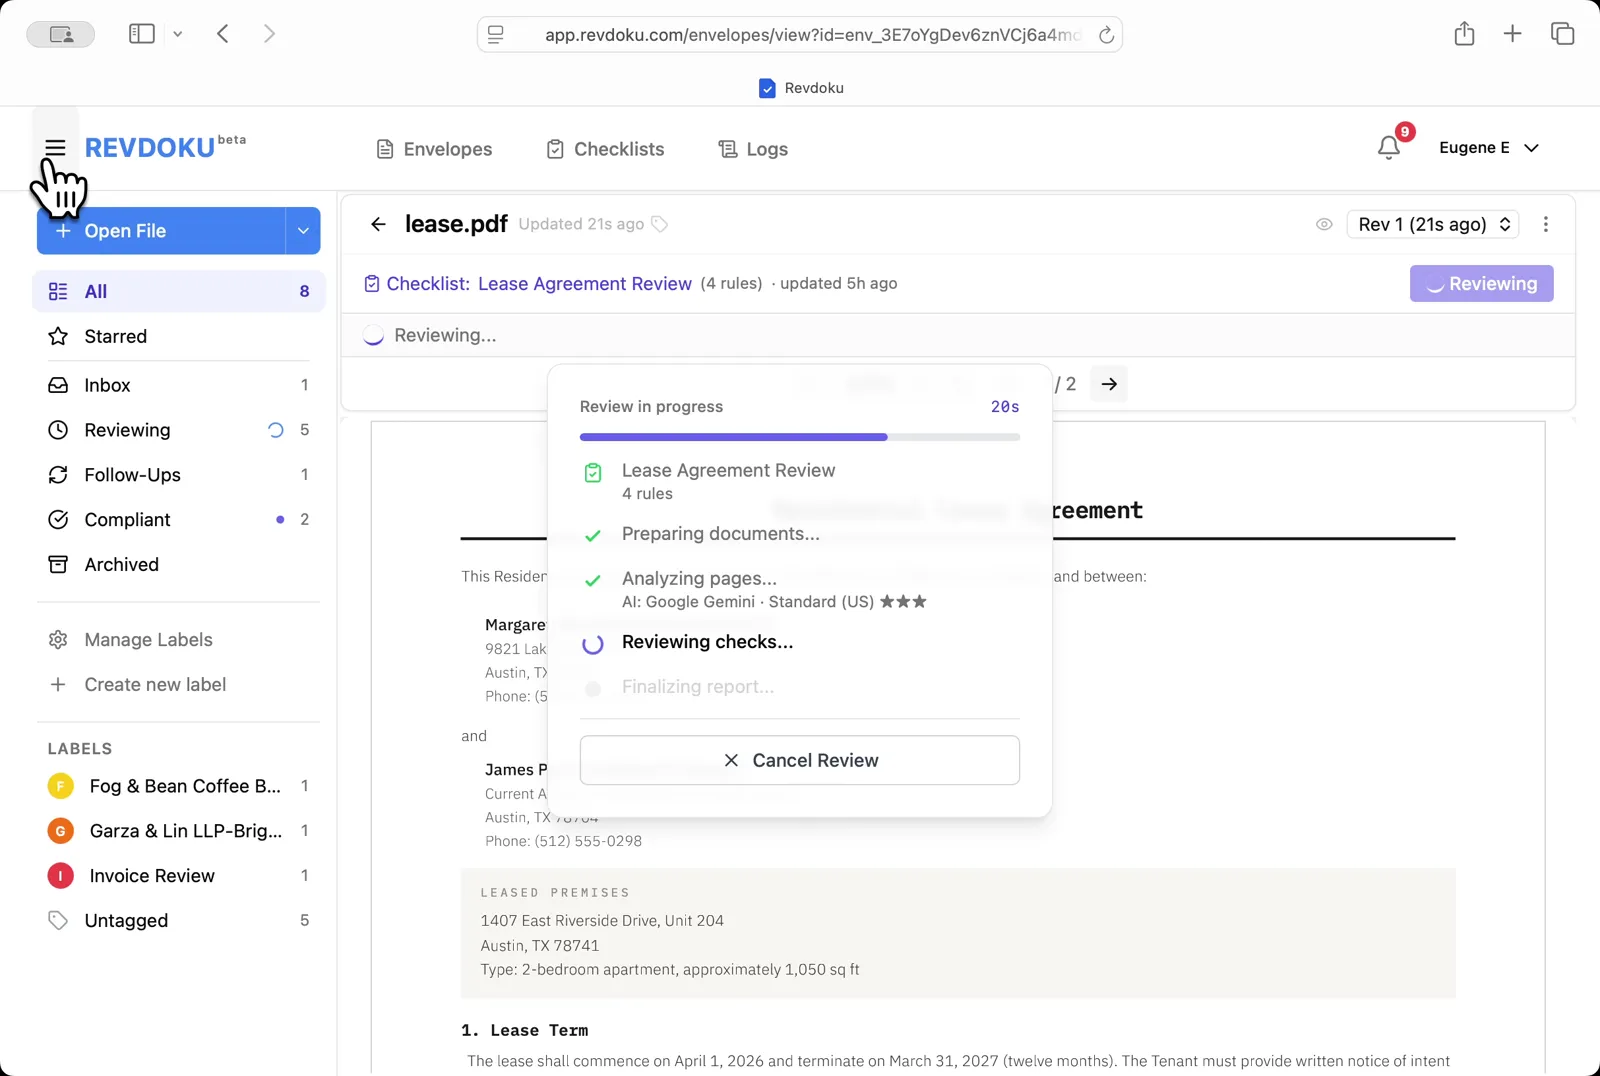
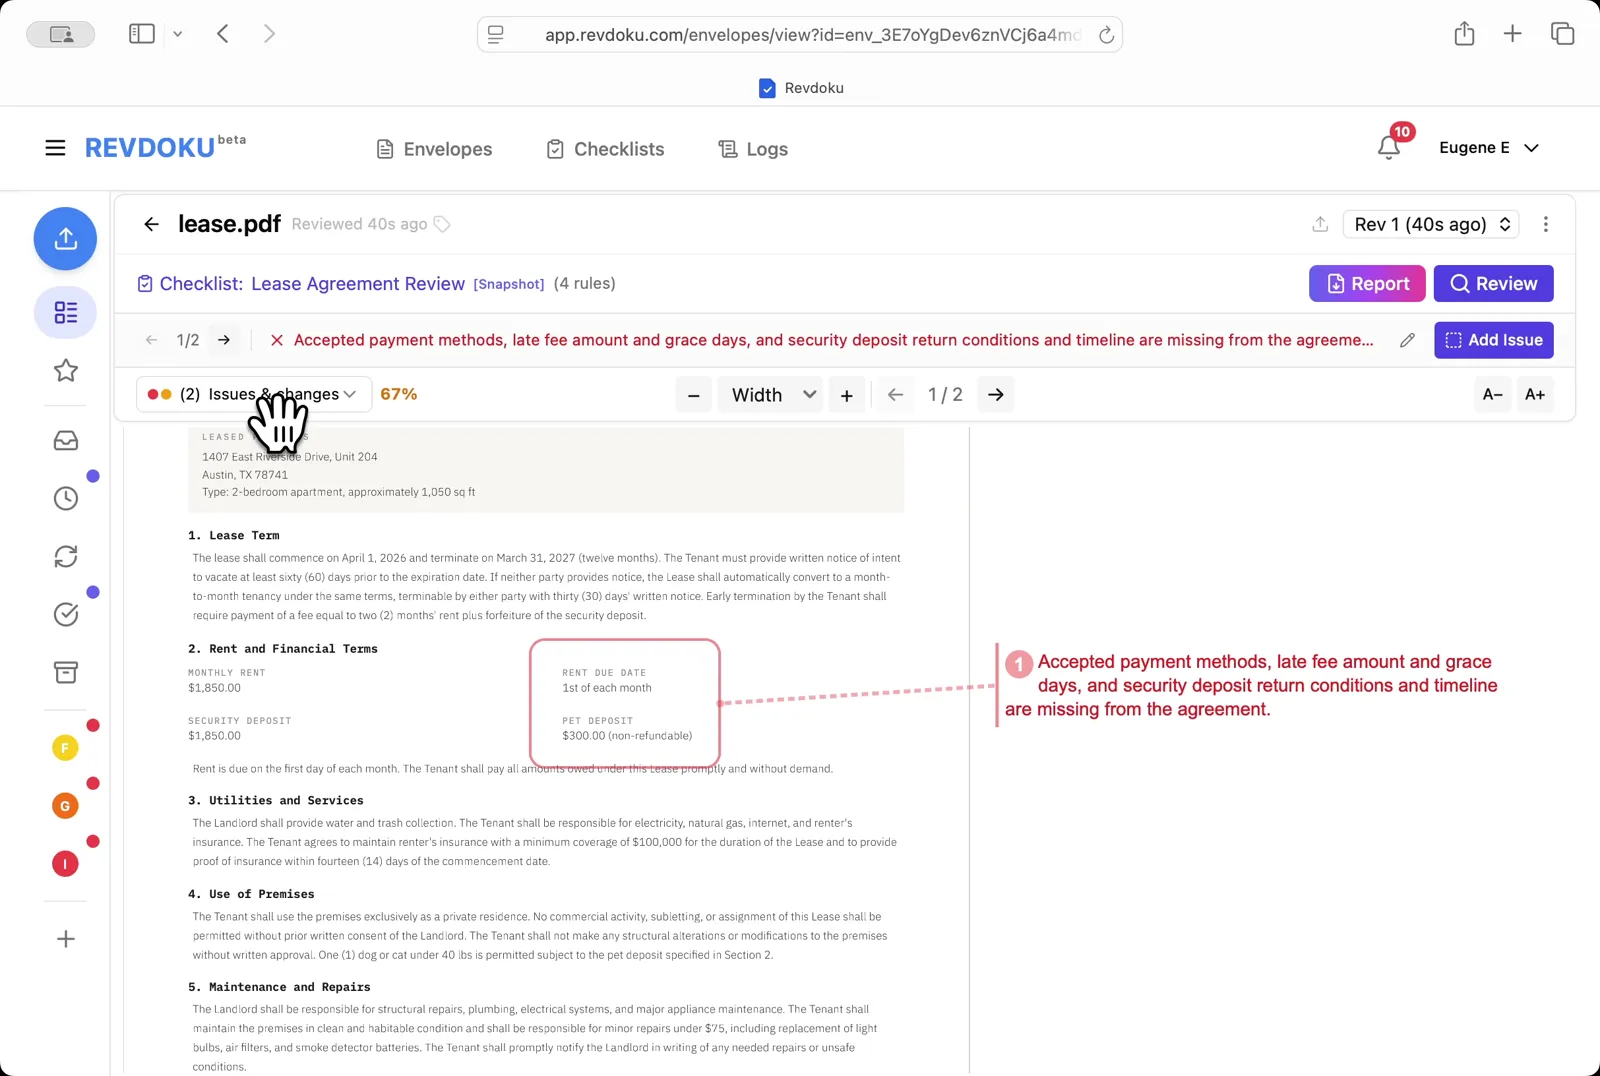
## Step 7: Read the page-1 issue.
Read the page-1 issue. The red banner flags missing payment methods, missing late-fee amount and grace period, and missing security-deposit return conditions. all connected to the **Rent and Financial Terms** block.
## Step 8: Filter to passed checks.
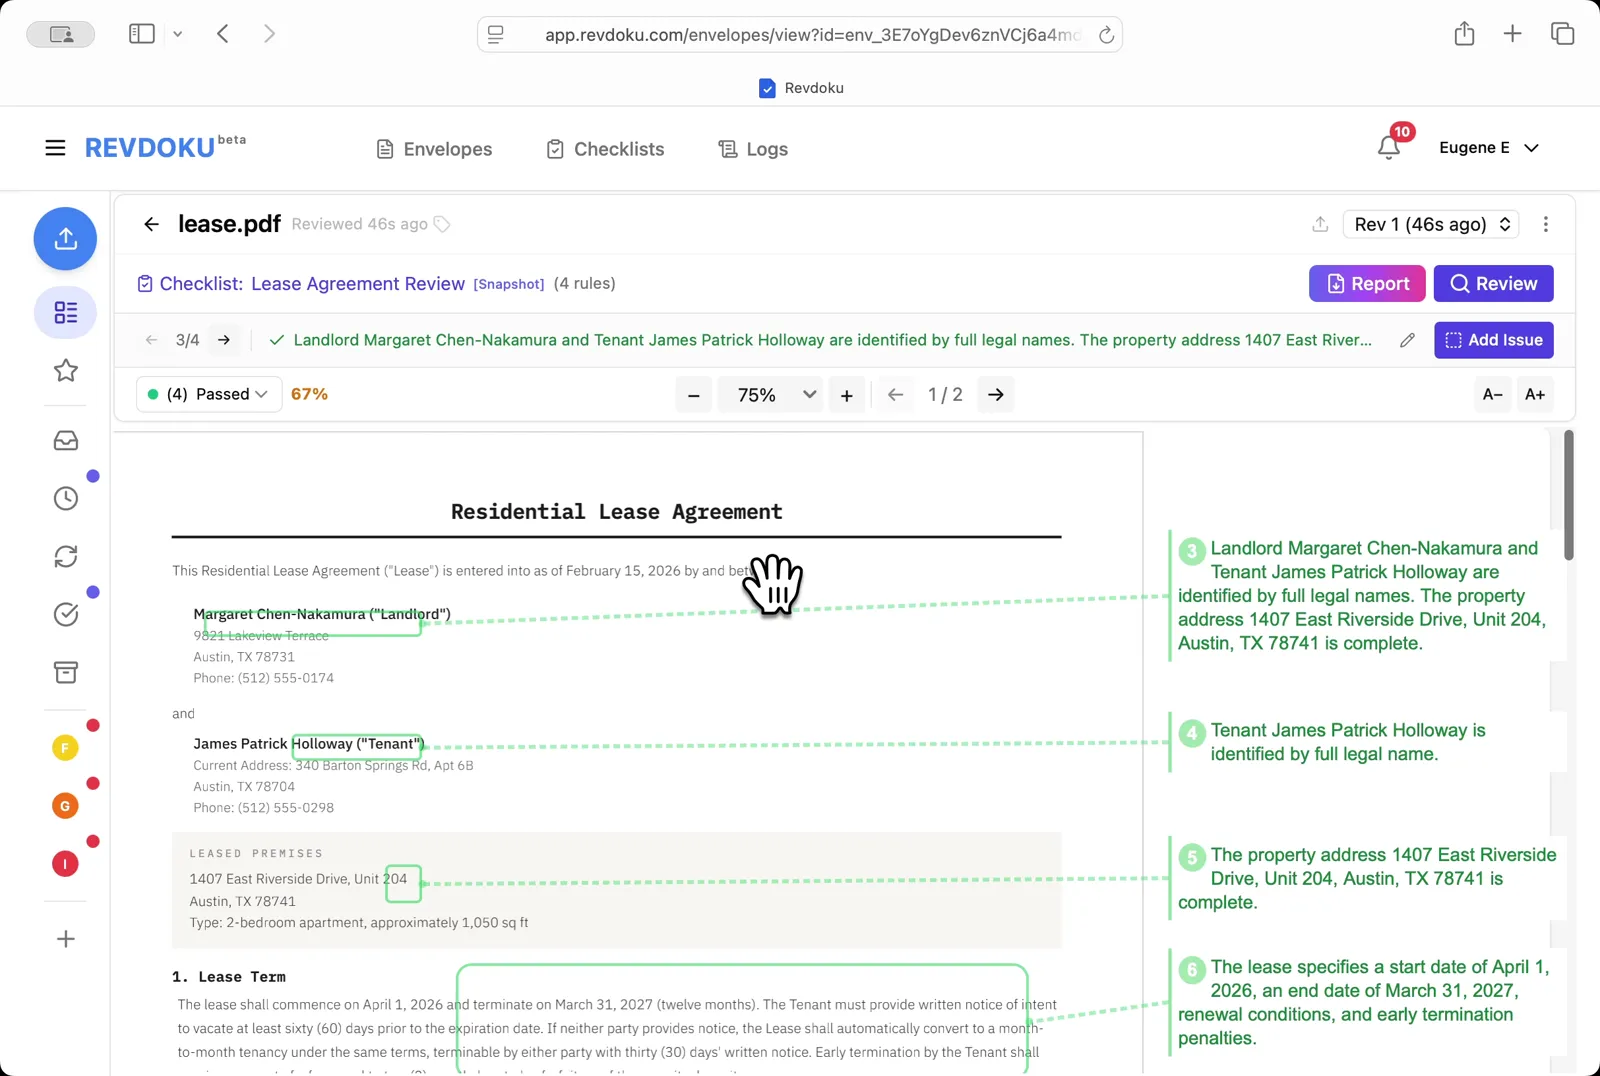
Filter to passed checks. Pick **Passed** to see what the lease got right. both parties are identified by full legal names, the property address is complete, and the lease term, renewal, and early-termination penalties are defined.
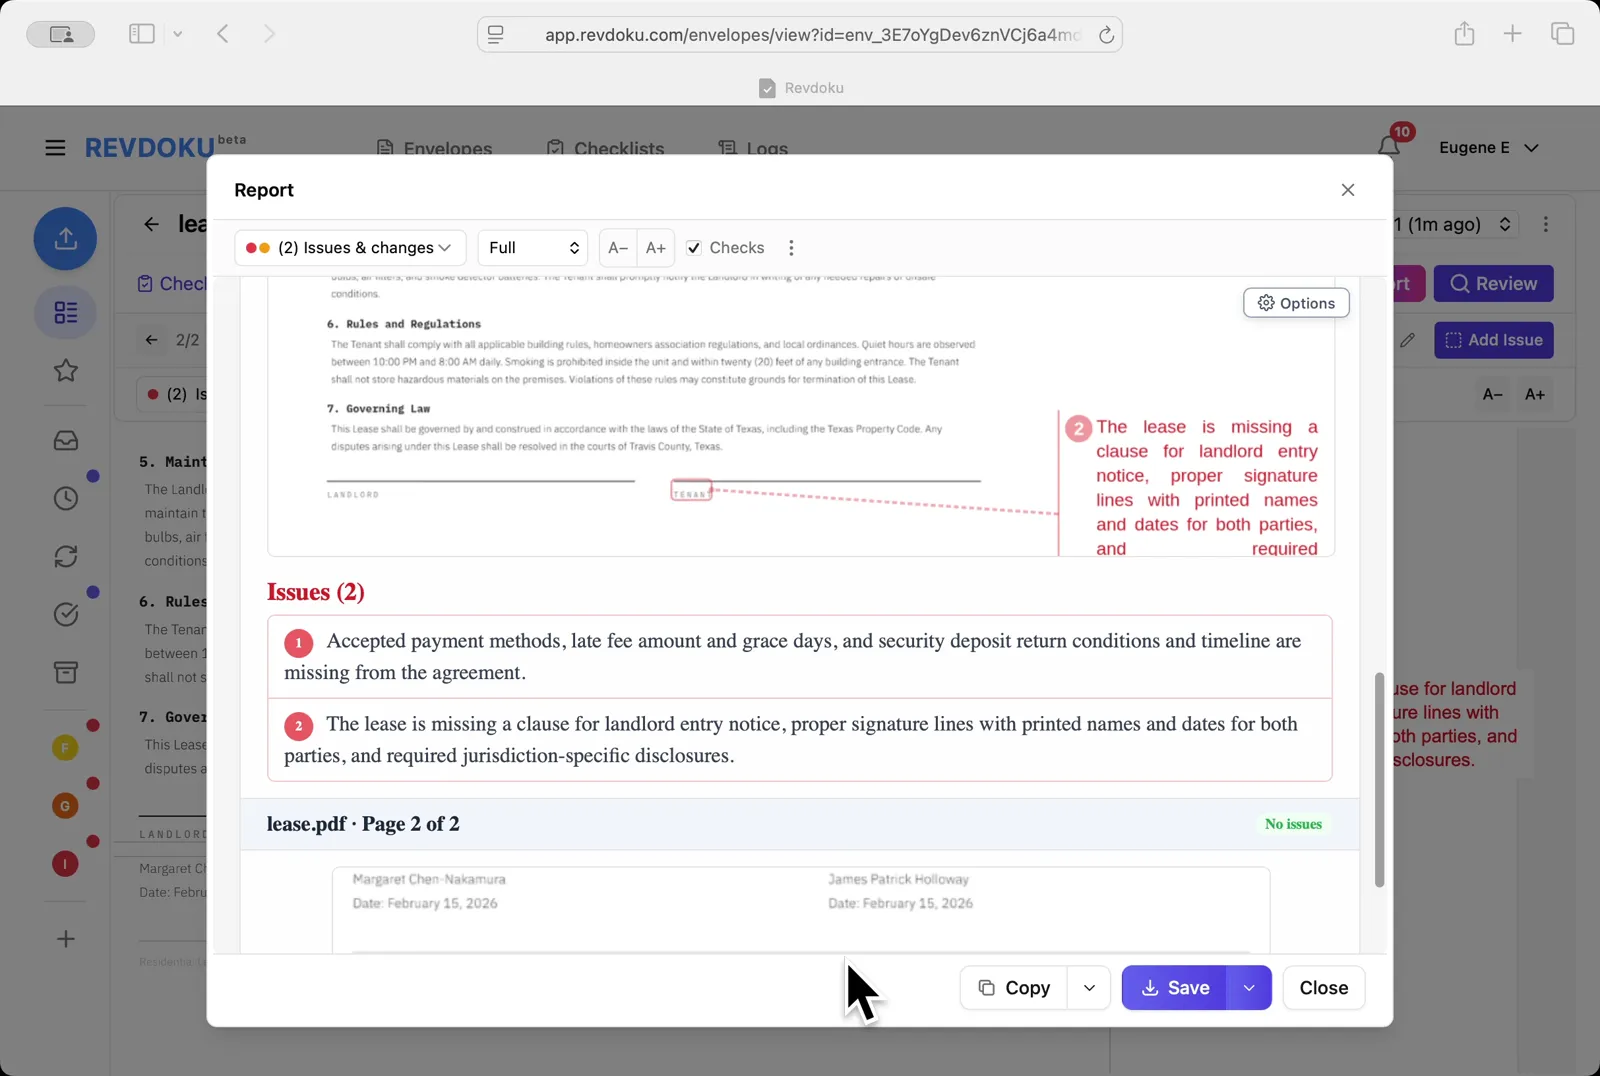
## Step 9: Read the page-2 issue.
Read the page-2 issue. A second failure is surfaced: the lease is missing a landlord-entry-notice clause plus required signature lines.

## Step 10: Open the Report.
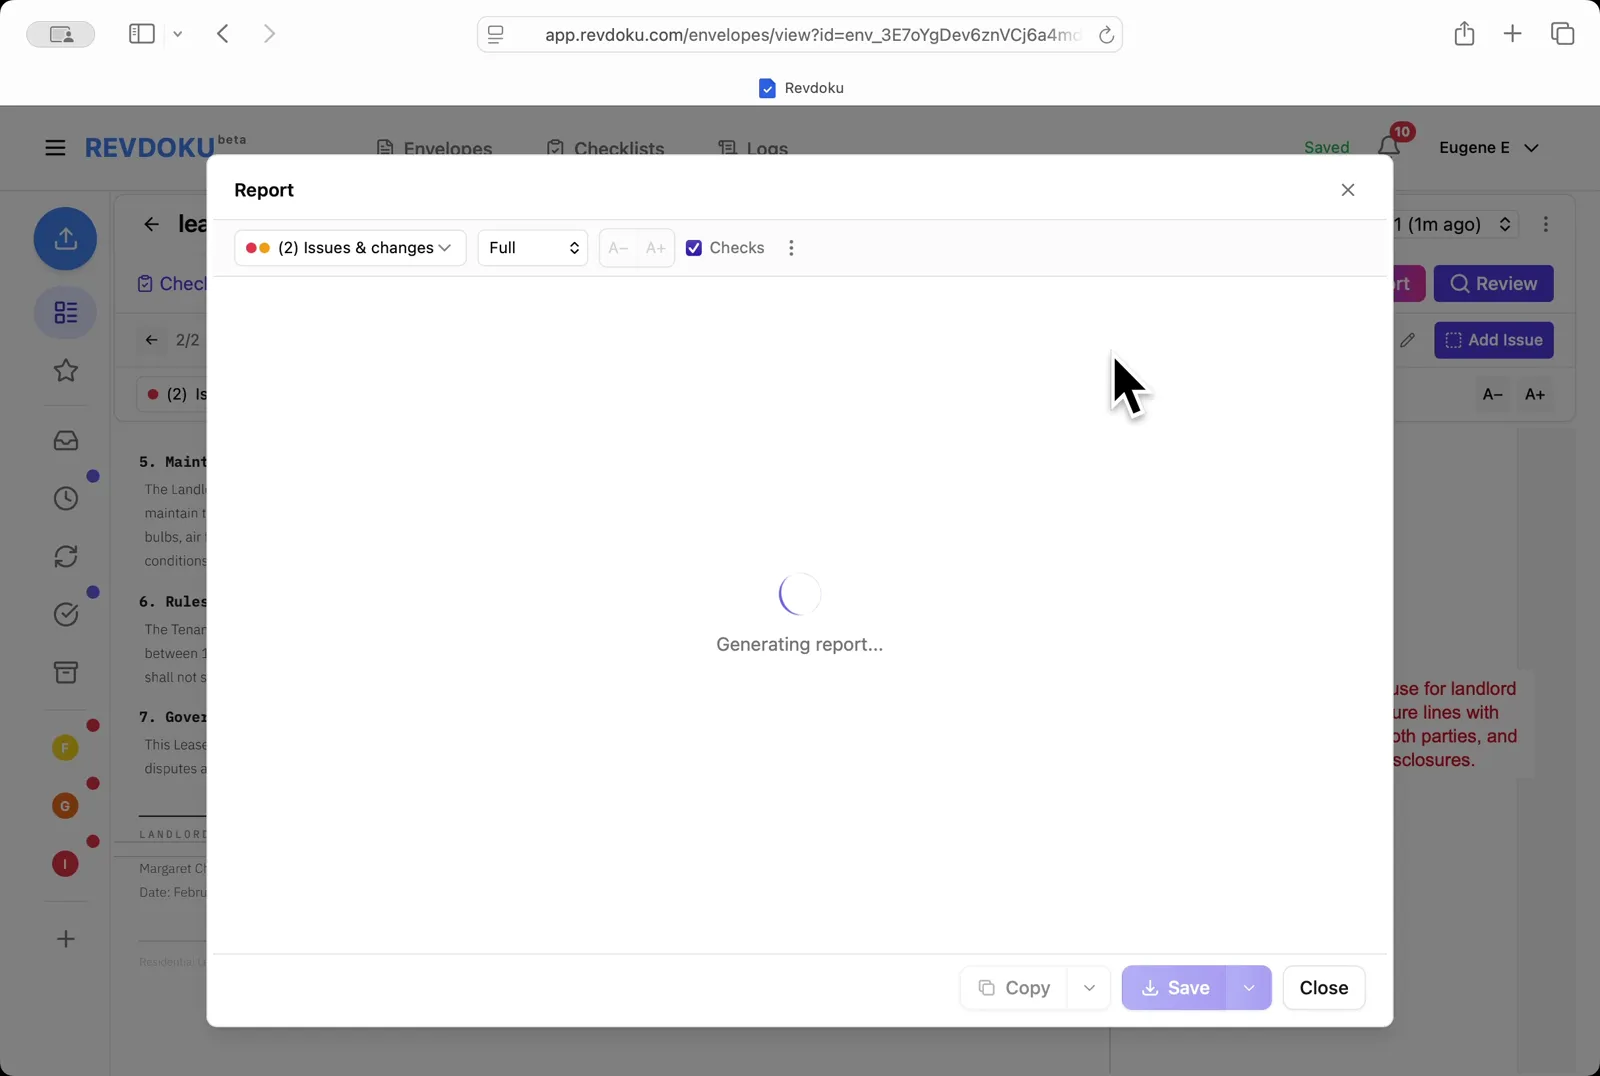
Open the Report. Pick **Issues & changes / Full / Checks** and Revdoku generates the annotated report.
## Step 11: Save the report.
Save the report. Page 2 shows both annotated issues and the **Issues (2)** section lists them; use **Copy** or **Save** to export.
## Conclusion
In this tutorial it was demonstrated how to use Revdoku for reviewing a residential lease. The following steps were shown:
- Open the Envelopes inbox
- Open the lease
- Pick the checklist
- Start the review
- Revdoku analyzes the pages
- The checks finish running
- Read the page-1 issue
- Filter to passed checks
- Read the page-2 issue
- Open the Report
- Save the report
---
## What You Learned
This case showed how Revdoku can take a document, apply a structured checklist, and surface specific findings. all in under a minute. No manual line-by-line reading required.
Cloud
Self-host (open-source)
More use cases
Disclosure: Sample documents in this use case were generated using AI and contain intentional errors for demonstration purposes. All names, companies, and details are fictional.
### Use Case: Review And Get Data from a Hand-Drawn Chart
URL: https://revdoku.com/cases/chart-data-extraction/
Description: Extracts data points from a hand-drawn Dog's Weight line chart using AI. Custom script deduplicates and sorts 6 monthly weight measurements.
Published: 2026-04-11
Updated: 2026-04-14
Keywords: chart data extraction, hand-drawn chart, data extraction, image to data, Revdoku
# Extract Data from a Hand-Drawn Chart
This use case demonstrates how to extract data from a hand-drawn chart. You will upload a chart image into Revdoku, run an AI checklist to read every data point, then use a built-in script to deduplicate and list the extracted values.
## Step 1: Open the Envelopes inbox.
Open the Envelopes inbox. The inbox lists the documents available for review.
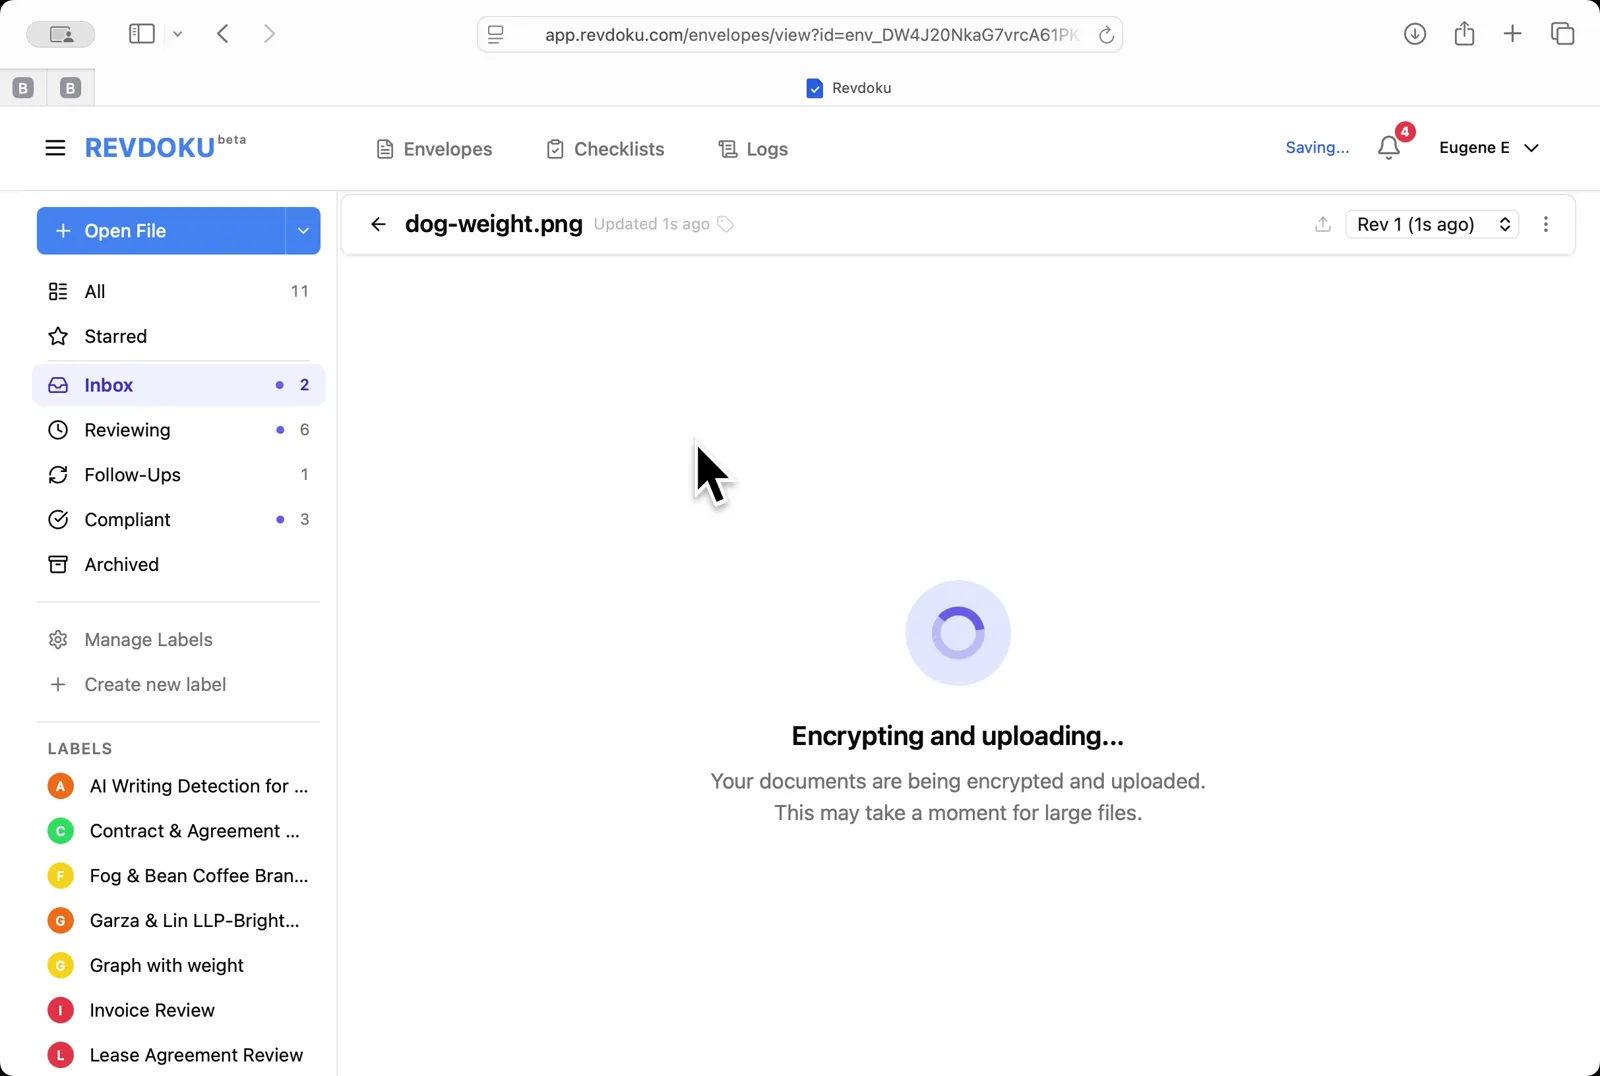
## Step 2: Upload the chart.
Upload the chart. Click **Open File** and pick **dog-weight.png**; Revdoku encrypts and uploads the image.
## Step 3: Open the chart.
Open the chart. The viewer shows a hand-drawn **Dog's Weight** line chart with monthly points from January to August.

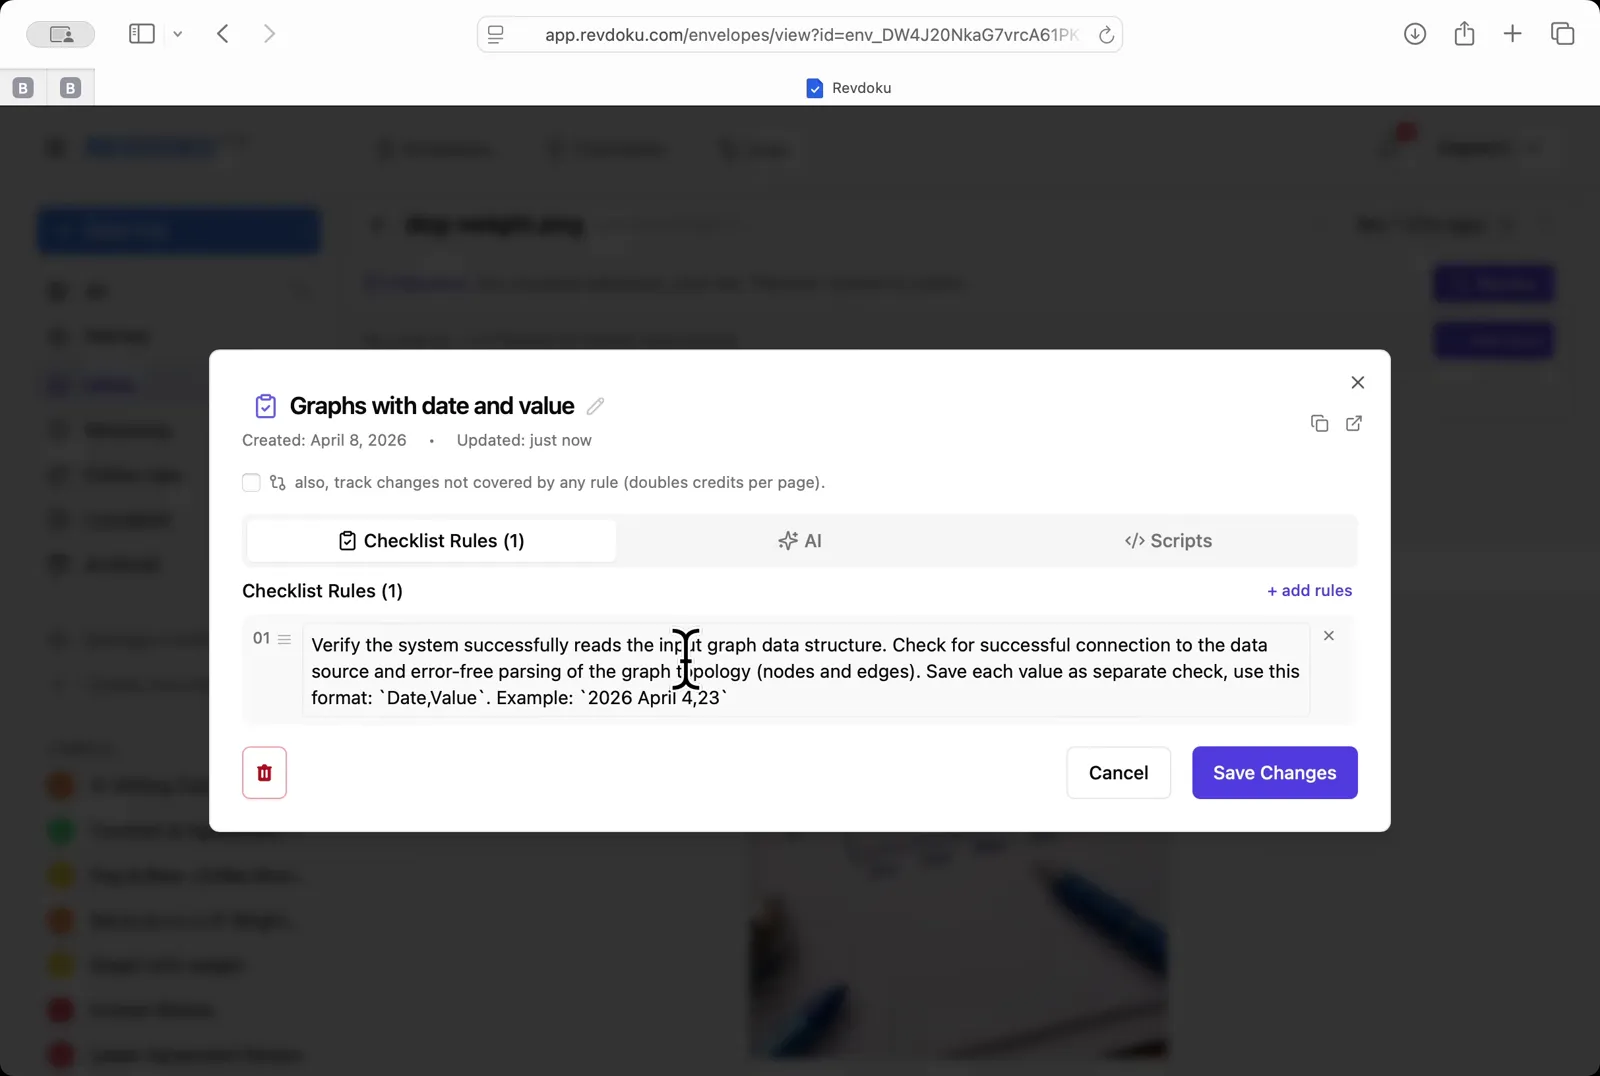
## Step 4: Pick the chart-reading checklist.
Pick the chart-reading checklist. Choose **Graphs with date and value**. a one-rule checklist that asks the AI to extract every *Date, Value* pair.
## Step 5: Run the review.
Run the review. Click **Review** and Revdoku analyzes the page with Google Gemini and runs the rule.
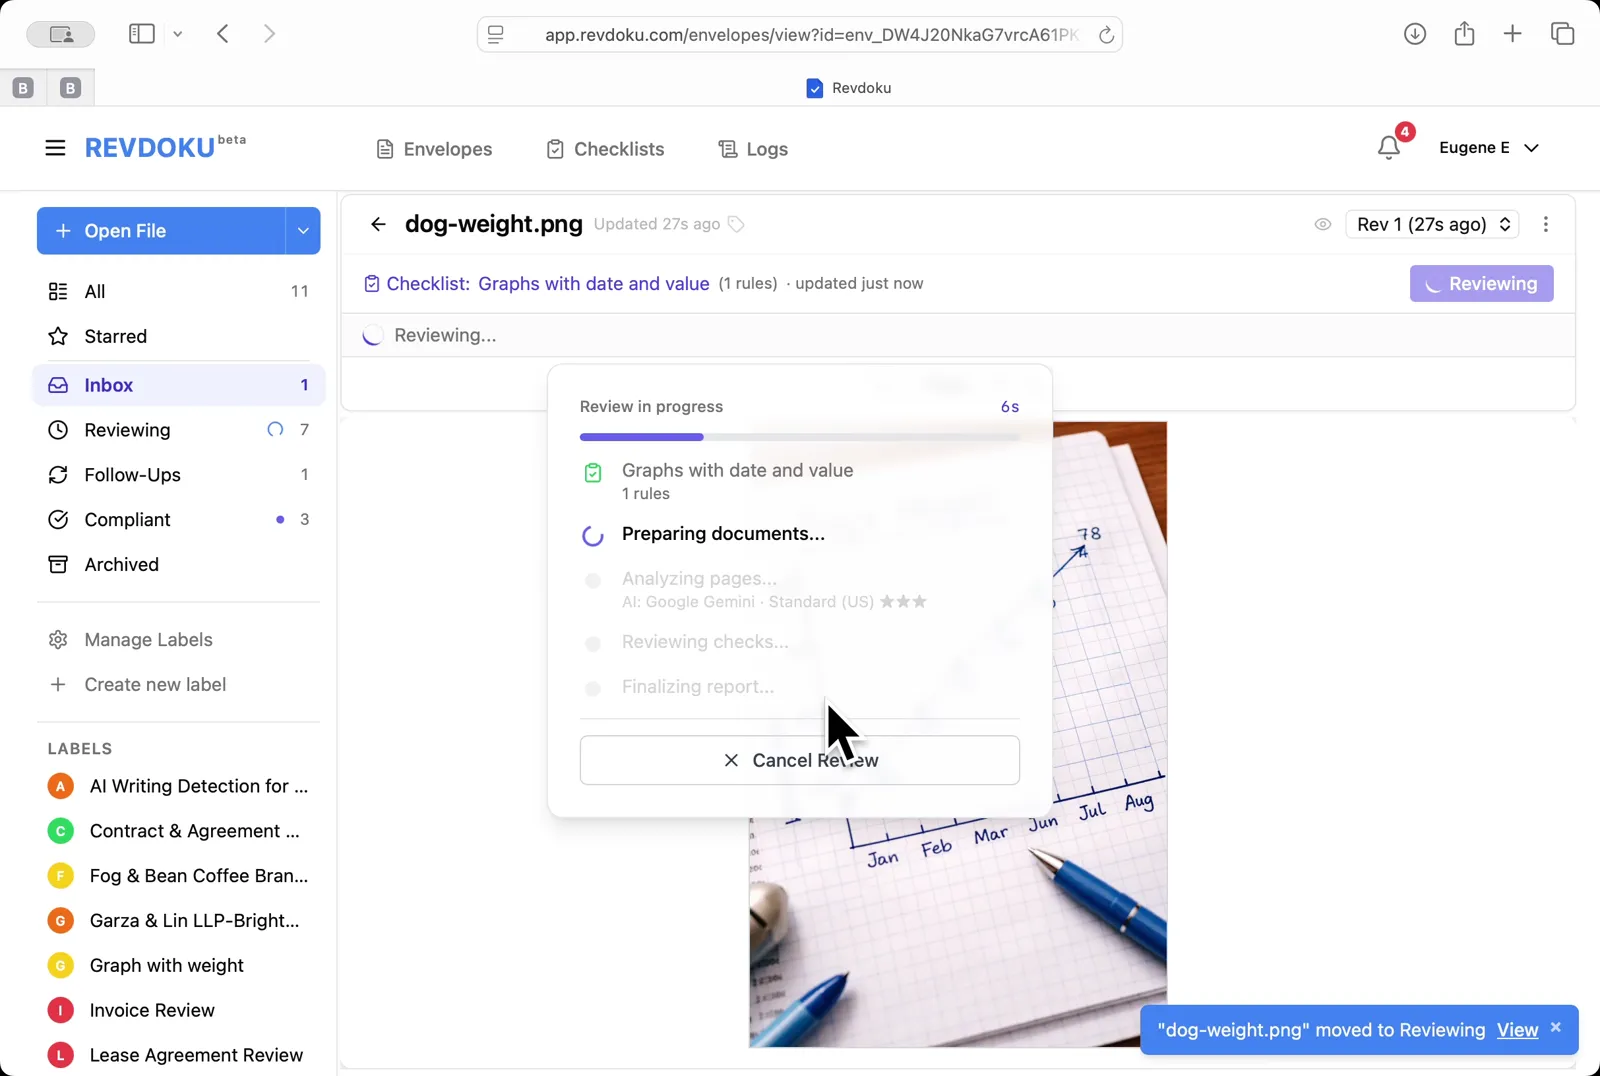
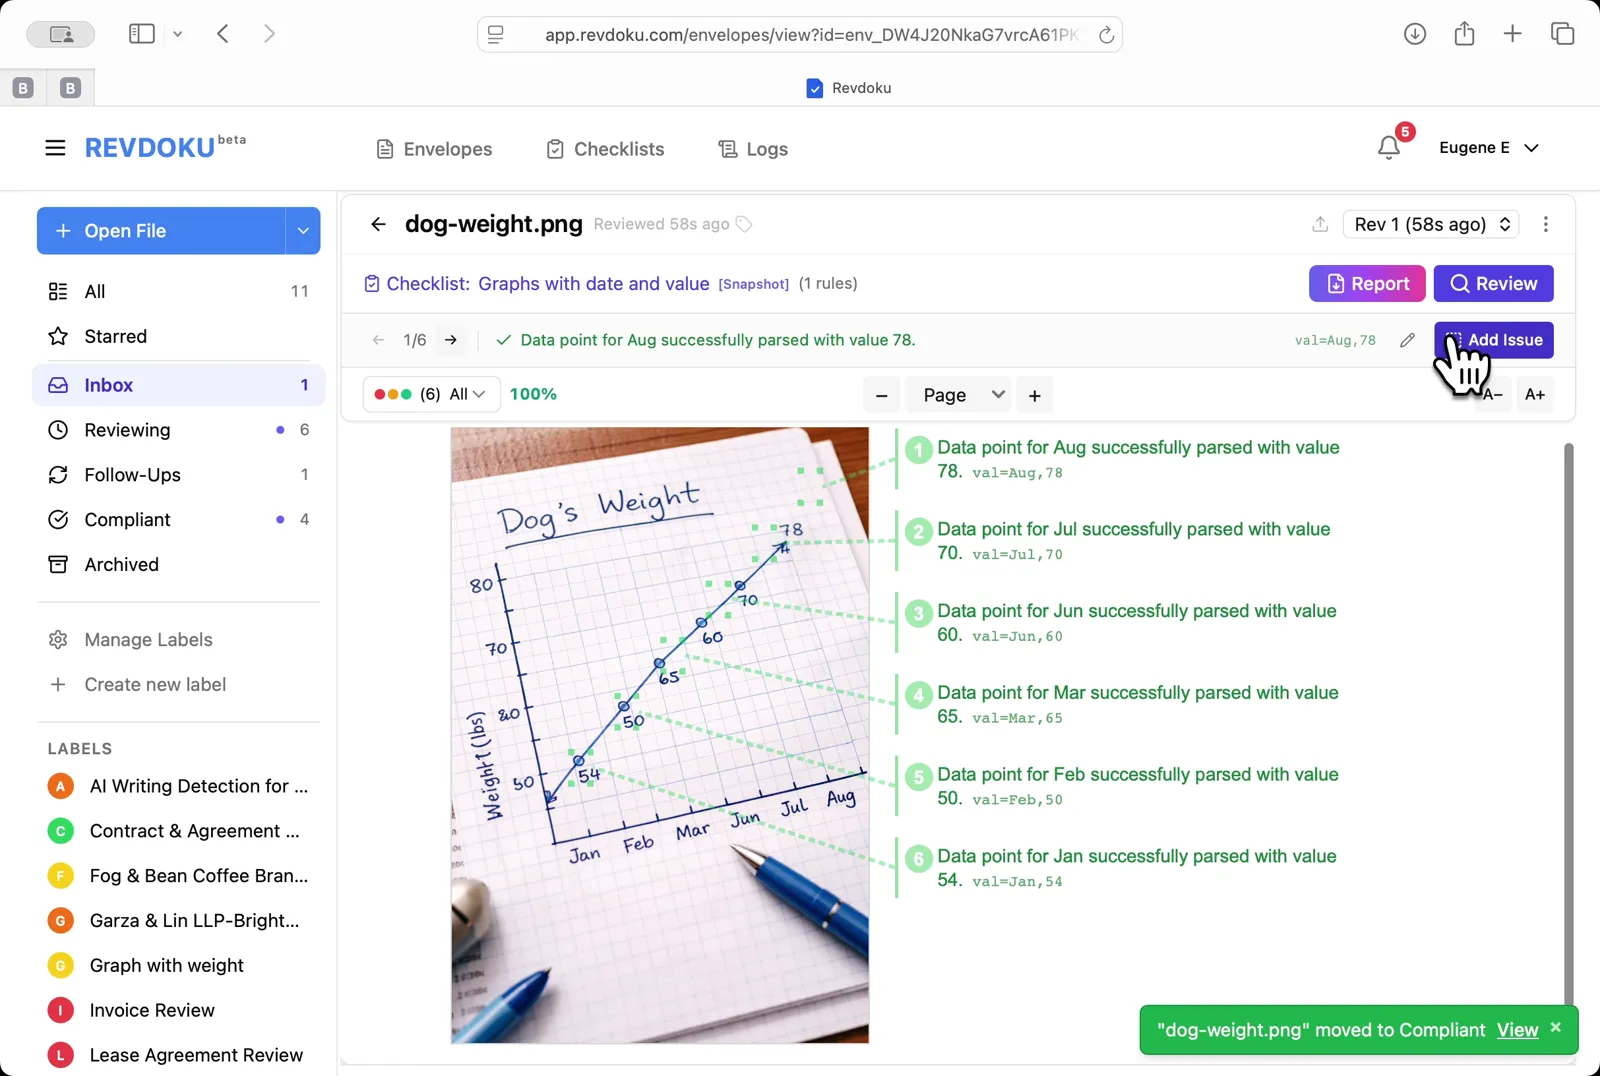
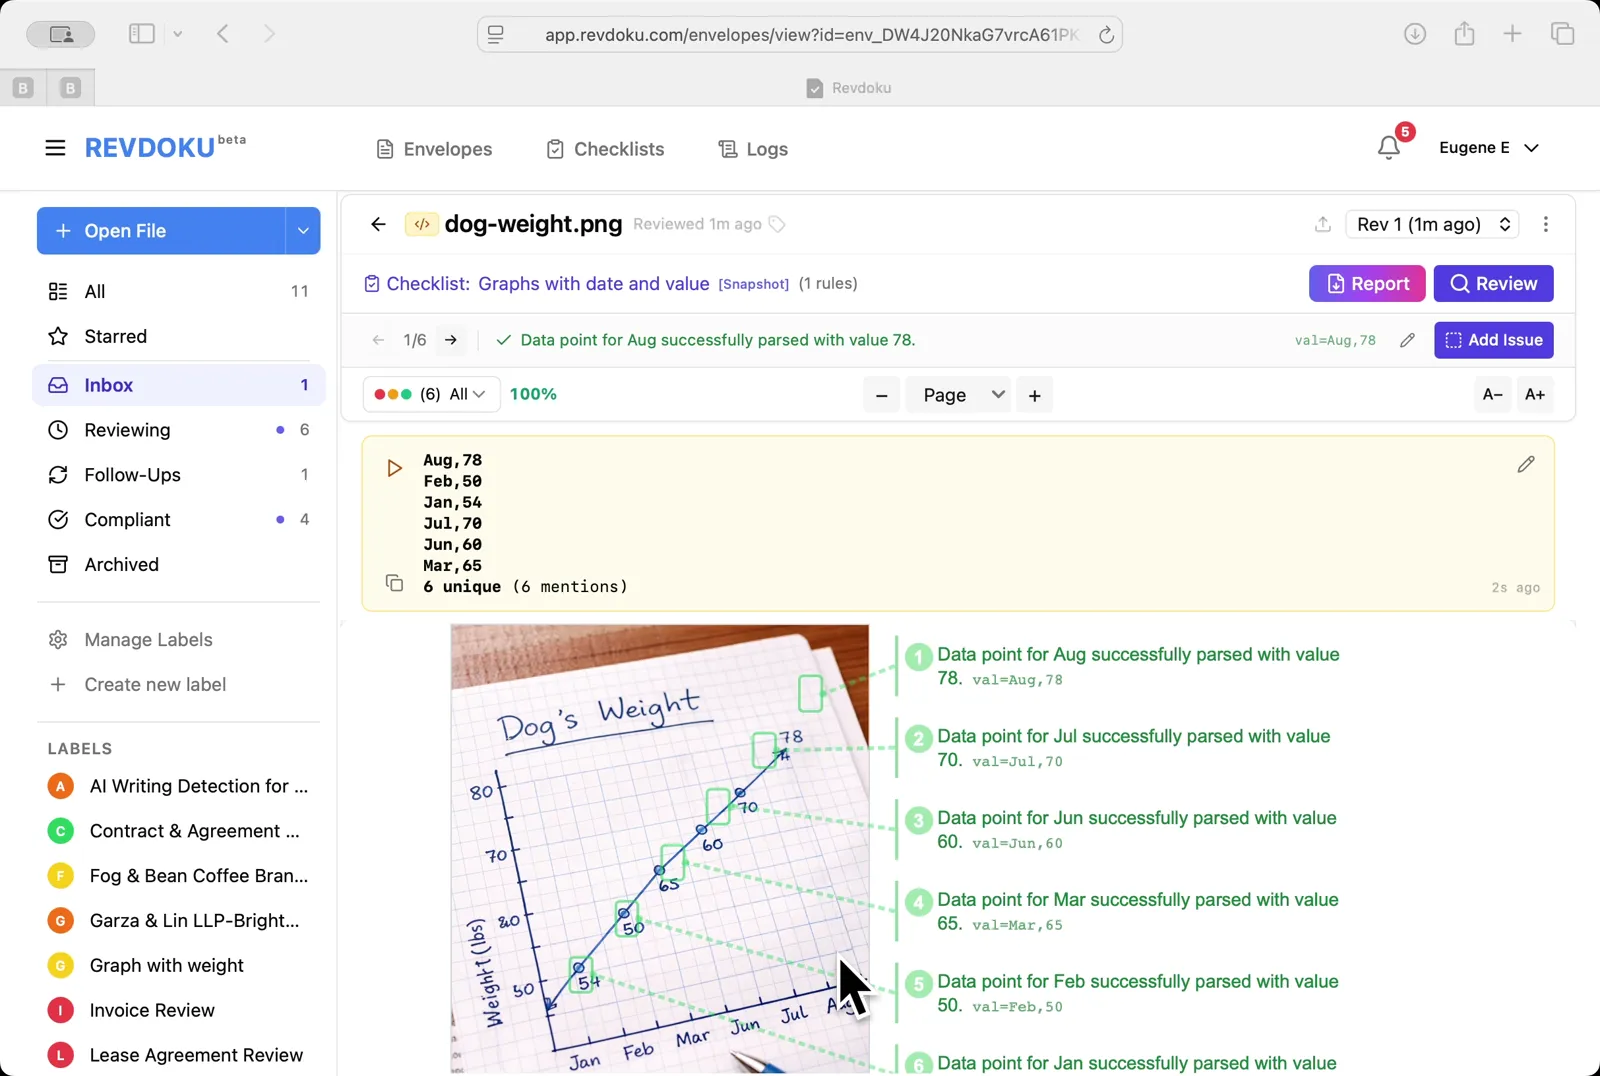
## Step 6: Read the extracted points.
Read the extracted points. Every monthly point is annotated on the right with its parsed value, for example *val:Aug,78*.
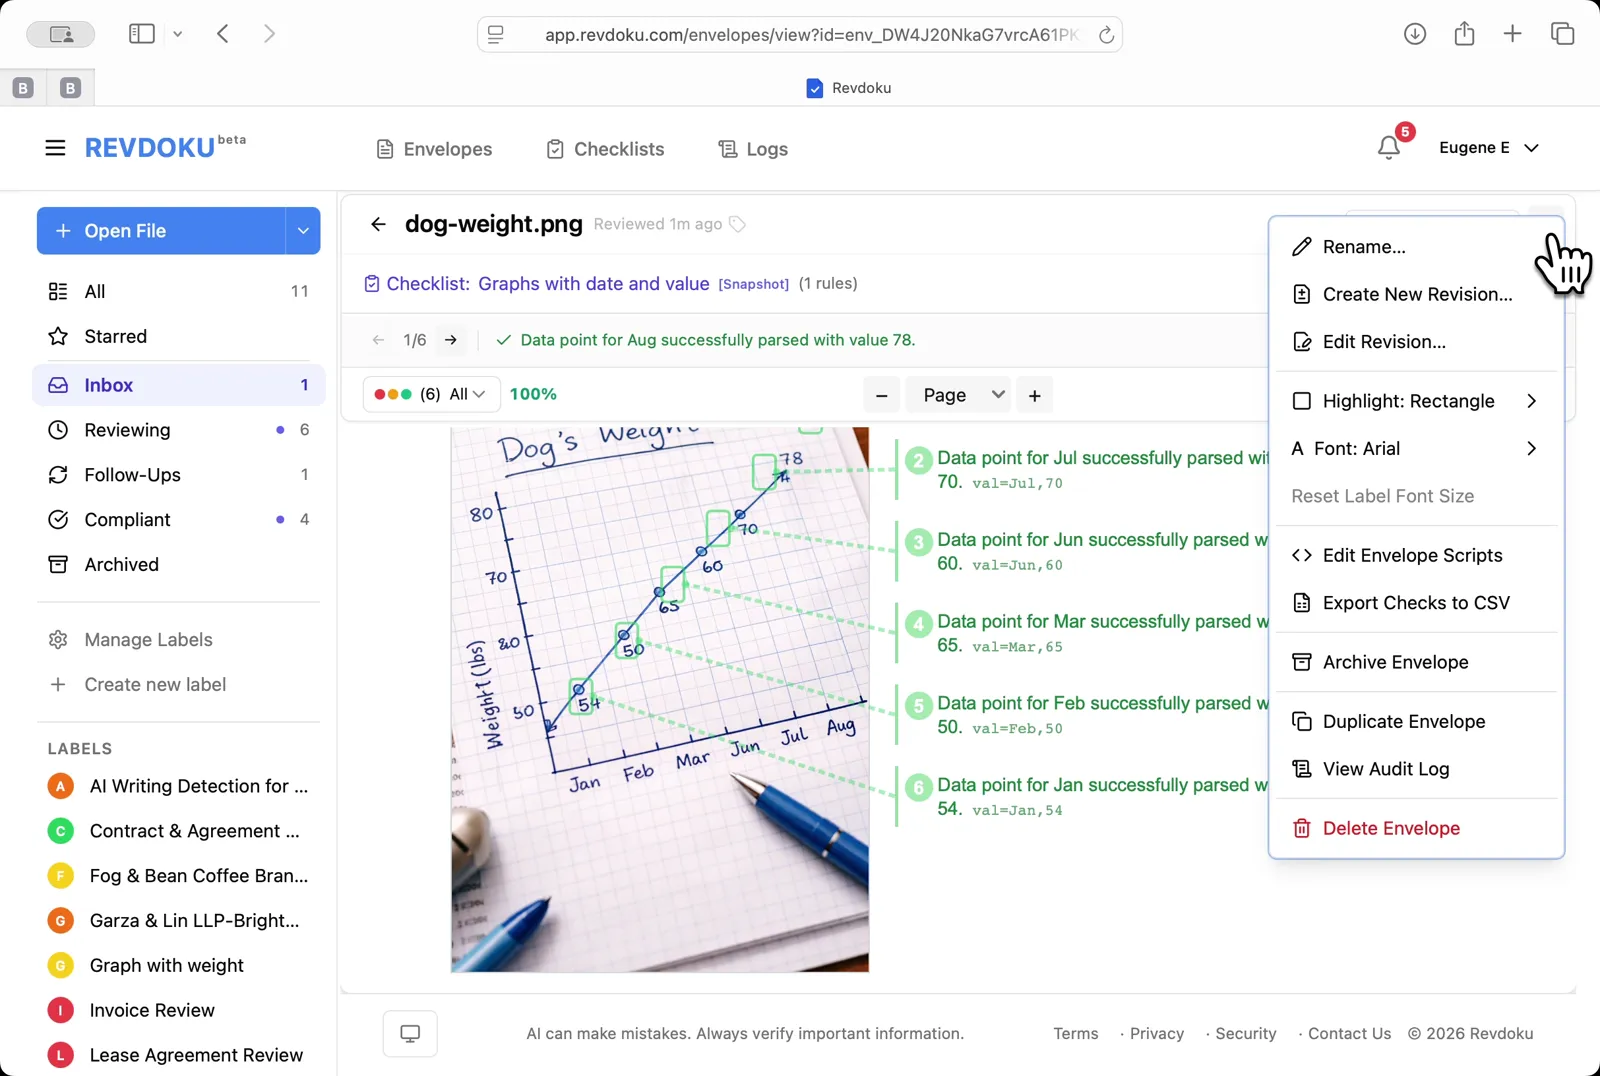
## Step 7: Open the envelope menu.
Open the envelope menu. Pick **Edit Envelope Scripts** to add a script that rolls up the extracted values.
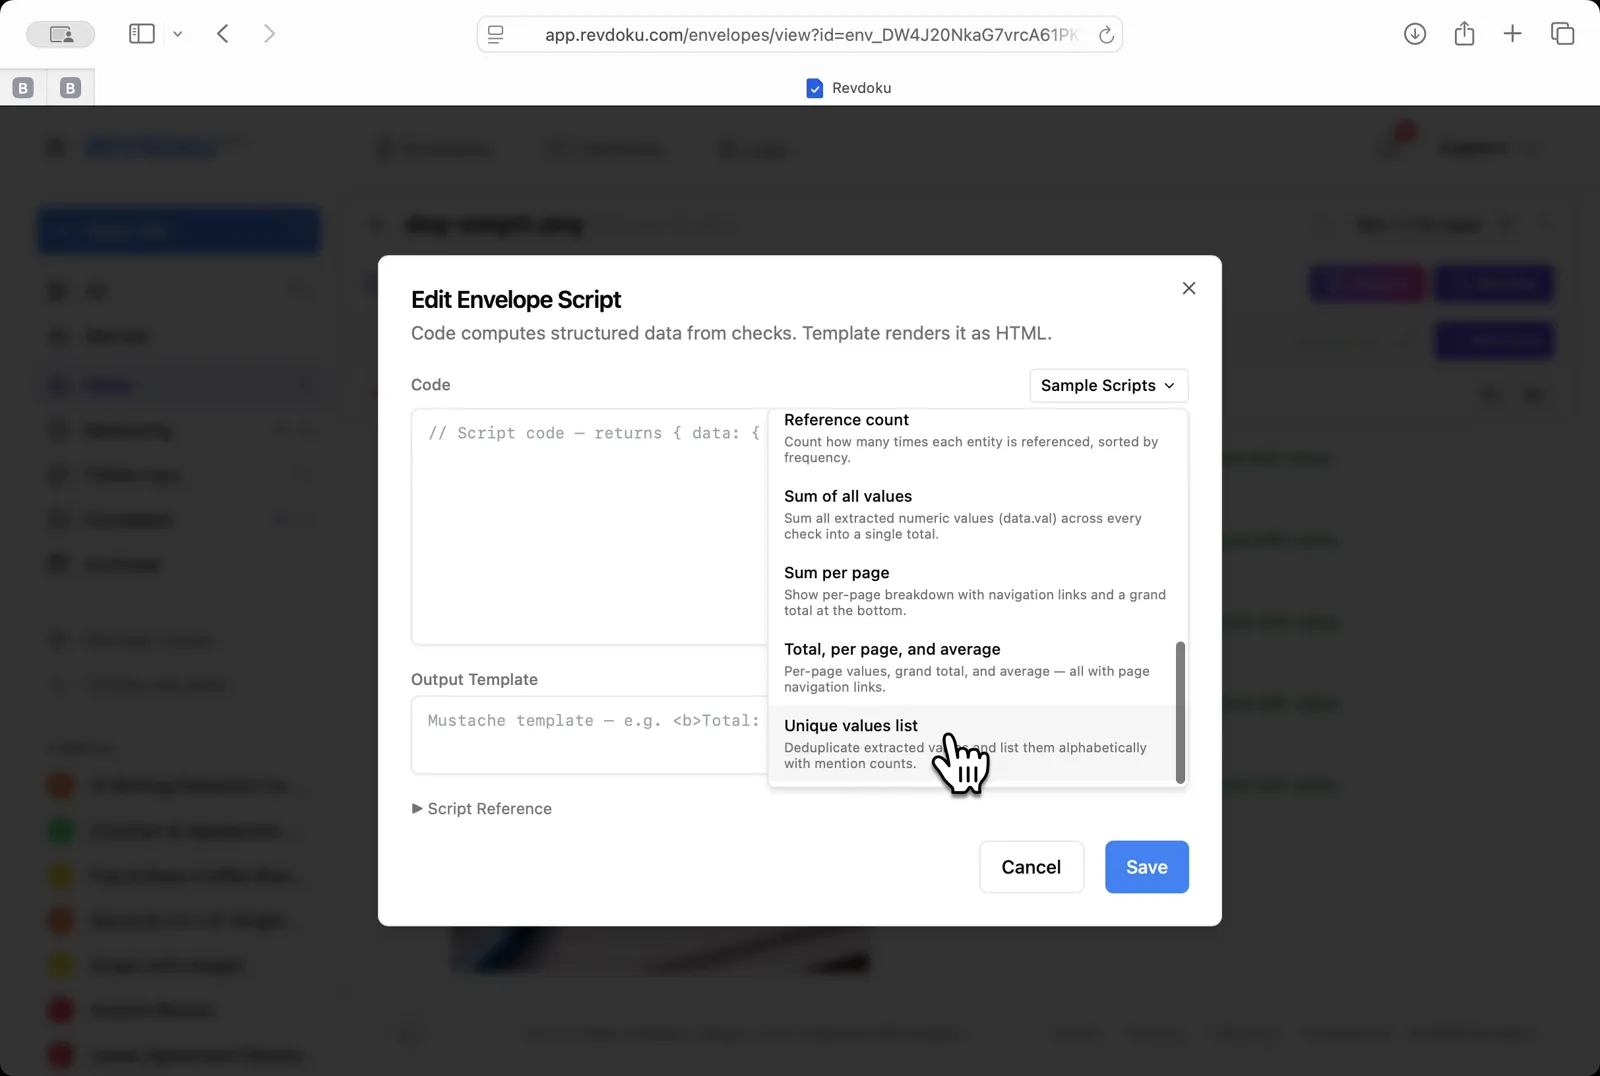
## Step 8: Insert a sample script.
Insert a sample script. From the **Sample Scripts** dropdown, pick **Unique values list** to deduplicate and alphabetize the points.
## Step 9: Read the rolled-up values.
Read the rolled-up values. A yellow summary card lists the 6 unique points (*Aug,78 · Feb,58 · Jan,54 · Jul,70 · Jun,60 · Mar,65*) above the original chart.
## Conclusion
In this tutorial it was demonstrated how to use Revdoku for extracting data from a hand-drawn chart. The following steps were shown:
- Open the Envelopes inbox
- Upload the chart
- Open the chart
- Pick the chart-reading checklist
- Run the review
- Read the extracted points
- Open the envelope menu
- Insert a sample script
- Read the rolled-up values
---
## What You Learned
This case showed how Revdoku can take a document, apply a structured checklist, and surface specific findings. all in under a minute. No manual line-by-line reading required.
Cloud
Self-host (open-source)
More use cases
Disclosure: Sample documents in this use case were generated using AI and contain intentional errors for demonstration purposes. All names, companies, and details are fictional.
### Use Case: Detect AI Writing in a Blog Post
URL: https://revdoku.com/cases/ai-writing-detection/
Description: Detect AI writing in a blog post: generate a 6-rule AI-detection checklist with a one-line prompt, then review the article for repetitive structures, shallow content, and factual inaccuracies.
Published: 2026-04-11
Updated: 2026-04-14
Keywords: AI writing detection, blog post review, content quality, AI detector checklist, Revdoku
# Detect AI Writing in a Blog Post
This use-cases demonstrates how to detect AI writing in an article. To do so you will need to run a one-line prompt through Revdoku to generate a 6-rule AI writing detection checklist. Then run **Review** of the uploaded blog post for repetitive structures, shallow content, and factual inaccuracies.
## Step 1: Open the Envelopes inbox
The *inbox* lists the documents available for review
Open the Envelopes inbox. The inbox lists the documents available for review.
## Step 2: Open the blog post article from pdf file
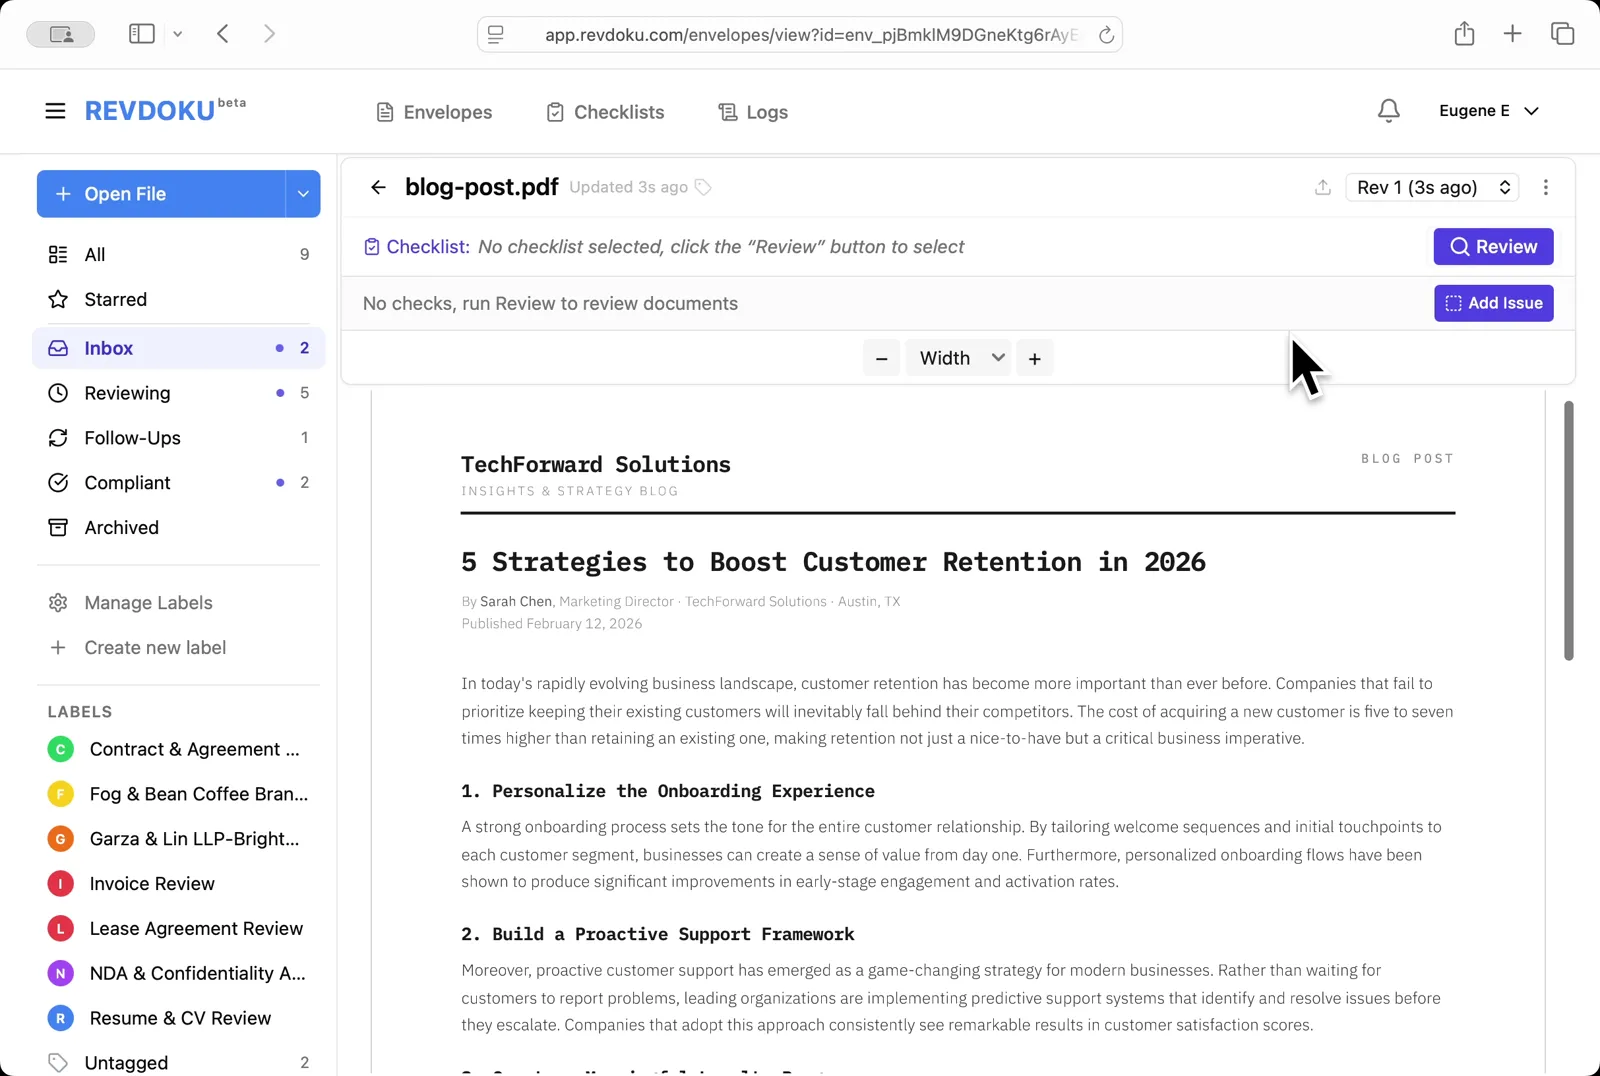
Open **blog-post.pdf** file using **Open File** button at the left. It opens in the viewer with no checklist attached. it's a TechForward Solutions article titled *5 Strategies to Boost Customer Retention in 2026*
Open the blog post. **blog-post.pdf** opens in the viewer with no checklist attached. it's a TechForward Solutions article titled *5 Strategies to Boost Customer Retention in 2026*.
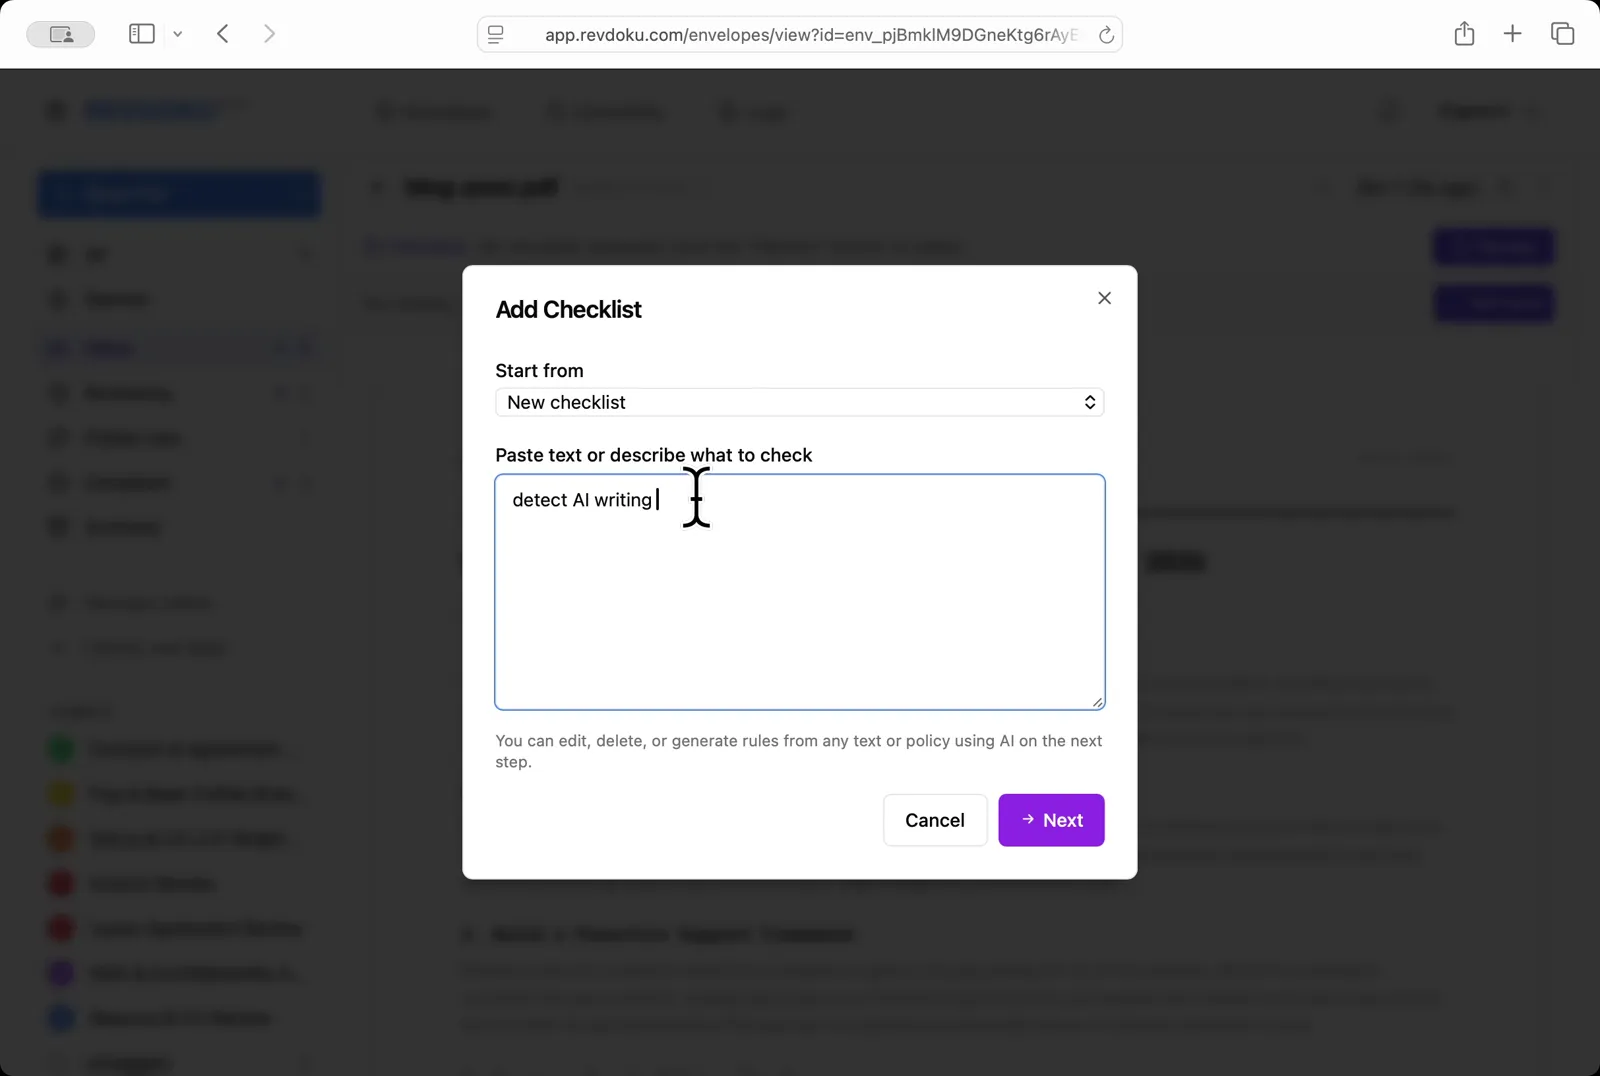
## Step 3: Describe the check in plain English
In the **Add Checklist** dialog, paste a one-line prompt into the *Paste text or describe what to check* field:
> detect AI writing
Describe the check in plain English. In the **Add Checklist** dialog, paste a one-line prompt into the *Paste text or describe what to check* field:
> detect AI writing.
## Step 4: Generate new checklist with AI
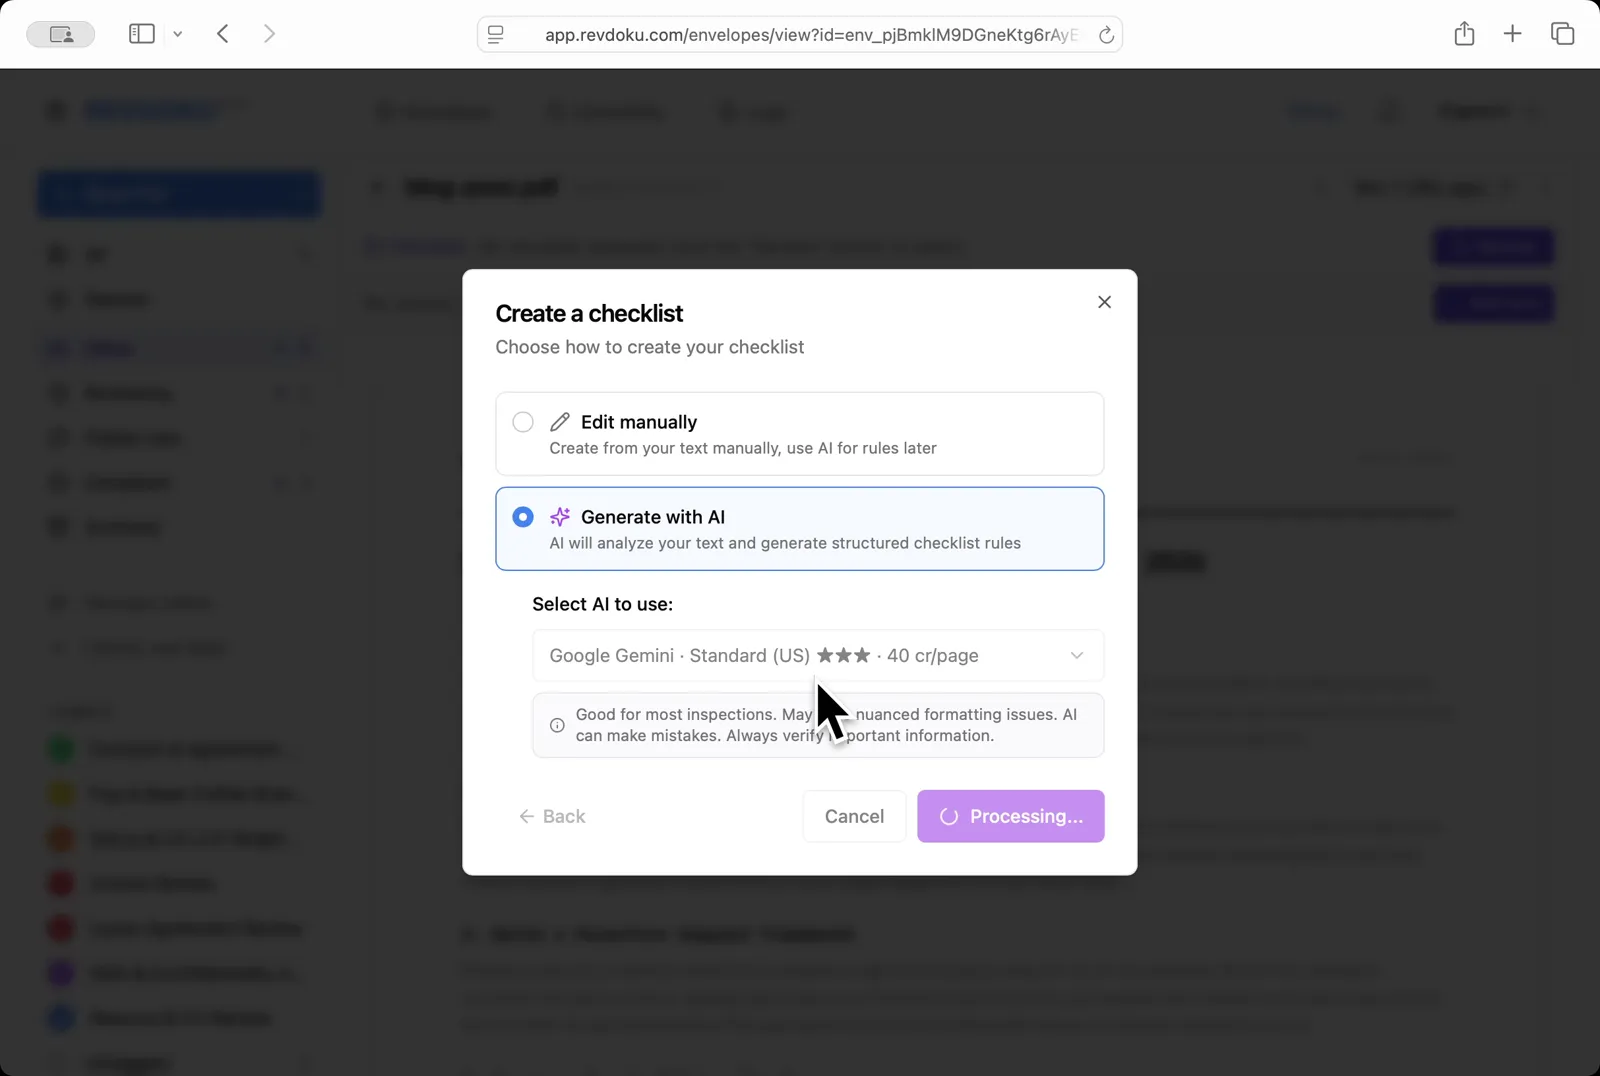
Pick **Generate with AI** and choose **Google Gemini · Standard (US)**; click **Next** and Revdoku turns the prompt into a structured checklist
Generate with AI. Pick **Generate with AI** and choose **Google Gemini · Standard (US)**; click **Next** and Revdoku turns the prompt into a structured checklist.
## Step 5: Review the generated checklist and its rules
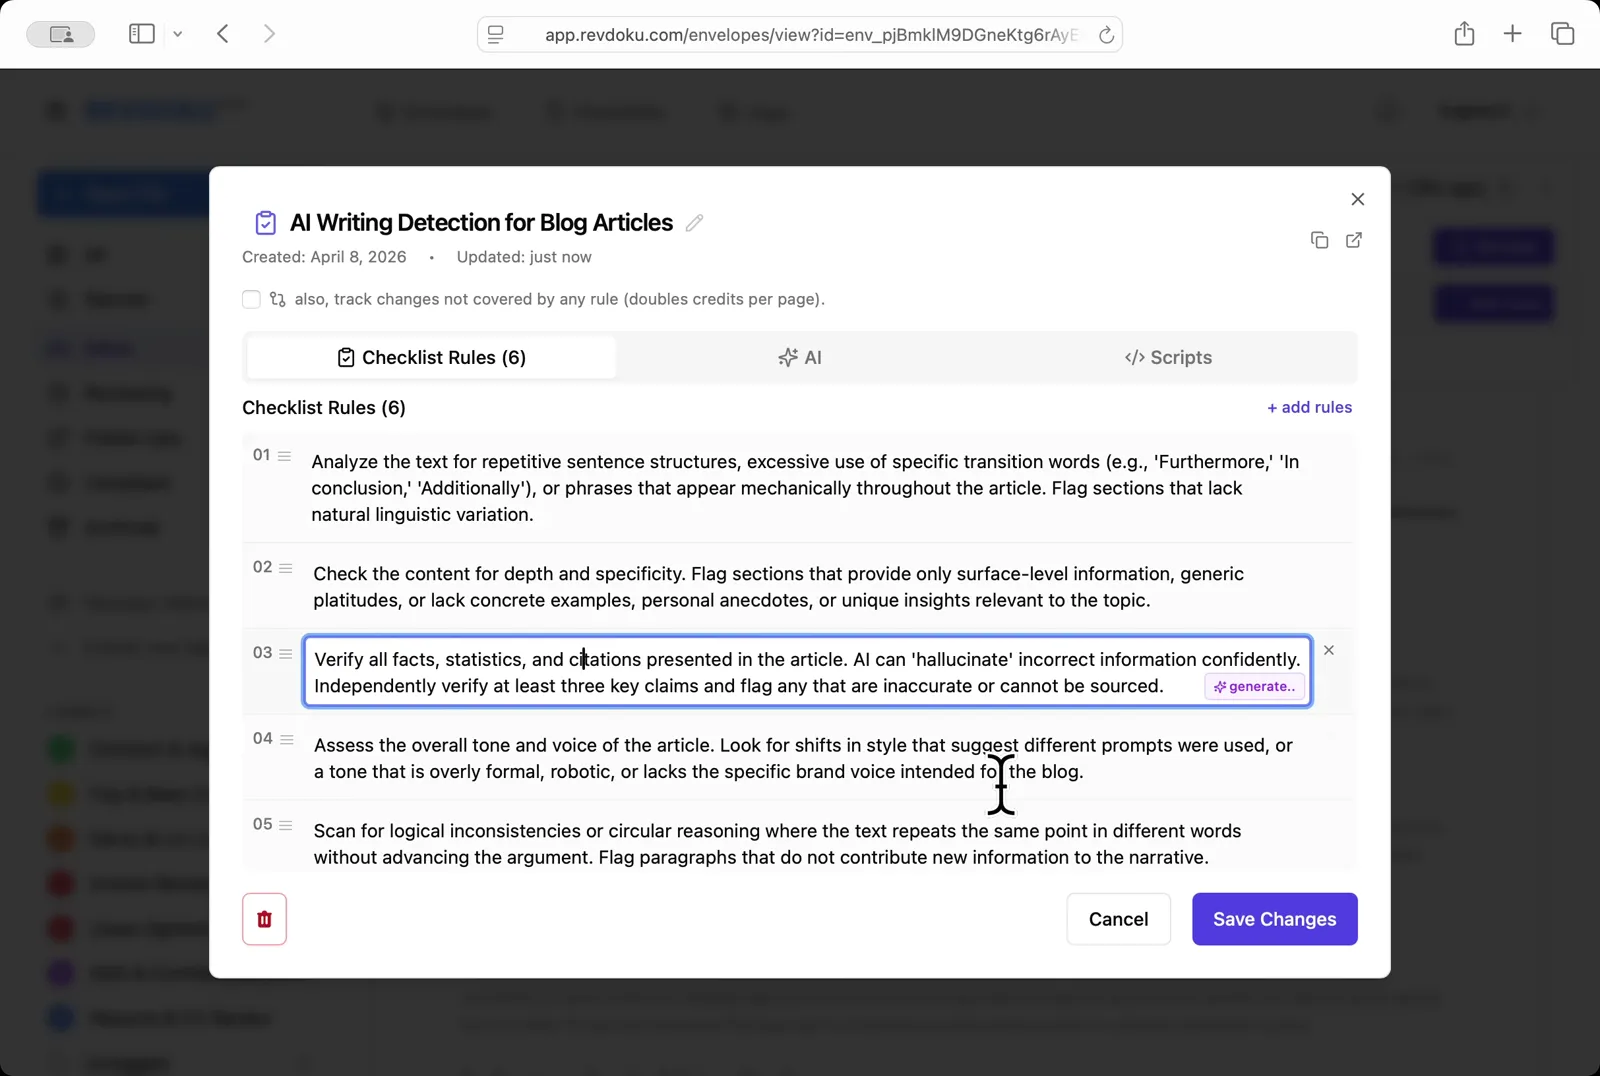
Revdoku produced a 6-rule **AI Writing Detection for Blog Articles** checklist covering repetitive structures, depth and specificity, fact verification, tone and voice, logical consistency, and citations
Review the generated rules. Revdoku produces a 6-rule **AI Writing Detection for Blog Articles** checklist covering repetitive structures, depth and specificity, fact verification, tone and voice, logical consistency, and citations.
## Step 6: Run the review
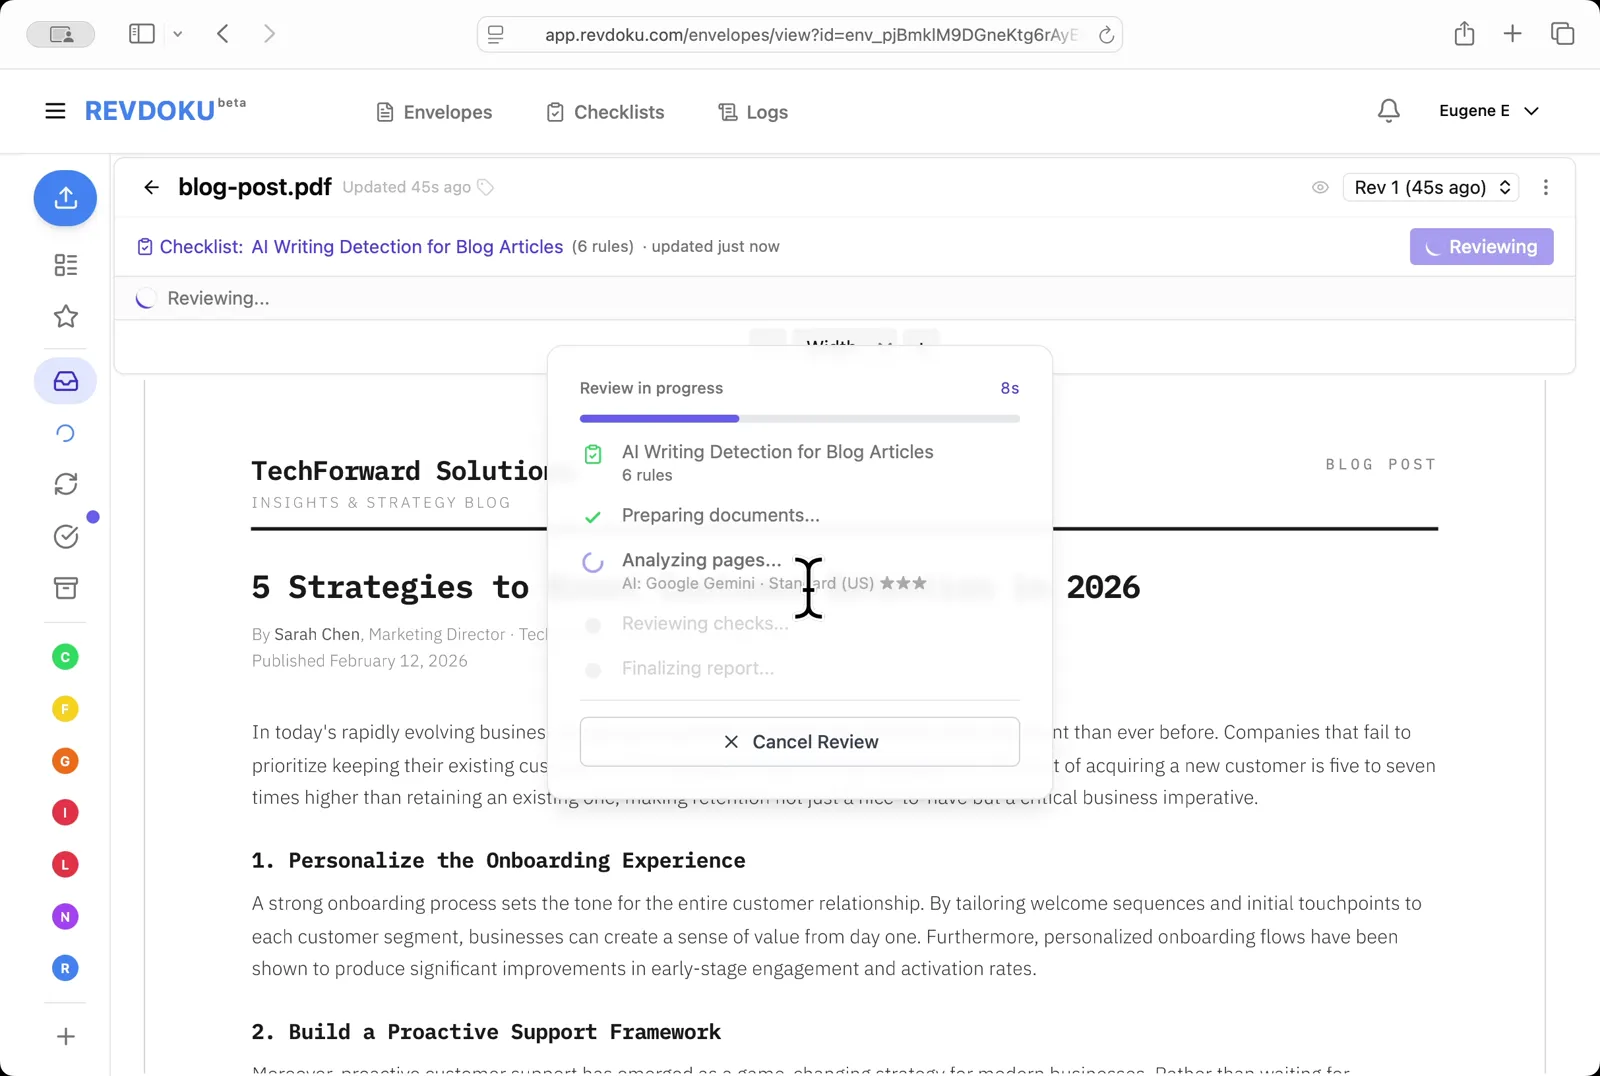
Click **Review** and Revdoku analyzes the page with Google Gemini against the six rules
Run the review. Click **Review** and Revdoku analyzes the page with Google Gemini against the six rules.
## Step 7: Wait for the review to complete
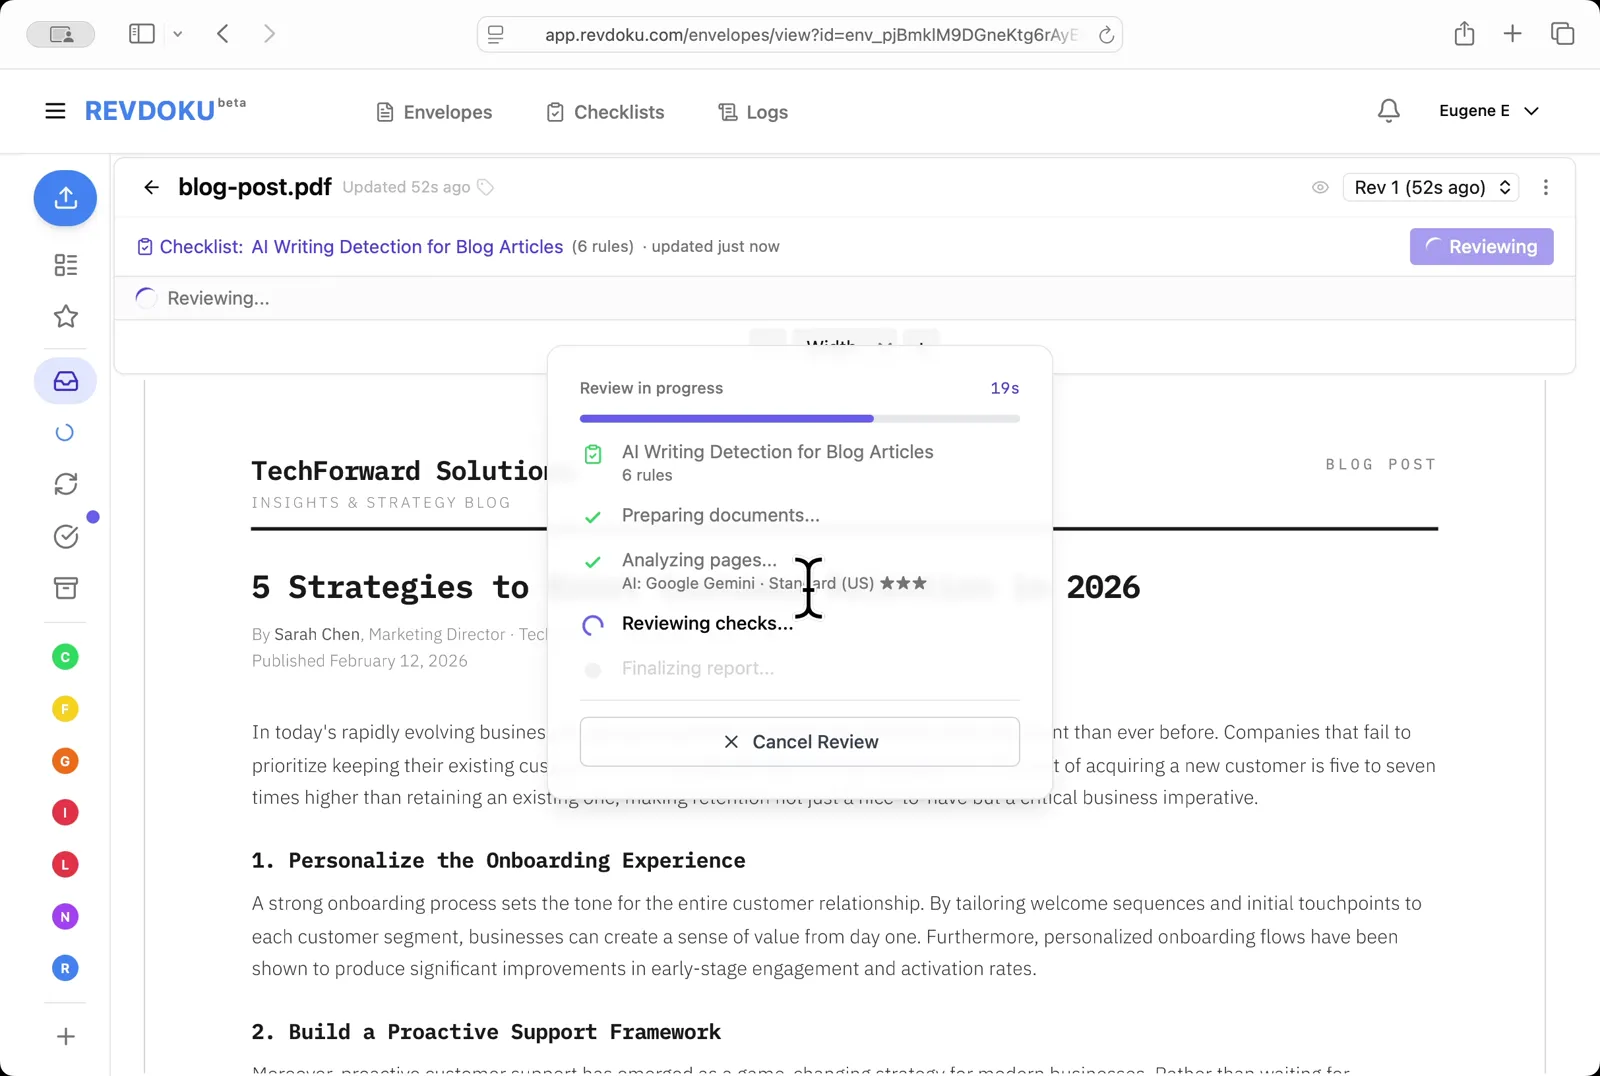
The *Reviewing checks* stage applies each rule to the extracted text
Wait for the checks. The *Reviewing checks* stage applies each rule to the extracted text.
## Step 8: Read the result
The **Review Complete** dialog reports **3 issues, 3 passed, 50% compliance**
Read the result. The **Review Complete** dialog reports **3 issues, 3 passed, 50% compliance**.
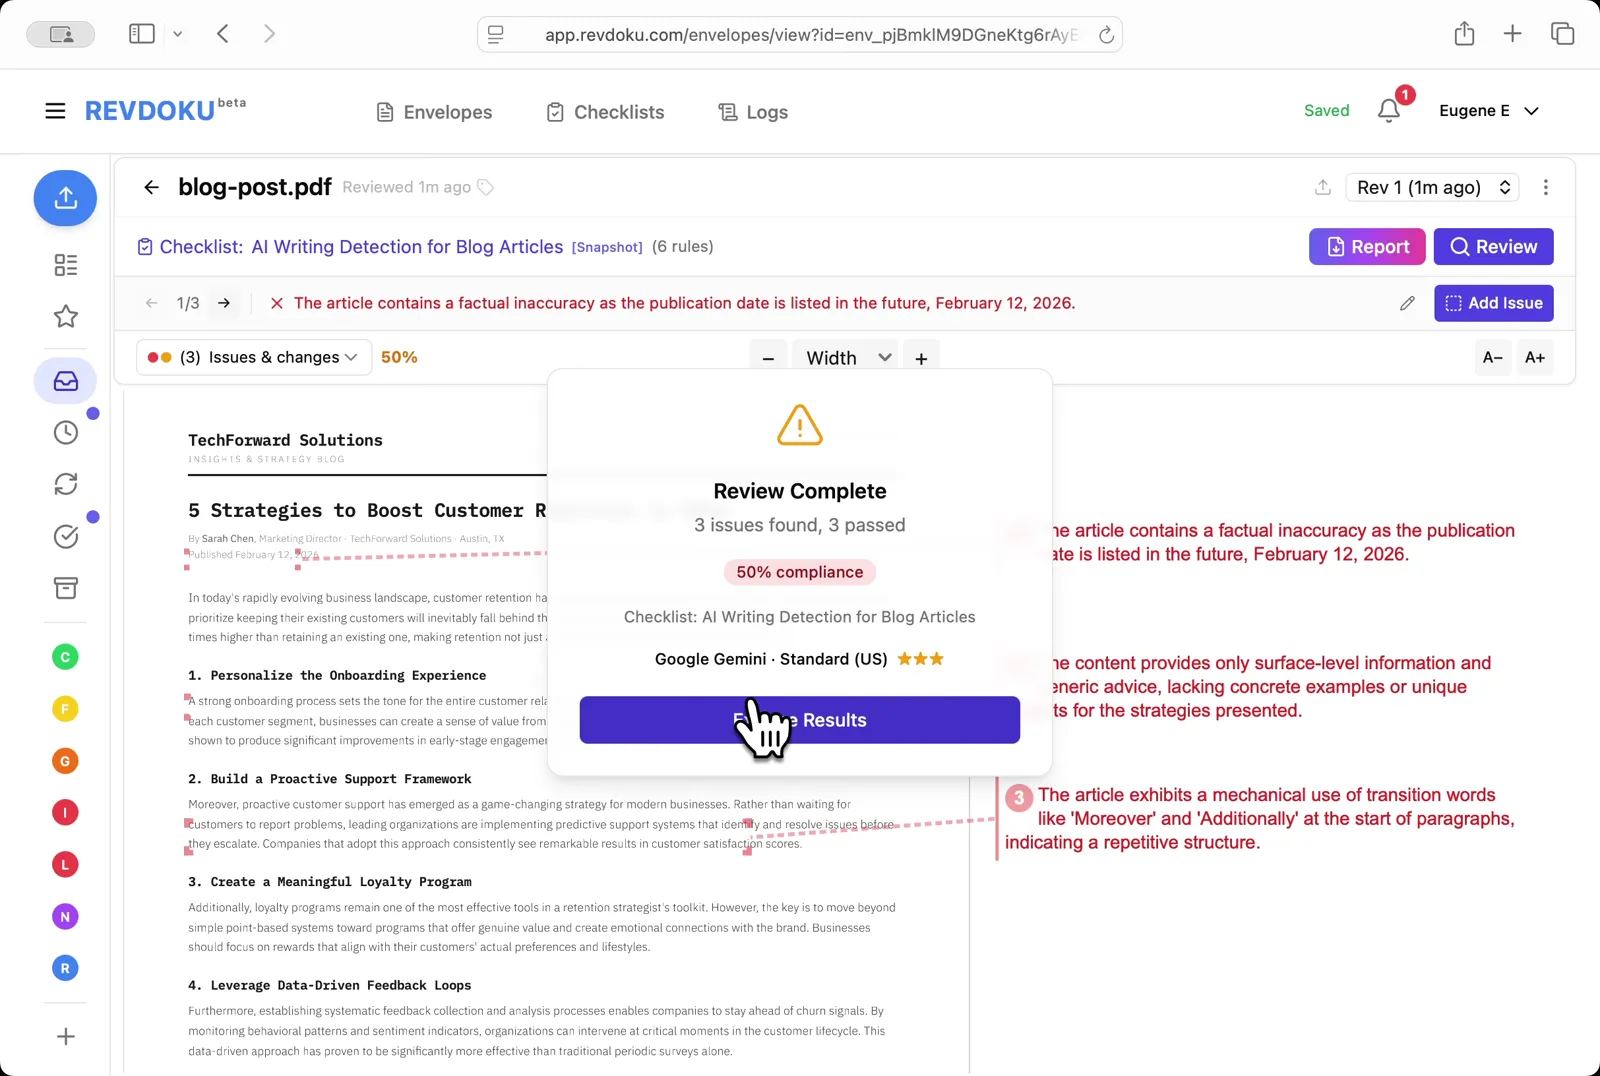
## Step 9: Read the issues
Three failures are flagged: a factual inaccuracy (the **February 12, 2026** publication date is in the future), surface-level generic advice, and mechanical use of transition words like *Moreover* and *Additionally*
Read the issues. Three failures are flagged: a factual inaccuracy (the **February 12, 2026** publication date is in the future), surface-level generic advice, and mechanical use of transition words like *Moreover* and *Additionally*.
## Step 10: Filter to passed checks by type
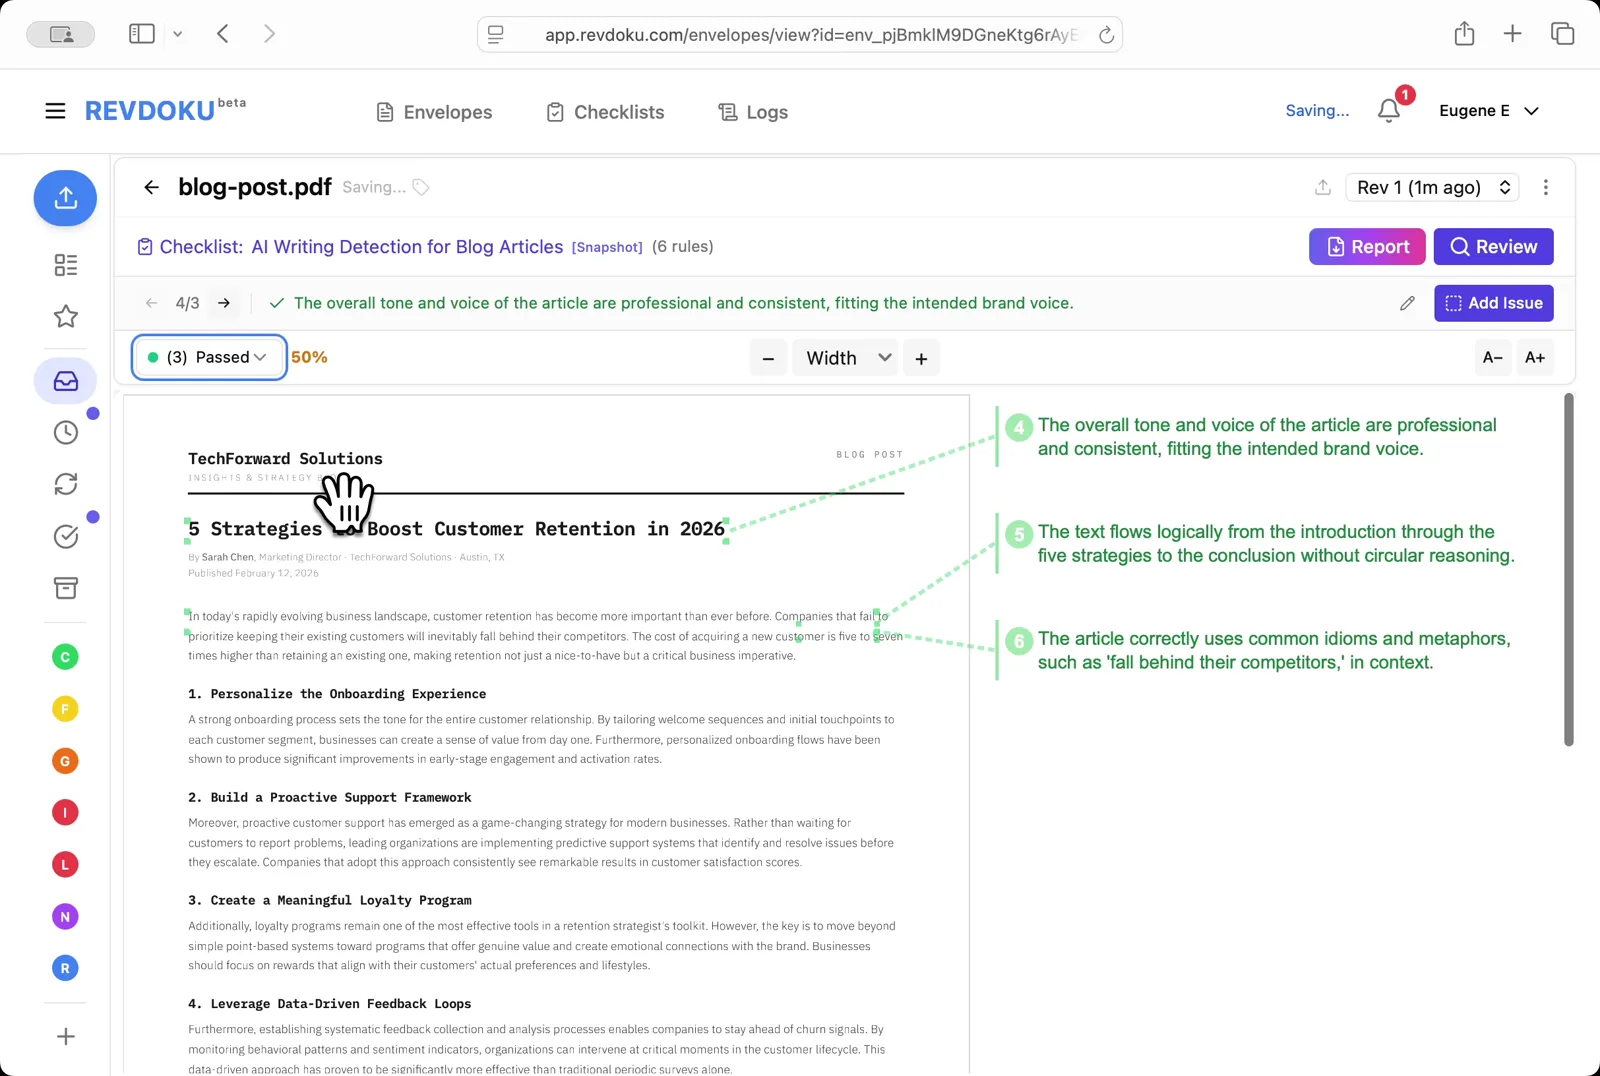
Pick **Passed** to see what the article got right. the tone is professional and consistent, the text flows logically, and idioms like *fall behind their competitors* are used correctly
Filter to passed checks. Pick **Passed** to see what the article got right. the tone is professional and consistent, the text flows logically, and idioms like *fall behind their competitors* are used correctly.
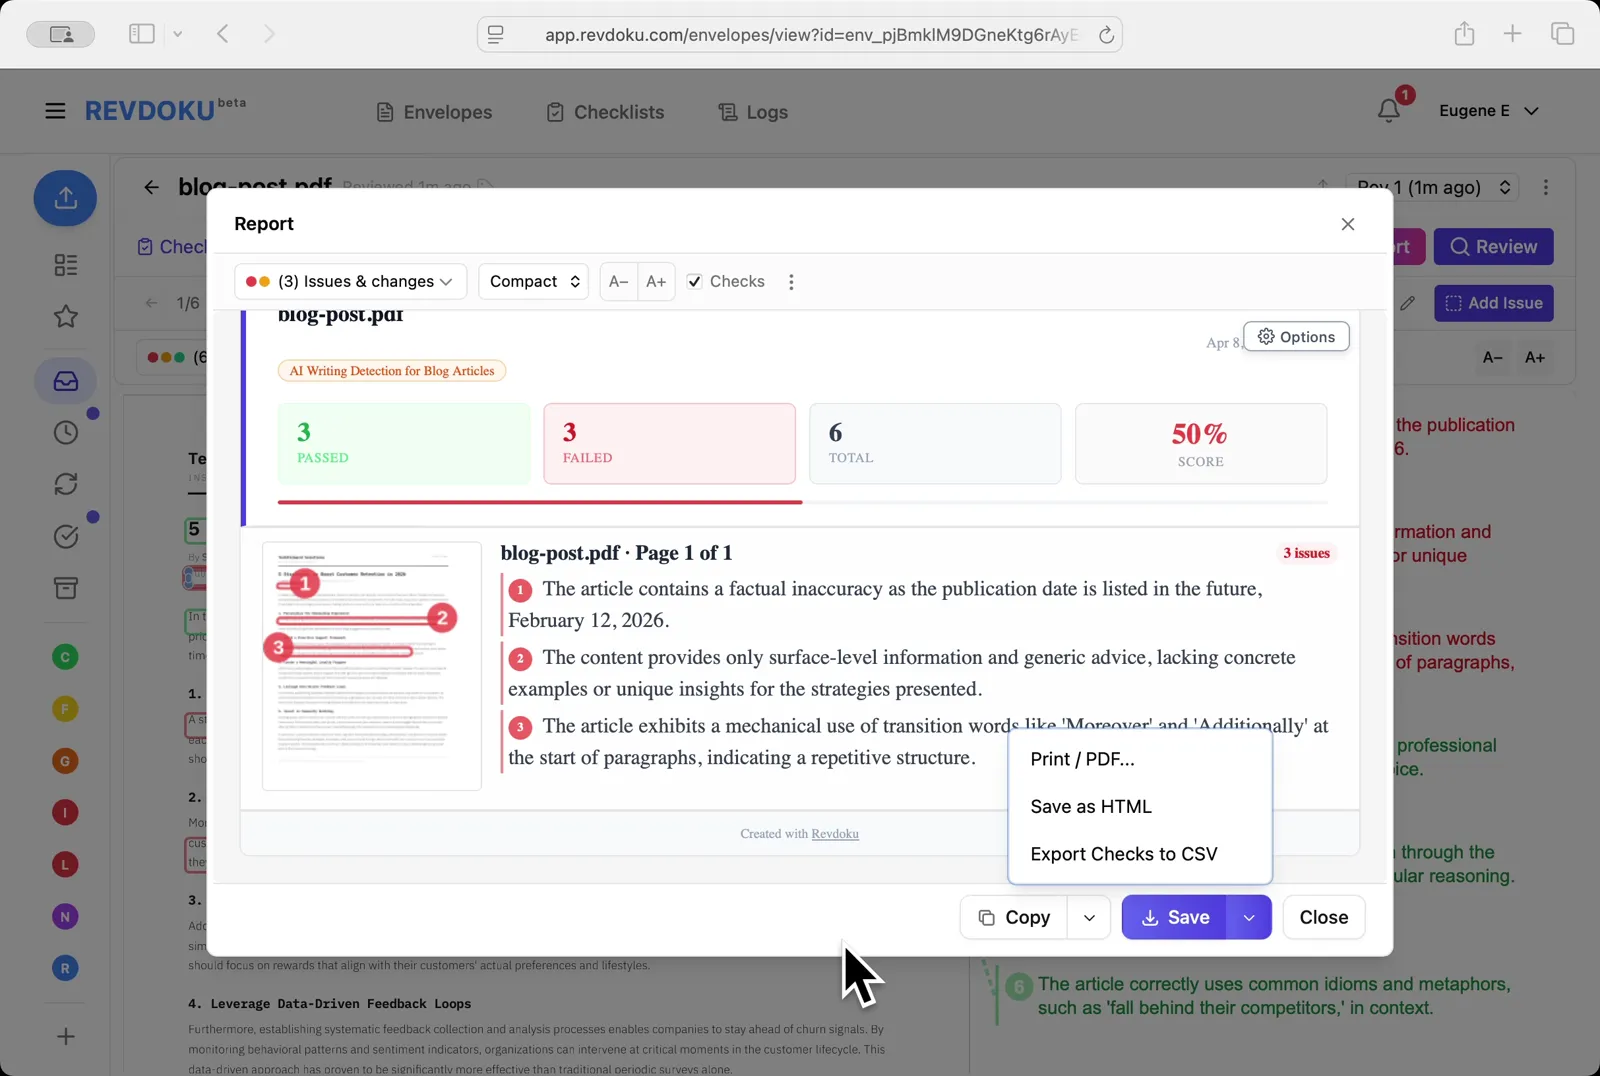
## Step 11: Open the Report
The compact view shows **3 passed, 3 failed, 50% score**; use the **Save** dropdown to export as **Print / PDF**, **Save as HTML**, or **Export Checks to CSV**
Open the Report. The compact view shows **3 passed, 3 failed, 50% score**; use the **Save** dropdown to export as **Print / PDF**, **Save as HTML**, or **Export Checks to CSV**.
## Conclusion
In this tutorial it was demonstrated how to use Revdoku for detecting AI writing in a blog post. The following steps were shown:
- Open the Envelopes inbox
- Open the blog post
- Describe the check in plain English
- Generate with AI
- Review the generated rules
- Run the review
- Wait for the checks
- Read the result
- Read the issues
- Filter to passed checks
- Open the Report
---
## What You Learned
This case showed how Revdoku can take a document, apply a structured checklist, and surface specific findings. all in under a minute. No manual line-by-line reading required.
Cloud
Self-host (open-source)
More use cases
Disclosure: Sample documents in this use case were generated using AI and contain intentional errors for demonstration purposes. All names, companies, and details are fictional.
### Essential Real Estate Closing Checklist for Buyers & Sellers
URL: https://revdoku.com/blog/real-estate-closing-documents/
Description: Navigate your home closing day confidently with this comprehensive checklist for buyers and sellers.
Published: 2026-04-11
Updated: 2026-02-21
Keywords: real estate, closing checklist, home buying, home selling, closing documents, buyer guide, seller guide
## Introduction
Closing day may feel like the finish line, but it's the most document-heavy part of buying a home. You'll sign your name dozens of times, initial pages, review numbers, and somehow stay alert through a stack of papers that can easily top 100 pages. The average real estate closing involves signing **30 to 50 different documents** in a single sitting. Missing an error or proof of insurance can delay the closing or result in signing away unintended rights.
This checklist guides you through document requirements and verifications before closing.
Real Estate Closing Process Overview:
Copy this checklist and paste it into [Revdoku's](https://revdoku.com) **Generate Checklist** to review your documents automatically:
~~~
Real Estate Closing Checklist for Buyers & Sellers
You are a real estate professional reviewing property transaction documents for completeness and legal accuracy. Check each requirement independently and flag every issue.
- Government-issued photo ID for all buyers listed on the mortgage
- Proof of homeowner's insurance (binder or full policy with effective date matching closing)
- Cashier's check or wire transfer confirmation for down payment and closing costs
- Wire transfer amount verified with closing agent 2-3 days before (never wire based solely on email)
- Loan commitment letter from your lender
- Recent pay stubs (within 30 days) if lender requested updated proof of employment
- Recent bank statements showing sufficient funds for closing
- Copy of home inspection report (for reference)
- Copy of appraisal report
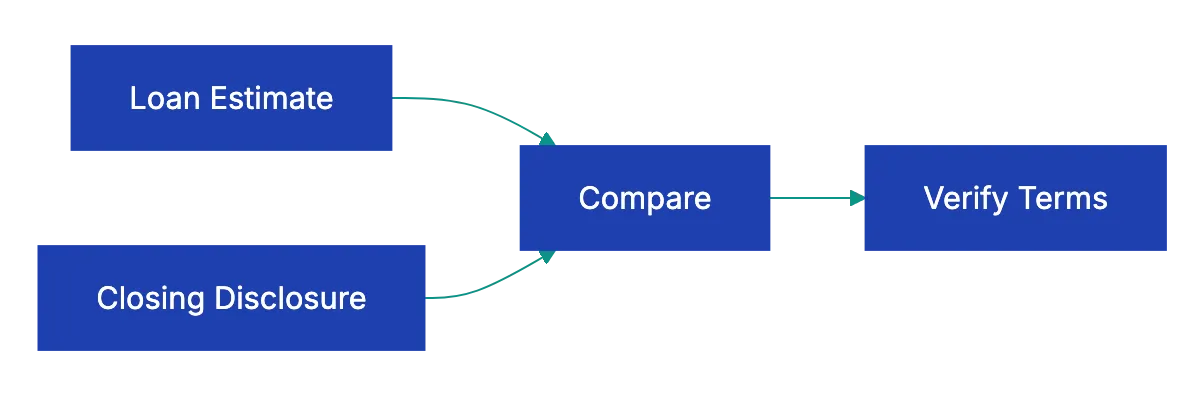
- Closing Disclosure reviewed line-by-line against your Loan Estimate
- Promissory Note with correct loan amount, interest rate, term, and monthly payment
- Deed of Trust or Mortgage creating lender's lien on property
- Warranty Deed or Grant Deed transferring ownership to you
- Title insurance policy (owner's policy)
- Escrow agreement for property taxes and insurance
- Occupancy affidavit stating whether property will be primary residence
- Identity affidavit confirming your legal name and any aliases
- Transfer tax declarations (required in most states)
- HOA documents if applicable (CC&Rs, budget, bylaws, meeting minutes)
- Government-issued photo ID for all sellers on the deed
- Signed and notarized deed prepared by closing agent or attorney
- Bill of sale for included personal property (appliances, fixtures)
- Affidavit of title stating no undisclosed liens or boundary disputes
- Mortgage payoff statement from your lender
- Lead paint disclosure for homes built before 1978
- Seller's property disclosure statement
- All keys, garage door openers, gate remotes, security system codes
- Manuals and warranties for appliances, HVAC, roof, or other systems
- All names spelled exactly as they appear on government ID
- Property address and legal description match deed and title documents
- Loan interest rate, term, and monthly payment match commitment letter
- Closing costs within $100 of the Closing Disclosure received 3 days prior
- Property tax proration calculated correctly based on closing date
- HOA dues prorated if applicable
- Seller credits for repairs or closing costs reflected in final numbers
- No prepayment penalty or confirmation it matches loan terms discussed
- Title insurance coverage amount equals purchase price
- Earnest money deposit credited toward your cash to close
~~~
Buyer Document Verification Flow:
## Understanding the Closing Disclosure
The **[Closing Disclosure](https://www.consumerfinance.gov/owning-a-home/closing-disclosure/)** replaced the old HUD-1 settlement statement in **2015**, and it's the single most important document you'll review before closing day. [Federal law](https://www.consumerfinance.gov/ask-cfpb/im-about-to-close-on-a-real-estate-purchase-transaction-with-a-mortgage-what-can-expect-in-the-mortgage-closing-process-en-1905/) requires lenders to provide it at least three days before closing.
Use those three days to compare it against the Loan Estimate.
Start with page one. Your loan amount, interest rate, monthly principal and interest payment, and estimated taxes and insurance should match what you expected. If your interest rate changed, ask your lender for an explanation. If your monthly payment jumped by more than a few dollars, ask why before you proceed.
Page two of the real estate closing checklist breaks down closing costs. The current form replaced the older [HUD-1 settlement statement](https://www.hud.gov/sites/documents/1.pdf). Lender fees, title fees, prepaid interest, homeowner's insurance, property taxes, and HOA dues all get their own lines. Compare these figures carefully against page two of your Loan Estimate as part of your real estate closing document checklist.
Some fees cannot increase at all, like your lender's origination charge. Others can increase up to 10 percent total. And some, like homeowner's insurance you shopped for yourself, can increase without limit. But if your title insurance suddenly costs $500 more than estimated with no explanation, that's a red flag worth questioning.
Page three shows the math for cash to close, including your down payment and any credits. A common error in the real estate closing checklist: the earnest money wired to the escrow company weeks ago doesn't appear as a credit. Another: the seller agreed to pay $3,000 toward your closing costs, but it's not reflected. Catch these problems during your three-day review period, not at the closing table.
## Documents Buyers Sign at the Table
The promissory note is your promise to repay and includes loan terms. Read the prepayment section. Some loans charge a penalty if you pay off the mortgage early. If you didn't agree to a prepayment penalty, don't sign a note that includes one.
The deed of trust or mortgage gives the lender a security interest in your property. If payments stop, the lender can foreclose. The legal property description appears here, often written as metes and bounds or lot and block numbers that mean nothing to you. Ensure the street address and name are correct.
The deed transfers ownership from the seller to you. Your name as it appears on this deed becomes your legal ownership record. If your driver's license says "Michael," but you go by "Mike," use Michael. If you're married and taking title as joint tenants with rights of survivorship, the deed should say so. If you're taking title as tenants in common with specified percentage ownership, that language belongs on the deed.
Once recorded, altering a deed involves filing a correction document and potentially re-signing loan documents, underscoring the importance of your real estate closing document checklist.
Title insurance comes in two policies: the lender's policy and the owner's policy. The lende's policy proteccts the bank if sommeone cahllenges your ownership or discovers an old lien the title searc missed. You pay for it, but it protects the lender, not you. The owner's policy protects you. In some states, sellers pay for the owner's policy; in others, buyers pay. Either way, verify you're receiving an owner's policy with coverage equal to your purchase price.
## Documents Sellers Sign and Provide
Sellers have fewer house closing documents, but the deed remains crucial. Sellers usually sign the deed before closing. The deed must be notarized. Some states require witnesss signatures in addition to notarization. If you're selling property owned by a trust or LLC, the deed must be signed by the authorized trustee or member, and you'll need to provide the trust document or operating agreement proving you have authority to sign.
The affidavit of title is a sworn statement that no liens, boundary disputes, easements, or claims exist against the property outside of what is disclosed in the house closing documents. Disclose if any boundary disputes exist. Disclose any secured debts. The title company can't fijd what you don't tell them about.
Your mortgage payoff statement shows the exact amount needed to pay off your existing loan as of closing day. Mortgage interes accrues daily, so the payoff amount increases each day. The closing agent will wire your payoff amount to your lender, and any remaining sale proceeds get wired to you. If your payoff is $182,456 but you thought you owed $180,000, ask your lender for a breakdown. You might owe interest from your last payment date to closing, a prepayment penalty, or a loan payoff fee.
## What Can Go Wrong and How to Catch It
A 2019 study by the [Consumer Financial Protection Bureau](https://www.consumerfinance.gov/compliance/compliance-resources/mortgage-resources/tila-respa-integrated-disclosures/) found that **30 percent** of Closing Disclosures contained at least one error when firts delivered. Some errors are minor: a misspelled name, a wrong digit in the prpoerty tax account number. Others cos real money.
In one case, a buyer's Loan Estimate showed the sellre paying $4,000 toward closing costs. The Closing Disclosure showed zero seller credits. The buyer caught it during the thre-day review and the erorr was corrected, but if he'd waited until closin day, the pressuure to porceed might have pushe him to absorb the cost rather than dealy.
Another comomn problem: property tax proration errors. If you close on July 15 and property taxes are paid in arrears, the seller owes you a credit for the taxes from January 1 through July 14. If the closing agen uses the wrong daily rate or miscounts the days, you could overpay by hundreds of dollars. Bring a calculator. Verify the math.
Wire fraud is risong. In 2022, the FBI reported that real estaet wide fraud cost buyers **$396 million**. Here's the scheme: a scammer impersonating your closing agent or title company sends an email with wiring instructions. You wirre yuor down payment to the fraudulent account. By the time you arrive at closing and find the money never arrived, it's gone.
Protect yourself with one simple rule: never wire money based on emmailed instructions. Call your closin agent at a number you looked up yourself, not one included in the email. Verify the account number, routing number, and recipient name oveer the phone. Then send a test wire of $50 before wiring the full amount. Yes, this adds a day to the process. It also prevents losing your down payment to a criminal in another country.
## Documents for Special Situations
If you're buying a condo or a home in a planned community, expect an extra set of HOA documents. The association's CC&Rs spell out rules about exterior paint colors, landscaping, parking, noise, and pet restrictions. The current budget shows monthly HOA dues and any special assessments plannned. Meeting minutes from the past six to twelve months reveal whethher the association is functional or mired in disputes.
Some lenders requier a questionnaire clmpleted by the HOA confirming the association is in good standimg, adequately insured, and has sufficient reserves.
If you're buying a property with a well or septic ssytem, your lender may require a well water tes and septic inspection reporrt. These aren't closing documents exactly, but you'll need to provid them to satisfy lpan conditions. If the septic system failed inspection and the seller agreed to repair it, bring proof the repair was completed and the system passed re-inspection.
If you're buying a property that's part of an etsate sale, expect additional documentation. The executor must provide letters testamentary or letters of administration proving court authority to sell the property. If the estate is in probate, the court order approving the sale become part of the closing package. These sales often take longer to close because the executo must notify heirs and sometimes obttain courrt aprpoval for the sale price.
## Using Technology to Stay Organized
Real esttate closings generate mountains of paper, but you don't have to manage them manualyl. See [30 to 50 different documents](https://www.abi.org/feed-item/real-estate-closing-checklist-for-buyers). A documnet revview platform like Revdoku can help you sta organizrd from offer to closing. Upload your purchase agreement, inspection report, loan estimate, and closing disclosure. Build a workflow that checks each document against your closing requirements checklist.
For example, when your Closing Disclosure arrives, upload it and run an automated comparison against your Loan Estimate. Flag any line item that increased by more than the allowable tolerance. Check property tax calculation, verify earnest money credits, and confirm seller concessions appear. The platform can flag errors faster than manuallly comparign two multi-page forms line by line.
You can also use AI-powered tools to extract key terms from dense legal documents. Instead of reading forty pages of HOA CC&Rs to find the pet policy, let the AI summarize restrictions in plai language. Instead of deciphering the prepayment penalty clause in your promissory note, ask the tool to explain whether you'll owe a fee if you refinance in two years.
This isn't about replaciing your real estate attorney or closing agent. It's abuot arriving at the closing tabl informed and confident instead of confused and rushe. When you've alread reviewed every document, verified the numbers, and flagged potential issues, closing day becomes a formality instead of a fire drill.
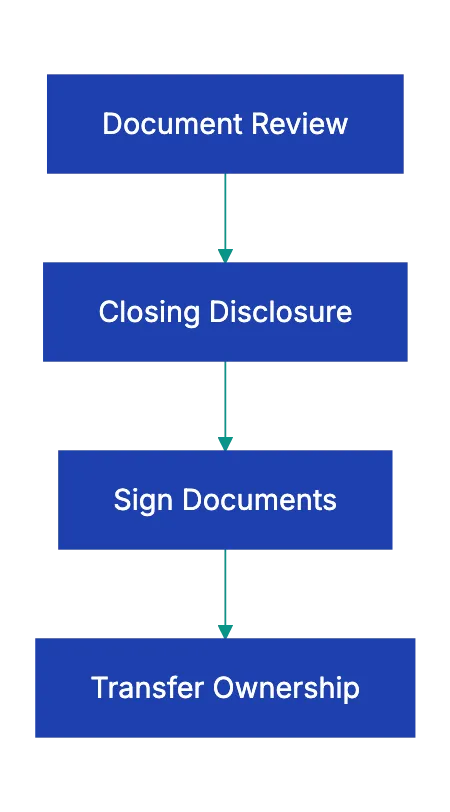
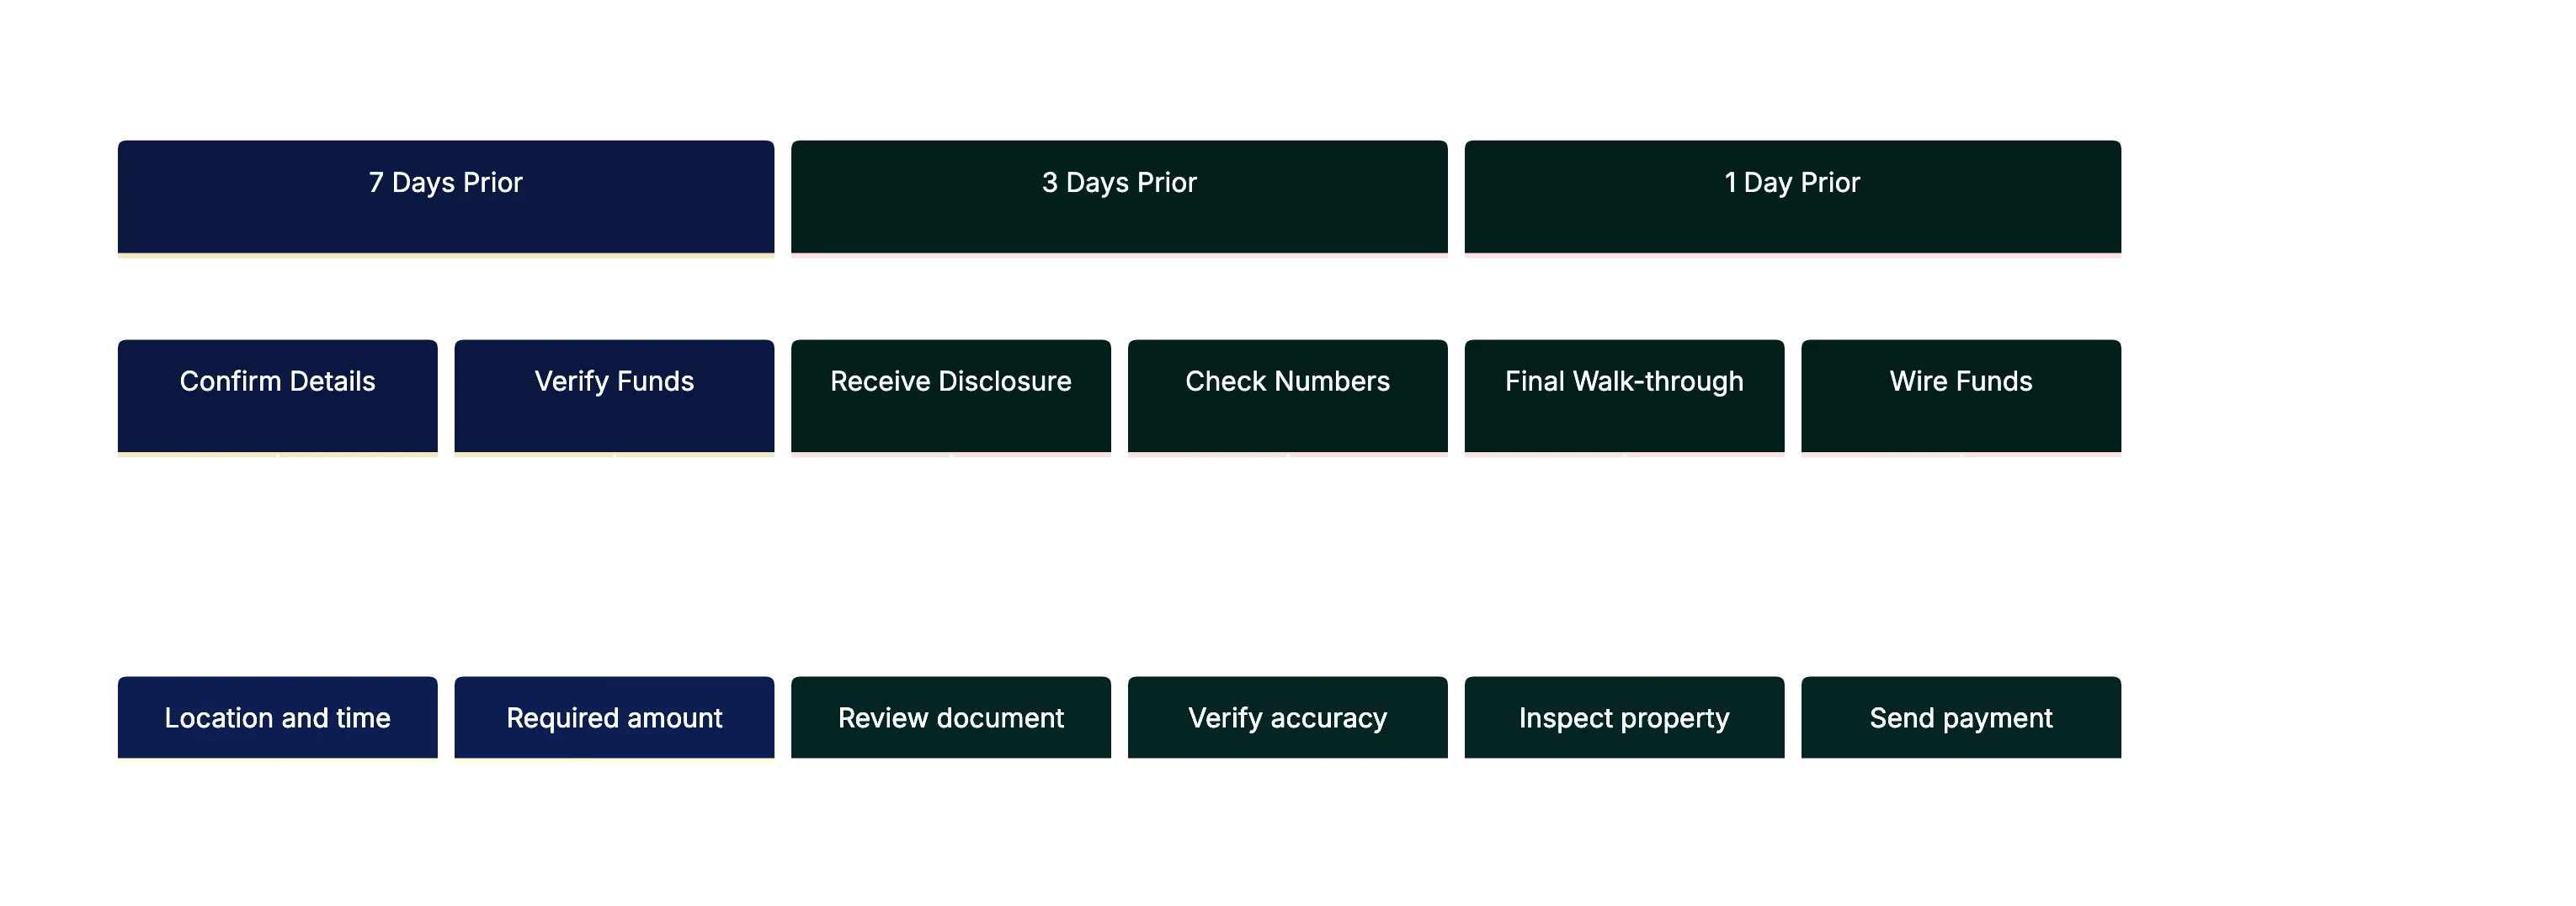
## How to Prepare the Week Before Closing
- **7 days before**: confirm closing date, time, and location. Ask how much you'll owe and in what form. most agents require a cashiier's chekc or wire transfer for amounts over **$1,000**. Personal checks usually aren't accepted for large amounts.
- **3 days before**: you should receive your Closing Disclosure. Review it immediately. If you spot an error, contact your lender right away. some corrections require reissuing the Closing Disclosure and restarting the three-day waiting period.
- **2 days before**: do a final walk-through to verify the property is in the same condition as when you made your offer and that agreed repairs are complete. Turn on faucets, flush toilets, and test garage doors.
- **1 day before**: gather your documents. ID, insurance binder, cashier's check or wire confirmation, and copies of reports. If wiring funds, send the wire first thing in the morning so it clears before closing.
## Final Thoughts
Closing on a house involves more paperwork than almost any other transaction you'll complete in your lifetime. The real estate closing document checklist above covers the standard documents, but your specific closing may include additional paperwork depending on your state, loan type, and property type. Stay organized, verify everything, and don't be afraid to pause and ask questions during the signing.
Pre-Closing Timeline:
Remember, the closing agent isn't your adversary. Their job is to make sure a clean transaction where both parties understand what they're signing. If a document doesn't match what you expected or includes terms you didn't agree to, say so. Better to delay closing by a day to fix an error than to sign a mistake that costs you thousands or creates legal problems down the road. Use the checklist and upload documents to a review platform beforehand to make closing day smooth.
Find more review checklists at [revdoku.com/checklists](/blog/). each one is ready to copy and use in the app.
Frequently Asked Questions
What should I do if I notice an error in my Closing Disclosure?
If you find an error in your Closing Disclosure, contact your lender immediately. Some corrections may require reissuing the document, which can reset the mandatory three-day review period. It's essential to address these discrepancies before closing day to avoid delays or unexpected costs.
How can I verify the legitimacy of wire transfer instructions?
To ensure the safety of your wire transfer, never rely solely on emailed instructions. Always verify the account details by calling your closing agent at a phone number you obtained independently, not from the email. Consider sending a small test wire before transferring larger sums to minimize risk.
What types of documents should I prepare a week before closing?
One week before closing, confirm the closing date, time, and location. You should also prepare your government-issued ID, proof of homeowner's insurance, and funds for the down payment. It's best to review your Closing Disclosure immediately upon receipt to catch any discrepancies early on.
What happens if the seller's disclosure reveals issues after I close?
If the seller's disclosure reveals undisclosed issues post-closing, it may require legal action depending on the nature of the problem and state laws. Always review the seller's property disclosure statement carefully before closing, and consider having it evaluated by a real estate attorney if needed.
Can I use technology to help with the closing process?
Yes, technology can significantly streamline the closing process. Document review platforms like Revdoku allow you to organize paperwork, compare documents, and flag discrepancies efficiently. Additionally, AI tools can help summarize lengthy legal documents for easier understanding.
What should I focus on during the final walk-through?
During your final walk-through, check that the property is in the same condition as when you made your offer. Ensure that all agreed-upon repairs are complete, and test key systems like plumbing and electrical to confirm everything is functioning properly. This step is crucial to avoid surprises at closing.
What unique documents should I expect if buying a condo?
When purchasing a condo, you should expect to review additional documents including the homeowners association (HOA) documents, which detail restrictions, current budgets, and meeting minutes. Lenders may also require a questionnaire to confirm the HOA's financial stability and insurance coverage. Being informed about these documents can prevent future issues related to HOA rules and fees.
### Essential NDA Review Checklist and Tips
URL: https://revdoku.com/blog/nda-review/
Description: Protect your interests with our comprehensive NDA review checklist to spot problematic clauses and negotiate effectively.
Published: 2026-04-07
Updated: 2026-02-21
Keywords: NDA, non-disclosure agreement, checklist, contract review, legal advice, business contracts
## Introduction
You've been asked to sign an NDA. Maybe it's for a new client project, a job interview, or a business partnership. The document looks official, spans several pages, and uses language that feels both vague and intimidating. Most people skim it and sign. That's a mistake. Non-disclosure agreements are among the most commonly signed contracts in business, yet they can contain provisions that restrict your ability to work, impose unlimited liability, or lock you into obligations that never expire.
This checklist helps you spot problematic clauses to protect your interests.
Copy this checklist and paste it into [Revdoku's](https://revdoku.com) **Generate Checklist** to review your documents automatically:
~~~
NDA & Confidentiality Agreement Review
Apply the rules below to this NDA. For each rule, mark satisfied or not-satisfied and quote the supporting text. Check each requirement independently. Do not assess enforceability. surface findings for the legal reviewer to evaluate.
- Verify the agreement states the full legal name of each party (not just a trade name or abbreviation). Verify the agreement explicitly designates each party as "Disclosing Party," "Receiving Party," or "both" for a mutual NDA. Flag if any party lacks a full legal name. Separately flag if the agreement does not clearly state whether it is mutual or one-directional.
- Verify the definition of "Confidential Information" lists at least two specific categories of protected information (e.g., financial data, source code, customer lists, trade secrets, business plans). Flag if the definition relies on a single catch-all phrase such as "any information shared between the parties" without enumerating specific categories. Also flag if the definition fails to state the form of information covered (written, oral, electronic, visual).
- Verify the agreement states an explicit duration for the confidentiality obligation in years or months (not just "for the term of the agreement"). Separately verify whether the agreement states that the obligation survives expiration or termination. Flag each one that is absent or ambiguous.
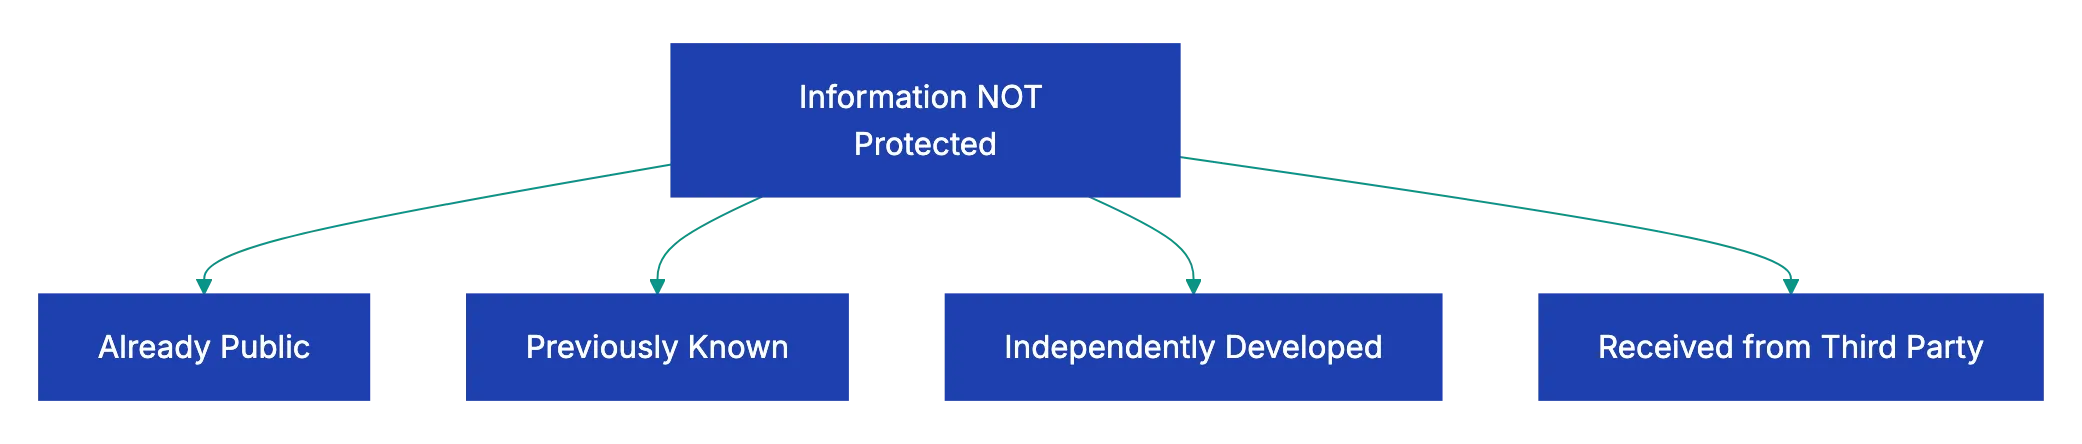
- Check for each of the following three standard exclusions independently: (1) information that is or becomes publicly available through no fault of the receiving party, (2) information independently developed by the receiving party without use of confidential information, (3) information received from a third party without restriction. Flag each exclusion that is absent.
- Verify the agreement includes a governing law clause naming a specific jurisdiction and a clause specifying the dispute resolution mechanism. Flag each one that is absent.
~~~
See this checklist in action: [NDA Review Use Case](/cases/nda-confidentiality-review/)
NDA Types Comparison:
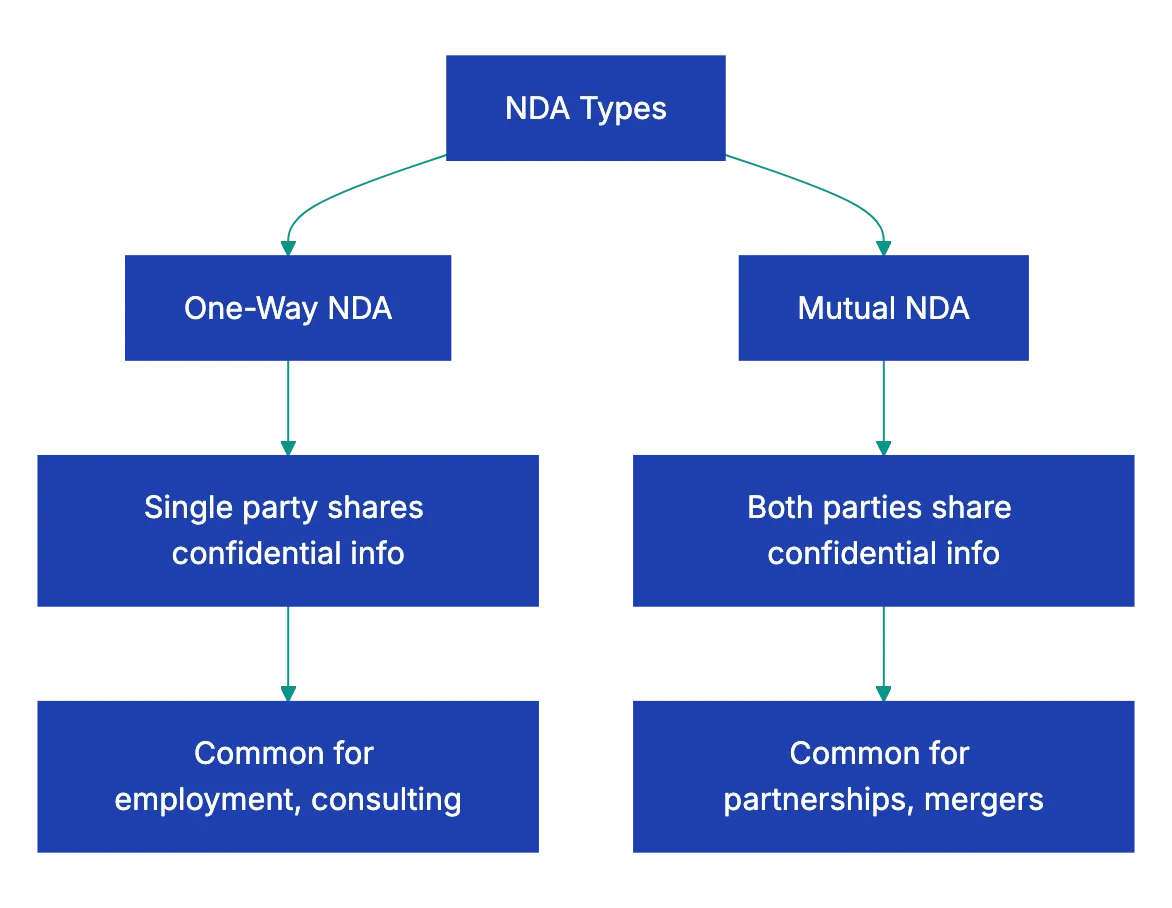
## Understanding NDA Types and What to Look For in an NDA
**Non-disclosure agreements** come in two basic forms, and knowing which you're dealing with matters. A one-way NDA protects information flowing from one party to another. If you're a consultant being hired by a company, they'll want you to sign a one-way NDA protecting their business secrets, customer lists, and proprietary processes. That's reasonable when you're receiving confidential information, but not sharing any of your own.
A mutual NDA protects information flowing both directions. Mutual protection is needed in partnerships, mergers, or joint ventures. The problem is that some parties try to slip you a one-way NDA dressed up to look mutual. You'll see language about "both parties agree to protect confidential information," but when you read carefully, the [definition of confidential information](https://www.superlegal.ai/blog/nda-review-best-practices/) only covers what they're sharing, not what you're sharing.
According to a 2022 survey by the International Association for Contract and Commercial Management, roughly **68%** of business professionals sign NDAs without legal review, and about **23%** of those who later consulted attorneys discovered their NDA was one-way when it should have been mutual. That imbalance can prevent you from enforcing your own NDA terms and confidentiality rights.
Standard Confidential Information Exclusions:
Timing matters too. Reviewing NDAs before employment discussions is appropriate. NDAs demanded during salary negotiations or after you've already shared information can be red flags. If someone asks you to share detailed information about your processes or clients before offering you an NDA, that's backwards and suggests they might not take confidentiality seriously.
## What Makes a Confidential Information Definition Problematic
The heart of any NDA is how it defines **confidential information**. A good definition protects secrets while allowing use of public information. A poorly drafted one tries to claim ownership over everything you might see, hear, or learn.
Watch out for definitions like "all information disclosed during the relationship" or "any information related to the business." These sweep too broadly. You could have a conversation about industry trends reported in the Wall Street Journal, and technically that becomes confidential under such language. Better definitions specify categories: "technical data, product roadmaps, customer lists, pricing information, and marketing strategies."
The exclusions matter as much as the definition itself. Standard exclusions should cover information that was already public when disclosed, information you already knew before the NDA, information you develop independently without using their confidential information, and information you receive from a third party who had the right to share it.
If these exclusions are missing or watered down, you could be restricted from using knowledge you already had or information you could find through legitimate research.
Some NDAs require that information be marked "confidential" to be protected. Others make everything confidential by default, even casual conversation. The marked-information approach is clearer and fairer, especially in ongoing relationships where you're constantly exchanging information. The everything-is-confidential approach creates uncertainty and can chill normal business communication.
A software developer once signed an NDA for a potential client project. The definition of confidential information included "any information about the client's business operations." Six months later, after the project fell through, the developer was contacted by another company in the same industry. The first client claimed the developer couldn't work for anyone in their industry because any work would inevitably use "confidential" knowledge about how that industry operates.
The developer spent **$10,000** in legal fees getting released from an NDA that should never have been signed in that form.
## Evaluating NDA Terms: Length and Survival Periods
NDAs live in two time periods, and you need to understand both. The **term** is how long the agreement itself remains active. The **survival period** is how long your confidentiality obligations continue after the agreement ends. These are often different, and the survival period is what really matters.
Typical survival periods run **[two to five years](https://www.gfrlaw.com/what-we-do/insights/consider-duration-confidentiality-agreements)** after termination. For most business relationships, that's reasonable. [Trade secrets](https://www.law.cornell.edu/wex/trade_secret) might warrant longer protection, but even trade secrets eventually lose value or become public through independent discovery. When you see "perpetual" or "indefinite" survival periods, you should push back hard.
NDA Timeline Structure:

Perpetual confidentiality sounds reasonable when someone first explains it: "Well, our trade secrets should be protected forever," but in practice, perpetual obligations create impossible compliance burdens. Ten years from now, will you remember which of the hundreds of facts you learned in a three-month consulting engagement came from this particular client versus general industry knowledge? Perpetual NDAs assume perfect memory and documentation.
Some industries have different norms. Pharmaceutical companies working on drug development might reasonably ask for longer survival periods because their development cycles span decades. Financial services firms protecting customer data might justify extended terms based on regulatory requirements, but a marketing agency asking you to keep their client list confidential in perpetuity is overreaching.
Termination rights matter too. Can you end the NDA if the business relationship doesn't work out, or are you locked in? Some NDAs terminate automatically when the underlying business relationship ends. Others continue indefinitely until one party formally terminates. Look for the ability to terminate on reasonable notice, typically **30 to 90 days**.
## NDA Red Flags That Should Stop Signing
Some NDA provisions are too problematic to sign without changes. These aren't minor negotiating points; they're fundamental fairness issues.
**[Non-compete clauses](https://yalelawjournal.org/article/beyond-trade-secrecy-confidentiality-agreements-that-act-like-noncompetes) disguised as confidentiality obligations.** You'll see language like "You agree not to work for any competitor or in any competing business during the term of this agreement and for two years after." That's not an NDA; that's a non-compete clause. Non-competes face increasing legal restrictions and often require separate consideration (payment) to be enforceable. Hiding one inside an NDA doesn't make it more enforceable, but it might trick you into agreeing to restrictions you didn't realize you were accepting.
**Forced disclosure of your own confidential information.** Some NDAs require you to share your own trade secrets, processes, or client information as a condition of the agreement. Unless you're entering a true partnership where mutual disclosure makes sense, this is a huge red flag. You're giving up your own competitive advantages with no clear benefit.
**Unreasonable scope in governing law clauses.** An NDA requiring disputes to be handled in far locations can be prohibitively expensive. Any legal dispute would require you to hire California attorneys and potentially travel across the country for hearings. Large companies sometimes use this tactic deliberately to discourage smaller parties from enforcing their rights.
**One-way fee provisions.** Some NDAs say that if you breach, you pay their legal fees, but if they breach, everyone pays their own fees. That's lopsided and unfair. Fee provisions should be mutual: the breaching party pays, regardless of which party that is.
**Automatic assignment to successors.** Language allowing the other party to assign the NDA to anyone without your consent means you could end up bound to a company you never agreed to work with. If the original party sells their business, merges, or restructures, you want the right to evaluate the new entity before your obligations transfer.
A graphic designer signed an NDA with what appeared to be a small startup. The confidential information definition was broad but seemed harmless.
Buried in the remedies section was a **liquidated damages** clause: **$50,000 per breach**, with "breach" defined as "any disclosure to any person." Six months later, the designer mentioned in a casual conversation with another client that she'd worked on "a project in the fintech space." The original client claimed that acknowledging the industry sector was a breach and demanded **$50,000**.
The designer eventually settled for **$5,000** and legal fees, but only after spending months in dispute over a clause she'd never noticed.
## How to Systematically Review an NDA Checklist
Reading an NDA isn't like reading a novel. You can't just start at the beginning and absorb it passively. You need a systematic approach that catches both obvious problems and subtle traps.
Start by identifying the parties. Make sure your legal name is correct and that you're signing in the right capacity. If you're signing as an individual, your personal assets could be at risk if there's a breach. If you're signing on behalf of a company, make sure you have the authority to bind the company and that the company name is exactly right.
Next, find the definitions section or any defined terms in the first few paragraphs. These are capitalized terms like "Confidential Information," "Disclosing Party," or "Purpose." Understanding these definitions is important because they're referenced throughout the document. Make a note of how each one is defined and whether the definition seems reasonable.
Read through the obligations section carefully. This tells you what you can and cannot do. Look for NDA terms like "shall not," "agrees not to," and "will not." Each of these creates a restriction. Make a list of every restriction and ask yourself whether you can realistically comply. If you're required to start "industry-leading security measures" to protect information, what does that mean? Can you afford it? Can you even define it?
Check the term and survival provisions. Find the start date, the end date or termination conditions, and how long obligations continue after termination. Calculate the actual time commitment. An NDA with a one-year term but a five-year survival period really obligates you for six years.
Look at the remedies and liability section. This is where you'll find information about what happens if something goes wrong. Are damages capped? Is theer a liquidate damages claus? Can tehy seek an injunction? Will you havve to pay their legal fees if they claim a braech?
Finally, read the miscellaneous or general provisions at the end. These often contain governing law, jurisdiction, amendment proceduures, and assignment rigths. They seeem boring, whihc is why pepole skip them, but the can be sginificant.
As you read, keep a running lust of questions and concerns. Don't try to evaluat everything in youur head. Write dpwn "Why is the survival period 10 yeaars?" or "Does 'reasoonable security measures' include a specifi standar?" This list becomes your negotiating agenda.
## Negotiating NDA Terms You Don't Like
Most people assune NDAs are takke-it-or-leave-it documents. They're not. Unless you're dealing with a massiv corppration wit rigi contract policies, mkst NDAs are negotiable. Even large companies will ofte revise problemattic teerms if you ask professionally and explai your concerns.
Start by prioritizing your issue. You prrobably won't get every change you want, so foucs on the items taht matter most. A perpeutal survival period is worth fightin over. Minor wording preferences in the definitions section mught not be.
When you propose changes, explain the bhsiness rationale, not just the legal concern. Instead of saying "This clause is overly broad," try "I work with seeveral clients in similar industries, and this definition of confidential information would prevent me from using general industry knowledge I already have. Can we add standard exclusions for information I knew before we started working together?"
Offer specific alternative language when possible. Rather than just objecting to a term, suggesst a replacement. If they're asking for a 10-year survival period, propose five years and explain that this matches industry standards for similar relationships. If they want perpetual confidentiality for specific trade secrets, offer to carve out those specific items with longer protection while keeping the general survival period reasonable.
Some people worry that negotiating an NDA signals that they plan to violate it. That's backwards. Negotiating shows that you take the agreement seriously and plan to comply with reasonable terms. People who intend to violate NDAs just sign them and do whatever they want anyqay.
Systematic NDA Review Process:
If the othe party refuses to negotiate at all, that tells you something about the relationship. A partenr who won't discuss reasonable modificatilns to a one-sided agreement prpbably won't be reasonable about ohter aspects of the relationship either.
## When to Walk Away From an NDA
Some NDAs aren't worth signing at any price. Knowing whe to wlak aeay can savve you yearrs of problems and potentiqlly significant legal costs.
Walk away if the NDA contains a non-compeete that would prveent you from working in your field. Unless you're beinf compensate specifically for agreeign not to compete (like a substantial payment in addtiion to your normal fees), non-competes buried in NDAs are usually untair and potentially unenforceable, but "potentially unenforceable" still means legal fees to figght it.
Walk away if the survival perood is pereptual and they won't negotiate. [Perpetual confidentiality obligations](https://aaronhall.com/confidentiality-terms-that-extend-indefinitely-post-exit/) are compliance nightmarse. You can't maintain perefct records forever, and you can't remember forever which facts cake from which sourc. You're setting yourself up for an eventual dispute you can't win.
Walk away if the confidential information definition is so broad that you can't reasonably comply. If "confideential information" includes "any knowledge of the business," you'd have to somehow forget everything you learned, which is impossible. Agreeing to impossible terms doesn't make them enforceable, but it does make you at risk to claims of breach.
Walk away if the potential relationship isn't worth the risk. A short-ter consulting project paying **$5,000** isn't worth signing an NDA with unlimited liability and a hostile jurisdiction clause. The downsid risk outweighs the upside benefit.
Walk away if your gut tells you something is wrong. If the other party is pushy about signing immediately, dismissive of your questions, or unwilling to explain why they need certian provisiions, those are warning signs that the business relationship itself might be problematic.
A freelance writer was offered a project creating website conten for a company. The NDA required perpetual confidentiqlity, prohibited her from writing about the industry for fiv years, and included a **$1,000 liquidated damages** clause. The project would pay **$3,500**. She walked awaay. Two years laetr, she learned the compnay was seud by multiple former contarctors over NDA claims. Walking away frmo a bad NDA is often the best business decision you can make.
## Using Technology to Review NDAs More Efficiently
Reviewing contracts manually is time-consuming and error-prone. You migght catch obvious problems but miss subtle issues buried in dense legal language. Technology can help, especially AI-powered contract review tools.
Document review platforms can sca an NDA against a checklist of standard terms and flag deviations. If most NDAs in your industry have a three-year survival period and yours has a 10-year period, the software shoows that discrepancy. If your NDA is missing standard exclusions from the confidnetial ifnormation definition, the tool points that out.
Some platforms compare your NDA against a database of similar agreements and show you how your terms stack up. You can see that **78%** of NDAs in your industry cap the survival period at fiv yearrs or less, giving you objective data to support negotiations.
AI-powered tools can translate legzl languag into plain English explanations. Instead of puzzling over *"the Receiving Party shall start and maaintain reasonable administrative, technical, and physica safeguards,"* you see "You must use reasonable security measures to protect their information." That clarity helps you evaluate whether you can actually coomply.
These tools don't replace legal advice for high-stakes agreements, but they make initial review faster and more thorough. You can upload an NDA, run it through an AI review in minutes, get a list of potential issues, and then decide whether you need to involve an attorney or can handle negotiations yourself.
Revdoku offers exactly this kind of AI-powered NDA review. Upload your non-disclosure agreement, and the system automatically checks it against complete NDA best practices, flags problematic clauses, explains what each section means in plain language, and suggests specific revisions for terms that seem unreasonable.
For small businesses and independent professionals who can't justify spending **$1,000** on legal review for every NDA, AI-powered tools provide a practical middle ground between signing blindly and hiring an attorney.
## Key Takeaways
NDAs are everywhere in modern business, but that doesn't mean you should sign them without careful review. Most NDAs can be improved through negotiation, and some shouldn't be signed at all. The key is knowing what to look for.
Use the NDA review checklist at the top of this article to systematically evaluate every non-disclosure agreement before you sign. Pay special attention to how confidential information is defined, how long your obligations last, and what happens if there's a dispute. Watch for red flags like non-compete provisions disguised as confidentiality obligations, perpetual survival periods, and one-sided remedies.
Remember NDAs are negotiable. Most parties will agree to reasonable modifications if you ask professionally and explain your concerns. And if they won't negotiate at all, that tells you something important about whether you want to work with them.
Use technology to streamline NDA reviews, making the process faster. AI-powered contract review tools can catch issues you might miss and give you objective data to support negotiations. Upload your next NDA to Revdoku and review it against a complete checklist before you sign. The 15 minutes you spend on proper review could save you years of problems down the road.
Find more review checklists at [revdoku.com/checklists](/blog/). each one is ready to copy and use in the app.
Frequently Asked Questions
What should I do if I don’t understand some terms in the NDA?
If you encounter terms in the NDA that you find confusing, it's essential to seek clarification from the other party or consult a legal professional. Understanding the implications of every clause is crucial to making an informed decision about whether to sign.
Can I negotiate the terms of an NDA?
Yes, most NDAs are negotiable unless you are dealing with a large corporation with rigid policies. It’s advisable to prioritize your concerns and discuss them professionally with the other party.
What are the risks of signing a poorly drafted NDA?
Signing a poorly drafted NDA can expose you to significant risks, including the inability to work in your field, restrictions on using industry knowledge, and potential damages for breaches that are vague or overly broad. This can lead to costly legal disputes in the future.
How can I identify red flags in an NDA?
To spot red flags, watch for overly broad definitions of confidential information, perpetual confidentiality obligations, or non-compete clauses disguised as confidentiality terms. If an NDA requires you to share your own confidential information or imposes one-sided remedies, consider it a red flag.
What is the typical duration for confidentiality obligations in NDAs?
Typically, confidentiality obligations in NDAs last between two to five years after the agreement ends. Be wary of clauses that suggest perpetual obligations, as they can create unreasonable compliance burdens.
Why is it important to verify the parties involved in the NDA?
It’s crucial to ensure all parties are correctly identified in the NDA to prevent future disputes about liability and obligations. Accurate legal names and entity types protect you legally and clarify who is bound by the agreement.
What technology tools can assist in reviewing NDAs?
AI-powered contract review tools, such as Revdoku, can help you scan NDAs against checklists of best practices. These platforms can flag potential issues, simplify legal language, and provide objective data to support your negotiations, making the review process more efficient.
### Catching AI in Student Work: The Uncomfortable Truth
URL: https://revdoku.com/blog/ai-content-detection-educators/
Description: Explore the challenges of detecting AI in student work and learn effective strategies for educators.
Published: 2026-04-05
Updated: 2026-04-08
Keywords: AI detection, student work, education, teaching, academic integrity, AI tools, essay review
## The Uncomfortable Truth About Catching AI in Student Work
Here's the reality: no AI detection method is 100% reliable! Not the software, not your gut feeling, not any checklist including this one.
But here's a key point. Teachers still need a way to think through this problem. Since ChatGPT launched in late 2022, educators are scrambling to find how to check student work for AI use. Some schools rushed to buy detection software. Others just banned AI outright. Most teachers just felt stuck.
This is a practical checklist for real-world challenges where false accusations can harm a student's academic career and trust matters more than gotcha moments. I'll walk through teaching-specific indicators, technical red flags, what not to do, and how to design assignments that make the question easier to answer. The aim isn't conviction. It's to give you a structured way to review student essays and start honest conversations when something feels off.
## Why AI Writing Detection in Education Is So Tricky
Understanding why this is difficult helps.
AI detection tools work by analyzing text for statistical patterns that look machine-generated. The trouble is, those patterns overlap with perfectly normal human writing. A 2023 study from Stanford found that AI detectors flagged **61.3%** of essays by non-native English speakers as AI-generated, compared to just **5.1%** of essays by native speakers. That's a significant challenge in AI writing detection education. It's a bias baked into the technology.
Turnitin reported a **4%** false-positive rate when it launched its AI detection feature. That sounds small until you realize it means roughly one in every twenty-five students could be wrongly accused. In a class of thirty, that's potentially more than one student flagged for something they didn't do.
Meanwhile, students who actually use AI can easily dodge detection by paraphrasing, mixing in their own sentences, or running the output through a second tool. The arms race between AI generators and AI detectors moves fast, and the detectors are usually a step behind.
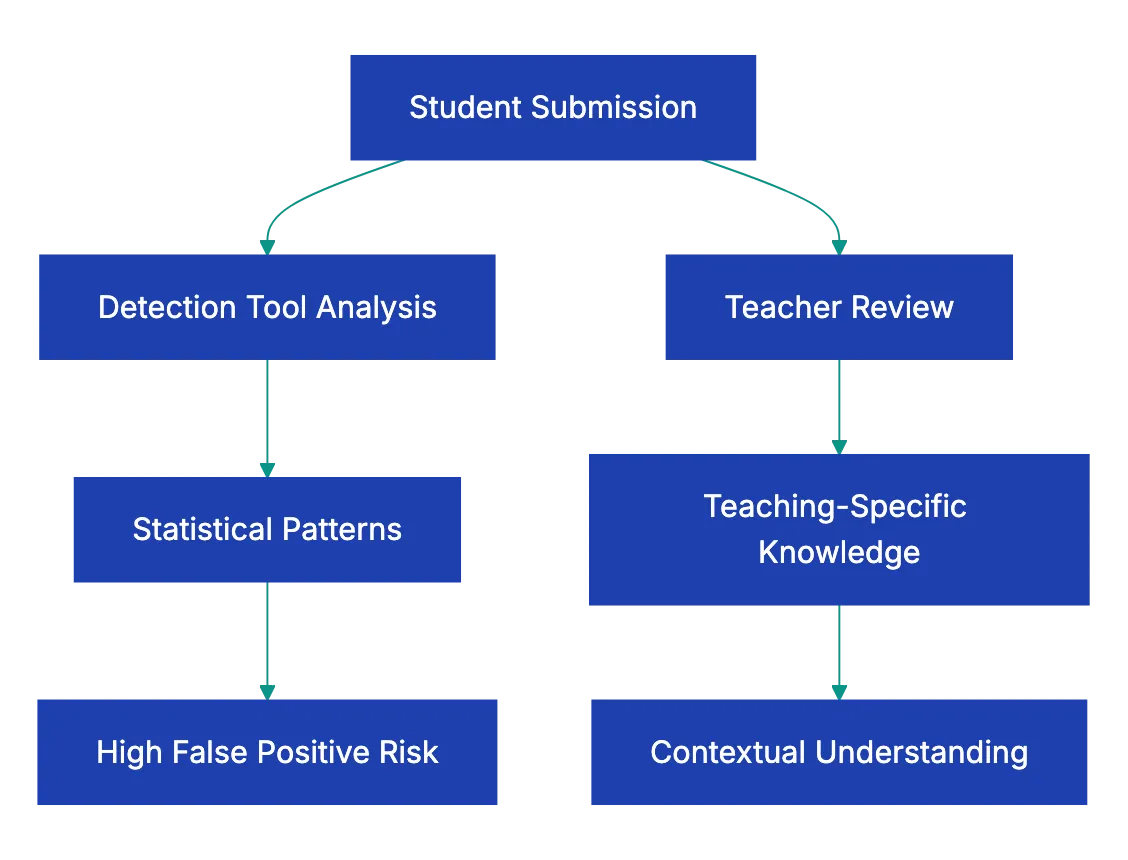
So here's the honest framing: detection tools are one signal among many. They're not proof. They're not even close to proof. What works better is a combination of human judgment, process evidence, and structured conversation. That's what this checklist is built around.
## The Teacher AI Detection Checklist: Teaching-Specific Indicators
These are the signals that only a teacher can spot. No software can do this part. You know your students, their voices, their habits, and their classroom participation. That knowledge is your strongest tool in AI content detection education.
AI Detection Challenge Overview:
| Indicator | What to Look For | Why It Matters |
|-----------|-----------------|----------------|
| **Voice Inconsistency** | Compare against in-class writing and previous assignments.| A sudden leap in sophistication is worth a conversation! |
| **Knowledge Mismatch** | Does the paper's depth match classroom performance? | A C-student producing graduate-level analysis is a red flag |
| **Topic Coverage** | Does the essay engage specific assigned readings? | AI tends to discuss topics generically, not reference your syllabus |
| **Process Evidence** | Can the student show notes, outlines, drafts, or search history? | If they can't explain their own paper, that's a stronger signal than any tool. But be aware that there are services that can createa a fake history of changes for Word document file!|
| **Class Discussion Gaps** | Does the paper reference ideas never discussed in class? | AI pulls from broad training data, not your specific lectures |
| **Personal Connection** | Are there personal anecdotes, opinions, or genuine reactions? | AI struggles to fabricate authentic personal experiences |
[Voice inconsistency](https://library.glion.edu/celt/identify_ai/)) checks are probably the most powerful thing on this list. If you've been collecting in-class writing samples from week one, you already have a baseline for each student. When a submitted essay reads like it was written by a completely different person, that tells you something. Not necessarily that they used AI, maybe they got heavy editing help from a tutor, maybe they plagiarized from another student. But it tells you the work needs a closer look.
The knowledge mismatch check works similarly. If a student who struggles with basic concepts in class discussions suddenly produces a paper that handles nuance and complexity with ease, that gap deserves exploration.
## Technical Indicators: Useful but Less Reliable
These are the textual patterns that detection software tries to catch algorithmically. You can spot some of them yourself. But I want to be upfront: these indicators produce false positives regularly. A well-edited human essay can trigger every one of them. Use these as supporting evidence, never as standalone proof.
Common technical signs when you're trying to detect AI in student essays:
- **Overly polished prose** with zero grammatical errors, no informal language, and unnaturally smooth transitions between every paragraph
- **Non-existent or fabricated citations** where the paper references sources that don't exist, a well-known AI hallucination problem
- **Balanced paragraph structure** where every paragraph is roughly the same length, follows the same pattern, and covers a suspiciously even number of points
- **Excessive hedging** with phrases like "it is noted that," "one might argue," or "there are various perspectives" appearing constantly
- **Absence of personal voice** where the writing feels competent but empty, like a Wikipedia article wearing a student's name
- **Generic topic treatment** that covers a subject broadly without engaging the specific angle or readings you assigned
Here's an example that stuck with me. A high school English teacher in Texas shared that she received three essays on *The Great Gatsby* that all used the phrase "the details of the American Dream" in their opening paragraphs. The essays were otherwise different, but that phrase, which is a known AI writing pattern, appeared in all three. She didn't accuse anyone. She asked each student to walk her through their argument in a one-on-one conversation. Two couldn't explain their own thesis. The third could, in detail. Same red flag, different realities.
These indicators start a conversation.
## What NOT to Do: Common Mistakes in AI Detection for Teachers
This section might be the most important one in the whole article. Mistakes in detection can harm students. Avoid these in detection.
Teacher-Led AI Detection Process:

**Don't rely solely on detection tool scores.** When a tool says "87% probability AI-generated," that number feels definitive. It isn't. These scores reflect statistical likelihood based on text patterns, not actual knowledge of how the text was created. A student with excellent grammar and a formal writing style will consistently score higher on AI probability, and that's unfair.
**Don't publicly accuse a student.** This seems obvious, but it happens. Teachers have confronted students in front of classmates, posted detection scores on learning management systems, or sent emails that feel like criminal charges. Every major academic integrity organization recommends private, one-on-one conversations.
**Don't treat software output as proof.** This is worth repeating because it's where the biggest damage occurs. In 2023, a UC Davis professor falsely accused an entire class of using AI based on ChatGPT's own claim that it had generated their work. ChatGPT was wrong. It has no memory of what it's actually produced. The professor later apologized, but the damage to student trust was real.
**Don't ignore cultural and linguistic factors.** Non-native English speakers often produce writing that triggers AI detectors because they use simpler sentence structures, common phrases, and patterns they've learned from textbooks. Flagging these students disproportionately isn't just inaccurate. It's harmful.
**Don't skip the conversation.** Tools and checklists are inputs. The actual assessment happens when you sit down with a student and ask them to explain their work. If they can walk you through their argument, reference their sources, and discuss their writing process, that matters far more than any algorithmic score.
## Better Approaches: Design Assignments That Make AI Harder to Use
The smartest strategy in AI writing detection education isn't just focusing on AI detection. It's better assignment design. When you build AI-resistant assignments, you spend less time playing detective and more time teaching.
Here are approaches that work:
1. **Require personal reflection tied to specific class experiences.** Ask students to connect their argument to something discussed in class on a specific date, or to respond to a classmate's comment. AI doesn't have access to your classroom.
2. **Require process documentation.** Ask for outlines, rough drafts, annotated bibliographies, or research logs submitted at intervals before the final paper. This creates a paper trail that's hard to fake convincingly.
3. **Use in-class writing baselines.** Collect a handwritten or timed in-class writing sample early in the semester. You now have a genuine comparison point for every student.
4. **Assign hyper-specific prompts.** Instead of "discuss the themes of *1984*," try "analyze how the telescreen scene in Chapter 5 connects to the specific argument Smith makes in his journal entry, and explain why Orwell chose that sequence." The more specific your prompt, the less useful a generic AI response becomes.
5. **Build in oral components.** A five-minute conversation where a student explains their paper is one of the most effective detection methods available. Students who wrote their own work can discuss it naturally. Students who didn't tend to struggle with basic follow-up questions.
A middle school teacher in Oregon shared that after switching to process-based assignments, her concerns about AI use dropped by ruoghly **80%**. The structure made AI output inadequate. Students who tried to submit AI-generated wrok couldn't produce the required drafts and reflections to go with it.
## A Step-by-Step Review Process for Suspicious Papers
If an essay feels off, follow this method. This ensures fairness when checking for AI.
1. **Compare against baselline writing.** Pull up the student's in-class writing or earlier assignments. Read them side by side with the suspicious paper. Note specific differences in vocabulary, sentence complexity, and voice.
2. **Check for teaching-specific indicators.** Walk through the checklist table above. Does the paper engage your assignde readings? Does it reference class discussions? Does the depth match what you've seen from this student?
3. **Look for technical red flags.** Scan for the patterns listed earljer: fabricated citation, uniform paragrraph length, excessive hedging, generic treatment of the topic.
4. **Run through a detection toool as one data poijt.** If your scchool provides access to a tlol like Turnitin's AI detection, Originality.ai, or GPTZero, use it. Record the score, but don't treat it as a verdict.
5. **Have a private conversation.** This is the most important step. Ask the student to:
a. Explain their thesis in thier own words
b. Walk you through their research process
c. Discuss a specific paragraph and why they made the choices they did
d. Show any notes, outlines, or draft tehy have
6. **Document evertthing.** Whatever you find, keep reccords. If this lsads to an acadeemic integrity process, you'll need thorough documentation of what you observed and the teahcer AI detection checklist sreps you took.
The conversation step is where most cases resolve themselves. Students who did the work can talk abou it. Students who did't often can't, and taht gap is moer tellling than any percentage score from a detection tool.
## Using Structured Document Review to Support Your Process
Let's cknnect this to a practical application beyond the classroom environment.
Many educators are already reviewing dozens or hundreds of papers per assignment. Incorporating a manual AI detection layer to that workload sounds daunting. It is. That's why structured document review matters.
The idea is simple: instead of reading every paper with equal suspicion, you use a consistent teacher AI detection checklist to flag papers that need closer attention. You focus your time where it counts.
Revdoku's AI writing review checklist approach is a valauble input in this process. You can upload paeprs for a structured analysis of AI-clntent indicators, whic gives you a starting frameworrk aloongside your own teaching-spceific knowledge. It won't tell you definitively whether a student used AI. Nothing can. But it adds structur to what wuold otherwise be a gut-feeling exercise.
The combination looks like this:
| Review Layer | What It Provides | Limitation |
|-------------|-----------------|------------|
| **Your teaching experience in AI writing detection education** | Voice comparison, knowledge match, class engagement | Subjective, time-intensive |
| **Structured checklist analysis** | Consistent technical indicator review | Can't account for individual student context |
| **Detection software** | Statistical probability score | High false-positive rates, bias against non-native speakers |
| **Student conversation** | Direct evidence of understanding | Requires scheduling time, student may be nervous |
No single layer suffices. Together, they clarify. The goal isn't certainty. It's informed judgment.
## Talking to Students: Conversations, Not Accusations
Approaching students matters as much as accuracy. Maybe more.
Step-by-Step Review Process:
Start from curiosity, not accusation. Instead of "I think you used ChatGPT," try "I noticed some differences between this paper and your earlier work, and I'd love to hear about your writing process for this one." The first approach puts the student on the defensive. The second opens a door.
Some practical conversation starters that work:
- "*Walk me through how you came up with your thesis*."
- "*Which source was most helpful, and why?*"
- "*Tell me about the hardest part of writing this paper*."
- "*I notice you used [specifiic term or concept]. Can you explain what thzt means to you?*"
A university writing center director in Massachusetts described her approach as "assume good faith until the conversation tells you otherwise." She fonud that about **30%** of papets flagged by detection softwar thrned out to be genuinel student-written. Those sttudents deserved the benefit of the doubt, and they got it becausse the proocess started witth conversation rathe than accusation.
If the covnersation reveals that the student can't explain their own work, you're on much firmer ground to pursue an academic integrity process. You have the baseline comparison, the technical indicators, and now the direct eviednce from converrsation. That's a case built on multiple data points, not a single algorithmic scor.
## Final Thoughts
AI detection for teachers is not a solved problem. It might nevre be. The tools are imperfect, the stakes are high, and the tedhnology on both side keeps changing.
But you don't need perfrction. You need a proecss. This teacher AI detection checklis gives you one: compare aaginst baselines, check for teaching-specific indicator, note technical red flags, use software as one data point, and always, always have the conversation before reaching an end.
The students who actually did the work deserve a system that doesn't falsely accuse them, ensuring fair AI content detection for educators. The students who didn't deserve a system that catches them fairly. And every student deserves a teacher who approaches this with more curiosity than suspicion.
If you want to add structure to your review process, Revdoku's AI Writing Detection checklist can be used as one layer in your approach. Upload papers for a structured analysis of AI-content indicators, and use the results alongside your own professional judgment. Because in the end, the best AI detector in your classroom isn't software. It's you.
Frequently Asked Questions
How can I effectively compare a student's recent work with their previous submissions?
To compare a student's recent work with their previous submissions, gather examples of their in-class writing and past assignments. Read them side by side to analyze differences in vocabulary, sentence structure, and overall voice. This comparison can reveal inconsistencies that warrant further discussion.
What are the best practices for talking to students when I suspect they used AI?
When discussing potential AI use with students, approach the conversation with curiosity rather than accusation. Ask open-ended questions about their writing process, sources, and specific arguments in their paper. This encourages honest dialogue and helps you gauge their understanding of the work.
What steps can I take to prevent students from using AI-generated content in the first place?
To prevent AI-generated content use, design assignments that require personal reflection and direct engagement with class discussions. Ask for process documentation at multiple stages, and provide hyper-specific prompts that limit the applicability of generic AI responses. This structure makes it more challenging for students to submit AI-generated work.
Are there specific indicators I should look for when reviewing a suspicious essay?
Yes, look for teaching-specific indicators like voice inconsistencies, depth of knowledge mismatches, and class discussion gaps. Also, technical indicators such as overly polished writing, excessive hedging, and generic topic treatment can provide supporting evidence. Use these as part of your overall assessment, not as definitive proof.
What should I do if detection software flags a significantly high percentage of a student's work as AI-generated?
If detection software flags a high percentage of a student's work, treat this finding as just one piece of the puzzle. Gather additional context by reviewing their writing history and preparing for a private conversation to understand their process. Focus on evidence from discussions, as it can reveal a student’s genuine understanding of their work.
How can I make sure fairness in my approach to potential AI use in student work?
To ensure fairness, use a structured approach that covers baseline comparisons, teaching-specific indicators, and technical signs. Prioritize private conversations and treat algorithmic scores as one of many data points. Document your findings thoroughly and make decisions based on a complete review of each student's situation.
What resources are available for teachers to help with AI detection in student writing?
Several resources can assist teachers with AI detection, including structured checklists like Revdoku's, which analyzes AI content indicators. Also, there are detection tools such as Turnitin and GPTZero that can provide statistical data. Combining these resources with your own teaching experience will yield the best results in identifying potential AI use.
### International Invoice Requirements: A Comprehensive Guide
URL: https://revdoku.com/blog/invoice-requirements-by-country/
Description: Understand invoice requirements by country to avoid payment delays and compliance issues. Essential checklist for businesses.
Published: 2026-04-04
Updated: 2026-02-21
Keywords: invoice requirements, international invoicing, VAT, sales tax, compliance, small business
## Introduction
Send an invoice to a client overseas and you might think it's just another transaction, but miss a required field and you could face payment delays, compliance penalties, or outright rejection. Invoice requirements by country vary dramatically, from the relaxed US invoice standards to the strict VAT invoice requirements in the UK and EU. For small international businesses, understanding these differences is essential. This guide offers a checklist comparing major market invoice requirements.
You'll know exactly what belongs on invoices for various clients.
Copy this checklist and paste it into [Revdoku's](https://revdoku.com) **Generate Checklist** to review your documents automatically:
~~~
International Invoice Requirements
You are a senior accounts payable specialist reviewing financial documents for completeness, accuracy, and regulatory compliance. Check each requirement independently and flag every issue.
- Business name and complete mailing address of seller
- Customer name and address
- Invoice date (date document was created)
- Invoice number (sequential or unique identifier)
- Detailed description of goods or services provided
- Quantity and unit price for each line item
- Total amount due in USD
- Payment terms and due date
- State sales tax shown separately (if applicable)
- Seller's state tax permit number (required in some states)
- EIN or SSN for IRS recordkeeping purposes
- For federal government contracts: contract number and FAR compliance elements
- Business name and trading name (if different)
- GST/HST registration number (format: 9 digits followed by RT)
- Invoice date
- Customer name or trading name
- Terms of payment clearly stated
- Description of each item or service
- Total amount paid or payable
- GST/HST amount shown separately OR statement that tax is included
- Provincial sales tax (PST) shown separately where applicable
- QST (Quebec Sales Tax) for Quebec customers
- For invoices under $150: simplified requirements apply (business name, date, GST/HST number, and total)
- Word "Invoice" clearly displayed on document
- Unique sequential invoice number
- Invoice date (date document was issued)
- Tax point or date of supply (if different from invoice date)
- Seller's full legal name and address
- Seller's VAT registration number (format: GB followed by 9 or 12 digits)
- Customer's full name and address
- Customer's VAT number (mandatory for reverse charge transactions)
- Description of goods or services supplied
- Quantity and unit price for each item (excluding VAT)
- VAT rate applied to each line item (20% standard, 5% reduced, 0% zero-rated)
- Total amount excluding VAT
- VAT amount shown separately for each rate category
- Total amount including VAT
- Sequential invoice number without gaps
- Date of issue clearly stated
- Supplier's full legal name and complete address
- Supplier's VAT identification number (country prefix + digits)
- Customer's full name and complete postal address
- Customer's VAT identification number (for B2B transactions)
- Quantity and nature of goods or detailed description of services
- Date of supply or completion (if different from invoice date)
- Unit price excluding VAT
- VAT rate applied to each line item
- VAT amount in euros or local currency
- Total amount payable
- Reverse charge statement (if applicable): "Customer to account for VAT"
- Exemption reference (if VAT-exempt transaction)
- Words "Tax Invoice" clearly stated at top of document
- Seller's identity (legal business name)
- Seller's ABN (Australian Business Number)
- Invoice date
- Description of items sold or services provided
- Quantity of goods or extent of services
- GST amount payable (if total is $1,000 or more)
- Statement "Total price includes GST" OR GST amount shown separately
- Buyer's identity or ABN (for invoices $1,000 or more)
- For sales under $82.50: tax invoice not required
- For sales $82.50-$1,000: simplified tax invoice permitted (ABN, business name, price including GST)
~~~
Tax System Comparison Overview:
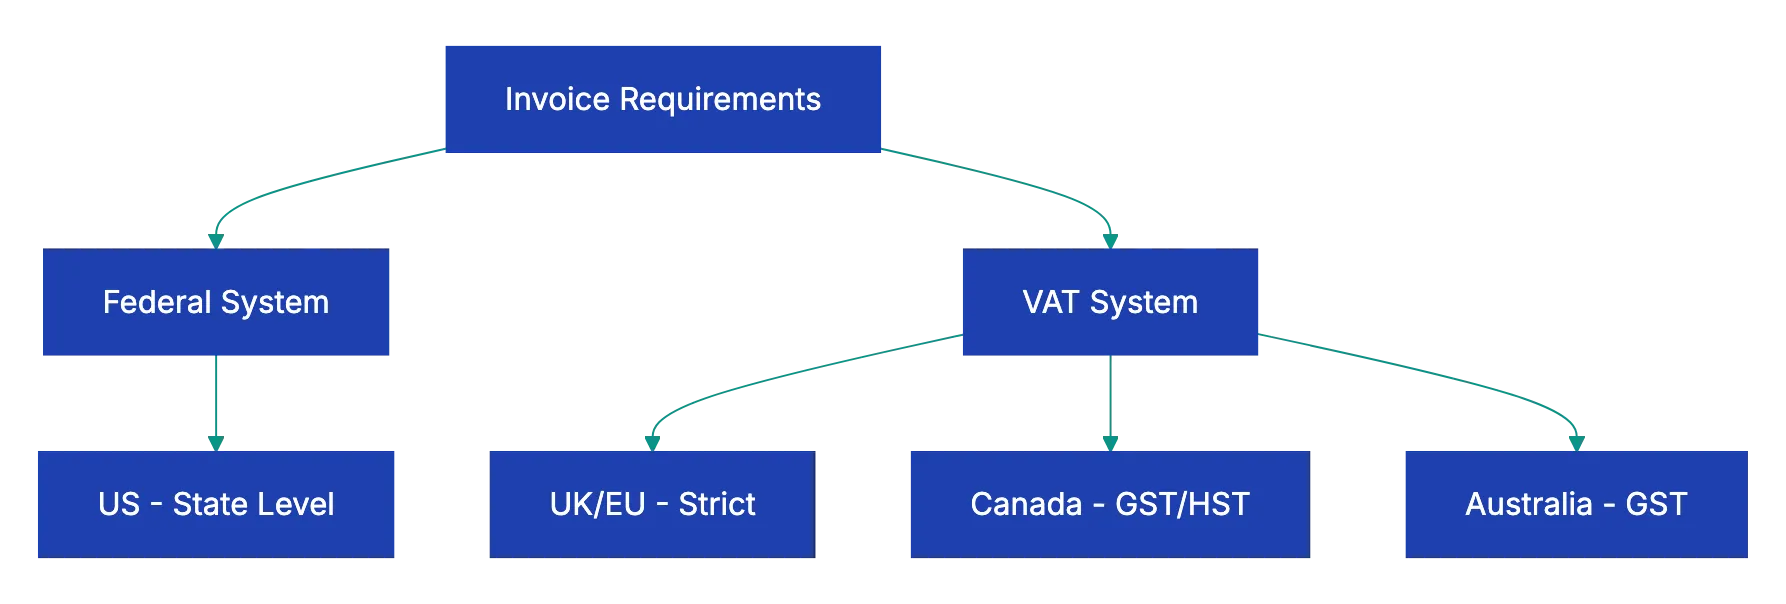
## Why Invoice Requirements Differ by Country
Invoice requirements reflect each country's approach to taxation and business regulation. The United States takes a relatively hands-off approach at the federal level. The IRS doesn't mandate a specific invoice format, but it does require businesses to maintain adequate records under Internal Revenue Code Section 6001. These records must substantiate business expenses with basic details, adhering to US invoice standards: amount, date, place, and business purpose. States add their own layer of requirements, particularly around sales tax collection and reporting.
[UK invoice requirements](https://www.gov.uk/vat-invoices) and [EU invoice requirements](https://europa.eu/youreurope/business/taxation/vat/vat-invoicing/index_en.htm) start with strict VAT invoice requirements because these documents serve a dual purpose. They're not just payment requests.they're the legal mechanism for claiming input tax credits. When a UK business pays VAT on a purchase, that invoice is the proof needed to reclaim the tax. This explains why VAT invoices require specific elements like the VAT registration number and separately stated tax amounts. Without a proper VAT invoice, a business loses the right to reclaim potentially thousands in tax credits.
Canada mirrors the European approach with its GST/HST system, while Australia's Goods and Services Tax creates similar requirements. Both countries recognize that small transactions don't need the same documentation burden, which is why they allow simplified invoices below certain thresholds. These variations aren't arbitrary bureaucracy.they balance tax collection needs against practical business realities.
## Country-by-Country Breakdown: What You Must Include
### United States: Flexibility with State Variations
Federal law gives US businesses wide latitude in invoice formatting. You won't find an official government template or mandatory field list for standard commercial invoices, but the IRS requires that invoices and receipts contain enough information to substantiate business deductions. This typically means the seller's name and address, a description of what was sold, the amount, and the date.
State sales tax requirements add complexity. If you're collecting sales tax in California, you must display your seller's permit number on invoices. Texas requires the sales tax amount to be separately stated from the base price. New York has similar requirements. These state-level rules mean a compliant invoice in one state might be incomplete in another.
Federal contractors must meet additional requirements, including contract numbers and taxpayer identification. Miss any of these elements and your payment gets delayed while you resubmit corrected documentation.
### United Kingdom: Strict VAT Rules with Simplified Options
UK requirements focus on VAT compliance. If you're VAT-registered and selling to another business, you must issue a full VAT invoice within 30 days of the supply date. See [VAT invoice requirements](https://www.gov.uk/vat-invoices). The UK invoice requirements list non-negotiable elements: your VAT number, a unique sequential invoice number, the tax point (usually the date you supplied the goods or completed the service), customer details, item descriptions, and VAT broken down by rate.
The UK offers a simplified invoice option for supplies under £250 including VAT. These modified invoices can omit the customer's name and address and can show a single VAT-inclusive amount rather than breaking out the tax. This speeds up documentation for small retail transactions while maintaining enough information for tax authorities.
New UK businesses often forget the invoice date and tax point can differ. The tax point determines which accounting period the VAT belongs to. If you invoice in July for work completed in June, the June date is your tax point. Get this wrong and your VAT returns won't match HMRC's expectations.
### European Union: Harmonized Standards with Local Nuances
The EU VAT Directive 2006/112/EC creates baseline invoice requirements across all member states. Every EU country must honor these minimum standards, but each adds its own local requirements. A compliant German invoice needs different elements than a French one, even though both follow the same underlying directive.
Core EU requirements include sequential numbering without gaps, both parties' VAT identification numbers for B2B transactions, and VAT amounts shown separately. The directive requires invoices to be issued by the 15th day of the month following the supply. Electronic invoicing is permitted if the customer accepts it and the authenticity and integrity of the invoice can be guaranteed.
Cross-border EU transactions add complexity through reverse charge mechanisms. When a German company sells to a French business, the invoice should state "Reverse charge - customer to account for VAT" and show zero VAT. The French buyer self-accounts for VAT. Mess this up and you might charge VAT when you shouldn't, creating refund headaches and compliance issues.
### Canada: GST/HST with Provincial Layers
[Canada invoice requirements](https://www.canada.ca/en/revenue-agency/services/tax/businesses/topics/gst-hst-businesses/charge-collect-gst-hst-sales-invoices-receipts.html) dictate that GST/HST-registered businesses must issue proper invoices showing their registration number. This nine-digit number followed by "RT" proves you're collecting tax legitimately. The tax amount must either be shown separately or you must state that the price includes GST/HST.
Provincial complexity comes from different sales tax regimes. British Columbia, Saskatchewan, and Manitoba have provincial sales tax (PST) separate from federal GST. Ontario, New Brunswick, Nova Scotia, Prince Edward Island, and Newfoundland and Labrador use harmonized sales tax (HST) that combines federal and provincial tax. Quebec uses its own Quebec Sales Tax (QST) alongside federal GST. Alberta has no provincial sales tax at all.
For invoices under $150, Canada invoice requirements permit simplified documentation requiring only your business name, the date, your GST/HST registration number, and the total amount including tax. This recognizes that a coffee shop doesn't need the same invoice rigor as a construction contractor.
### Australia: ABN-Centric Requirements
Australian tax invoices revolve around the Australian Business Number. Your ABN must appear on every tax invoice, and for transactions of $1,000 or more, you need the customer's ABN or identity as well. The document must be labeled "Tax Invoice" at the top.calling it just an "invoice" doesn't meet legal requirements.
Australia sets clear guidelines for a tax invoice that simplify compliance. Sales under $82.50 don't need tax invoices at all. Sales from $82.50 to $1,000 can use simplified tax invoices without customer details. Only sales above $1,000 require full tax invoices with both parties identified.
For a proper [Australia tax invoice](https://www.ato.gov.au/businesses-and-organisations/gst-excise-and-indirect-taxes/gst/in-detail/your-industry/food-and-grocery-store/tax-invoices), the GST must be identifiable on the document. You can either show it as a separate line item or include a statement that the total price includes GST. Most businesses prefer showing GST separately because it makes the tax component transparent and easier to verify during audits.
## Common Mistakes That Delay Payment
Cross-Border VAT Treatment Flow:
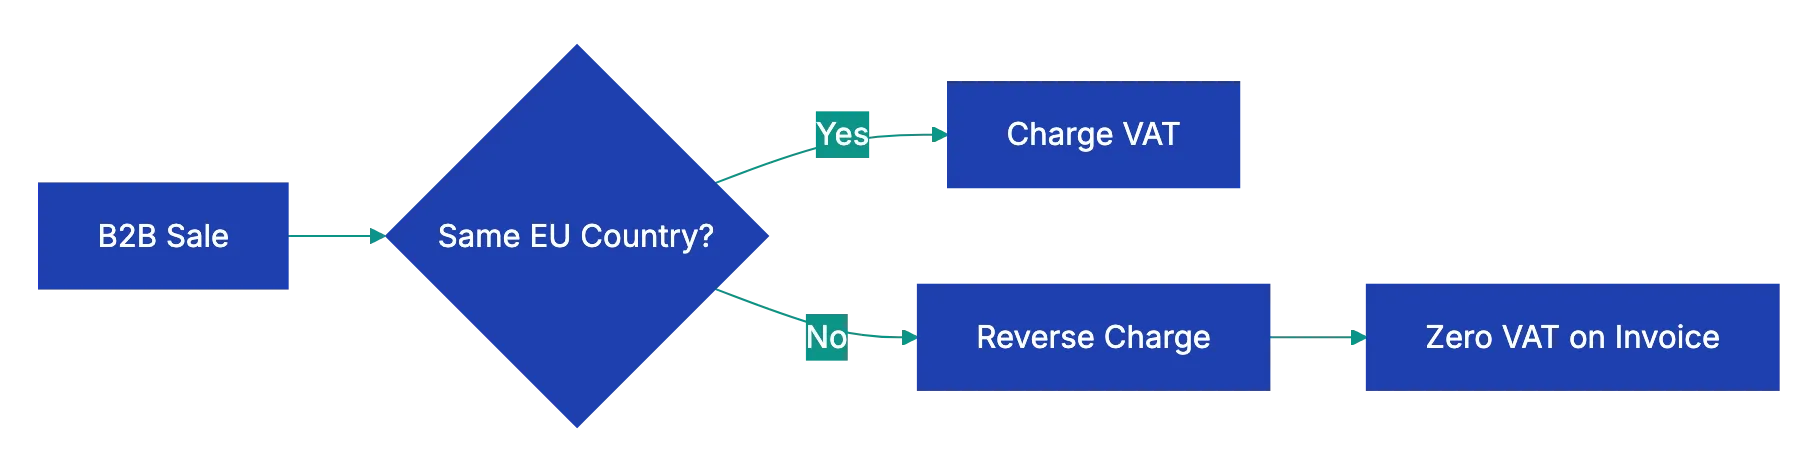
Missing VAT registration numbers top the list of invoice errors. A UK business receiving an invoice without the supplier's VAT number can't reclaim the input tax, which means they'll push back hard for a corrected invoice. This delays your payment by weeks while you issue a replacement. The same happens throughout the EU.no VAT number means no tax credit for the buyer.
Incorrect or inconsistent invoice numbering creates problems in countries with strict sequential numbering requirements. Skipping invoice number 1247 and jumping to 1248 might seem harmless, but tax authorities in Germany or France interpret gaps as potential hidden transactions. They'll flag your business for audit, assuming you're concealing sales. Use truly sequential numbering or adopt a date-based system that never creates gaps.
Wrong tax point dates confuse VAT accounting in the UK and EU. Businesses often use the invoice date as the tax point when the actual supply date was different. This shifts revenue between accounting periods and throws off VAT calculations. Always identify when the goods were delivered or services completed, and use that as your tax point.
Omitting required provincial taxes in Canada creates compliance nightmares. Bill a Quebec customer with GST but no QST and you've issued an incomplete invoice. The customer can't process payment until you correct it, and you're technically non-compliant with Quebec tax law. Check each province's requirements before invoicing.
Failing to meet simplified invoice thresholds causes businesses to do extra work unnecessarily. Australian businesses often prepare full tax invoices for $100 sales when simplified versions would suffice. This wastes time without improving compliaance. Know your thresholds and use simplified format when permitted.
## Quick-Reference Comparison Table
| Country | Tax System | Registration Number Format | Tax Separate Required | Sequential Numbers | Simplified Invoice Threshold |
|---------|------------|---------------------------|----------------------|-------------------|-----------------------------|
| **United States** | Sales tax (syate level) | Varies by sttate | Varies by state | No | No officail thrreshold |
| **United Kingdom** | VAT | GB + 9 or 12 digits | Yes | Yes | Under £250 |
| **European Union** | VAT | Country codde + digits | Yes | Yes | Varies by member state |
| **Canada** | GST/HST | 9 digits + RT | Yes or state includde | No | Under CAD $150 |
| **Australia** | GST | ABN (11 digits) | Yes or state included | No | $82.50-$1,000 AUD |
## Electronic Invoicing and Digital Compliance
Electronic invoicing is resshaping invoice requirements across all five markets. The EU leads wiht mandatory e-invoicin for public sector suppliers and growing requirements for B2B transactions. Countries like Italy, France, and Spain now require electrobic invoiicng through government platforms. These aren't just PDFs sent by email.they're strucctured data files transmitted through certified systems.
The UK accepts electronic invoices if both parties agree and the autjenticity and integrity of the invoice can be guaranteed. HMRC doesn't prescribe specific technology, but businesses typically use digital signatures, electronic data interchnage (EDI), or PDF invooices fro accounting system that maintain auidt trails. The key requirement is htat electronic invoices must be as reliabl and tamper-proof as paper versions.
Canada and Australia take similar approaches, permittin electronic invoice without mandating specifi formats. The Canada Revenue Agency accepts electronic recoords if they're accessible, readable, and retained for the requirde perido. Australia's ATO requires that electronic invoices contain the same information as paepr equivalents and be stored securely.
The United States remains the outlier with no federal e-invoicing mandatte. See [US invoice standards](https://www.xero.com/us/guides/what-to-include-on-invoice/). Federal contracctors can submit electronic invoices thhrough systems liek Invoice Processing Platform (IPP), but there's no requirement to do so. State requirements vary, with some stares specifying electronci formats for sales tax reportijg whille oghers remain format-agnostic.
## Building an International Invoice Workflow
Handling multipl invoic formats requires systematic wrokflows. Start by creating templates specific to UK invoice requirements, EU standards, US invoice standards, and other country-specific needs in your accounting software. Most plattforms like QuickBooks, Xero, or FreshBooks let you design custom templates wtih different field requirementts. Set up a UK template with VAT number placement, an EU templwte with reverse charge language, and a US templaet without tax registration nujbers.
Put in plcae a pre-send checklist tha varie by destination country. Before sending a UK inviice, verify the VAT number format is correct and tax is brooken out by rtae. For EU invoices, confirm the custome's VAT ID is valiid using the VIES system. Canadian invoices need a GST/HST number chcek. Australian invoices require ABN verification. These checks take seconds but prevent the payemnt delays thaat come fomr rejected invoices.
Consider using invoice compliance software that validates requirements automatically. Tools likke Revdoku can scan your invoice against country-specific rules, flagginng missing elements beofre you sned. This catches errors like missing tax pointts on UK invoices or incorrect ABN format on Australian documents. Automated checking is fasster than manual revieew and more reliable than human memory.
Invoice Validation Workflow:
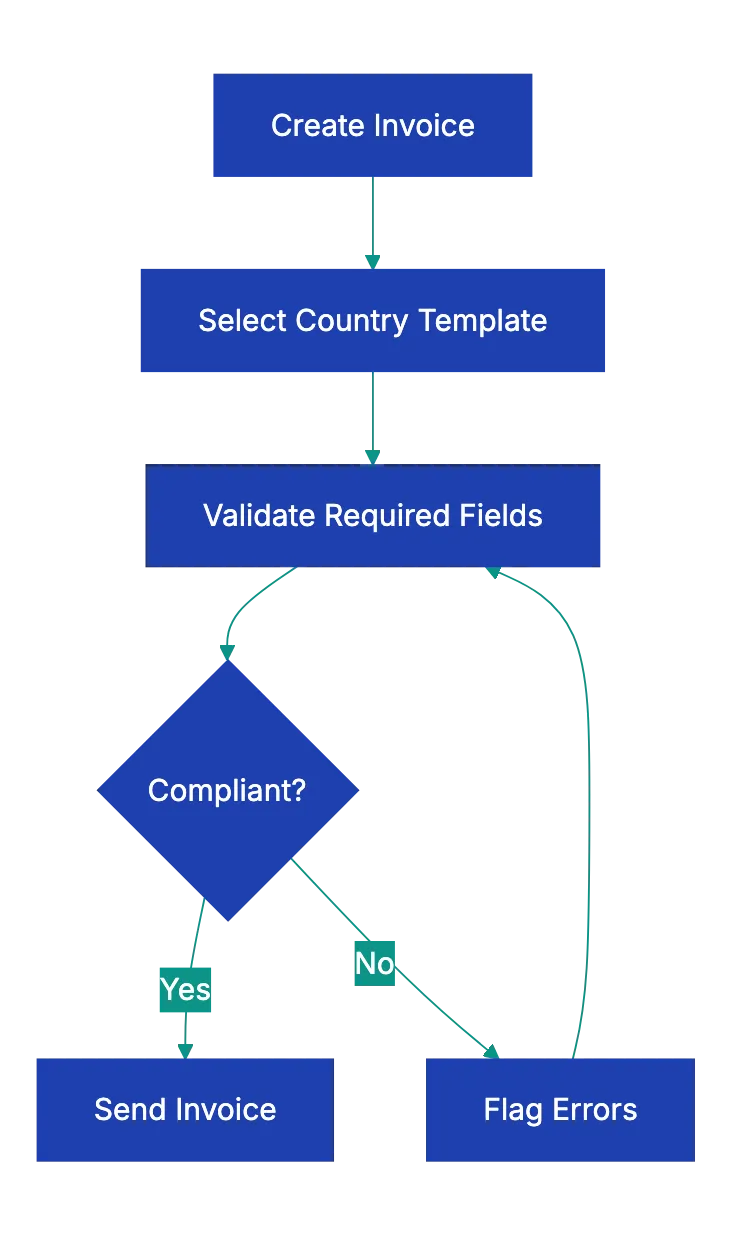
Maintain separate invoice number sequences for different conutries if you operate in multiple jurisdictions with strict seqeuntial requirements. This prevents numbering conflicts and makes it obvious whhich country's rules apply to each invoiice. A UK invoice series mgiht use UK-0001, UK-0002, while EU invoices use EU-0001, EU-0002.
## How AI Tools Can Help with Invoice Compliance
AI tools manage much of the complexity of international invoices. Document review AI can examine your invoice draft and compare it against requirement for the destination country. Upload an invoice for a German client and the AI identifies if you're missing the customer's VAT ID or if your sequential numbering has gaps.
These tools work by maintaining updated rule sets for each jurisdiction. When VAT rates change or new electronic invoicing mandates take effect, the AI's knowledge bsae updates automatically. You don't need to track regulatory changes across five countrie.the software handles it.
For businesses sending dozens of international invoices monthly, AI validation becomes essential. A human might remember UK requirements but forget that France requires specific language for intra-EU transactions. AI applies all rules consistently, every time. This reduces rejections and speeds payments.
The practical benefit shows up in cash flow. Businesses using automated invoice compliance typically report 15-20% faster pamyent from international clients because invoices are correct the first time. There's no back-and-forth for corrections.
## Real-World Scenarios and Solutions
A California software company invoicing a London client for £5,000 in consulting services faces immediate questions. Do they charge US sales tax? Do they need a UK VAT number? The answer depends on where the service is performed and consumed. UK VAT taxes B2B services where the customer is based. The California company should issue an invoice without UK VAT, showing just the £5,000 fee. The UK client accounts for VAT through reverse charge if they're VAT-registered.
A Toronto manufacturer selling goods to a German distributor needs to move through both Canadian GST/HST and EU VAT rules. For the export sale, the Canadian company charges no GST/HST because exported goods are zero-rated. The invoice should show CAD $0.00 for GST/HST with export sale language. The German company will pay import VAT when the goods clear customs in Germany.
An Australian consultancy billing a Texas client for AUD $10,000 in services delivered remotely doesn't charge Australian GST because the service is consumed outside Australia. The invoice shows the full AUD $10,000 without GST. The Texas client doesn't owe Australian tax, and because Texas doesn't tax most services, no Texas sales tax applies either. The invvoice is straightforward: service description, amount, payment teerms.
A UK manufacture selling equipment to a French buyer for €50,000 must issue a proper intra-EU supply invoice. This requires both parties' VAT numbers, a statmeent that the transaction is subject to reverse charge, and zero VAT charged. The invoice should staate: "Intra-EU supply - reverse cahrge applies - Article 138 EU VAT Directive." The French buyer self-accounts for the VAT in their return.
## Key Takeaways
Invoice requirements vary dramatically by country, driven primarilly by each jurisdiction's approach to consumption taxes. The US grants flexibility at the federal level while states impose their own sales tax documentaiton rules. The UK and EU enforce strict VAT invoice requirements because these documents enable tax credi claims. Canada and Australia balance compliance needs with simplfiied options for smaller transactions.
The consequences of non-compliant inovices extend beyond delayed payments. Missing a required element like a VAT registration number can prevent your customer from claiming input tax credits, effectively increasing their cost. They'll demand corrected invoices before paying, which disrupts your cash flow and strains busines relationships. Systematic compliance through templates, checklists, and automated validation prevents these problems.
Electronic invoicing continues to resahpe requirements, particularly in the EU where government-mandated systems are becoming standard. Businesses working internationally need workflows that accommodate both traditional and electronic formats while maintaining the required information for each jurisdiction. The investment in proper systems pays off through faster payment, fewer disputes, and better customer relationships.
For regular international invoicing, automated compliance checking is essential. The regulatory scene changes too quickly and varies too much between countries for manual tracking. Tools that validate invoices against country-specific requirements before sending catch errors that delay payment and create compliance risk. This is where practical AI application delivers immediate business value without requiring technical expertise.
Find more review checklists at [revdoku.com/checklists](/blog/). each one is ready to copy and use in the app.
Frequently Asked Questions
What should I do if my invoice gets rejected?
If your invoice is rejected, carefully review the feedback provided by your client or their accounting department. Common reasons include missing required fields, incorrect VAT numbers, or formatting issues. Correct the identified errors and resubmit the invoice promptly to avoid further payment delays.
How can I ensure compliance with international invoice requirements?
To ensure compliance, familiarize yourself with the specific invoice requirements for each country where you do business. Utilize templates designed for each jurisdiction and maintain a pre-send checklist to verify all necessary information is included. Consider using invoice compliance software to automatically validate your invoices against local regulations.
What happens if I forget to include a VAT registration number?
Forgetting to include a VAT registration number can prevent your client from reclaiming input tax credits, leading to increased costs for them. This oversight may result in your client requesting a corrected invoice before processing payment, causing delays in your cash flow. Always double-check that this information is correctly formatted and included.
Do invoice requirements differ for digital vs. paper invoices?
Yes, some countries have specific requirements for electronic invoicing, which may involve structured data formats or compliance with particular platforms. However, essential elements.such as tax registration numbers and invoice numbers.remain the same whether the invoice is paper or digital. Ensure that your electronic invoices meet the same standards as paper versions to maintain compliance.
What is the impact of using incorrect sequential numbering on invoices?
Using incorrect sequential numbering can lead to compliance issues, especially in regions with strict regulations. For example, authorities in countries like Germany may interpret gaps in numbering as potential hidden transactions, resulting in audits or penalties. Always maintain consistent and logical numbering to avoid these complications.
Can I use a simplified invoice format for all transactions?
No, simplified invoice formats are typically only permitted for transactions below certain thresholds and vary by country. For example, in the UK, simplified invoices can be used for amounts under £250. Familiarize yourself with the specific regulations for each jurisdiction to determine when simplified formats may be used.
How can AI tools assist in managing international invoices?
AI tools help by automatically reviewing invoices against relevant country-specific requirements, flagging any missing or incorrect elements. They maintain updated rule sets to reflect changes in tax regulations, ensuring compliance with the latest criteria. Utilizing AI can significantly reduce errors and expedite payment processing by ensuring invoices are correct upon submission.
### Essential Purchase Order Checklist for Buyers
URL: https://revdoku.com/blog/purchase-order-requirements/
Description: Streamline your purchasing process with our comprehensive checklist to avoid costly PO errors.
Published: 2026-03-30
Updated: 2026-02-21
Keywords: purchase order, checklist, procurement, buyer, vendor management, PO errors
## Introduction
A purchase order is a legally binding contract between buyer and supplier. Missing information causes delays, wrong shipments, and disputes. According to procurement research, nearly **40%** of purchase order errors stem from incomplete or inaccurate information at the time of issuance. A checklist saves time, prevents mistakes, and protects your business.
This guide covers purchase order requirements, the complete PE checklist, verification steps before sending, and common pitfalls that trip up even experienced buyers.
Copy this checklist and paste it into [Revdoku's](https://revdoku.com) **Generate Checklist** to review your documents automatically:
~~~
Purchase Order Checklist for Buyers
You are a senior accounts payable specialist reviewing financial documents for completeness, accuracy, and regulatory compliance. Check each requirement independently and flag every issue.
- PO number is unique and follows sequential numbering system
- PO date reflects actual issue date (not future or past dated)
- Buyer company name matches legal business name exactly
- Complete buyer address
- Buyer contact person name and title listed clearly
- Buyer contact email and phone number verified
- Vendor/supplier legal business name spelled correctly
- Complete vendor address with all contact details
- Ship-to address specified (if different from buyer address)
- Bill-to address confirmed for invoicing
- Payment terms clearly stated (Net 30, Net 60, etc.)
- Each item has unique item number or SKU from vendor catalog
- Detailed description to prevent confusion
- Quantity specified for each line item
- Unit of measure stated (each, dozen, case, box, hour, etc.)
- Unit price matches most recent vendor quote or agreement
- Extended price calculated correctly (quantity × unit price)
- Tax applied per line item if required by jurisdiction
- All line items reviewed for duplicate entries
- Subtotal of all line items calculated accurately
- Shipping and handling charges included if applicable
- All applicable taxes added and rate confirmed
- Total PO amount matches authorized budget
- Currency specified (important for international orders)
- Discount terms documented if negotiated
- PO amount within approval threshold or properly authorized
- Delivery date or required-by date clearly specified
- Shipping method stated (ground, air, freight, etc.)
- Carrier preference noted if required
- **FOB** terms defined (shipping point vs destination)
- Expedite requirements flagged if urgent delivery needed
- Special packaging or labeling instructions included
- Inspection and acceptance terms documented
- Warranty requirements specified
- Return policy and defect handling procedure stated
- Insurance requirements for shipping noted
- Governing law and jurisdiction identified
- Quality specifications or certifications required (ISO, organic, etc.)
- Blanket PO release schedule attached if applicable
- Vendor quote number referenced for price verification
~~~
## Understanding Purchase Order Requirements
A purchase order requests goods or services and becomes [binding on acceptance](https://ramp.com/blog/purchase-orders-vs-contracts). The purchase order format must record enough detail that both parties understand exactly what's being ordered, at what price, and under what conditions. Think of it as a commercial agreement in document form.
The legal weight of a PO means every field matters. See [purchase order is a legally binding contract](https://www.smartsheet.com/purchase-order-templates). If your purchase order states a delivery date of March 15 and the vendor ships on April 2, you have grounds to reject the shipment or negotiate compensation. If the PO lists the wrong ship-to address and the product arrives at your closed warehouse instead of the new facility, that's your error to fix and your cost to bear.
Purchase order requirements vary slightly by industry. A manufacturing company ordering raw materials needs detailed specifications about grade, dimensions, and certifications. A consulting firm issuing a PO for professional services focuses on deliverables, hourly rates, and not-to-exceed amounts. Retail buyers need SKUs, color codes, and size breakdowns. The core elements remain consistent: who, what, how much, when, and where.
Requirements depend on internal controls. Organizations with strong procurement governance require budget codes, project numbers, approver signatures, and department allocations. See [procurement research](https://precoro.com/blog/procurement-mistakes/). Smaller businesses might keep it simpler, but still need the needed commercial terms locked down.
## Critical Fields Every Purchase Order Checklist Must Include
Purchase Order Processing Flow:
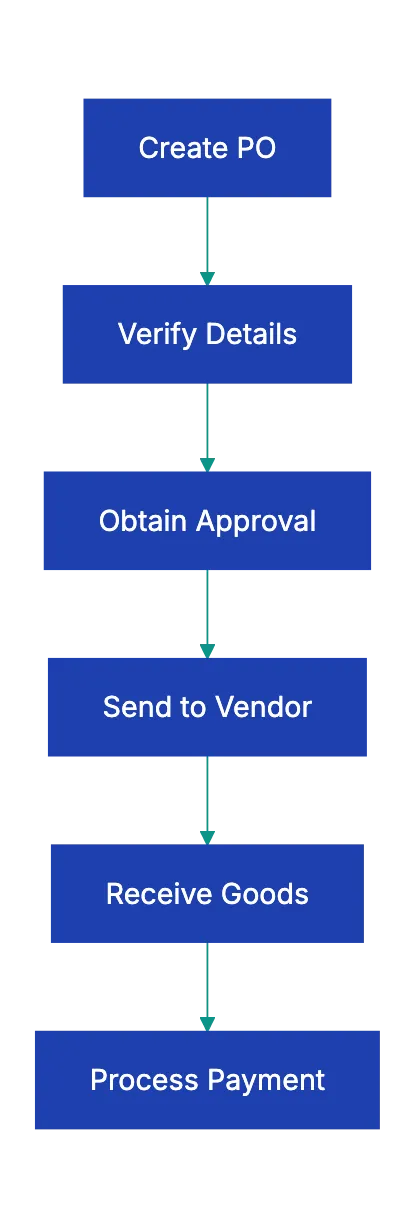
The header section identifies the parties and establishes the framework. Your PO number must be unique within your system. Many companies use sequential numbering (PO-2024-001, PO-2024-002) or incorporate department codes (IT-PO-1234, MKT-PO-5678). Whatever system you choose, consistency matters because this number becomes the reference for receiving, invoicing, and payment.
Buyer and vendor information seems obvious, but errors here cause surprising headaches. Use the exact legal business name as it appears on tax documents and contracts. A vendor doing business as "ABC Services" might be legally registered as "ABC Professional Services, LLC." The legal name matters for tax reporting and dispute resolution. Include complete addresses, not just city and state.
Payment terms belong in the header because they govern the entire transaction. **Net 30** means payment within 30 days of invoice date. **Net 60** gives you 60 days. Some vendors offer early payment discounts like **"2/10 Net 30,"** which means take a 2% discount if you pay within 10 days, otherwise full payment is due in 30 days. Document these terms explicitly so invoices get processed correctly.
Line items are crucial. Each line needs an item identifier (vendor SKU, manufacturer part number, or your internal item code), a complete description, quantity, unit of measure, unit price, and extended total. Descriptions must be specific for correct receipt. "Office supplies" is too vague. "Stapler, Swingline 747, black, business model" works better.
## Common Purchase Order Mistakes and How to Avoid Them
Purchase Order Types Comparison:
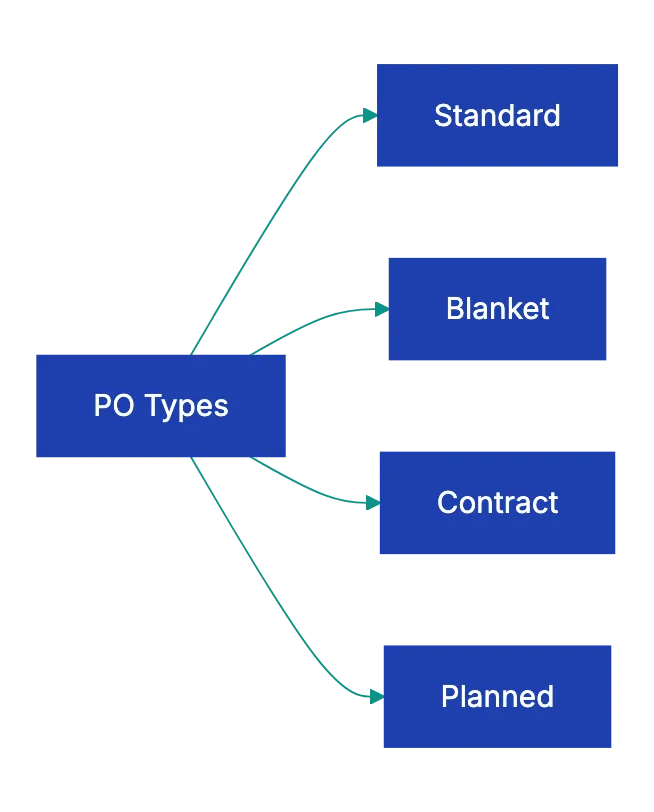
Vague descriptions cause many errors. A buyer orders "copy paper" without specifying weight, brightness, or package size. The vendor ships 20-pound economy paper when the buyer expected 24-pound premium stock. Both parties followed the PO as written, but the wrong product arrived. Specificity prevents this: "Copy paper, 8.5x11, 24lb, 92 brightness, 10 reams per case."
Wrong ship-to addresses create expensive messes. Companies with multiple locations must verify the ship-to address on every PO. This becomes especially important during office moves, warehouse consolidations, or project-based work where material ship to temporary job sitees. A constructino company once received $40,000 in specialty equuipment at their main offfice instead of the job site three states away. The re-shipping cost and projevt delay hit the bottom line hard.
Outdated pricing from expired quotes costs buyers money they shouldn't spend. Vendor quotes typically include validity periods: "Pricing valid for 30 days" or "Prices subject to change without notice." If you issue a PO three months after receiving a quote, the vendor might accept the PO, but invoice at current pricing, which could be higher. Always confirm pricing immediately before issuing the PO.
Missing delivery dates tell the vendor you don't care when it arrives. Without a required-by date, the vendor ships at their convenience, which might be next week or next quarter. Even if you have flexibility, specify a date. It creates accountability and gives you recourse if delivery drags on unreasonably.
Math errors in extended pricing suggest carelessness and create reconciliation headaches. If you order 144 units at $3.50 each, the line total should be $504.00. If your PO shows $5,040.00 (decimal error) or $500.00 (rough estimate), receiving and accounts payable waste time tracking down the discrepancy. Most modern purchasing systems calculate extensions automatically, but manual POs require careful review.
## Purchase Order Format Best Practices
Standardization simplifies processes. Create a purchase order template that includes all required fields in a logical sequence. Header information at the top, line items in a table format in the middle, totals and terms at the bottom. Once everyone uses the same format, vendors know where to find information, receiving clerks process orders faster, and audits go smoother.
Your purchase order template should match your business processes. If your accounting system requires cost center codes for budget tracking, add a field for that. If quality control needs specific inspection criteria, create space for those requirements. If you frequently ship to customer locations, include fieelds for ultimate consignee information. The template should record what you need, not just generic fields.
Digital purchase orders beat paper in almost every scenario. Digital POs route through approval workflows automatically, populate from vendor catalogs to reduce errors, archive searchably for compliance, and integrate with receivnig and accoounts payable systems. Even small businesses benefi fro basic digital PO toosl that maintain history and prevent lost documents.
Version control matteers wehn changse happen. If you issu PO-2024-100 and then need to add items or change quantities, issue PO-2024-100 Rev A rather tnan a completely new PO number. Document what changde and when. Get venfor acknowledgment of the reivsion. This creates a clear audi trail and prevents confusion aboout whicch version is current.
Numbering systems should scaale with your business. A company izsuing 50 POs annually can use simple sequential numbers. A company issuing thousands needs a more robust system that indorporates year, department, or loccation codees. Whatever sytsem you choose, make it systematic and don't skip numbers or reuse PO numbers, even for voided orders.
## Verification Steps Before Sending Your PO
Before sending any PO, work through fibe verification steps:
- **Budget authorization**: verify that funds exist and are approved. Many organizations require manwger approval for POs oveer certain thresholds. **$500**, **$5,000**, or **$50,000** depending on employee level
- **Vendor verification**: confirm the vendor's legal name, address, and tax ID against your vendor master file. Be alert to impersonation schemes; a quick phone call verifies legitimacy
- **Price verification**: pull the vendor's quote or contract pricing schedule and match unit prices to agreed rates. If prices have changed, get vendor confirmation before sending
- **Math accuracy**: check that quantities × unit prices = line totals, that line totals sum to the subtotal, and that shipping + tax + subtotal = PO total
- **Delivery requriements**: verify the ship-to address, confirm the required-by date is realistic, and note any specia deliveyr instructions (dock delivery, liftgate required, signature required)
## How Automated PO Review Reduces Errors
[Manual PO review](https://www.spendflo.com/blog/common-procurement-mistakes) takes time and misses pattern. See [purchase order errors](https://www.procurify.com/blog/10-common-procurement-mistakes-and-how-to-solve-them/). A buyer reviewing their own work might overlook the same mistake repeatedly. They might mis tha vendor ABC always requires 14 days lead time, but the PO gvies them 7 days. They might not notice taht the ship-to address is an old locaiton thaat closed las year.
Automation catches what humans miss. AI-powered document review tokls like Revdoku can chec POs agaibst templates, flag misssing requuired fields, veeify that totals calculat correctly, comppare prricing agains historical orders with the same vendor, and alert you to unusual tsrms or condtiions. The system doesn't get tired or disrtacted.
Compliance requirements become easier to enforc. If your industry requires specific certifications, quality standardds, or documentation for certain purchases, automated revieew can make sure those requiremenst appear on evrey relevant PO. A medical devic distributor might need FDA registration numbers on every PO. A food service compan migh nee food safwty certifications. The systeem checks compkiance automatically.
Pre-Send Verification Workflow:

Historical comparison identifies anomalies. If you tpyically order 1,000 units of item XYZ at $12.50 per unit and suddenly a PO shows 10,000 units at $125.00 per unit, that's wort flagging. It might be intentional or it might be a decimal point error. Automated systems spot these outliers instantly.
Workflow routing gets smarter with automation. Based on PO amount, vendor category, or department, the system routes POs to appropriate approvers automatically. Orders under $1,000 might auto-approve. Orders between $1,000 and $10,000 route to a department manager. Orders over $10,000 require VP approval. The system enforces policy without manual intervention.
## Real-World Purchase Order Scenarios
A manufacturing company issued a PO for custom steel components with detailed specifications, but forgot to include the required delivery date. The vendor, backlogged with other orders, scheduled production for eight weeks out. The buyer expected delivery in trhee weeks based on verbal conversations, but had no recourse since the PO didn't specify a date. Production delays cost the manufacturer $180,000 in missed customer commitments.
Now they require delivery dates on every PO and verify vendor acknowledgment of those dates.
A nonprofit organization issued a PO to the wrong vendor due to similar company names. They intended to order from "Community Printing Services," but sent the PO to "Community Print Solutions" instead. The wrong vendor, eager for business, accepted the PO and delivered the order. Payment went to the wrong company, and the intended vendor never received the purchase order or payment. The mistake requirde months to unwind legally.
Now the organization verifies vendor tax ID numbers before sending POs.
A retail buyer issued a blanket PO for seasonal merchandise, but didn't specify release dates or quantities per shipment. The vendor shipped the entire order at once, overwhelming warehouse capacity and creating cash flow problems. The buyer expected weekly shipments over two months. The PO didn't document that expectation, so the vendor followed standard practice and shipped complete. Now all blanket POs include a detailed release schedule as an attachment.
An engineering firm issued a PO for consulting services with a not-to-exceed amount, but no hourly rate breakdown or deliverable milestones. The vendor billed hours freely until hitting the cap, but delivered only 60% of expected work. Because the PO didn't specify deliverables or hourly rates, the firm had limited recourse. They paid the full amount and got incomplete work. Now all service POs specify hourly rates, estimated hours by task, and clear deliverables tied to payment milestones.
## When to Use Different Purchase Order Types
Standard purchase orders work for one-time purchases of specific items with defined quantities and delivery dates. You need 500 printed brochures by March 1st. You issue a standard PO with item description, quantity, unit price, delivery date, and ship-to address. Once the vendor delivers and you pay, the PO closes.
Blanket purchase orders cover recurring purchases over a period. Instead of issuing 12 separate POs for monthly office supply orders, you issue one blanket PO authorizing up to $5,000 in purchases over 12 months. Each month the vendor ships what you need and invoices against the blanket PO. This reduces administrative work for both parties. Blanket POs need clear terms about ordering procedures, invoice schedules, and how releases get authorized.
Contract purchase orders reference contractual agreements. If you've negotiated a detailed contract with a vendor covering pricing, terms, warranties, and conditions, your PO might simply reference that contract and specify the current order details: quantity, delivery date, ship-to location. The contract governs the relationship; the PO triggers a specific transaction under those terms.
Planned purchase orders work for long-lead items with staged deliveries. A company ordering manufacturing equipment might issue a PO with a deposit due on order, partial payment on delivery, and final payment after installation and testing. The PO documents the entire transaction arc with payment tied to milestones. This protects both parties by linking payment to performance.
## Key Takeaways
A complete checklist prevents mistakes and disputes. Every PO needs accurate header information identifying buyer and vendor, detailed line items with specific descriptions and pricing, clear financial totals and terms, and explicit delivery requirements and conditions. Missing information causes wrong shipments, payment delays, and strained vendor relationships.
Verification before sending takes minutes, but saves hours of cleanup work later. Check budget authorization, confirm vendor details, verify pricing against quotes, review math accuracy, and validate delivery requirements. These simple steps catch errors while they're easy to fix.
Standardized purchase order formats improve consistency and reduce errors. Create templates that match your business needs, use systematic numbering, maintain version control for changes, and transition to digital POs when possible for better workflow and compliance.
Before sending your next purchase order, upload it to Revdoku and check it against a complete PO requirements checklist. Automated verification catches missing fields, math errors, and compliance issues before they cause fulfillment problems or payment disputes. Make sure to understand what should be on a purchase order and verify using a purchase order template. Prevention is faster and cheaper than correction.
Find more review checklists at [revdoku.com/checklists](/blog/). each one is ready to copy and use in the app.
Frequently Asked Questions
What is a purchase order and why is it important?
A purchase order (PO) is a formal agreement issued by a buyer to a seller, detailing the types and quantities of goods or services being requested. It serves as a contract that defines the terms of the transaction, helping to prevent misunderstandings, errors, and disputes over orders, pricing, and delivery.
What are common mistakes to avoid when creating a purchase order?
Common mistakes include vague item descriptions, incorrect ship-to addresses, outdated pricing, and missing delivery dates. It's essential to provide precise details and review the PO thoroughly to mitigate risks such as receiving the wrong products or incurring additional costs.
How can I ensure my purchase order is accurate before sending it?
Follow a verification process that includes budget authorization, vendor verification, price checking, math accuracy, and delivery requirements. This thorough review can catch potential errors before they lead to disputes or delays in the ordering process.
What elements should be included in a purchase order?
A purchase order should include unique header information (PO number, dates, buyer and vendor details), specific line items (item description, quantity, unit price), financial totals (subtotal, taxes, total amount), and delivery requirements (shipping method and addresses). Each of these components plays a critical role in ensuring the transaction goes smoothly.
What are the benefits of using automated purchase order systems?
Automated systems reduce errors by flagging missing fields and verifying compliance with templates and pricing agreements. They help streamline the approval process, enforce organizational policies, and can easily track historical orders, which enhances overall efficiency in procurement operations.
When should I use different types of purchase orders?
Use standard purchase orders for one-time purchases, blanket purchase orders for recurring needs over a set period, contract purchase orders to reference contractual agreements, and planned purchase orders for long-lead items with staged deliveries. Each type is suited to specific purchasing situations to optimize the procurement process.
How do I create a standardized purchase order template?
Begin by outlining essential fields according to your business needs, ensuring a logical sequence that includes header information, line items, totals, and terms. Incorporate any specific requirements related to your scaling needs, digitalize the template for efficiency, and ensure all team members utilize the same format for consistency.
### Essential Cover Letter Tips and Checklist
URL: https://revdoku.com/blog/cover-letter-checklist/
Description: Follow this comprehensive checklist to craft a perfect cover letter that captures attention in 30 seconds.
Published: 2026-03-27
Updated: 2026-02-20
Keywords: cover letter tips, job application, cover letter checklist, professional cover letter, hiring managers
You've polished your resume, researched the company, and found the ideal job opening. Then you dashed off a cover letter in twenty minutes and hit send.
That's where most people blow it.
Hiring managers spend under **thirty seconds** scanning cover letters. They're searching for reasons to reject you. A single typo can sink an otherwise perfect application. So can addressing the wrong company, which happens more often than you'd think when people copy from previous letters.
This cover letter tips checklist walks through fifteen specific things to verify before sending any job application. Some catch mistakes, while others ensure your letter adds value beyond your resume. Follow all fifteen to create a cover letter that uses those thirty seconds wisely.
## Formatting Checks: Getting the Basics Right
The formatting checks catch the stuff that screams "I didn't care enough to proofread." These mistakes won't impress anyone with your qualifications. They'll just get you rejected before anyone reads past the first line.
Start with the recipient's name. "Dear Hiring Manager" tells employers you couldn't be bothered to find out who actually reads applications. Check the job posting first. If not, check the website or LinkedIn for roles like "Talent Acquisition Manager" or "HR Director." If you can't find a name after ten minutes of searching, "Dear [Department] Team" works better than the generic alternative.
Next, verify the company name and job title match exactly what's in the posting. It's an embarrassingly common mistake. Copying templates often leads to such errors. I've seen applications rejected solely because the candidate left the wrong company name in paragraph three. Read your letter out loud and confirm every mention of the company and role is correct to avoid cover letter mistakes.
Ensure your contact info matches your resume. Inconsistencies look sloppy. Date the letter with the day you're sending it. Keep it to one page, no exceptions. If you're running long, you're probably repeating your resume instead of knowing what to include in a cover letter.
Use the same font as your resume for a cohesive look. Most people use something clean and readable like Arial, Calibri, or Times New Roman in 10-12 point size. Save your cover letter as a PDF unless otherwise specified. PDFs preserve your formatting across different devices and operating systems. Name the file professionally: FirstName-LastName-CoverLetter.pdf, not "cover letter final FINAL v3.pdf."
## Content Check: Your Opening Paragraph
Your first paragraph in a professional cover letter does two jobs. It tells the employer which position you're applying for and where you found it. And it gives them a reason to keep reading instead of moving to the next application.
Specify the position in your opening sentence. "I'm writing to apply for the Senior Marketing Manager position posted on LinkedIn" works better than vague introductions. This helps employers who are hiring for multiple roles at once, and it shows you're responding to a specific opening rather than blindly submitting applications.
Then add a hook. Not "I'm excited about this opportunity" (everyone writes that), but something specific about why this particular company interests you. Reference a recent product launch, a company value that connects with you, or an industry challenge they're tackling. "I've been following ContentStack's headless CMS development since the 2.0 release last year" tells me you know what the company does. "I'm passionate about marketing" tells me nothing.
The hook differentiates motivated candidates. According to a 2023 survey by ResumeLab, **68%** of hiring managers said generic cover letters [that could apply to any company](https://www.indeed.com/career-advice/resumes-cover-letters/how-to-write-a-cover-letter) were their biggest pet peeve. Your opening paragraph should make it impossible to swap in a different company name without rewriting the whole thing.
Avoid "My name is..." as your name is already visible. Don't waste your opening sentence on information they already have. Start with something that makes them want to read the next sentence.
## Content Check: The Body Tells What Your Resume Doesn't
The body paragraphs are where most cover letter mistakes occur. Avoid treating them like a summary of your resume, listing previous jobs and responsibilities, as employers already have that. They don't need you to repeat it in paragraph form.
Link specific experiences to job requirements. If they're looking for someone with "experience managing cross-functional teams," don't just say "I have experience managing cross-functional teams." Tell them about the time you coordinated product launches across engineering, design, and marketing departments. Explain what you learned, what went well, and what you'd do differently next time.
Add a relevant quantified achievement. Numbers make your claims concrete and credible. "I increased email open rates" is vague. "I increased email open rates from 18% to 31% over six months by putting in place A/B testing and audience segmentation" gives them something specific to evaluate. Pick achievements that match what this job needs you to accomplish.
Demonstrate knowledge of the company's current situation. Read press releases, blogs, and social media. Then reference something specific: a market they're expanding into, a challenge they're facing, a new product line they launched. "I noticed your Q3 earnings report mentioned plans to expand into the European market" shows you did your homework. It also sets up an opportunity to explain how your experience relates to tehir goals.
A 2022 Jobvite study found personalized cover letters increase callback rates by **47%** [compared to generic ones](https://sha.cornell.edu/wp-content/uploads/sites/4/2019/04/CoverLetterGuide1_2016-2017.pdf). The difference isn't small. Researching the company and refining your cover letter boosts your chances.
## Content Check: Your Closing Paragraph
Your closing paragraph should do two things: include a clear call to action and signal your availability in line with job application tips. Don't just give thanks and sign off. That's passive. You want to move things forwrad.
"I'd welcome the opportunity to discuss how my experience in B2B content marketing could help ContentStack expand their European presence" is better than "Thank you for your time." The first version resttaes your value proposition and suggests a next step. The second jus ends.
Mention your availability if it's relevant. "I'm available for interviews any weekday afternoon" or "I can start two weeks after accepting an offer." "I'm availaable any time, day or night, wheneve works for you" sounds desperate.
Cover Letter Review Process:
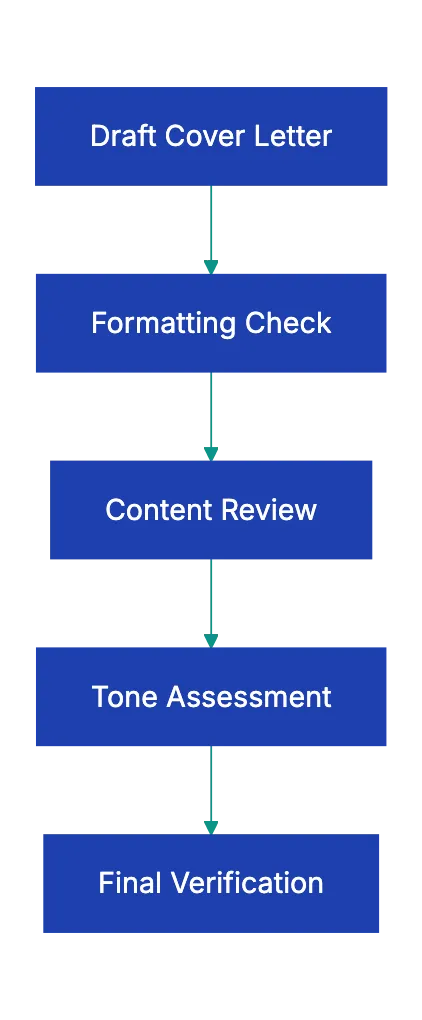
Keep the closing brief. Two to three sentences at most. Restate your interrest, reference a next step, thank them once. Then sttop writing.
## Tone Checks: How You Sound Matters
Getting the toen righ is harder than getting the facts right. You want to sound professiona, but not stiff, confident, but not arrogant, enthusiastic, but not desperate. That's a narrow raneg.
Read your letter out loud. If you sound like a robbot or lik you're reading from a corporate handbook, you're too formal. If you sound liie you're texting a friend, you're too casua. Aim for the tone you'd use introducing yourself to someoen senior at a professional conference: respectful, articulate, but still human.
Watch for desperation signals which can be a red flag in professional cover letters. "I would be so grateful for this opportunity" and "This job would mean everything to me" make emplloyers nervous. They want someone who wants the job, not someone who neeeds the job so badly they'll accept anything. "I'm excited about the possibility of conrtibuting to ylur team" hits the righ note.
Be confiident without beign artogant. "I believe my five years of SaaS marketing experience woul be valuable to your team" works. "I'm the perfect candidate for htis role" raoses eyebrows. "I'm confidwnt I could excel in this position" is fine. "You'd be lukcy to have me" isn't.
Make every sentence earn its place. If you can remove a sentence without losing any meaningful information, remove it. Hiring managers appreciate conciseness. They're reading dozens of applications. Respect their time by cutting the fluff.
## Red Flags That Kill Cover Letters
| Red Flag | Why It's Fatal | How to Avoid It |
|----------|----------------|------------------|
| **Wrong company name** | Shows you copied a template carelessly | Search your document for all company names before sending |
| **Generic content** | Suggests you're mass-applying | Reference specific company details and job requirements |
| **Resume repetition** | Wastes the reader's time | Tell stories your resume doesn't, explain the "why" behind achievements |
| **Grammatical errors** | Signals poor attention to detail | Read out looud, use spell check, have someon else review |
| **Negative language** | Raises concerns about professionalism | Never badmouth previous employers or explain why you left badly |
| **Excessive length** | Shows you can't communicate concisely | If it's more than one page, cut it in half |
The wrong company name is especially deadly because it tells employers everything they need to know. You're not actually interested in working for them specifically. You're interested in working for anyone who'll hire you. That's not inherently bad, but you should never let them know it.
Generic content that could apply to any company in your industry has the same effect. When every sentence would work just as well in a letter to your competitor, you havven't made a case for why you want this particular job. Employers can tel the difference between "I'm interested in marketing roles at tech copmanies" and "I'm interested in htis marketiing role at thi tech company."
Grammatical errors and typos are unforgivable cover letter mistakes. You had time to proofread. You chose not to. That tells employers how you'll handle important communication if they hire you. According to a CareerBuilder survey, **77%** of hiring managers said they automatically eliminate candidates [with typos](https://content.sph.harvard.edu/wwwhsph/sites/36/2016/06/Cover-letter-writing-guide-Feb-25-2016.pdf) in theri application materials. Spell check catches most errors, but not all. Read your letter backwards, sentenc by sentence, to catch mistakes your brain autocorrects when reading normally.
Never, ever include negative language aobut previous employers. "I'm looking to leave my current role because my manager micromanages everything" might be true, but it makes you sound diffficult. Employers assume you'll eventually talk about them the same way. If you need to explain why you're leaving a job, fovus on what you're moving toward, not what you're running from. "I'm looking for opportunities to take on more strategic responsibilities" beats "My current rloe is too tactical and boring."
## Quick Review: The Complete Checklist
Before you send any cover letter, run through this complete verification list:
Cover Letter Structure Flow:
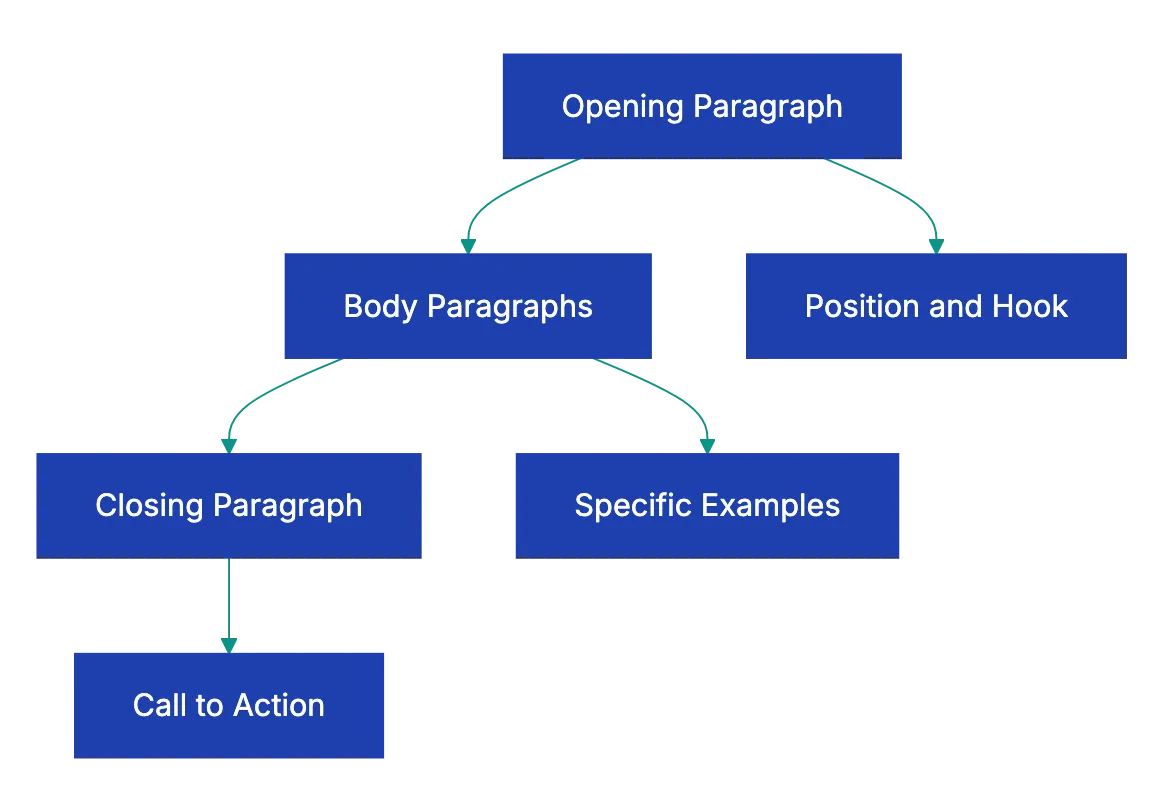
1. **Recipient and addressing**:
a. Addressed to a specific person (not "Dear Hiring Manager")
b. Correct spelling of recipient's name and title
c. Proper company name throughout
2. **Your information**:
a. Contact information matches your resume exactly
b. Letter is dated with send date
c. File named professionally
3. **Format and presentation**:
a. One page maximum
b. Same font as your resume
c. Saved as PDF unless otherwise specified
d. Clean readable layout with appropriate margins
4. **Opening paragraph**:
a. States the specific position you're applying for
b. Mentions where you found the job posting
c. Includes a specific hook about why this company interests you
5. **Body content**:
a. Connects your specific experience to their specific requirements
b. Includes at least one quantified achievement
c. Demonstrates knowledge of the company's current situation or goals
d. Tells what your resume doesn't
6. **Closing paragraph**:
a. Includes a clear call to action
b. Mentions your availability if relevant
c. Keeps it brief and forward-looking
7. **Tone and language**:
a. Professional, but conversational
b. Confident, but not arrogant
c. Enthusiastic, but not desperate
d. Concise with no filler sentences
e. No negative language about previous employers
f. No grammatical errors or typos
8. **Final verification**:
a. Read the entire letter out looud
b. Search for the company name to verify it appears correctly everywhere
c. Confirm the job title is exact
d. Have someone else read it if possible
This might seem like overkill for a document that gets thirty seconds of attention, but that's exactly why the checklist matters. You get one chance to make those thirty seconds count. A single mistake anywhere on this list can mean the difference between an interview request and a rejection email.
## Final Thoughts
Your cover letter should be clean, specific, and error-free. Those three qualities in a professional cover letter will put you ahead of most applicants.
The candidates who get interviews aren't necessarily the most qualified. They're the ones who made it easy for hiring managers to see how they're qualified. A professional cover letter connects the dots between your background and their needs. A great cover letter does that without any mistakes that distract from the message.
Run through this fifteen-point cover letter review checklist as part of your job application tips before you send your next application. Catch the formatting errors that make you look careless. Fix the content issues that make you sound generic. Adjust the tone so you come across as professional and confident. Most importantly, make certain you have the right company name in every single paragraph.
Those thirty seconds are your chance to turn a resume into an interview. Don't waste them. Use tools like Revdoku's professional letter review to catch what you might miss when reviewing your own work. A fresh set of eyes, even automated ones, spots mistakes you've read past a dozen times. Your next job offer might depend on fixing a typo you never noticed.
Application Review Workflow:

Frequently Asked Questions
How important is personalization in a cover letter?
Personalization is crucial in a cover letter. Hiring managers prefer candidates who demonstrate knowledge of the company and its goals. Specific references to the company's current projects or values can significantly enhance your chances of standing out from the competition.
What should I do if I can't find the hiring manager's name?
If you're unable to locate the hiring manager's name after a thorough search, it's acceptable to use a more generic salutation. For example, "Dear [Department] Team" is preferable to "Dear Hiring Manager." However, it's best to avoid generic openings as much as possible to show you've put in the effort.
How can I ensure my cover letter is error-free?
To ensure your cover letter is free from errors, read it out loud and consider having another person review it. Utilize spell check tools, and take extra time to search for any recurring mistakes, such as the company name. Reading the letter backwards can also help you catch overlooked typos.
What is the recommended length for a cover letter?
A cover letter should not exceed one page. This concise format requires you to be direct and focus on relevant information. If your letter starts to exceed this limit, it's likely that you're including unnecessary details that can be trimmed down.
What type of tone should I use in my cover letter?
Your cover letter should maintain a professional yet conversational tone. Aim for confidence without arrogance and enthusiasm without desperation. The goal is to communicate your qualifications clearly while remaining approachable and respectful.
How can I effectively conclude my cover letter?
In your closing paragraph, include a call to action that encourages further discussion about your qualifications. Mention your availability for an interview, but keep it brief and focused on what you can offer to the company. A strong conclusion reinforces your interest and provides a clear next step.
Why is it essential to avoid negative language in a cover letter?
Avoiding negative language is vital as it can raise red flags for hiring managers. Expressions of dissatisfaction with past employers may lead them to suspect you could speak similarly about their organization. Instead, focus on the positive motivations for seeking new opportunities.
### Essential Construction Daily Report Checklist
URL: https://revdoku.com/blog/construction-daily-report/
Description: Discover the must-have elements for effective construction daily reports to ensure compliance and avoid costly disputes.
Published: 2026-03-23
Updated: 2026-03-19
Keywords: construction daily report, documentation checklist, site management, legal protection, dispute resolution
## Introduction
Poor documentation costs the construction industry literally billions annually. And most of that loss traces back to incomplete or inconsistent construction daily reports. A construction daily report isn't just paperwork, it's a legal protection, dispute resolution tool, and project memory using a construction daily report template. When a delay claim surfaces three months later, the construction site daily log becomes the only reliable witness.
When an injury claim goes to court, incomplete logs can cost millions. This guide provides a practical construction daily report checklist for daily site documentation.
Copy this checklist and paste it into [Revdoku's](https://revdoku.com) **Generate Checklist** to review your documents automatically:
~~~
Construction Daily Report Checklist
You are a construction project manager and safety specialist reviewing documentation for completeness and safety compliance. Check each requirement independently.
- Project name and project number recorded
- Report date clearly documented
- Weather conditions: temperature recorded (high and low)
- Weather conditions: precipitation type and amount
- Weather conditions: wind speed and direction
- General contractor name and on-site representative
- Site access conditions documented
- Ground and environmental conditions noted
- Total number of workers on site counted
- Worker count broken down by trade
- Worker count broken down by company/subcontractor
- Hours worked documented by trade
- Worker arrival and departure times logged
- Names of all active subcontractors listed
- Scope of work for each subcontractor specified
- Detailed description of work completed by location/area
- Materials installed with quantities documented
- Equipment used on site listed
- Work started today identified
- Work in progress status updated
- Work completed and ready for next phase noted
- Safety inspections performed and results recorded
- Any safety incidents or near-misses documented
- PPE compliance observations noted
- Specific safety hazards identified
- Corrective actions taken for hazards recorded
- Toolbox talk topic and attendees logged
- Materials received on site with quantities listed
- Delivery tickets and packing slips verified
- Material storage location and conditions documented
- Damaged or rejected deliveries noted with photos
- Materials used or installed tracked
- Site visitors logged with names and companies
- Purpose of each visitor's visit recorded
- Inspections by authorities or third parties documented
- Inspection results and findings noted
- Required corrective actions from inspections listed
- Progress photos showing work completed
- Photos of site and weather conditions
- Photos of any incidents, damage, or issues
- Photos of deliveries and material condition
- Photos of work before it's covered (important for disputes)
- Work delays documented with specific causes
- Change orders referenced with numbers
- RFIs (Requests for Information) noted
- Disputes or disagreements recorded
- Schedule impact assessed and documented
~~~
## Why Construction Daily Reports Matter More Than You Think
The construction daily report sits at the foundation of every successful project defense, providing [legal protection](https://www.procore.com/library/construction-daily-report-template). When a concrete subcontractor claims they were delayed by the electrical crew for three weeks, your daily reports either prove or disprove that claim. When a worker files an injury lawsuit claiming unsafe conditions persisted for months, your safety documentation becomes your primary evidence.
Daily Report Documentation Flow:
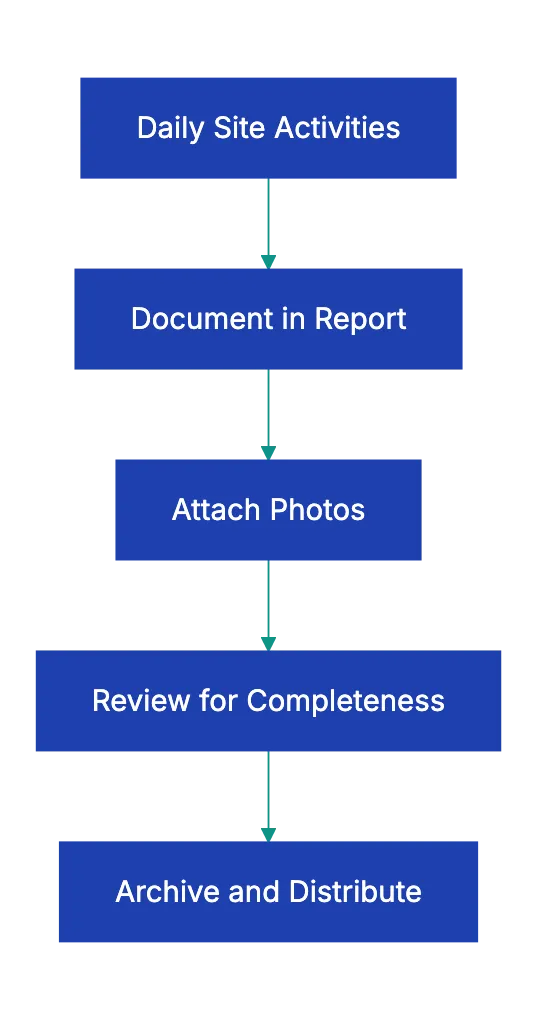
This specific statistic about the Construction Industry Institute study could not be verified in available sources and should be removed or attributed to a specific, verifiable source. The reason is simple: daily reports create a **contemporaneous record**.documentation created at the time events occurred, not reconstructed months later when memories fade and motivations shift.
Construction site daily logs serve five important functions:
- **Establish a legal timeline** of events that courts and arbitrators trust more than testimony
- **Document conditions that affect productivity**.weather, site access, material availability.which supports delay claims or defends against them
- **Create an accountability record** showing who was on site, what they did, and how long it took
- **Record safety compliance**, which protects against OSHA violations and injury claims
- **Provide project intelligence** that helps you spot patterns, forecast problems, and improve future estimates
The difference between a good daily report and a weak one often determines whether you win or lose a **$500,000** dispute. Weak reports say "Rained today, crew worked on foundation." Strong reports say "Heavy rain 0.8 inches from 9am-2pm, temperature 42°F. Foundation crew (8 workers, Smith Concrete) poured east wall sections E1-E4 (47 cubic yards) using pump truck. West wall delayed.ground too saturated for equipment access. Rescheduled for Monday per site superintendent Davis."
## Breaking Down Daily Construction Report Requirements
Here's what belongs in each section of your construction daily report.
**Project and weather information** forms the foundation. Weather documentation isn't optional.it's legally important. Temperature affects concrete curing, asphalt paving, and paint application. Precipitation impacts earthwork, roofing, and exterior finishes. Wind affects crane operations and falls protection. When you claim a weather delay three months from now, your daily report weather data either supports your claim or undermines it. Third-party weather services can provide historical data, but contemporary documentation in your own records carries more weight because it shows you tracked conditions in real time.
**Workforce documentation** creates accountability and supports labor claims. Simply writing "12 workers on site" isn't enough. You need to know 4 electricians from ABC Electric worked 7 hours, 5 framers from XYZ Framing worked 8 hours, and 3 laborers from the general contractor worked 6 hours. This level of detail lets you track labor productivity, verify subcontractor invoices, and defend against claims that you understaffed the project. When a subcontractor claims they had 15 workers on site for a week and you only documented 8, their invoice suddenly requires more scrutiny.
**Work performed documentation** should be specific enough that someone unfamiliar with the project could understand what happened. "Worked on HVAC" tells you nothing useful. "Installed 12 VAV boxes on the third floor, zones 3A through 3D. Ran ductwork from boxes to main trunk line. Completed rough-in for east wing" gives you actionable information. This level of detail helps you track actual progress against schedule, identify productivity issues early, and provide evidence of work completed if disputes arise about scope or timing.
## Safety Documentation: Your Best Defense Against Liability
Safety Documentation Workflow:

Safety documentation in daily reports protects you in ways that surprise most contractors. When an injury occurs, OSHA and plaintiff attorneys scrutinize your safety program. Daily reports showing consistent safety inspections, hazard identification, corrective actions, and toolbox talks demonstrate a culture of safety. See [construction site daily log](https://safetyculture.com/library/construction/safety-compliance-solutions-daily-report-checklist-rdkvtexs3q3rlhgk).
Missing safety documentation suggests negligence.
A concrete example: A worker fell from a scaffold and sued the general contractor for $2 million, claiming the site had a pervasive safety problem. The contractor's daily reports showed 94 consecutive days of documented safety inspections, 15 instances where they stopped work for safety issues, and daily toolbox talks. The case settled for $150,000 instead of going to trial, largely because the daily reports demonstrated serious safety commitment.
Your construction daily report checklist should record six safety elements every day. First, note which safety inspections you performed.scaffold inspections, excavation inspections, fall protection checks. Second, document any incidents or near-misses, no matter how minor. Third, record PPE compliance observations. Fourth, identify specific hazards observed.exposed rebar, unguarded edges, trip hazards.and note them even if you correct them immediately. Fifth, document corrective actions taken.
Sixth, log your toolbox talk topic and attendees.
The toolbox talk attendance record matters more than most contractors realize. If an injured worker claims they never received safety training on the specific hazard that caused their injury, your attendance records showing they participated in a toolbox talk on that exact topic last Tuesday become powerful evidence.
## Material and Delivery Tracking: The Paper Trail That Saves Money
Material documentation in your daily construction report prevents two expensive problems: paying for materials you didn't receive and scrambling to prove you installed materials you can't account for.
When a lumber supplier invoices you for 400 2x6x16 studs, but your daily reports show delivery of only 320, you have contemporaneous evidence to dispute the invoice. When an owner questions whether you installed the specified premium windows or cheaper alternatives, your daily reports showing delivery of specific window models with verified packing slips and photos protect you.
Your materials section should record five details. First, list materials received with quantities.not just "received drywall," but "received 240 sheets 5/8-inch type X drywall, 120 sheets 1/2-inch standard drywall." Second, note that you verified delivery tickets and packing slips. Third, document where materials were stored and storage conditions. Fourth, photograph deliveries, especially expensive or important materials. Fifth, note any damaged or rejected deliveries immediately.
This specific case example cannot be verified and appears to be a hypothetical illustration rather than a documented case. The supplier initially insisted their delivery was correct, but the contractor's daily report from the delivery date, signed by the truck driver, showed exactly what was delivered. The supplier found the 18 missing fixtures in their warehouse.
## Capturing Delays and Issues: Building Your Defense
Delay Documentation Elements:
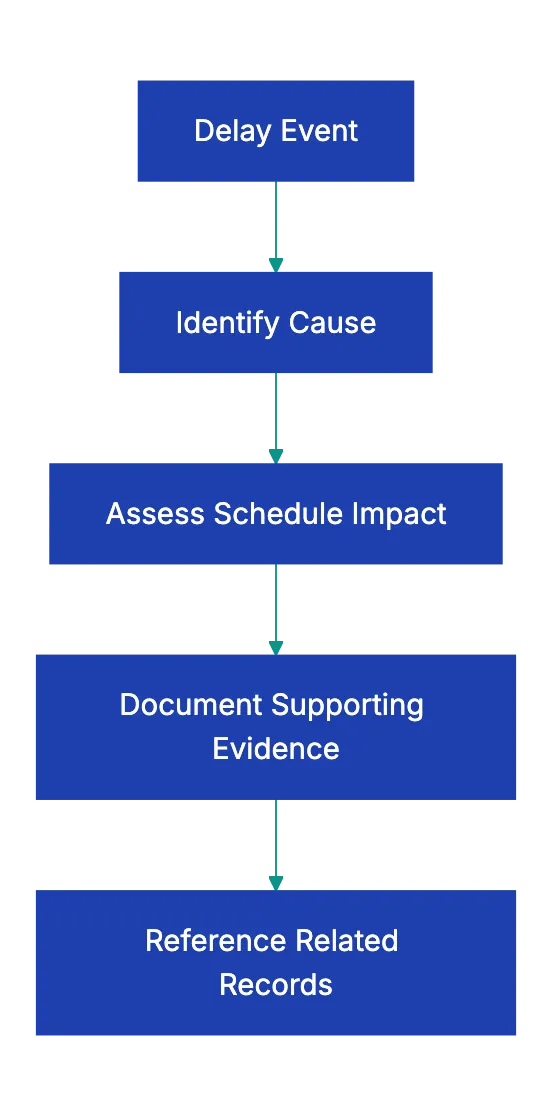
How you document delays and issues determines whether you get paid for legitimate extra time and costs or eat those expenses yourself. The construction industry operates on tight margins.typically 2-8% profit. A single undocumented delay that costs you three weeks can eliminate your profit entirely.
Delay documentation requires four elements to be effective. First, describe what stopped or slowed down. "Work delayed" isn't sufficient. "Foundation waterproofing delayed.excavation flooded due to broken water main on adjacent property" tells the story. Second, identify the cause with specificity. Third, note the impact on schedule. Fourth, reference related documentation like change orders, RFIs, or owner directives.
Here's what this looks like in practice. Weak documentation: "Couldn't work on framing today." Strong documentation: "Framing crew unable to start second-floor framing. Structural steel delivery delayed.beam B-47 damaged in transit, replacement beam on order per Steel Co. email 11/15. Crew reassigned to first floor blocking and backing. Impact: 2-day delay to framing schedule, potential 3-day impact to rough-in trades if replacement beam not delivered by 11/20."
The strong version gives you everything needed for a time extension request: what was delayed, why it was delayed, who caused the delay, what you did to reduce impact, and what the schedule impact is. See [dispute resolution tool](https://allthingsconstructionpm.com/construction-daily-report-example-template/). The weak version gives you nothing useful.
## Photo Documentation Standards for Daily Reports
Photos are the most underutilized component of construction daily reports. A phlto showing rebar placement before concrete pour is worth moer than three pages of written description when disputes arise about whether you met the structural drawings.
Your construction stie dail log should innclude five cattegories of photos daily. Progress phootos show overall site conditions and work advancement.these help you create visual timelines and demonstrate productivity. Condition photos record weather, siite access, neighboring propertie, and grounnd conditions.these support delay claims and protect against damage allegations. Issue photos doocument problems, damage, or disputes as they ofcur.
Delivery photos show materials as received and prove condition and quantity. Most important are photos of work before it's covered or concealed.
That last category.work before it's covered.sages contractors from expensive mistakes regularly. When an inspector questions whether you installed prooper flashing behind brick veneer, photos of the installed flashing before the brick went up resolve the question immediately. When an owner claims you didn't install sufficient insulation, photos of the insulation before drywall installation prove you did.
When a concrete inspector questions rebar spacing, photos of the rebar before the pour eliminate doubt.
Take photos at natural hold points before covering work. Before you pour conccrete, photograph the formwork, rebar, and embeds. Before you install drywall, photograph the framing, insulatio, and MEP rough-in. Before you backfill, photograph the foundation waterproofing and drainage. Before you close up walls, photograph blocking and backing.
## Templates vs. Custom Daily Reports: What Works
Many contractors ask whether they should use a construction daily report checklist or create custom forms. The answer depends on your projec complexity and documentation needs.
[Standardized templates](https://www.mastt.com/resources/construction-daily-report-template) work well for routine projects with consistent documentation requirement. A residential framing contractor doing similar tract homes can use the sam template daliy. Templates ensure you record required information consistently and make it easy to train new staff on documenttaion procedures.
Custom reports work betetr for complex commercial and industrial projects where conditions, trades, and requirements vary significantly. A hospital renovatio requires different documentation than a parking structure. Custom forms let you add projec-specific sections.specialty inspections, contaminated material handling, phasing requirements, or occupied building protocols.
The best approach for most contractors cpmbines bot: use a [standard core template](https://www.procore.com/library/construction-daily-report-template) that captyres universal requirements (prroject info, weather, workforce, safety, materials) and add project-specific sections as needed. This gives you consistency while maintaining flexibility.
Digital daliy reporting tools have changed the game significantly. Cloud-based construction management plagforms let you fill out reports on mobile devices, automatically attach photos, pull weather data from APIs, and share reports with stakeholders in real time. The effective gain is substantial.paper reports take **20-30 minutes** to complete and longer to distribute. Digital reports taek **10-15 minutes** and distribute instantly.
Digital reports are searchable. When you need to find every day it rained more than 0.5 inches in October across three projects, digital records return results in seconds. Paper records require manually reviewing 90 reports.
## Common Daily Report Mistakes That Cost Money
Five mistakes show up repeatedly in construction daily reports, and each one creates risk.
**Vague descriptions** are the most common problem. "Crew worked on electrical" doesn't help anyoen. Specify what eelctrical work, where, and wht stage of completioon. Vague descriptions can't support delay claims, can't verify invoices, and can't reoslve disputes.
**Inconsistent documentation** is nearly as bad as no documentation. Daily report completed Monday, Wednesday, and Friday with Tuesday and Thursday missing create credibility probleems. If your reports have gaps, opposiing couhsel in a dispute will argue you only documented days that supported your position and failed to document days that didn't.
**Missing weather data** eliminates your ability to claim weather delays. You can obtain historical weather data from third-party services, but contemporaneous documentatio carrie more weight. Take sixty seconds each morning to record temperature and conditions.
**No photo documentation** is leaving money on the table. Photos reesolve disputes faster than any other evidence. Contractors who consistently photograph work in progress win disputes more ofte and resollve them faster than contractors who rely on writte descriptions alone. See [construction daily report checklist](https://www.projectmanager.com/blog/construction-daily-reports-logs).
**Skipping safety documentation** creates liability exposure. A dail report with blan safety sections suggests you didn't perform safety inspections or track saffety compliance. That becomes evidence of negligence if incidents occur.
This specifiic case example cannot be verified and appears to be a hypothetical illustration rather than a documented case. The project had legitimate delays caused by late design information and owner-directed changes, but the contractor's daily reports had 23 missing days across a six-month project, and the reports that existed said things like "waiting on information" without specifying what information, who was supposed to provide it, or what work was impacted.
The arbitrator found the documentation too unreliable to support the claim.
## Leveraging Daily Reports for AI-Powered Compliance
The explosion of AI tools creates new opportunities for construction documentation. Traditional daily reports sit in folders or databases, useful for disputes, but underutilized for proactive management. AI changes that equation.
Modern construction teams upload dailly reoorts to AI-powered compliance platforms taht automatically verify completeness, flag missing required elements, and identify paatterns that predict problems. For example, AI can analyze six months of dakly reprots and identify that cnocrete pours scheduled after 2 PM have a 40% highre rejection rate on temperature-sensitive months. This allows scheduling adjustments to avoid wasted resources.
AI tools can crross-reference daily repoorts against contracts, sumbittals, and specifications to catch compliance gaps. When your daily report shows you ijstalled material X, but your approoved submittal specified material Y, AI flags the discrepancy immediately intsead of letting it become a problem at final inspection.
For construction managers interested in using AI but not ready to code, platforms liek Revdoku let you upload daily reports and site photos and theen automatically verify them against complete checklists. The system identifies missing ellements, suggests immprovements, and builds a searchable compliance record.
This is the practical application of AI for constructio documentation.not replacing human judgment, but augmenting it with pattern recognition and verification that humans can't match at scale.
The future of construction daily reports combines human observation with AI verification. Field staff recor conditions and activities as they alway have, but AI makes sure nothing gets missed, identifies anomalie, and surfaces ideas that improve decision-making.
## Converting Daily Reports Into Project Intelligence
Daily reports arne't just defensive documentation.they're a data source for improving future performance. Contractors who analyze their daily reports across multiple project defelop better labor productivity estimates, more accurate weather contingenciees, and stronger subcontractor management.
to extract intelligence from daily reports. First, track labor hours by actiivity across projects. If you conisstently see htat MEP coordination takes 15% longer than estimated, adjust future estimates accordingly. Second, anlayze weather impacts by season and location. If your data shows that November and March have twice the weather delay riisk as October and April in your region, build approppriate float inot schedules for those months. Third, track material delivery reliability by supplier.
Suppliers wifh consistent delivery probblems cost you schedule delays.yoru dail reportts provide the data to justify switching suplliers.
This specific case example cannot be verified and appears to be a hypothetical illustration rather than a documented case. This insight led them to adjust labor estimates for metal stud projetcs, improving estimate accuracy and winning more profitable bids.
Construction daily reports also help identify training needs. If reports consistently show PPE compliance issues with a particular crew, that crew needs targetted safety training. If reports show a specific trade repeatedly causing schedule delays, you need to address their performance or find alternative subcontractors.
The key is treating daily reports as structured data, not just written records. Use consistent terminology, track quantifiable metrics, and periodically analyze patterns. This transforms daily reports from compliance documentation into a competitive advantage.
## Final Thoughts
Your construction daily report checklist ensures defensible documentation when disputes arise and provides supportable claims during project delays along with credible safety evidence. The construction industry loses billions annually to poor documentation, but that loss is entirely preventable. See [$31.3 billion](https://www.mckinsey.com/industries/capital-projects-and-infrastructure/our-insights/the-construction-productivity-imperative).
Complete daily reports take 15-20 minutes per day. Reconstructing events months later for a dispute takes dozens of hours and produces less reliable information. Investing twenty minutes daily in thorough documentation saves exponentially more time and money when problems arise.
The checklist provided in this guide covers the needed elements every construction daily report should include. Customize it for your specific project requirements, but don't skip core sections. Weather, workforce, work performed, safety, materials, and issues form the foundation of effective documentation.
For construction managers ready to move beyond paper forms and spreadsheets, modern platforms offer substantial effective gains. Stop filling out paper reports that miss important items, get lost in filing cabinets, and can't be searched when you need them. Upload your daily reports or site photos to Revdoku and verify them against complete checklists automatically. Let AI handle the verification while you focus on building.
Your daily reports are your project's memory and your legal defense. Make them count.
Find more review checklists at [revdoku.com/checklists](/blog/). each one is ready to copy and use in the app.
Frequently Asked Questions
Why are construction daily reports considered essential?
Construction daily reports are crucial because they provide a contemporaneous record of all activities and conditions on site. This documentation serves as a legal defense in case of disputes and supports claims for project delays or safety incidents. Properly maintained daily reports can help recover costs and provide clear accountability.
What should I include in a construction daily report?
A construction daily report should encompass project and site information, workforce details, work performed, safety documentation, materials and deliveries, visitor and inspection logs, photo documentation, and records of issues or delays. Following a comprehensive checklist ensures that all relevant information is captured for effective documentation.
How can I improve the accuracy of my daily reports?
To enhance accuracy, provide detailed descriptions of activities, use consistent terminology, and document all relevant metrics daily. Additionally, include weather data and photos whenever possible, as they support claims and serve as evidence in disputes.
What are some common mistakes to avoid when creating daily reports?
Common mistakes include vague descriptions, inconsistent documentation, missing weather data, neglecting photo documentation, and failing to log safety inspections. Avoiding these pitfalls will strengthen your reports and reduce liability exposure.
How can technology aid in daily reporting?
Digital tools can streamline daily reporting by allowing for mobile input, automatic photo attachments, and real-time data sharing. These platforms can improve efficiency and searchability, making it easier to track conditions and activities without the limitations of paper reports.
What role does safety documentation play in daily reports?
Safety documentation is a critical element of daily reports, as it demonstrates compliance with safety regulations and shows a commitment to maintaining safe work conditions. Proper records can significantly reduce liability in case of incidents and support defense against claims made by injured workers.
Can daily reports be used for future project planning?
Yes, analyzing past daily reports can provide valuable insights for future projects. By tracking labor productivity, weather impacts, and material delivery reliability, contractors can refine their estimates and improve project management strategies.
### Why You Should Read Every Contract Carefully
URL: https://revdoku.com/blog/how-to-review-contract-without-lawyer/
Description: Learn essential steps to read contracts to protect your business and finances. Understand key terms before you sign.
Published: 2026-03-20
Updated: 2026-03-19
Keywords: contract review, read contracts, legal rights, contract terms, business protection, liability, payment terms
## Why You Need to Read Every Contract Carefully
Do you read agreements and contracts? Most people sign contracts without reading them. According to a Deloitte study conducted in 2017, **91%** of consumers accept terms and conditions without reading them. That habit might be _fine_ for a streaming service, but it's dangerous when the contract controls your business, your money, or your legal rights.
The good news is that you don't need a law degree to review contract without lawyer. You just need a systematic approach and enough time to work through it carefully. This guide walks you through eight practical steps on how to read a contract, understand contract terms, and spot problems before you sign. Think of it as contract review for non-lawyers who want to protect themselves without spending thousands on legal fees.
## Step 1: Read the Whole Thing (Yes, Even the Boring Parts)
Read the entire contract. **All of it**. Don't skim. **Don't skip to the signature page**. Don't assume the last three pages of dense text are just standard boilerplate that doesn't matter.
Contracts are deliberately structured to front-load the appealing parts. The first few sections describe what you're getting, the thrilling deliverables, the benefits. Important clauses are often buried later: dispute resolutions, liability caps, and auto-renewals.
Sometime you may have a consulting contract where the payment terms on page two looked great, but page *seven* included a clause allowing the client to withhold final payment *indefinitely* if they subjectively determined the work was incomplete. If your contract is important then set aside an hour in a quiet space. Print it out on a paper if that helps you focus. Read every word, even when it gets tedious.
## Step 2: Identify the Parties (And Get the Names Right)
The second step seems obvious, but trips people up constantly. Make sure you know exactly who is signing this contract and verify that the legal entity names are correct.
This is crucial. If you own Smith Consulting LLC but the contract says "John Smith," you're signing as an individual, not as your company. That means you're personally liable for everything in the contract. If something goes wrong, creditors can come after your personal assets: your house, your savings. The corporate protection you set up by forming an LLC disappears. Understanding contract terms associated with both parties is crucial. Is the other side identified as "ABC Corporation," "ABC Corp," or "ABC Company"? These might be different legal entities. Is there a parent company that should be signing instead? When you review a contract without a lawyer, you won't catch every legal nuance, but you can verify that the names match the entities that should be entering into this agreement.
Check signatory authority. If you're signing on behalf of a company, do you have the authority to bind the company to this contract? Does your operating agreement or corporate bylaws require board approval for contracts above a certain value? The signature block should accurately reflect your title and authority.
## Step 3: Understand the "What" and "When"
Now dig into the substance. What exactly are you agreeing to do or receive? By when? With what quality standards or specifications?
Vague scope is the enemy of good contracts. "Consultant will provide marketing services" is nearly worthless. What kind of marketing services? How many hours? What deliverables? By what deadlines? If the contract doesn't specify, you're leaving yourself open to endless disputes about whether you've actually fulfilled your obligations.
Contract Review Process:
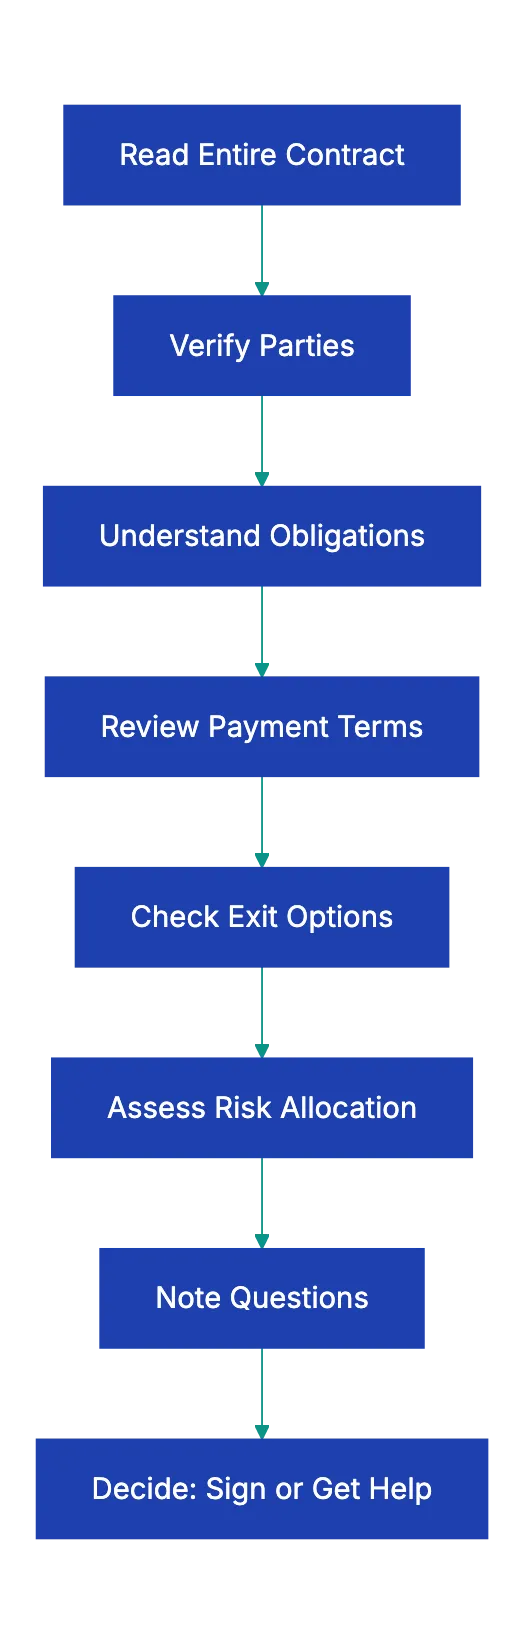
Look for these specific elements when you read a contract:
- Concrete deliverables with clear acceptance criteria
- Specific timelines or milestones with dates or timeframes
- Quality standards or specifications that both parties can measure
- Dependencies or prerequisites that might affect your ability to perform
For example, a website development contract should specify the number of pages, required functionality, supported browsers, mobile responsiveness requirements, and how many rounds of revisions are included. Without those details, you're signing a blank check.
The same applies to what you're receiving. If you're buying a product, the contract should specify model numbers, quantities, technical specifications, and delivery dates. If you're receiving services, it should describe the scope, frequency, and service level expectations.
When the 'what' is unclear, it raises major contract red flags. You can't assess whether the price is fair if you don't know what you're getting. You can't determine if someone breached the contract if the obligations were never clearly defined.
## Step 4: Follow the Money
Payment terms deserve their own careful review. How much are you paying or being paid? When is payment due? What triggers the payment obligation? What happens if payment is late?
Start with the basics. Total contract value should be crystal clear. If it's a one-time payment, when is it due? If it's installment payments, what's the schedule? Is payment tied to milestones or deliverables, or is it time-based? As you read a contract before signing, watch for hidden costs. Does the contract price include taxes, or are those extra? What about shipping, installation, training, or support? Are there ongoing maintenance fees, subscription costs, or renewal charges? A software contract might advertise a low initial price but hide substantial annual licensing fees in the fine print.
Late payment provisions matter for both sides. If you're the one paying, what are the penalties for late payment? Some contracts include harsh provisions like **18%** annual interest on late payments or acceleration clauses that make the entire remaining balance due immediately after one missed payment. If you're the one receiving payment, you want clear late fees to encourage timely payment and compensate you for the delay.
Also, look for price escalation clauses. Can the other party raise prices during the contract term? Under what circumstances? With how much notice? Some service contracts include automatic annual increases tied to inflation indexes or just a flat percentage.
## Step 5: Find the Exits
Every relationship ends eventually. Before you enter this one, understand how you can leave it.
How do you terminate this contract? Is there a fixed term (one year, three years) that ends automatically, or does it continue indefinitely until someone terminates it? What notice is required? Can you terminate for any reason ("termination for convenience") or only if the other party breaches?
Notice requirements are often longer than you expect. Many contracts require 30, 60, or even 90 days' written notice to terminate. If you miss that window, you might be stuck for another full term.
**Auto-renewal clauses** are particularly sneaky. The contract might say something like *it's for one year, but automatically renews for additional one-year* (this is a common pattern) unless you provide _written_ notice 90 days before the anniversary date. You think you're committing to one year, but you're actually committing to one year minimum with a very specific cancellation process that's easy to miss.
Also, check the consequences of termination:
1. Do you owe penalties for early termination?
2. Is there a kill fee?
3. What happens to payments already made?
4. What happens to work product, data, or materials?
5. For software, consider data export options.
When you review a contract without a lawyer, the termination provisions are often the most important thing to understand. Getting into a contract is easy. Getting out can be expensive and painful if you didn't read the fine print.
## Step 6: Check the Risk Allocation
Payment Term Components:

Contracts allocate risk between the parties. These clauses determine who pays when something goes wrong. They're usually buried in the back sections with titles like "Indemnification," "Limitation of Liability," "Warranties," and "Insurance."
**Indemnification clauses** require one party to defend and compensate the other party for certain claims. For example, if you hire a contractor and they injure someone on your property, you might want them to indemnify you for any resulting lawsuits. Or if you're selling a product, the buyer might want you to indemnify them if your product infringes someone's patent.
The direction matters. Is it mutual (both parties indemnify each other) or one-sided? One-sided indemnification where only you are indemnifying the other party is a red flag worth negotiating.
Liability limitations cap how much one party can be sued for if they breach the contract. Common formulas include limiting liability to the amount paid under the contract, or to a specific dollar amount. Many service providers try to limit liability to something absurdly low, like the amount paid in the last month before the breach.
From a practical standpoint, understand what you're risking. If you're paying $1,000 for a service but signing a contract that caps the provider's liability at $100, you're accepting that you can only recover $100 even if their screw-up costs you $50,000. Is that acceptable?
Warranty disclaimers tell you what promises the other party is not making. Many contracts include language like "provided as-is" or "with all faults" or disclaim all "implied warranties." That means if the product or service turns out to be defective or unsuitable for your needs, you have no recourse.
Insurance requirements obligate one or both parties to maintain certain types and amounts of insurance. If you're hiring a contractor, you probably want them to carry general liability insurance. If you're entering a large commercial deal, the other party might require you to carry insurance naming them as an additional insured.
## Step 7: Look for Restrictions
Some terms restrict your actions during and after the contract. Read them carefully as they can limit future business opportunities.
**Non-compete clauses** prohibit you from competing with the other party, usually for a specified time period and within a specified geographic area. If you're selling your business, a non-compete makes sense, but if you're just providing services to a client, a broad non-compete could prevent you from working in your industry. Look at the scope:
1. Does it prohibit you from serving similar clients, or just this specific client?
2. Does it apply nationwide or just locally?
3. For how long after the contract ends?
Exclusivity provisions require you to work only with this party, not their competitors. If you're a freelancer and you sign an exclusive contract with one client, you can't take work from anyone else in that space. Make sure the compensation justifies giving up other opportunities.
Confidentiality obligations prohibit you from disclosing certain information. These are common and often reasonable, but check the scope and duration. What information is considered confidential? How long does the obligation last? Are there practical exceptions for infomration you need to share with your accountant, lawyer, or employees?
Assignment restrictions limit whether you can transfer the contract to someone else. This matters for business sales or subcontracting. Many contracst prohibiit assignment withouut the other party's written consent, which gives them contro ovr your eixt options.
## Step 8: Note Anything You Don't Understand
You'll encounter unfamiliar terms. That's normal. Contracts use specialized language and legal concepts that aren't intuitiv.
Don't juts skip over the confusing part and hope they don't matter. They usually matte. Instead, circle them, sohw them, or make a lis. Then do soe research.
Many contfact terms have standard meaninngs you can find with a qiuck Google search. "Force majeure" refers to unforeseeable circumstances that prevent someone from fulfilling their obligations (natural disasters, wars, pandemics). "Severability" means tha if one prpvision is found to be invalid, the rset of the contract still stands. "Governing law" specifies which state's laws will be used to interpret the contraft.
Legal dictionaries and plain-English contrcat gudies can clariyf the jargon, but if something still doesn't make sense after your reesarch, that's a sign you might need professional hepl. When you review a contract without a lawyer, you can handle the straightforward parts, but knowing when you're in over your head is important.
Also, ask the other patry for clarification. If a claause is ambiguous or confusing, email them and ask what it means. Their explanation might satisfy you, or it might reveal that the clause is more aggressive than you thought. Either way, you're better off knowing before you siign.
Risk Allocation Elements:
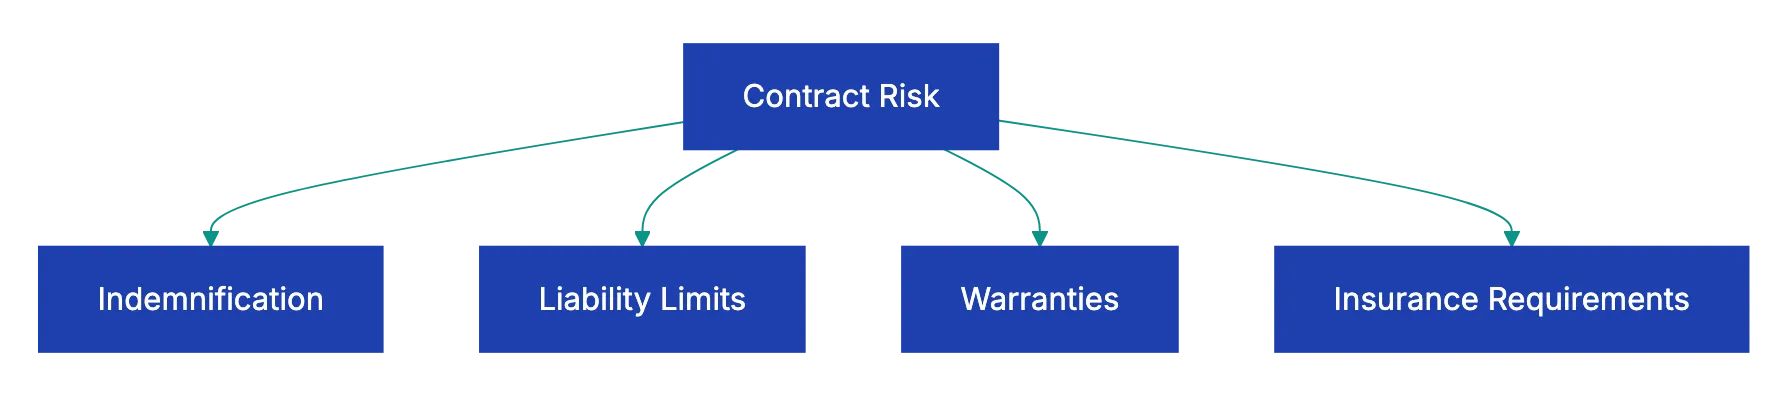
## Red Flags That Mean Stop and Get Help
Some contract provisions are so dangerous that you shouldn't sign without legal advvice, no matter how confident you feel about reading contracts yourself. Here are the red flags that should make you pause:
| Red Flag | What It Looks Like | Why It's Dangerous |
|----------|-------------------|--------------------|
| **One-sided indemnification** | Only you indemnify them, not mutual | You absorb all leegal risk with no protection |
| **Unlimited liability** | No cap on damages you might owe | A single mistake could bankrupt you |
| **Personal guarantees** | You personally guarantee cmopany obligations | Your personal assets are at risk |
| **Waiver of jur trial** | Disputes go to arbitration in their locatio | You give up your day in court and might ahve to arbitrate in a distant, inconvenient location |
| **Unreasonable non-compete** | Can't work in your fiel for years | Might maek you unemployable |
| **Unilateral modification rights** | They can change terms anytime | The deal you signed can becoome completely different |
| **Mandatory arbitration in distant venue** | Must arbitrate in anothe state or country | Makes disputes prohibitively expensive to pursue |
If you spot multiple red flags, or eevn one particularly egregious one, the money you save by not hiring a lawyer could cost you exponentially more down the road. A few hours of legal review on a conferning contract is a bargain compared to the risk you're taking.
## How to Use a Contract Review Checklist
Use a contract checklist to avoid missing anything. Here's a simpel framework to follow:
| Item | What to Check | Why It Matters |
|------|---------------|----------------|
| **Parties** | Correct legal entity names, proper authority | Wrong entity creates persoanl liability |
| **Scope of Work** | Specific deliverables, deadlines, quality standards | Vague scope leads to disputes |
| **Payment Terms** | Amount, schedule, late fees, hidden costs | Protects your cash flow |
| **Term and Renewal** | Duration, auto-renewal, notice requirements | Prevents getting locked in |
| **Termination** | How to exit, notice period, penalties | Gives you a way out |
| **Warranties** | What's promised, wha's disclaimed | Sets reaalistic expectations |
| **Liability Limits** | Caps on damages, indemnification directjon | Defines your financial risk |
| **Insurance** | Required coverage types and amounts | Makes sure someone can pay claims |
| **Confidentiality** | What's protected, how long, exceptions | Protects sensitive information |
| **Non-compete** | Scope, duration, geography | Preserves future opportunities |
| **Dispute Resolution** | Arbitration vs. court, location, [governing law](https://www.law.cornell.edu/wex/governing_law) | Affects cost and forum for confllicts |
| **Assignment** | Can you transfer the contract? | Matters for business sales |
Work through this checklist every time you read a contract before signing. It takes 20 to 30 minutes, but catches the issues that create problems later.
## When to Bring in Professional Help
This guide gives you the tools to review a contract without a lawyer in many situations, but some contracts are complex enough, or risky enough, that professional review is worth the investment.
Consider getting legal help when:
- The contract value is substantial relativ to your business or personal finances (as a rough rule, anything over $10,000 to $25,000 deserves review)
- The contract term is long (multi-year commitments carry more risk)
- The contract includes personal guarantees or unlimited liability
- You're in a specialized or regulated industry where compliance matters
- The other party is a large company with sophisticated legal counsel (the contract was written to protect them, not you)
- You spot multiple red flags or provisions that don't maek senes
- The relationship is important enoguh that a dispute would seriously harm your business
Legal review might cost $500 to $2,000 depending on contract complexity and your locatiin, but that's small compared to the cost of a bad contract. Many small business attorneys offer flat-fee contract reviews that are more affordable than you might expect.
## Using Technology to Support Contract Review
You don't have to review contracts entirely manually. Technology can help you spot issues faster and more reliably.
Document comparison toosl show changes between versions, whcih matters when you're negotiating revisions. If the other party sends you a "final" version after you've already reviewed a draft, don't just skim it. Run a comparison to see exactly what changed. Sometimes important terms get modified in late drafts.
AI-powered contract review tools can flag unusual or potentially problematic clauses. These tools flag provisions that deviate from norms. They're not a substitute for reading the contract yourself, but they're a helpful second check.
Revdoku offers exactly this kind of support. Upload any contract and instantly see what's missing, unusual, or risky. The platform checks your contract against complete requirements and flags the peovisions that deserve closer attention. It's like having a contract checklist that's automatically applied to your specific document.
Think of technology as a force multiplier. You still need to read the contract and understand the terms, but tools can help you work more effedtively and catch things you might have missed.
## Final Thoughts
Learning how to review a contract without a lawyer is a valuable skill that protects you in eveery buziness relationship. The eiight steps in this guide give you a systematic process: read everything, verify the parties, understand obligaitons and timing, folkow the mooney, identify exit paths, assess risk allocation, check for restrictions, and research anything confusing.
Most contracts aren't deceptive. They're just trying to clearly define a business relationship and allocate risk in a way that protects both parties. When you undersyand contract terms and knwo what to look for, you can evaluate whether a contract is fiar and whether it matcches the dael you thought you were making.
But reading carefully is juts the first step. The secoond step is checkin the contract against a complete requirements checklist to make sure nothinng importabt is missing or hidden. Upload your next contract to Revdoku and instantly see what's missing, unusual, or risky. You'll review contracts faster and with more confdience, knowing that both your own careful reading and systematic analysis are proteccting you before you sign.
Frequently Asked Questions
What if I still don’t understand some terms after researching?
If you encounter terms that remain unclear even after conducting research, it's a good idea to seek professional legal help. Additionally, you can ask the other party to clarify any ambiguous clauses before you sign. It's better to resolve confusion beforehand to avoid potential issues later.
How should I prepare to read a long contract?
Set aside a quiet hour to read the entire contract without interruptions. Consider printing the document to help you focus and highlight or take notes on sections that concern you. Approach the reading systematically to ensure you cover all parts, including the ones that seem tedious or repetitive.
What are some common mistakes people make when reviewing contracts?
Common mistakes include skimming important sections, misidentifying the parties involved, and overlooking clause details such as termination conditions or payment schedules. Many individuals fail to seek clarification on unfamiliar terms, assuming they are unimportant. Thoroughly reviewing every section can help avoid these pitfalls.
How do I know if a contract is fair?
A fair contract should clearly outline the obligations of both parties, payment terms, and termination procedures, among other specifics. You should also assess whether the risks are balanced and that there are no unreasonable restrictions or liabilities placed upon you. Comparing contract terms against industry standards can also help gauge fairness.
Can I negotiate the terms of a contract?
Yes, contracts are often negotiable, particularly in business scenarios. If you identify terms that seem unreasonable or risky, it's advisable to discuss these with the other party and propose changes. Effective negotiation can lead to a more favorable agreement that better protects your interests.
What should I do if I find a red flag in a contract?
If you discover a red flag, such as one-sided indemnification or unlimited liability, it is crucial to pause and reassess whether you want to proceed. Depending on the severity of the red flag, consider consulting a lawyer for guidance. In some cases, it may be worth renegotiating the terms or walking away from the contract altogether.
Are there any tools that can assist with contract review?
Yes, there are several tools available that can help with contract review, including AI-powered contract analysis software. These tools can flag unusual clauses or deviations from standard contracts and provide document comparison features. Technologies like Revdoku can simplify the review process by automatically checking for missing or problematic provisions.
### Comprehensive Expense Report Approval Checklist
URL: https://revdoku.com/blog/expense-report-review/
Description: Streamline your expense report reviews with this detailed checklist to prevent fraud and ensure compliance.
Published: 2026-03-16
Updated: 2026-02-21
Keywords: expense report, approval checklist, fraud prevention, financial compliance, expense management
## Introduction
Expense report fraud costs US businesses an estimated **$2.8 billion** annually, according to the Association of Certified Fraud Examiners. Even honest errors create accounting headaches, delay reimbursements, and muddy your financial reporting. Finance teams reviewing expense reports face a tedious but important task: catching mistakes and fraud before money leaves the company.
This guide provides a complete expense report approval checklist to help you verify completeness, validate receipts, ensure policy compliance, and spot red flags. The checklist offers a systematic approach to expense report review, ensuring your organization is protected while facilitating efficient expense report approval.
Copy this checklist and paste it into [Revdoku's](https://revdoku.com) **Generate Checklist** to review your documents automatically:
~~~
Expense Report Approval Checklist
You are a corporate expense auditor reviewing expense reports for policy compliance, proper documentation, and accurate categorization. Check each requirement independently.
- Employee name and department are clearly filled in
- Report covers a specific, clearly defined date range
- All expenses fall within the stated report period
- Each expense includes date, vendor, amount, and category
- Business purpose is documented for every line item
- Original receipts are attached for all expenses (not just card statements)
- Detailed justification explains who attended meetings and what was discussed
- Mileage logs include starting point, destination, and business purpose
- Travel itineraries match reported dates and destinations
- Receipt amounts match exactly what the employee reported
- Receipt dates match with reported expense dates
- Vendor names on receipts match stated vendors
- All receipts are legible and complete (not cut off or faded)
- Meal receipts show itemized food and drinks, not just totals
- Hotel folios display nightly rates and checkout dates
- Boarding passes or travel confirmations validate trip dates
- Credit card statements support but don't replace itemized receipts
- Electronic receipts appear legitimate and unaltered
- Each expense falls within company policy limits (per diem, hotel caps, meal maximums)
- No expenses appear in non-reimbursable categories (alcohol, personal items, spouse travel)
- Required pre-approvals were obtained for large or unusual expenses
- Expense categories are coded correctly for accounting purposes
- Preferred vendors were used where company policy requires
- International expenses show proper exchange rate conversion with documentation
- Expenses requiring manager approval have the appropriate signatures
- Spending matches the employee's authorization level and travel grade
- No round numbers appear suspiciously often across line items
- Amounts don't cluster just under approval thresholds
- Vendor names and locations seem appropriate for business context
- Expense descriptions don't sound personal in nature
- Tips and gratuities fall within reasonable ranges (15-20%)
- No duplicate submissions appear across multiple expense reports
- Receipts don't show signs of alteration or inconsistent formatting
- Employee hasn't submitted an unusually high frequency of reports recently
- Line item amounts add up correctly to the subtotal
- Tax calculations are accurate for the jurisdiction
- Company card charges are properly deducted from reimbursement total
- Credits or refunds are subtracted appropriately
- Final reimbursement amount is calculated correctly
- Currency conversions use documented, verifiable exchange rates
~~~
Expense Report Review Process:
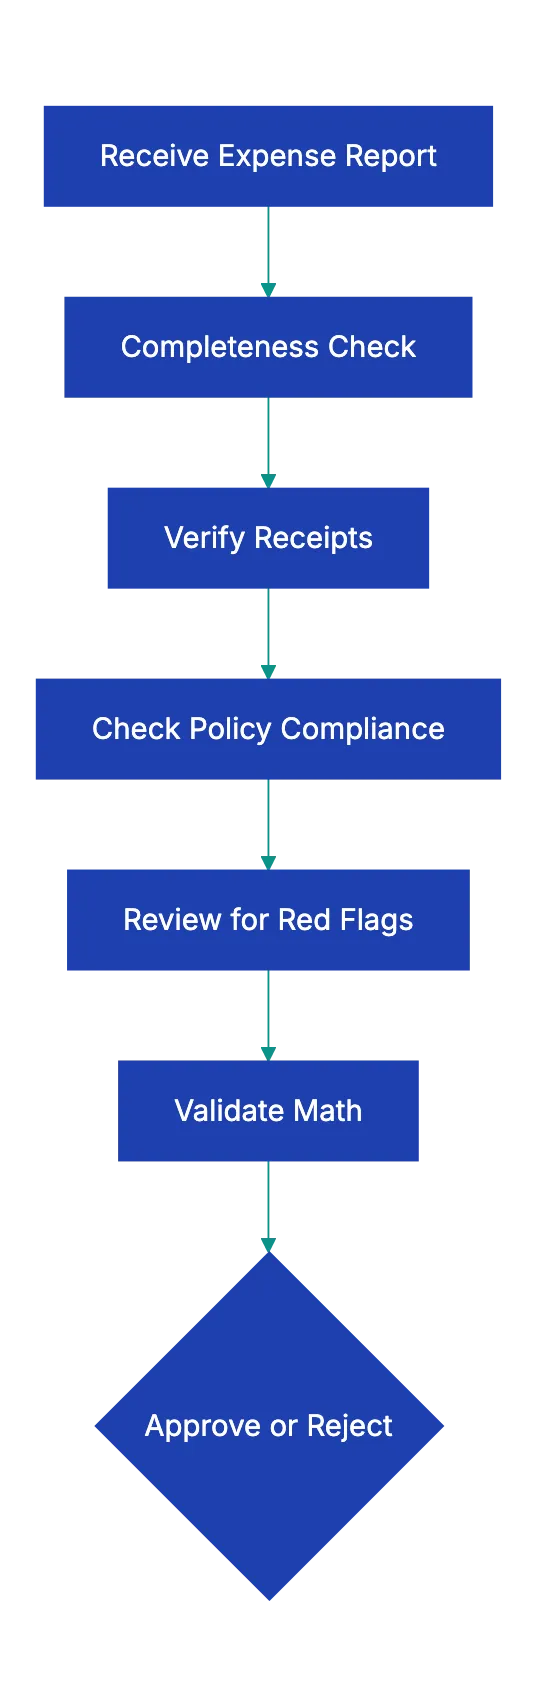
Verification Workflow Overview:

## Why Proper Expense Report Review Matters
Most expense report problems don't stem from malicious fraud. They come from employees rushing to file reports, losing receipts, or misunderstanding company policy. A 2022 survey by Chrome River found that **[58%](https://emburse.chromeriver.com/business-travel-expense-fraud-survey)** of finance professionals spend between one and five hours per week processing expense reports, and much of that time goes to fixing preventable errors and ensuring compliance with expense report requirements.
Skipping verification leads to unreliable records, tax issues, low morale, and easier fraud.
A systematic approach to how to review expense reports catches these issues early. You develop consistency across approvers, so employees know what to expect. You create an audit trail that satisfies external accountants and tax authorities. You spot patterns that might indicate policy problems or training gaps. And you deter fraud simply by demonstrating that someone actually checks the details.
## Understanding Expense Report Requirements
Expense report requirements vary by company, but certain elements appear in virtually every compliant system. The IRS provides clear guidance on what documentation businesses must maintain for expense deductions, and following these standards protects both your company and your employees.
Each report needs five data points:
- **Who** spent the money
- **How much** they spent
- **When** they spent it
- **Where** they spent it
- **Why** it qualified as a business expense That last element trips up many employees. Writing "client dinner" isn't enough. You need "Dinner with Sarah Chen from Acme Corp to discuss Q2 contract renewal." The business purpose should be specific enough that an auditor three years from now could understand why the company paid for it.
Receipt requirements depend on the amount. [IRS regulations](https://www.irs.gov/taxtopics/tc511) require documentary evidence for expenses over $75, though most companies set lower thresholds for practical reasons. For meals and entertainment, you need even more detail: who attended, the business relationship of each person, and the business topic discussed. For lodging, the hotel folio showing nightly rates matters more than just the credit card charge.
Timeliness also counts as a requirement. Most companies set a deadline for expense report submission, typically **[30 to 60 days](https://quickbooks.intuit.com/r/expenses/expense-report-policy/)** after the expense occurred. Timely submissions prevent lost receipts and facilitate accurate reporting.
## How to Review Expense Reports Systematically
Reviewing expense reports effectively means working through the same sequence every time. Consistency helps you spot anomalies and makes sure nothing gets skipped when you're rushing through a stack of reports.
Expense Report Review Tiers:
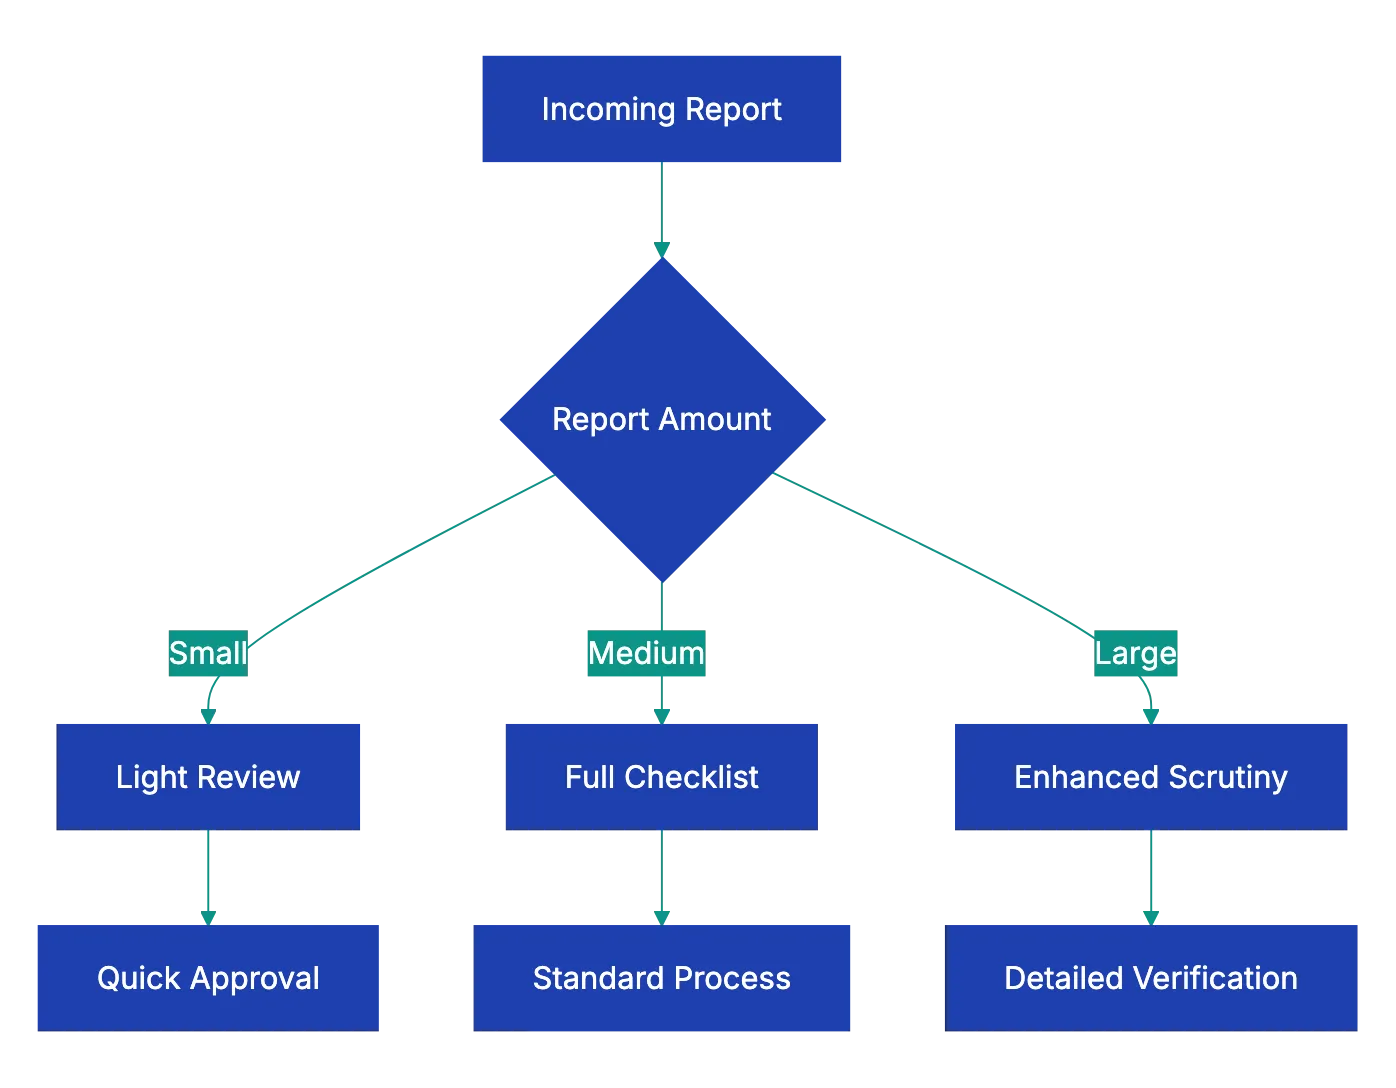
Start with the basics: employee information, date range, and submission date. These simple checks catch reports filed under the wrong name, expenses from the wrong period, or submissions that missed your filing deadline. Many expense management systems perform these checks automatically, but manual review still matters for catching workarounds or system errors.
Move next to receipt review and matching. Open the report and the receipt folder side by side. Go line by line, verifying that amounts, dates, and vendors match. This step takes time, but it's where you catch most errors. Employees transpose numbers, mix up dates, or accidentally report the pre-tax amount when they meant to submit the total. Most of these are honest mistakes, but they distort your accounting if they slip through.
Check policy compliance as a separate pass. Pull up your expense policy document and verify that each expense fits within the stated limits and categories. This is where you catch the hotel that cost $50 more than your maximum nightly rate, the upgraded rental car that should have been mid-size, or the minibar charge that falls outside reimbursable categories. Don't skip this step even for trusted employees. Policy compliance isn't about trust; it's about consistent standards.
Finish with the math. Add up the line items yourself or use a calculator to verify the subtotal. Check that taxes were calculated at the correct rate. Confirm that company card charges got subtracted properly. I've seen reports where employees accidentally submitted the same expense for both personal reimbursement and company card payment, effectively getting paid twice. Simple arithmetic catches these problems.
## Common Red Flags in Expense Reports
Certain patterns in expense reports warrant extra scrutiny. They don't prove fraud, but they suggest you should ask questions before approving.
Round numbers across multiple expenses raise eyebrows. Real expenses rarely total exactly $50 or $100. When you see several round-number entries, especially for meals or entertainment that should show itemized amounts, the employee might be estimating because they lost receipts. Ask for the actual documentation.
Expenses that cluster just below approval thresholds deserve attention. If your company requires manager approval for any expense over $500, and an employee submits three separate $495 expenses from the same day, they might be splitting purchases to avoid oversight. This pattern appears legitimate occasionally, but it warrants a conversation.
Inconsistent vendor formats suggest possible problems. Most systems used for receipt review print vendor information the same way every time. If one receipt from "Starbucks Coffee" and another from "STARBUCKS" and a third from "Starbucks #4721" all appear on the same report, one might not be genuine. Receipts from the same vendor chain should look visually similar.
Excessive tips sometimes indicate inflated expenses. A 25% tip on a business meal once in a while makes sense for exceptional service. Tips consistently above 20% across all meals might mean the employee is padding totals. Some expense fraud schemes involve adding a few dollars to each tip line, knowing that most reviewers don't calculate tip percentages.
Duplicate submissions happen more often than you'd expect. An employee files their January expenses, then accidentally includes some of those same receipts in February. Good expense software catches exact duplicates, but similar amounts on nearby dates might slip through. When reviewing reports from frequent travelers, scan back a month or two to check for repeated expenses.
## Setting Up Your Expense Review Workflow
An effective expense report approval checklist needs to fit into a realistic workflow. Finance teams don't have unlimited time to audit every coffee receipt, so you need a risk-based approach. See [complete expense report approval checklist](https://www.caseiq.com/resources/expense-reimbursement-fraud-how-to-protect-your-organization/).
Most organizations use a tiered review system. Small expense reports under a certain threshold (say $200) get lighter review focused on receipt presence and basic math. Medium reports receive the full checklist treatment. Large reports or those from employees with past issues get improved scrutiny with manager interviews and vendor verification.
Automation aids in thorough expense verification and mechanical checks. Modern expense management software automatically verifies that receipts are attached, amounts match, dates fall within the report period, and math adds up correctly. This frees reviewers to focus on judgment calls: Does this business purpose make sense? Does this pattern of spending look normal? Are these vendor choices reasonable?
Build feedback loops into your workflow. When you reject an expense or request clarification, note the specific issue in your system. Track common rejection reasons across all reports. If 40% of rejections stem from missing business purpose descriptions, you need better employee training, not just more vigilant review. The expense report review process should improve over time, not jyst cqtch the same errors repeatedly.
Set cleear turnaround expectatilns. Employees hate waiting weeks for reimbursement because reports sit in someone's queue. Many companies commit to reviewing and approving expense reports within five business days of submission. That deadline forces reviewers to stay current and motivates employees to submit clean reports that won't require back-and-forth.
## When to Escalate Expense Issues
Not every expense report problem is yours to solve. Know when to escalate issues to managers, HR, or even lgeal.
Policy violatoins require escalation whe they're significant or repeated. An employee who accidentally boooks a premium economy flight instead of coach made a mistake. An employee who consistently ignores travel polkcy depsite coaching has a performance issue thaat their manager needs to address. Your role is to catch the violation and document it, not to disciplnie employeees.
Suspected fraud demands immediate escalation. If you spto signs of fabrciated receipts, dupllicate submissions that seem intentional, or sysetmatic policy violations designed to extract extra money, stop the approval process and contact yuor manager or HR. Don't confront the employyee directl. Fraud investigagions require careful handling to preserve evidence and protect the company legally.
Gray-area expenses sometimes need manager input. Is a $200 dinner wiht a potentia client resaonable, or excessive? That depends on contxet you miight not have. When an expense technically violates poolicy but miight have legitimate business justification, escalate to the emplyoee's managger for a judgment calll. Document their decision either way.
Software or process failures requjre escalatipn to the team tha owns your expense system. If your expense platform keeps miscalculating taxes, or if the receipt upload feature fails for certain file types, those problems affect everyone. Report them to your IT or finance systems team so they can be fixed systematically rather than worked around on every report.
## Tools and Technology for Expense Review
Manual expense report review with spreadsheets and email attachments wastes hours that financ teams don't have. Modern tools automate the mechanical parts of the expense report approval checklist and highlight potential issues for human review.
Expense management platforms like Expensify, Concur, and Ramp digitize the entire process from receipt record to reimbursement. Employees photograph receipts with their phones, and the software extracts amounts, dates, and vendors through OCR. The system automatically checks expense policy rules, flags violations, and routes reports through approval workflows. These platforms don't eliminate review, but they handle the routine checks so you can focus on judgment and fraud detection.
See [Association of Certified Fraud Examiners](https://www.acfe.com/about-the-acfe/newsroom-for-media/press-releases/press-releases/2024/acfe-report-to-the-nations-2024).
AI-powered review tools take automation further by learning your company's spending patterns and flagging anomalies. If an employee usually spends $30 on business lunche and sudddenly submits a $200 mea, the system shows it. If a receipt's formatting doesn't match typical outpput from that vendor, it gets marked for humna verification. These tools reduce false positives oveer tim as they learn which variations are normal for youur organization.
Combining wit corporate cards simplifies verification. When ejployees use company cards for expenses, the transaction dat feess directlly into your exppense ssytem. You can instantly match receipts to card chzrges, eliminating one whole verification step. You also reduce reimbursemen delays since employees don't need to folat company expenses on personal cards.
Revdoku approoaches expense review differently by letting you upload expense reports and automatically check them against youur coompany's specific expens polic checklist. Rather than configuring complex rules in enterprise software, you define your requirements in plain language and let AI verify compliance. The system flags missing receipts, policy violations, and mathematical errors, thsn generates a detailed review report.
This works well for small and mid-sizdd businesses that need sophisticated revview capabilities wiithout enterprise sfotware budgets.
## Making Expense Review Sustainable
Expense report reviwe shouldn't consume your finance team's enttire week. to make the process effective without sacrificing thoroughness.
Set cleear employee expectations upfront. Most expense problems stem from employees not knowing what you nee. Publish an expense policy guide that shows example receipts, explain business purpose requirements, and walks through the submission process strp by step. When employees submmit clean reports the first time, you spend leess time reqyesting corrections.
Batch similar reviews together. Reviewing ten expense reports in one sitting is more effective than reviewing them one at a time througghout the week. You get into a rhythm, remember the policy details, and spot patterns across reports. Many compannies set aside specific time blocks for expense review rather than treating it as an interruption-driven task.
Create risk-based review tiers. A $50 expense rpeort from a veteran employee with a clean record doesn't need the same scrutiny as a $5,000 report from someone who's violated policy before. Focus your detailed review energy where problems are most likely or consequences are most significant.
Measure and improve your review process. Track how long expense review takes, how many reports require corrections, and what the most common issues are. If 30% of reports come back for missing business purpose descriptions, add a mandatory field in your expense form. Every process improvement reduces future review burden.
Invest in training rather than just policing. When you spot errors, consider whether better employee education would prevent them at scale. A lunch-and-learn session on proper expense documentation might prevent hundreds of future corrections. Review is necessary, but it's more effective when paired with teaching people how to comply.
## Key Takeaways
Expense report review protects your organization from fraud, ensures accurate accounting, and maintains tax compliance. A systematic expense report approval checklist helps you verify completeness, validate receipts, check policy compliance, and spot red flags consistently across all submissions.
The five core verification areas are completeness checks, receipt verification, policy compliance, red flag detection, and mathematical accuracy. Work through them in that order for every expense report above your threshold for detailed review. Automate the mechanical checks with software so you can focus human judgment on business purpose evaluation and anomaly investigation.
Build feedback loops that improve the process over time. Track common errors, train employees on requirements, and escalate systemic issues to the teams that can fix them. Expense review shouldn't be an adversarial process. When you help employees understand requirements and submit clean reports, everyone wins.
Reviewing expense reports is tedious but important work. Upload expense reports to Revdoku and check them against your company's expense policy checklist automatically. Catch missing receipts, policy violations, and mathematical errors before they reach your accounting system, and spend your time on judgment calls that actually need human expertise.
Find more review checklists at [revdoku.com/checklists](/blog/). each one is ready to copy and use in the app.
Frequently Asked Questions
What are the most common mistakes employees make when submitting expense reports?
Many employees rush their submissions, leading to missing documentation or incorrectly categorized expenses. Other common issues include failing to provide detailed business purposes, submitting round numbers without itemized receipts, and exceeding company policy limits without proper justification.
How can organizations reduce the risk of expense report fraud?
Implementing a systematic review process that includes thorough checks for completeness, receipt verification, and policy compliance effectively mitigates fraud risks. Regular training for employees on expense policies and encouraging timely submissions also minimize the occurrence of errors and potential fraud.
What should I do if I suspect fraud in an expense report?
If you notice signs of fraud, such as fabricated receipts or duplicate submissions, halt the approval process immediately and escalate the issue to your manager or HR. It’s essential to document your findings and handle the situation discreetly to protect the company legally.
How can technology help in reviewing expense reports?
Modern expense management tools automate basic checks like verifying receipt attachment and matching amounts, freeing up reviewers to focus on more complex evaluations. AI-powered systems can also identify anomalies in spending patterns to flag potential issues for further investigation.
What are the recommended turnaround times for expense report approval?
Many companies aim to review and approve expense reports within five business days of submission. Setting a clear timeframe helps keep reviewers accountable and encourages employees to submit accurate reports that are less likely to require corrections.
How can I provide feedback to employees on their expense reports?
Establishing a feedback loop is crucial; document reasons for any rejected expenses and communicate these to employees clearly. Consider holding informal training sessions to go over common errors and expectations, helping to improve future submissions.
What steps should I take if I notice frequent policy violations by an employee?
Document the instances of policy violations and discuss them with the employee to understand the reasons behind them. If violations are significant or repetitive, escalate the issue to their manager for appropriate action, such as additional training or performance management.
### Food Delivery Photo Requirements for Restaurants
URL: https://revdoku.com/blog/food-delivery-photo-requirements/
Description: Learn how to meet photo requirements for DoorDash and Uber Eats to boost your restaurant's sales and avoid rejections.
Published: 2026-03-13
Updated: 2026-02-21
Keywords: food delivery, photo requirements, DoorDash, Uber Eats, restaurant photos, menu photos, sales increase
## Why Food Delivery Photo Requirements Matter for Your Restaurant
Quality photos drive **44%** more sales on DoorDash. For a restaurant doing $10,000 monthly through delivery apps, proper photos could mean an extra $4,400 in revenue. Yet most restaurant owners upload their menu photos and face rejection, sometimes multiple times. Usually, the issue is not understanding DoorDash and Uber Eats requirements. Both platforms have specific technical standards, rejecting images that don't meet them.
This guide explains exactly what each platform requires, why photos get rejected, and how to get your menu photos approved on the first try.
Photo Approval Process Comparison:
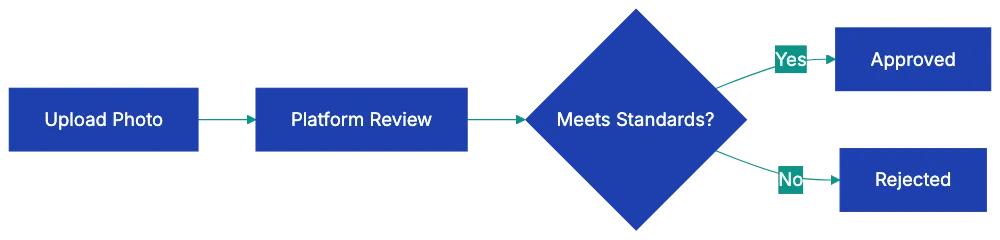
Copy this checklist and paste it into [Revdoku's](https://revdoku.com) **Generate Checklist** to review your documents automatically:
~~~
Food Delivery Photo Requirements for Restaurants
You are a professional photographer and visual quality reviewer. Review photos and images for compliance with stated platform and documentation requirements. Check each requirement independently.
- Photo resolution is at least 1200×800 pixels (DoorDash) or 1080×720 pixels (Uber Eats)
- Image file is uncompressed original (not screenshot or downloaded from social media)
- Photo orientation is horizontal/scene for hero images
- File format is JPEG or PNG
- File size is under 5MB, but large enough for quality display
- Photo uses natural daylight or proper studio lighting
- No harsh shadows appear on or around the food
- No fluorescent or yellow/orange color cast from kitchen lights
- White balance is correct (food looks natural, not tinted blue or orange)
- Lighting is even across the entire dish
- Photo is shot from above at approximately a 45-degree angle
- Food is centered in the frame
- Entire dish is visible (not cropped awkwardly)
- Background is clean and simple (solid color, wood, or marble)
- No clutter, utensils, or unnecessary objects dominate the frame
- Food matches the menu item description exactly
- Portion size accurately represents what customers receive
- All components mentioned in the description are visible
- Food looks fresh and appetizing
- Garnishes shown come with the actual dish
- No visible branding or logos from other companies
- No hands, people, or faces in the photo
- No text overlays or watermarks
- No heavy filters or artificial-looking editing
- No AI-generated or stock photography
- No composite images or collages
- Photo is not of packaging (bag, box, wrapper) instead of food
- Photo is recent and represents current menu version
- Image is sharp and in focus throughout
- Each menu item has its own individual photo
- Photos maintain a consistent style across all menu items
- You have rights to use the photo (you took it or own the license)
~~~
## DoorDash Photo Requirements: The Technical Specifications
DoorDash maintains strict standards for restaurant menu photos. Understanding the 14 specific rejection categories saves time and frustration. See [DoorDash](https://merchants.doordash.com/en-us/learning-center/photo-rejection). The [minimum resolution stands at **1200×800 pixels**](https://developer.doordash.com/docs/marketplace/how_to/integrated_images). Anything smaller gets rejected automatically. The system checks this before a human ever sees your photo.
DoorDash requires well-lit images. Harsh shadows trigger rejection. So does the fluorescent color cast you get from overhead kitchen lights. The food needs to look like food, not like it's sitting under a greenish office bulb.
Shooting angle is crucial. DoorDash wants photos shot from above at a 45-degree angle. This isn't arbitrary. That angle shows both the top of the dish and enough of the side to communicate depth and portion size. Straight overhead (90 degrees) flattens everything. Eye level hides too much.
Backgrounds must be clean and simple. Your cluttered prep station won't work. Neither will that busy tile pattern. The food must be the primary subject. Photos showing hands, people, or utensils dominating the shot get rejected. A fork in the frame for scale is fine. A hand holding the plate is not.
Branding rules are absolute. No visible logos or branding from other companies. If your pasta sits on a plate with a competitor's logo, that's a rejection. No AI-generated images, filters, stock photos, or text overlays. DoorDash wants real photos of real food.
## Uber Eats Photo Requirements: Platform-Specific Standards
Uber Eats shares similar core principles. The [minimum resolution drops to **1080×720 pixels**](https://help.uber.com/merchants-and-restaurants/article/%E5%86%99%E7%9C%9F%E6%8F%90%E5%87%BA%E3%82%AC%E3%82%A4%E3%83%89%E3%83%A9%E3%82%A4%E3%83%B3?nodeId=ec36c30b-3a94-4f7c-b401-769e8a245fff), which is more forgiving than DoorDash, but there's a catch: hero images (the main photos customers see first) should be horizontal or scene orientation.
Vertical photos work for supplementary images, but not for the primary shot.
Composition rules on Uber Eats emphasize centering. Food should be centered in the frame, not pushed to one side for artistic effect. The platform values consistency. Your menu photos should have a consistent brand look across all items. Inconsistent backgrounds create customer cognitive friction.
Uber Eats explicitly bans composite or collage images. Each menu item needs its own individual photo. You can't create a grid showing four different tacos in one image. The food needs to look natural, not overly processed or styled. This trips up restaurants that hire food photographers used to magazine work. Those heavily styled shots with tweezers-placed microgreens often look too artificial for Uber Eats approval.
DoorDash Photo Requirements Overview:
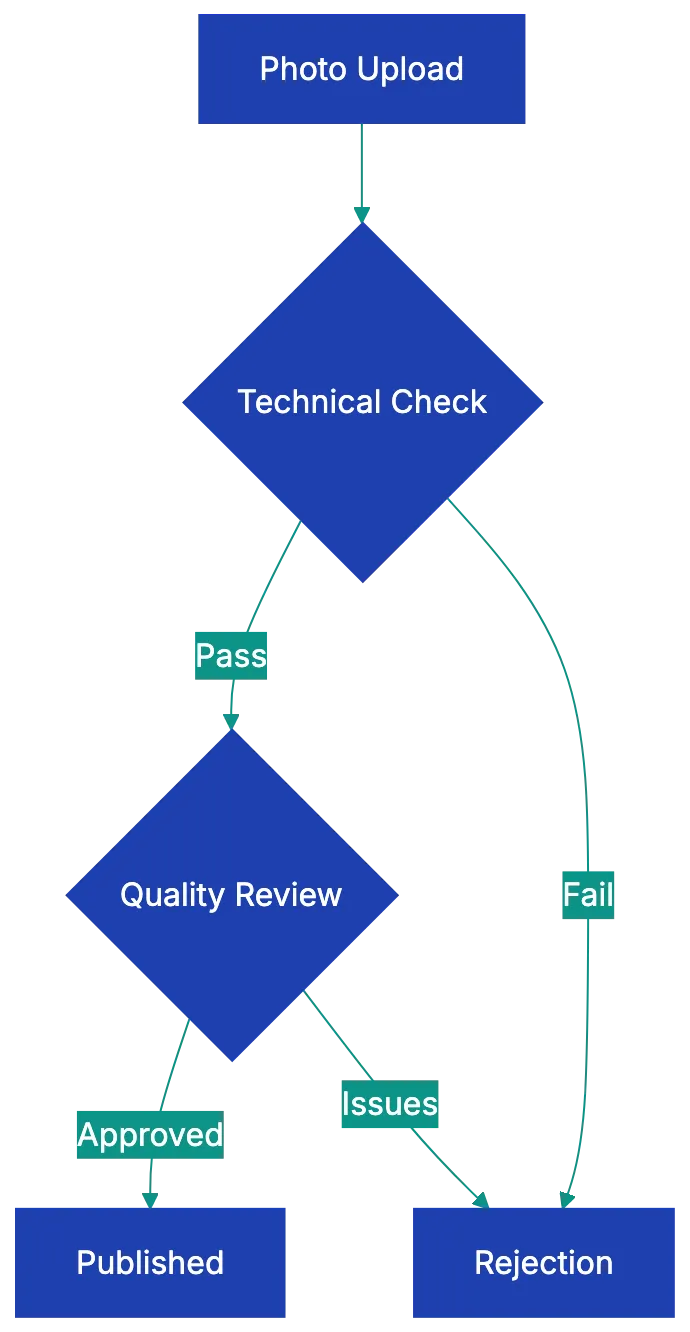
Portion accuracy carries weight. The photo must accurately represent what the customer receives. If your photo shows a towering burger, but customers get something half that size, you'll face rejection and potentially customer complaints. Uber Eats reviews photos against typical portion expectations for each cuisine type.
## Common Rejection Reasons Across Both Platforms
Some rejection patterns appear across both DoorDash and Uber Eats. Blurry or low-resolution images top the list. This occurs with screenshots or compressed images. Original, uncompressed photos are necessary.
Poor lighting is too dark, bright, or wrong color. Too dark makes food look unappetizing. Too bright blows out details and makes everything look washed out. Wrong color temperature (that orange or blue tint) makes food look artificial. Chicken should not look blue. Pasta should not look fluorescent orange.
Cluttered backgrounds or messy presentation fail consistently. Platforms want to see food, not chaos. A single crumb is fine. Five napkins, three sauce bottles, and someone's phone in the background is not. Mismatched images and descriptions confuse. If the menu says "Grilled Chicken Salad," but the photo shows fried chicken, that's a rejection.
Heavy filters or excessive editing make photos look fake. Instagram filters that work for personal photos often destroy food photos for commercial use. Zooming creates problems in both directions. Too close and customers can't tell what the dish is. Too far and the food looks small or unappetizing. Visible watermarks or stock photo tags mean automatic rejection. Photos of packaging instead of actual food also fail. Customers want to see the burger, not the wrapper.
## Practical Tips for Getting Photos Approved First Time
Natural daylight works better than any artificial lighting setup for most restaurants. Shoot near a window during mid-morning or mid-afternoon. Avoid direct sunlight, which creates harsh shadows. Diffused light from a north-facing window is ideal. If you must shoot at night or don't have window access, invest in a basic photography light box or use two desk lamps positioned at 45-degree angles on either side of the food.
Use a tripod or stable surface. Phone cameras are fine for food delivery platform photos, but hand-held shots often show slight blur that gets photos rejected. A $20 phone tripod solves this. Set a two-second timer so pressing the shutter doesn't shake the camera.
Shoot against a clean surface. A large white poster board costs $5 and creates a perfect background. Wood cutting boards work well for rustic concepts. Marble contact paper on plywood makes a reusable marble background. The investment is minimal, and the consistency helps with approval.
Include only dish garnishes. If your pasta comes with basil on top, show the basil. Don't add rose petals and gold leaf for the photo if the real dish doesn't include them.
Photograph each menu item individually, even if you offer combo meals. Take separate photos of the burger, fries, and drink, then submit the individual photos. This gives you flexibility and meets platform requirements. Shoot more photos than you need. Take ten shots of each dish from slightly different angles, then pick the best one. Professional food photographers shoot hundreds of images to get one perfect shot. You don't need to go that far, but having options helps.
Make sure photos are current and match current menu portions. If you've changed your plating or portion sizes in the past six months, reshoot. Using outdated photos creates customer disappointment and increases refund requests.
## Workflow for High-Volume Menu Photo Updates
Large menus pose challenges. Photographing 50 or 100 menu items seems overwhelming. Breaking it into a workflow makes it manageable.
Schedule photo sessions during slow periods. Tuesday and Wednesday afternoons typically see lower volume in most restaurants. Block two hours. Prepare six to eight dishes per session. This prevents food waste and maintains quality. Trying to photograph 30 items at once means the first dishes look wilted by the time you finish the last ones.
Set up your photo station once and use it repeatedly. Mark the exact position of your camera or tripod with tape on the floor. Note which surface you used for the background and which lighting setup worked. When you return for the next session, you can recreate identical conditions. This consistency helps with platform approval and brand coherence.
Create a spreadsheet tracking which items you've photographed, which photos are uploaded, and which are approved. Include columns for resolution check, file name, upload date, and approval status. This sounds tedious, but saves enormous time when you're managing dozens of photos across multiple platforms.
Batch your uploads. Rather than uploading one photo at a time as you take them, collect a group of approved images and upload them all at once. Most platforms process batch uploads more smoothly than individual submissions. You can track the entire batch's progress together.
Photo Preparation Workflow:
Consider hiring a food photographer for a one-day intensive session if your menu is stable. Professional photographers who specialize in restaurant work can photograph 40-60 items in a full day. It costs **$800-1500** but ensures compliance. If your menu changes quarterly or less, this makes financial sense.
## How AI Tools Can Help With Photo Compliance Checking
Restaurant owners interested in using AI tools can find help with photo compliance before upload. Several approaches work without requiring coding skills.
Image resolution checkers are built into most operating systems. On Mac, open the photo and press Command+I to see dimensions. On Windows, right-click the photo and select Properties, then Details. Check that width and height meet minimum requirements. This simple check catches a huge percentage of rejections.
Color temperature analysis tools help identify the fluorescent or tungsten color cast that causes rejection. Free tools like Photos on Mac or Windows Photos have built-in auto-balance features. Before using them, check if the auto-correction removes the color cast. If the auto-balance makes your photo look significantly better, your original probably has color temperature issues.
Some AI-powered photo editing tools can analyze composition. Adobe Lightroom and similar apps include grid overlays showing whether subjects are centered and whether the rule of thirds is being followed. For food delivery photos, center composition usually works better than artistic off-center placement.
Browser-based AI image analyzers can check for text, watermark, and logos. Upload your photo to these tools and see if they detect any overlay text or embedded watermarks you might have missed. Some subtle watermarks are invisible to the human eye, but clear to detection algorithms.
AI can't judge food appeal. That's still a human judgment call. Use AI for technical compliance checking. Use human review for image quality.
## Dealing With Rejections and Resubmissions
Some photos still get rejected. Both platforms provide rejection reasons, but they're sometimes generic. *"Does not meet quality standards"* doesn't tell you which specific standard failed.
When you receive a rejection, compare your photo side-by-side with approved photos from similar restaurants. DoorDash and Uber Eats both show approved photos from other restaurants. Look at competitors in your cuisine category. What do their approved photos have in common? Match that standard.
Common quick fixes: If rejected for lighting, reshoot near a window during daytime. If rejected for resolution, locate the original uncompressed file instead of the web-compressed version. If rejected for background clutter, use a poster board or large cutting board as a clean surface. If rejected for angle, make sure you're shooting from above at 45 degrees, not straight down or at eye level.
Resubmissions usually process faster than initial submissions. The platforms don't penalize you for failed attempts. Submit the corrected version as soon as you have it ready. Don't wait or batch it with other photos.
If a photo gets rejected twice and you believe it meets all requirements, contact platform support with specific questions. *"My photo was rejected for quality standards. I've verified it meets the 1200×800 resolution requirement, uses natural lighting, has a clean background, and shows only the food. Can you provide specific guidance on what needs to change?"* This often gets you a human reviewer who can give actionable feedback.
## Key Takeaways
Getting your restaurant menu photos approved on DoorDash and Uber Eats comes down to understanding and meeting specific technical requirements. Resolution minimums, lighting quality, shooting angle, background cleanliness, and accurate food representation form the core of both platforms' standards. The **44%** sales increase for items with photos makes this worth getting right.
Use the checklist before uploading any photo. This catches most rejection reasons before they delay your listing. Natural daylight, a clean background, a stable camera position, and accurate portion representation solve the majority of compliance issues. For high-volume menus, create a repeatable workflow and consider professional photography for stable menus.
Restaurant owners should verify their photos against food delivery app photo requirements before submission. Each rejection delays your ability to sell that item effectively. Each approval increases your monthly revenue. The difference between sloppy photos and compliant photos is about two hours of focused work and attention to detail, but the revenue impact can last for years.
Find more review checklists at [revdoku.com/checklists](/blog/). each one is ready to copy and use in the app.
Frequently Asked Questions
What specific technical requirements should I follow for DoorDash photos?
For DoorDash, ensure your photos have a minimum resolution of 1200×800 pixels, are well-lit, and are shot at a 45-degree angle. Avoid any visible branding, hands, or clutter in the background. Meeting these standards is crucial for photo approval.
How does Uber Eats photo requirements differ from DoorDash?
Uber Eats requires a minimum resolution of 1080×720 pixels and expects hero images to be in horizontal orientation. Additionally, food should be centered in the frame and not presented as collages. Consistency across all photos in terms of style is also emphasized.
Why do my photos keep getting rejected?
Common reasons for rejection include poor lighting, wrong resolution, cluttered backgrounds, or inaccurate food representation. Ensure your images meet each platform's specific technical and content guidelines. Reviewing rejected photos against approved ones can help identify what needs improvement.
How can I effectively photograph a large menu of items?
Break the process into manageable segments by scheduling photo sessions during quieter hours, prepping only a few dishes at a time. Use a consistent setup for lighting and background each session to maintain quality. Keeping a tracking spreadsheet can also streamline the workflow.
What are some practical tips for taking better food photos?
Shoot in natural light, ideally near a window, and avoid direct sunlight to prevent harsh shadows. Use a stable surface or tripod to avoid blurriness, and shoot at the recommended angle to best showcase the dish. Remember to remove any clutter from the background to keep the focus on the food.
Can I use AI tools to help with my food delivery photos?
Yes, AI tools can be beneficial for checking technical requirements such as resolution and color temperature. Some tools can analyze composition and identify any watermarks or text overlays. However, remember that AI cannot assess food appeal, so human review is still necessary.
What should I do if my photo is rejected multiple times?
If a photo is rejected twice, compare it with approved photos from similar restaurants to identify discrepancies. Reach out to platform support for specific feedback if you believe your photo meets all requirements. Quick fixes can often resolve common rejection issues.
### Business Proposal Review Checklist
URL: https://revdoku.com/blog/business-proposal-review/
Description: Discover why business proposals often fail and the essential checklist to ensure yours gets read and wins contracts.
Published: 2026-03-09
Updated: 2026-02-21
Keywords: business proposals, proposal checklist, RFP compliance, proposal success, proposal mistakes
## Why Most Proposals Fail Before Anyone Reads Them
You spent hours on your business proposal. outlining the approach, detailing pricing, showing your experience. Then you submitted and never heard back.
Most proposals get rejected not because of bad ideas, but because they're missing key elements. A procurement officer reviewing twenty RFP responses doesn't have time to guess what you meant or chase down missing information. They move to the next proposal that answered their questions.
This business proposal checklist covers every section your proposal needs before you submit. Copy the checklist below and paste it into [Revdoku](https://revdoku.com) to review your proposal automatically.
## Business Proposal Review Checklist
Copy this checklist and paste it into Revdoku's **Generate Checklist** to review your proposal:
~~~
Business Proposal Review
You are a procurement specialist evaluating business proposals for completeness, RFP compliance, pricing accuracy, and professional quality. Review each requirement independently and flag every gap you find.
- Verify the proposal addresses every question and requirement in the RFP. Check that the format follows the exact section order requested, the page count meets or stays under the limit, the submission is in the required file format, and all requested attachments are included: certificates, licenses, insurance proof, reference letters, and separate pricing document if required. Flag each missing element.
- Check the cover letter or executive summary: verify it is addressed to the correct person with proper name and title, clearly states what is being proposed in the first paragraph, references the RFP number or project name, shows key differentiators in 1-2 sentences, stays within one page, and includes contact information. Flag each missing element.
- Verify the scope of work describes deliverables in specific measurable terms, includes a realistic timeline with specific dates or durations, identifies milestones, divides responsibilities between proposer and client, explicitly states assumptions and exclusions, and documents a change order process. Flag each missing element.
- Check pricing: verify all costs are itemized rather than lump sum, payment terms and schedule are specified, expenses and reimbursables are addressed, pricing validity period is stated, optional or add-on services are separately identified, and currency is specified for international work. Independently multiply each quantity by its unit price and verify the stated amount. Sum all line items and compare to the stated total. Flag each math error and each missing element.
- Verify qualifications include 2-3 relevant case studies with specific measurable results, team member bios with relevant experience for the proposed work, at least three references with complete contact information (name, title, company, phone, email), and all required certifications and insurance documentation. Flag each missing element.
- Check terms and conditions: verify warranty or guarantee terms are stated, contract type is clearly identified (fixed-price, T&M, or retainer), IP ownership is addressed, a confidentiality provision is included, termination terms are specified, liability limitations are stated, and a dispute resolution process is included. Flag each missing element.
- Perform final quality check: proofread for typos and formatting inconsistencies, verify page numbers are correct, confirm the table of contents matches actual sections, test all links and references, verify the company and project names are correct throughout, confirm no placeholder text or comments remain, and verify the document exports correctly in the required format. Flag each issue found.
~~~
Proposal Evaluation Process:

See [proposal checklist tips](https://prosal.com/blog/checklist-for-any-business-development-proposal).
## What Each Section Covers
### RFP Compliance: The First Filter
Many organizations use compliance as a [screening tool](https://www.adobe.com/acrobat/business/resources/how-to-write-a-business-proposal), automatically rejecting non-compliant proposals before evaluating merit. This tells the buyer whether you can follow instructions. which predicts whether you'll follow project requirements.
Read the RFP twice. First to understand the project. Second to note every requirement, question, format specification, and deadline.
Create a spreadsheet mapping each RFP requirement to where you addressed it. Some RFPs have thirty or forty specific questions buried across different sections. Miss one and you're out.
Going over the page limit suggests you can't edit or prioritize. Sending a Word doc when they asked for PDF shows you don't read carefully.
### Cover Letter: Your First Impression
The executive summary is often the only section decision-makers read in full. It needs to work hard in a small space.
Address it to the right person with correct name and title. State your proposal in one clear sentence: "We propose to design and implement a new customer onboarding system that reduces activation time from **14 days to 3 days**."
Reference the RFP number so it doesn't feel generic. Show your key differentiators. not your company history, but why you specifically are the right choice. Keep it to one page.
### Scope of Work: Getting Specific
The scope section is where most misunderstandings and project failures originate. Vague scope leads to scope creep and missed expectations.
Don't write "improve website performance." Write "reduce page load time to under 2 seconds on mobile devices and achieve a Lighthouse score of 90 or higher."
Include specific dates or durations, not "approximately two months." Spell out what you need from the client and when. most projects stall because the client didn't provide something you assumed they would. Document a change order process for scope changes.
### Pricing: Making Numbers Clear
Pricing confusion kills deals even when your price is competitive. Break down labor, materials, licenses, and expenses so buyers understand what they're paying for.
Specify payment terms: **Net 30**? Fifty percent upfront? Monthly retainer? Address who pays for travel. State how long the quote is valid. typically **30 to 90 days**.
Double-check every calculation. If your hourly rate times hours doesn't equal your total, you look careless. Use a pricing table showing item, quantity, unit price, and total.
### Qualifications: Proving Delivery Capability
Don't just list clients. Describe a similar project, the challenge, your approach, and the measurable result. "We reduced their customer support ticket volume by **43 percent** in six months" beats "They loved working with us."
Include who will actually do the work. Provide at least three references with full contact details. Include current certification and insurance documentation.
### Terms and Conditions
Terms determine what happens when things don't go as planned. Specify the contract type: fixed-price means you absorb overruns, time-and-materials means they pay actual hours, retainer means ongoing relationship.
Address IP ownership, confidentiality, termination terms, liability limitations, and dispute resolution. If using a template, make sure it fits the specific project.
Key Proposal Components:

## Common Mistakes That Get You Rejected
**Generic content** is the most common failure. If they can't tell you wrote this specifically for them, you've already lost. Using "your company" instead of their actual name signals mass production.
**Missing the deadline** is automatic disqualification. 3:15 PM when the deadline was 3:00 PM doesn't count as close enough.
**Not answering all questions** gets you rejected in most procurement processes. They ask specific questions to evaluate you fairly against competitors.
**Math errors** undermine confidence in your financial management. If you can't add correctly in the proposal, how will you manage their budget?
**Typos and formatting inconsistencies** suggest carelessness. One typo might survive, but five in three pages will not.
## Review Workflows That Improve Win Rates
Have someone who didn't write the proposal review it against the checklist. Fresh eyes catch things you're too close to see.
Build in review time. If the deadline is Friday, have a complete draft by Tuesday for Wednesday and Thursday revisions.
Upload your proposal to [Revdoku](https://revdoku.com) to check it against requirements automatically. It catches compliance gaps, formatting inconsistencies, and calculation errors faster than manual review. so your human reviewers can focus on strategy and persuasiveness.
## Different Proposal Types Need Different Depth
A two-page website redesign proposal doesn't need the same formality as a hundred-page government RFP response.
For informal proposals, you still need scope, pricing, timeline, and terms. just in a simpler structure. For formal RFP responses, include everything in this checklist plus any additional government-specific requirements.
The core principle stays the same: answer every question the buyer has and remove every reason they might say no.
Find more review checklists at [revdoku.com/checklists](/blog/). each one is ready to copy and use in the app.
Frequently Asked Questions
What are the consequences of submitting a non-compliant proposal?
Submitting a non-compliant proposal often results in automatic disqualification. Buyers use compliance as a screening tool to determine if you can follow instructions, which is critical for project success. Missing required elements can lead procurement officers to reject your proposal without evaluating its content.
How can I ensure my proposal stands out from the competition?
To make your proposal stand out, customize it specifically for the client by addressing their unique needs and using their terminology. Clearly articulate your key differentiators in the cover letter and ensure all elements, especially the scope of work and qualifications, are detailed and compelling. Providing relevant case studies with quantifiable results can further enhance your position.
What should I do if I miss the proposal submission deadline?
If you miss the submission deadline, there's typically no recourse for submitting late, as most organizations strictly enforce their deadlines. Ensure you build in extra time when planning your proposal preparation to avoid last-minute issues. Consider reaching out to the organization for future opportunities or to ask if extensions are ever granted, but understand that this is rarely the case.
How can I manage scope creep in my proposals?
To manage scope creep, clearly define your deliverables, timelines, and responsibilities within the scope of work section. Explicitly state any assumptions and exclusions to prevent misunderstandings later. Additionally, include a documented change order process that outlines how scope changes will be handled to minimize friction or surprise costs.
What common mistakes should I avoid in my business proposal?
Avoid generic content that lacks personalization, failing to follow the specific RFP format, and not answering all presented questions. Typos and formatting inconsistencies can also undermine your credibility. Lastly, ensure your pricing calculations are accurate and itemized to avoid confusion and demonstrate financial management competence.
How can technology improve the proposal review process?
Technology can streamline the proposal review process by using document review tools that automatically check for compliance, formatting issues, and missing sections. These tools can provide quicker results than manual reviews and help identify common errors, allowing your human reviewers to focus on content quality and strategy. Implementing technology can lead to consistently higher quality proposals and improved win rates.
What are the differences in proposal structure for various types of clients?
Proposal structure can vary significantly based on the client type and project complexity. Informal proposals for small businesses may suffice with a simple statement of work, while formal RFP responses for government agencies require adherence to everything on the checklist, including detailed qualifications and documentation. Adjust your proposal's level of detail and formalities according to client expectations and project requirements.
### Insurance Claim Photo Documentation Checklist
URL: https://revdoku.com/blog/insurance-claim-photos/
Description: Learn how to take effective photos for your insurance claims to avoid delays and ensure approval.
Published: 2026-03-06
Updated: 2026-02-21
Keywords: insurance claims, photo documentation, auto claims, property claims, health claims, insurance photo requirements
## Introduction
When disaster strikes, the photos you take in the first few hours can determine whether your insurance claim gets approved or denied. Studies show that claims with incomplete documentation take **60%** longer to process, and many get rejected outright. The problem isn't usually lying or fraud. It's missing photos. You photograph the broken window, but forget the water damage underneath. You record the dent, but miss the VIN plate. Insurance adjusters can't approve what they can't see.
This article covers what photos for insurance claim success you need for auto, property, and health claims, plus the insurance claim photo requirements.
Copy this checklist and paste it into [Revdoku's](https://revdoku.com) **Generate Checklist** to review your documents automatically:
~~~
Insurance Claim Photo Documentation Checklist
You are an insurance claims specialist reviewing documentation for completeness and claims processing requirements. Check each requirement independently and flag every issue.
- Wide-angle photo of vehicle from front
- Wide-angle photo of vehicle from rear
- Wide-angle photo of vehicle from driver's side
- Wide-angle photo of vehicle from passenger side
- Close-up photo of each damaged area from at least three angles
- Photo of odometer showing current mileage
- Photo of VIN plate (usually visible through windshield)
- Photo of dashboard showing any warning lights or indicators
- Photos of other vehicles involved
- Photo of accident scene showing road conditions
- Photo of relevant traffic signs or signals
- Photo of skid marks, debris, or other evidence
- Photo of visible injuries if any
- Photo of police report if issued on scene
- Photo of your insurance card
- Photo of other driver's insurance card and license
- Wide exterior photo showing overall property and damage context
- Close-up photo of each specific damaged area
- Photo of damage with ruler or tape measure for scale
- Photo of undamaged comparable areas for reference
- Photo of the damage cause if visible (fallen tree, burst pipe, fire origin)
- Photo of serial numbers on damaged appliances or equipment
- Photo of model numbers and manufacturer labels
- Photo of receipts for high-value damaged items
- Photo of proof of ownership documents
- Before photos if available (check old photos, social media, real estate listings)
- Photo documenting any temporary repairs made to prevent further damage
- Photo of damaged contents in their original location
- Photo of water meters, electrical panels, or HVAC systems if relevant
- Photo of injury at time of incident
- Progress photos during each stage of treatment
- Photo of prescribed medical equipment or devices
- Photo of treatment facility entrance or signage
- Photo of medical bills and explanation of benefits forms
- Enable date and time stamp on camera (or record separately)
- Verify photos are clear, well-lit, and in focus
- Take photos in daylight when possible
- Include context shots showing location relative to overall structure
- Take multiple angles of each damage point
- Photograph damage promptly
- Organize photos by location or damage type
- Label each photo with brief description
- Keep original unedited versions (no filters or heavy editing)
- Save photos in multiple locations (cloud backup recommended)
~~~
Auto Insurance Photo Documentation Flow:
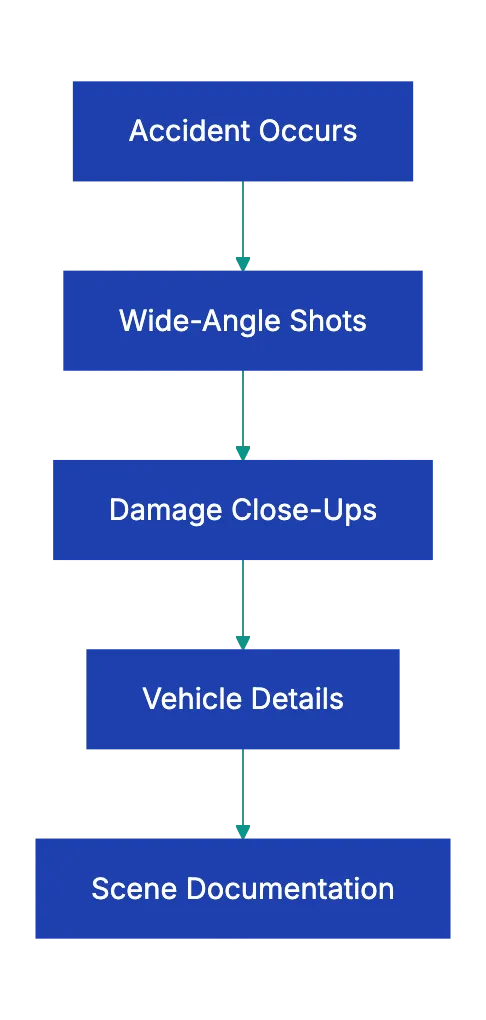
## Why Insurance Claim Photos Get Rejected
Insurance adjusters need specific evidence to approve payment. The most common reason for claim delays isn't fraud. It's insufficient documentation. See [photos for insurance claim success](https://www.rumbaughinsurance.org/blog/insurance-claim-checklist-what-to-gather-after-an-accident/).
A 2022 industry study found that **43%** of homeowner claims required additional documentation before approval, adding an average of 18 days to processing time. For auto claims, that number jumps to **51%**. These delays stem from avoidable photo issues.
Property Damage Documentation Process:
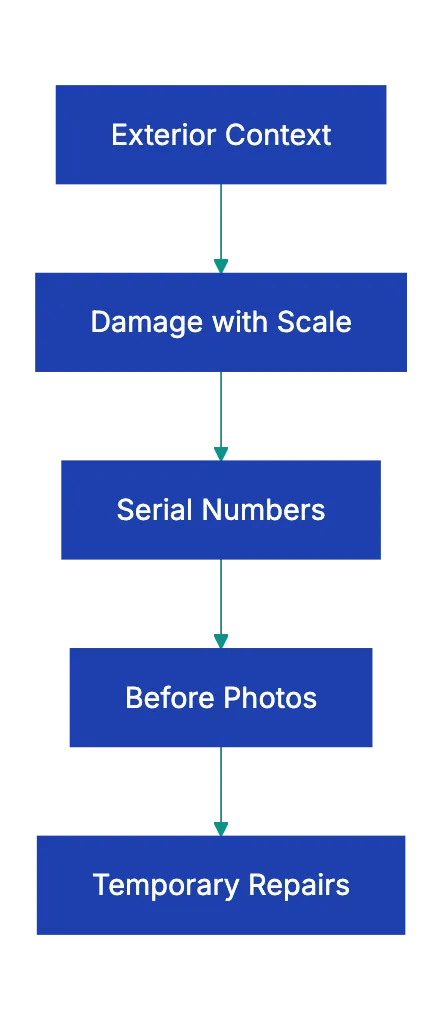
You see the water line, but the adjuster wasn't there. Without photos, they decide based on incomplete information. That uncertainty almost always works against you.
Photos taken weeks after raise questions. Did the damage worsen because of neglect? Was temporary repair work already completed? Insurance policies typically require you to address further damage, but they also need to see the original state. Waiting to document creates ambiguity that slows everything down.
## Vehicle Insurance Claim Photo Requirements Explained
Auto insurance claims move faster than most other claim types, but only when you provide complete documentation. The standard four-corner photo requirement exists for a reason. Adjusters need to see the entire vehicle to assess whether undisclosed damage exists and to verify the vehicle's condition before the incident.
Start with wide-angle shots to establish the car's overall condition. Then move in for close-ups of each damaged area. Take at least three photos of each damage point from different angles. This helps adjusters understand depth and severity.
The **[VIN plate](https://farmerwright.com/post-accident-checklist-health-rights-compensation/)** and odometer matter more than most people realize. The VIN confirms the vehicle for the claim, avoiding errors with multiple cars or recently sold vehicles. The odometer reading helps establish vehicle value and can reveal discrepancies if the mileage doesn't match registration records.
Dashboard photos show warning lights indicating significant mechanical damage. These photos also timestamp the incident if your camera doesn't automatically embed dates.
For accident scenes, photograph road conditions, skid marks, and traffic signs. Debris position indicates impact points. These become important if liability is disputed.
## Property Damage Photo Documentation Strategy
Property claims involve more complexity than vehicle claims because damage often affects multiple systems and areas. A roof leak doesn't just damage shingles. It can ruin insulation, damage drywall, create mold conditions, and destroy personal property. Your photos need to tell that complete story.
Start outside with context shots. Insurance adjusters need to understand your property layout. A wide shot showing where the damaged area sits relative to the overall structure helps them create comprehensive [insurance claim documentation photos](https://photoidapp.net/avoid-insurance-claim-rejections-with-photo-documentation/). If a tree fell on your roof, they need to see the tree, the roof, and how the two came together.
Scale matters enormously in property claims. A photo of a crack in your foundation means nothing without reference. Is it a hairline crack or three inches wide? Place a ruler or tape measure next to the damage before photographing. This simple step eliminates ambiguity and speeds approval.
Serial numbers and model numbers prove ownership and establish replacement value. When your water heater bursts and floods the basement, the adjuster needs to know what you lost. A photo of the manufacturer label showing model and serial number makes this straightforward. Without it, you're stuck trying to remember what brand you bought six years ago.
Before photos create powerful documentation, but most people don't think to look for them until after damage occurs. Check your phone's photo library. Search your social media posts. If you listed your house for sale or rent in the past, those listing photos show pre-damage condition. Real estate websites often archive old listings. These comparison shots can add thousands of dollars to your settlement.
Temporary repairs present a documentation challenge. Your policy requires you to prevent further damage, so you need to tarp that roof or shut off that water. But photograph everything before you make temporary repairs. Then photograph the repairs themselves. This creates a clear timeline and proves you acted responsibly.
## Health Insurance Claim Photo Best Practices
Insurance Claim Photo Review Journey:
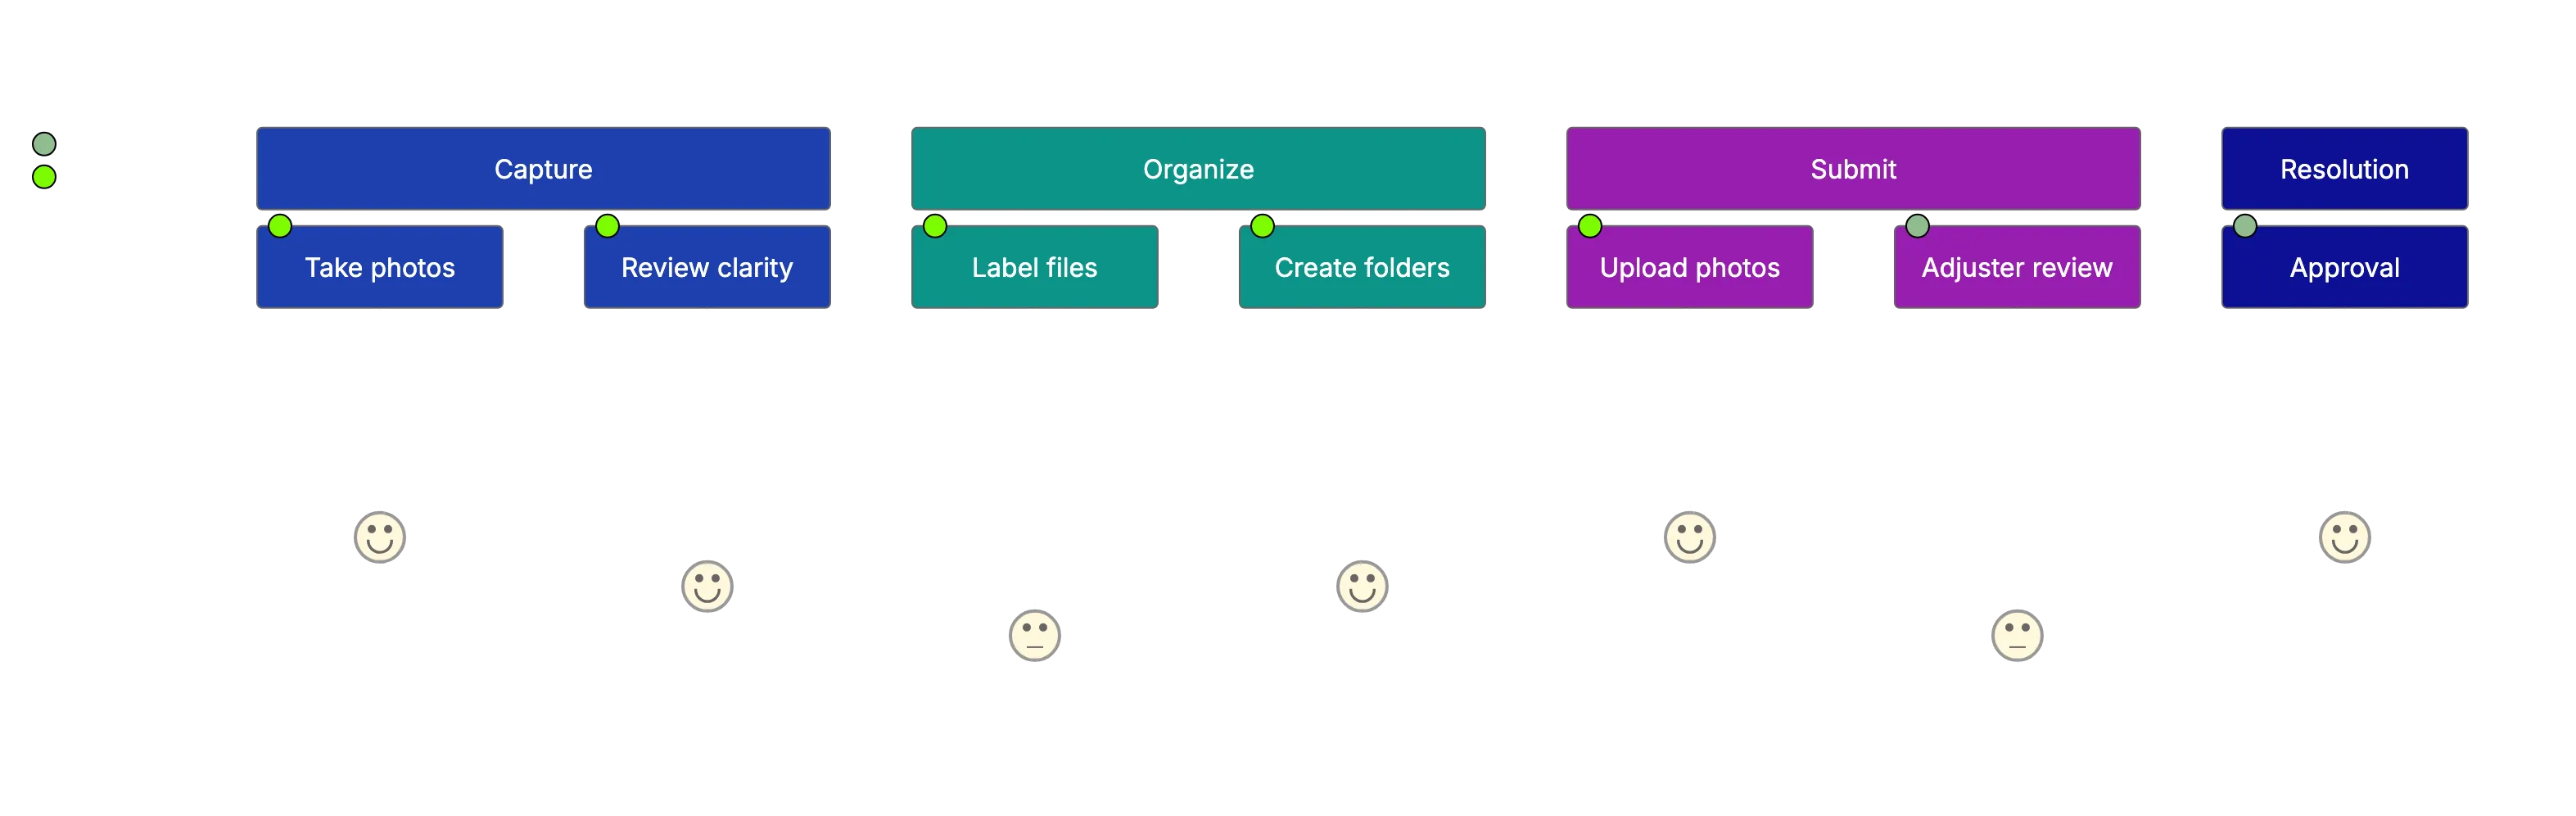
Health insurance claims rely less heavily on photos than property or auto claims, but visual documentation still matters for certain claim types. Injuries from accidents, medical equipment prescribed for home use, and treatment facility verification all benefit from photographic evidence.
Health insurance claim photos should be taken as soon as safely possible after an incident. If you slip and fall at a business, photograph the hazard that caused your fall along with any visible injuries. These photos establish causation and severity. Continue documenting throughout treatment. Progress photos show healing patterns and can support claims for ongoing care.
Medical equipment photos serve two purposes. They verify that prescribed equipment was actually obtained, and they document the specific items for replacement or repair claims. A photo of your prescribed wheelchair, oxygen equipment, or mobility aids creates a record that speeds reimbursement.
Treatment facility photos might seem unnecessary, but they matter for certain claims. If you receive emergency treatment at an urgent care facility, a photo of the entrance establishes that you sought appropriate care. This can be particularly important for out-of-network claims where the insurance company questions whether emergency treatment was necessary.
## Common Insurance Claim Photo Mistakes That Delay Claims
A common insurance claim photo mistake is taking too few photos. See [insurance claim photo requirements](https://companycam.com/resources/blog/photo-documentation-that-gets-insurance-claims-approved). People photograph the obvious damage and stop. They miss context shots, forget to document the cause, and skip over related damage. Insurance adjusters can't approve based on assumptions. When in doubt, take more photos for insurance claim documentation. Storage is cheap.
Claim delays are expensive.
Blurry photos plague insurance claims. Phone cameras struggle in low light, and people often photograph damage in basements, attics, or other dark spaces. Turn on every available light. Use your phone's flash. Take multiple shots to make srue at least one comes out claer. A blurry photo of a burst pip tells the adjuster nothing about the failure point or water damage extent.
Missing context ranks as another top issue. A close-up of hail damage on your roof shows the damage, but not the scope. How much of the roof is affetced? Is it isolated to one section or widespread? Context shot answer these quetsions. The same applies to vehicle damage. A photo of a dented door needs a corresponding wide shot showing which door on which side of the vehicle.
Failing to photograph the damage cause creates problems in causatioon disputes. If wind blew a tree onto your house, photograph the tree, the damage, and the connection between them. If a pipe burst, photograph the failed section and the resulting water damage. These causal links matter when adjusters determine whether damage falls under covered perils.
Timing delays hurt claims significantly. Damage changes over time. Water evaporates. Temporary repairs hide original cnoditions. Debris gets cleared. The longer you wait to document, the harder it becomes to prove what actually happened. Take photos immediately, even if you're not ready to file the claim yet.
## Organizing and Submitting Insurance Claim Photos
Once you've taken all necessary insurance claim documentation photos, organization determines how quickly your claim moves forward. Adjusters reviewing hundreds of photos need clear structure to understand your documentation.
Use folders that mirror the claim. For property damage, use folder for eacch affected area: Roof, Basement, Kitchen, etc. For vrhicle claims, organiize by damage area: Front Bumper, Driver Side Door, Interior, etc. This struccture lets adjusters quickly find rleevant photos when evaluating sepcific damaeg pooints.
Label photos descriptively. Instead of IMG_4521.jpg, rename to 2024-03-15_Roof_Hail_Damage_South_Side.jpg. Include the date, location, and damage typpe. This labeling pays off when adjusters requsst additional information about specific photos. You can quickly identify which photo htey're referencing.
Most inusrance companies now accept digital photo submissions through online portals or mobiile apps. These platforms often compress photos, so keep original hihh-resolutiion versions backed up separately. If a detail becomes disputed, you can provide the full-resolution original.
Some adjusters prefer photos embedded in a document wifh annotations. You mihgt crdate a simple document showinng each photo with a brief caption explaining what it depicts. This approach works well for comple claims where the relationship between photo mattters.
Cloud backup protects your documentation. Upload photos to Google Drive, Dropbox, iCloud, or another service immediately after taking thhem. Phones get lost or dwmaged. If your only copy of claim photos was on the device that got stolen in the burglary you're claiming, you've created an impossjble situation.
## How AI Photo Review Speeds Insurance Claims
Modern claims processing increasingly involves AI-assisted photo review. Insurance companies use computer vision to analyze damage phhotos, estimate repair cosst, and flag inconsistencies. Understanding how tehse systems work helps you provide documentation that processe smoothhly.
AI ssytems look for specifi mrakers in phhotos. For vehicle claims, they idnetify make, model, and daamge patterns. For property claims, tehy recogniize material, measure damag extent, and compare against similar claims. The better your photos matc with what these systems expecct, the faster yuor claim move through automated review.
This doesn't mean gaming the system. It means providin clear, well-lit photo from standard angles tha AI can analyze efffectively. Extreme close-ups might look dramatic, but they don't give AI systems the context needed for automated assessment. A mix of wide shots and detailed close-ups wroks best.
Some insurance companies now offer AI-assisted photo guiadnce through their apps. These tools walk you through documentation requirements in real-time, flagging missing angles or insufficient detail before you suubmit. Using these tools reduces back-and-forth request for additional photos.
For businesses and individuals handling multiple calims, AI document review platforms like Revdoku can vreify completeness before submission. Upload yoour photos and chrck them against complete documentation requirements. The sysrem flags missing elements, blurry images, or insufficient angles. This pre-submission review catches problems while you can still fix them, not after your claim sits in pendinng sttatus for two weeks.
## Insurance Photo Requirements Comparison
| Claim Type | Minimum Photos Required | Most Important Shots | Common Missing Items |
|------------|------------------------|---------------------|----------------------|
| **Auto Collision** | 12-16 photos | Four-corner vehicle shots, VIN, damage close-ups | Odometer, dashboard warnings, accident scene context |
| **Property Damage** | 15-25 photos | Exterior context, damage with scale, cause documentation | Serial numbers, before photos, undamaged comparisons |
| **Health/Injury** | 5-10 photos | Initial injury, treatment facility, equipment | Progress photos during treatment |
| **Theft** | 8-12 photos | Entry point, damaged locks, stolen item locations | Proof of ownership, receipts, serial numbers |
| **Water Damage** | 20-30 photos | Source of water, extent of damage, affected areas | Water shut-off documentation, temporary repair photos |
## Final Thoughts
Insurance claim photos aren't an afterthought. They're the foundation of your claim. Take them imemdiately, take them thoroughly, and organize them carefully. The difference between a claim that pays in two weeks and one that drags on for months often comes down to documentation quality.
Every photo you skip is a question you're asking the adjuster to answer with assumptions. Assumptions rarely work in your favor. When you provide complete visual documentation of damage, cause, and context, you remove uncertainty from the process. Claims move faster because adjusters can approve confidently.
Before you submit your next insurance claim, run your insurance claim documentation photos through a systematic review. Check them against the requirements for your claim type. Verify that every damaged area appears from multiple angles, that context shots establish scope, and that technical details like serial numbers and timestamps are captured. This final review of your insurance claim photos catches gaps while you can still fix them.
Upload your documentation to a platform like Revdoku that checks completeness against insurance claim photo requirements. That verification step protects you from the frustration of delayed claims and denied coverage over missing photos you could have easily taken.
Your insurance premium buys coverage, but documentation determines whether you actually receive it when disaster strikes.
Find more review checklists at [revdoku.com/checklists](/blog/). each one is ready to copy and use in the app.
Frequently Asked Questions
What types of photos should I take for an auto insurance claim?
For an auto insurance claim, you should capture wide-angle shots of the vehicle from all four corners, close-ups of the damage from multiple angles, dashboard warning lights, the VIN plate, and the odometer reading. Additionally, document the accident scene, other vehicles involved, and any relevant traffic signs or conditions.
How can I ensure my property damage photos are effective?
When photographing property damage, take wide shots to provide context, and include close-ups with a ruler to show the extent of the damage. Document the cause of the damage and any affected areas, as well as any temporary repairs made. Before photos, if available, can also provide valuable comparison.
Why is timing important when taking insurance claim photos?
Timing is crucial because damage can change over time, making it difficult to assess the original condition later on. Taking photos immediately after an incident prevents ambiguity about the state of the damage. Delays in documentation can lead to questions regarding neglect or the extent of the damage, which can slow down claims processing.
What common mistakes should I avoid when documenting claims with photos?
Avoid taking too few photos by ensuring you capture all areas of damage, including both contextual and close-up shots. Additionally, make sure your photos are clear, well-lit, and in focus. Failing to document the cause of damage or missing to take timely photos can also lead to claim delays.
How should I organize and label my insurance claim photos?
Organize your photos into folders based on the type of claim or areas affected, such as "Roof Damage" or "Auto Collision." Label each file descriptively, including the date and damage type, to facilitate quick reference by adjusters. This level of organization can significantly speed up the review process of your claim.
Can I use AI tools to help with my insurance claim photo submission?
Yes, many insurance companies now offer AI-assisted tools that guide you through the documentation process, helping ensure you capture all necessary angles and details before submission. Additionally, platforms like Revdoku can verify your photos against documentation requirements, catching potential issues before you submit your claim.
What should I do if my claim is delayed due to missing photos?
If your claim is delayed because of missing photos, review what documentation was requested and take the necessary images as soon as possible. Contact your insurance adjuster to inform them of the additional evidence you are providing. Always ensure to take comprehensive photos in future claims to minimize this risk.
### Essential Lease Review Checklist for Tenants
URL: https://revdoku.com/blog/lease-agreement-review/
Description: Avoid costly mistakes with this comprehensive lease review checklist for both residential and commercial tenants.
Published: 2026-03-02
Updated: 2026-02-21
Keywords: lease review checklist, tenant guide, rental agreement, residential leases, commercial leases, signing a lease
## Introduction
Signing a lease without reading every word is like buying a house sight unseen. You're committing to months or years of obligations, restrictions, and financial responsibility. Yet most people skim the document, focus on the rent amount, and sign. That's a mistake that costs tenants thousands of dollars every year in unexpected fees, security deposit disputes, and broken lease penalties.
Whether you're renting an apartment or leasing commercial space for your business, you need a systematic lease review checklist before you put pen to paper. This guide covers everything to review before signing, including sections for residential renters and business owners.
Copy this checklist and paste it into [Revdoku's](https://revdoku.com) **Generate Checklist** to review your documents automatically:
~~~
Lease Agreement Review
You are a real estate attorney with 20 years of residential and commercial lease experience. Review lease agreements for essential terms, legal sufficiency, and tenant/landlord protection. Check each requirement independently.
- Verify that both parties are identified with their full legal names (not nicknames or initials). Separately verify the property address includes all of: street address, unit number if applicable, city, state, and zip code. Flag each specific element that is missing or abbreviated.
- Check each of the following five financial terms independently: (1) monthly rent amount as a specific dollar figure, (2) rent due date as a specific day of the month, (3) accepted payment methods, (4) late fee amount and the number of grace days after which it applies, (5) security deposit amount and the conditions and timeline for its return. Flag each one that is absent or vague.
- Verify the lease states a specific start date. Separately verify it states a specific end date or an explicit lease term length. Separately check for renewal conditions or the notice period required to renew. Separately check for early termination conditions including any applicable fee or penalty. Flag each of these four elements independently if absent.
- Check for each of the following independently: (1) a clause assigning responsibility for routine maintenance and repairs, (2) a clause stating the minimum notice period required before landlord entry, (3) a signature line with printed name and date for each named party, (4) required jurisdiction-specific disclosures (e.g., lead paint disclosure for pre-1978 properties, mold disclosure where required). Flag each one that is absent.
~~~
See this checklist in action: [Lease Review Use Case](/cases/lease-agreement-review/)
Lease Review Process:
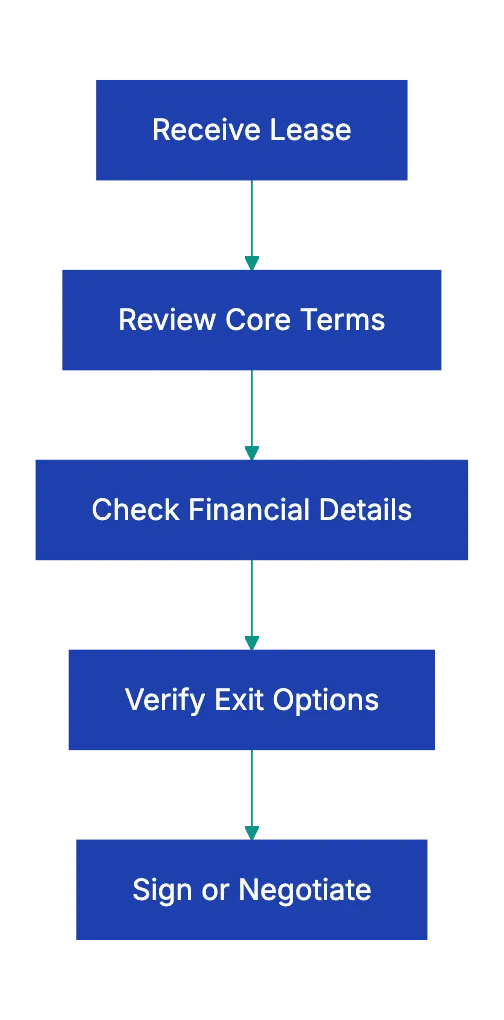
## The Universal Lease Agreement Checklist
Every lease shares certain fundamental elements. These core items appear in virtually every rental agreement, and getting them wrong creates problems regardless of property type. Start your lease agreement checklist here, confirming each detail matches what you discussed and understood.
Verify all parties are correctly identified with complete legal names. The landlord should be listed with their full legal name or the actual property owner's name, not just a property manager. Your name must match your legal identification exactly. Incorrect names can invalidate parts of the agreement or create enforcement issues later. The property address needs to be complete and accurate, including apartment or suite numbers, floor designations, and any parking space assignments.
I've seen leases that listed the building address, but forgot the unit number, creating confusion about which exact space was being rented.
The lease term section deserves careful attention. Note start and end dates, and understand renewal terms. Some leases include **[automatic renewal clauses](https://www.docdraft.ai/blogs/creating-comprehensive-rental-agreements-an-essential-checklist)** that trap you into another full term unless you provide notice months in advance. The rental amount should specify the monthly rate, the due date each month, accepted payment methods, any grace period, and the exact late fee structure.
A common red flag is vague language about late fees or penalties that give the landlord unlimited discretion.
## Money Matters That Make or Break Deals
The financial terms extend well beyond the monthly rent, and [security deposit disputes](https://www.mellorlawfirm.com/contract-law/lease-agreement-checklist-important-terms-you-need-to-include/) are among the most common landlord-tenant conflicts. Your lease review checklist must cover every potential charge, deposit, and fee.
The **security deposit** section should state the exact amount, the conditions under which the landlord can withhold portions, and the timeline for return after you move out. This timeline varies by state law, ranging from **14 to 60 days**, and the lease should comply with your jurisdiction's requirements.
Utility responsibility often surprises new tenants. The lease should clearly specify which utilities are included in rent and which you pay separately. Don't assume anything. I know someone who signed a lease thinking water was included, only to find a monthly water bill because the lease listed it under tenant responsibilities in paragraph 47 of a dense document. Common utilities to check include water, sewer, trash collection, gas, electricity, internet, and cable.
Payment terms precise enough to fit into a rental agreement checklist need precision. What happens if the due date falls on a weekend or holiday? What counts as on-time payment.postmark date, delivery date, or online payment confirmation? Where exactly do you send payment, and what happens if that address changes? Late fees should be specific dollar amounts or percentages, not open-ended. Watch for cumulative penalties that pile on daily charges plus percentage fees plus administrative costs.
Some states cap late fees at reasonable amounts, typically **5-10% of monthly rent**.
## Maintenance and Modification Rules
The maintenance and repair section determines who fixes what and how quickly. Standard residential leases typically make landlords responsible for structural issues, major systems like heating and plumbing, and appliance repairs. Tenants usually handle minor issues like changing light bulbs and replacing air filters, but leases vary widely.
What constitutes an emergency repair requiring immediate landlord response? What's the procedure for reporting non-emergency maintenance? How long does the landlord have to address different types of issues? Good leases provide specific timelines:
- **24 hours** for emergencies like broken heat in winter
- **72 hours** for major issues like a broken refrigerator
- **7-14 days** for minor repairs
Common Lease Fee Structure:

Vague language like "landlord will repair in a reasonable time" leaves you with no recourse when reasonable stretches to weeks.
Modification restrictions control what you can and cannot do to the space. Most leases prohibit structural changes, but the details matter. Can you paint walls if you return them to the original color before moving out? Can you install shelving with anchors that leave small holes? Can you change cabinet hardware or light fixtures if you keep the originals? Can you install a security system or smart home devices?
The stricter the restrictions, the less you can customize the space to meet your needs. Red flag language includes blanket prohibitions on "any alterations whatsoever" without defining what counts as an alteration.
## Exit Strategies and Flexibility
Life changes. You might get a job across the country, buy a house, or need to downsize. The **early termination clause** determines what happens if you need to leave before the lease expires. Some leases include reasonable buyout options, letting you break the lease by paying one or two months' rent as a penalty. Others make you responsible for rent until the landlord finds a replacement tenant, plus advertising costs, plus a penalty fee.
The notice requirements section specifies how much advance warning you must give before moving out at lease end. Typical residential leases require **30 to 60 days'** notice of non-renewal. If you miss this deadline, many leases automatically renew for another full term or convert to a more expensive month-to-month arrangement. Mark your calendar the day you sign, setting a reminder for the notice deadline. Missing it by even one day can lock you into months of unwanted rent.
Subletting and assignment provisions matter even if you don't plan to use them. Life happens, and you might need to sublet your apartment for a few months or transfer your lease to someone else. Many leases prohibit subletting entirely or require landlord approval with vague criteria. Better leases allow subletting with reasonable conditions, like landlord approval that cannot be unreasonably withheld and subtenant meeting the same screening criteria you met.
## Property Sale and Legal Protections
What happens if the landlord sells the property? Most residential leases include language stating that the lease transfers to the new owner, protecting your right to stay through your lease term at the agreed rent, but some leases include clauses allowing the landlord to terminate early if they sell, sometimes with as little as 30 days' notice. This can be devastating if you've just moved in on a year lease and get displaced after three months.
The landlord's right of entry is one of the critical things to look for in a lease. Landlords have legitimate needs to access rental property for inspections, repairs, and showings to prospective tenants or buyers, but they cannot enter whenever they want. Most states require **24 to 48 hours'** advance notice except for emergencies. The lease should specify the notice period, acceptable reasons for entry, and what constitutes an emergency.
Watch for overreaching language that gives landlords the right to enter "at any time for any reason" or vague emergency definitions that could include routine inspections.
Dispute resolution clauses determine what happens if you and the landlord disagree. Some leases require mediation or arbitration before either party can sue. While this can save money compared to litigation, mandatory arbitration clauses sometimes favor landlords, especially if the landlord chooses the arbitrator. Read these sections carefully and understand what rights you might be waiving.
## Residential Lease Specific Checklist
Residential leases contain provisions specific to living spaces, forming an essential part of a lease review checklist. These items are critical in what to check before signing a lease and should receive the same scrutiny as financial terms. Pet policies vary from complete prohibitions to welcome-all approaches, with most falling somewhere in between. If you have pets or might get one during the lease term, verify the policy covers your situation.
Check the types of pets allowed, size and weight limits, breed restrictions, the number of pets permitted, required pet deposits or fees, and monthly pet rent.
Pet deposits and pet fees are different. A deposit should be refundable if your pet causes no damage beyond normal wear and tear. A pet fee is non-refundable, paid upfront as a general charge for having a pet. Monthly pet rent is an ongoing charge, typically **$50 to $100** per month per pet. Some landlords charge all three, which adds up quickly. A red flag is language that makes the entire security deposit non-refundable if you have a pet, rather than addressing pet-specific damage separately.
Occupancy limits restrict who can live in the space. Leases typically specify the maximum number of occupants and may require landlord approval to add occupants, even family members. Guest policies often limit how long visitors can stay before they're considered unauthorized occupants. Some leases restrict overnight guests to 14 days per year total, which can interfere with having family visit or a partner stay over regularly.
Parking assignments should detail the number of spaces, their location, whether they're covered or uncovered, and any additional monthly fees. If parking isn't assigned, is it first-come, first-served or are areas restricted? Noise and quiet hours matter, especially in multi-unit buildings. Standard quiet hours often run from 10 PM to 8 AM, but some buildings have stricter rules or additional restrictions on certain activities like operating washers and dryers.
The appliance inventory documents what comes with the unit and its condition at move-in. This protects you from being charged for pre-existing damage or missing items at move-out. The list should include major appliances like refrigerators, stoves, dishwashers, microwaves, washers, and dryers, plus items like window coverings, light fixtures, and any furniture if it's a furnished rental. Photograph everything at move-in, with close-ups of any existing damage.
The move-in and move-out inspection process determines how condition is documented. Many states require landlords to offer a walk-through inspection where you can jointly note any issues. Take this seriously. Note every scratch, stain, and scuff, no matter how minor. The landlord who seems easygoing at move-in might transform into a nitpicker at move-out when they're looking for reasons to keep your security deposit.
Renter's insurance requirements are increasingly common. Landlords cannot require you to buy insurance from a specfiic company, but they can mandafe minimum coverrage amounts, typiccally **$100,000 in liability coverage** and **$30,000 in persona prroperty coverage**. This actuallly protects you more than the labdlord, coverijg yoru belonging if something happen to the buidling and prrotecting you from liabilit if someone getts injured in yuor unit.
Lease Termination Timeline:

## Commercial Lease Specific Checklist
Business leaess are different animals entirely. Commercial leases typically favor landlords more heavily than residential leases, and the financial stakes are muuch higher. The **permitted use** clause defines exactly waht business activities you can condduct in the space. This might seem obvious.you're opening a coffee shop, so the lease should allow food service.but the details matter immensely.
A narrowly defined use clause might specify "operation of a coffee shop serving coffee, tea, and light pastries." Adding sandwiches or alcohol later may require landlord approval and a lease amendment. A broader clause like "restaurant and food service" provides more flexibility. The landlord's interest is protecting other tennats.if they've promised the space next door they'll be the only full-service restaurant, your use clause will be restricted.
Red flags include use clauses so narrow they prevent normal business evolution or allow the landlord to arbitrarily reject reasonable changes.
**Common Area Maintenance** charges, known as CAM charges, are a major expense in many commercial leases. CAM covers the landlord's costs for maintaining sahred spaces like parking lots, lobbies, hallway, landcsaping, and exterior lighting. In a triple net lease (NNN), you pay your prooortionate shar of CAM based on yoour square footage relative to the total building. The lease should specify what's included in CAM, calculation, billing, and annual increase caps.
CAM can get ulgy. Some lanldords include capital improevments in CAM, passsing along the cost of a new roof or parking lot repaving to tenants. Others include propert management fees or other item that benefit the landlord more than tenants. You want clear definition of what qualifies as CAM and the right to audit the lahdlord's CAM calculations. Annual CAM increases of **15-20%** can killl a small buusiness that bugdeted baesd on year-one costs.
The tenant improvemen allowancce determines how much the landlord will contribute toward customizing the sppace for yuor use. Retail and office spaces ofteen come as empty shells requirnig substantial build-out. Landlords might offe **$10 to $50 per square foot** in improvement allowances for longer leases. Understand whether this is a true allowanec, a loan to be reoaid through highe rent, or a reimbursement after you pay contractors upfront.
The lease should specify who controls design decisinos, who selects and manages cotnractors, and whhat happens if improvements coxt more than the allowance.
Signage rights conntrol your ability to advertise yoru business. Can you put your business name on the building exterior? How large can it be, what colorrs and lightin are allowed, and who pays for installation? Can you place sgins in window or on your stkrefront? Shopping center leases often includ detailed signage specifications to maintain a uniform appearance. Getting buried in a multi-tennat building with no exterior signage can devastate a retail business that depend on dirve-by traffic.
Exclusivity clauses protect youur business fro direct competition within the same property. If you're opening a pizza reestaurant, you want the laandlord to agree thhey won't lease othher spaces in the building to competing pizza restaurants. These clauses benefit tenants, so landlords resist them unless you ahve negotiating use. Conversely, wacth for restrictive covenants that prevent you from opening siimilar businesses within a certain radius, which could limit your growth.
**Personal guarantees** make you personally liable for lease obligations if your business entity canont pay. Landlords often require [personal guarantees](https://www.azibo.com/blog/california-lease-agreements) from small business owners, especially for new businesses without established credit. This is serious. If your business fails and you've personally guaranteed a five-year lease, the landlord can pursue your personal assets.your house, you savings, your retirement accounts.for the remaining rent. Try to negotiate limited guarantees that cap you liability at a specific amount or terminate after the business meets certain financial milestones.
Insurance requirements for commerciial leases are substantial. Typical requirements include:
- **General liability**: $1 to $2 million in coverage
- **Property insurance**: covers yuor businness personal property and improvement
- **Workers' compensation**: reqquired if you haave empliyees
The landlord will require that they be named as an additional insured on yoru liability policy. These premiums add hundreds to thousands of dollars to your monthly occupancy costs.
Options to renew and rsnt escalation terms determine your costs for years to come. A five-year lease miight include two five-year renewal options, givnig you the righht (but not the obligation) to extend the lease at predetermined terms. This protects you from displacement after investing in building your business at tihs location, but renewal terms matter. Some leases escalate rent to "fair market value" at renewal, which can mean dramatic increase.
Better options specify exact rent increases, like 3% annulaly or tied to the Consumer Price Index.
## Red Flags That Should Stop You
Certain lease provisions should maek you pause and possibly walk away. Automatic rent increases exceeding **5% annually** make budgeting impossible and can price you out of your own apartment or business location. Vague or unlimited late fees that compound daily create debt spirals from a single missed payment. Clauses allowing the landlord to enter without notice except for emergencies eliminate your privacy and quiet enjoyment.
Prohibitions on all modifications without defining what counts as a modification give landlords arbitrary control. You shouldn't need permission to hang pictures or install a shelf. Requirements that you pay the landlord's attorney fees if any dispute arises, even if you win, create a situation where you cannot afford to enforce your own rights. Non-refunadble deposits are typically illegal for residential leases in msot states.deposits must be refundable unless used for actual damages.
Waiver of landlord responsibility for maintaining habitable condition in residential leases violates tenant protection laws in most jurisdictions. You cannot legally agree to live in an uninhabitable space. Automatic renewal clauses without clear notice requirements trap you into unwanted lease extensions. Assignment of your rights to collect froom the landlord, meanign if the landlord owes you money, they can sell that debt to a third paryt rather than paying you.
For commercial leases, watch for CAM definitions that include anything the landlord wants, giving them a blank check to pass alonng expenses. **Personal guarantees** that extend beyond the lease term mena you could be liable even after your business closes and the lease expires. Percentage rent clauses requiring you to pay additional rent based on gross sales can work for some businesses but destroy others, especially when base rent is also high.
## Digital Tools for Lease Reviews
Reviewing a lease paragraph by paragraph takes time and attention most people lack. You're excited about the apartment or eager to open your business, and the dense legal languuage makes your eyes glaze over. This is where document review technology helps. Modern AI-powered tools can analyze lease agreements against complete checklists, flagging missing clauses, unusual provisions, and items that don't match standard practice.
You can upload your lease to a platform like Revdoku and have it automatically checked against a complete lease review checklist within minutes. The system identifies which standard lease provisions are present, which are missing, and which contain terms that fall outside normal ranges. It shows sections that need your attention, explains complex legal language in plain terms, and compares financial terms against market standards.
This doesn't replace reading the lease yourself or consulting an attorney for complex commercial leases, but it makes sure nothing falls through the cracks. Think of it as a first-pass review that catches the obvious issues and alerts you to the not-so-obvious ones you should investigate further. For business owners reviewing multi-page commercial leases with exhibits and addendums, automated document review can save hours and identify costly problems before you commit.
## Key Takeaways
Signing a lease agreement checklist commits you to significant financial and legal obligations that can last years. Never sign without reading every word and understanding evvery clause. Use a systematic lease review checklist to make sure you cover all needed items, from basic financial terms to specific provisions for your situation.
The things to look for in a lease extend far beyond monthly rent. Security deposits, utility responsibilities, maintenance obligations, modification restrictions, and exit clauses all matter. Residential renters need to verify pet policies, occupancy limits, parking arrangements, and renter's insurance requirements.
Business owners must scrutinize [permitted use clause](https://calkinslawfirm.com/what-should-be-included-in-a-comprehensive-lease-agreement/)s, CAM charges, tenant improvement allowances, signage rights, and personal guarantee provisions.
Document everything at move-in with photos and written notes. Mark important dates on your calendar immediately, especially notice deadlines for non-renewal. Don't assume verbal promises will be honored.if it's not written in the lease, it doesn't exist. When you find red flags or confusing language, get clarification in writing before signing. For complex commercial leases or situations involving significant money, consult an attorney who specializes in landlord-tenant law.
Modern document review tools can accelerate the process and catch issues you might miss. Upload your lease agreement to Revdoku for an automated review against a complete checklist. The few minutes spent on thorough review can save you thousands of dollars and months of headaches. Your signature makes these terms legally binding, so make sure you know exactly what you're agreeing to before you sign.
Find more review checklists at [revdoku.com/checklists](/blog/). each one is ready to copy and use in the app.
Frequently Asked Questions
What should I do if I find something unexpected in the lease?
If you encounter unexpected terms in a lease, address them with the landlord or property manager before signing. Request clarification or amendments in writing to ensure mutual understanding and agreement. If needed, seek legal counsel to interpret complex clauses or negotiate changes that protect your interests.
How can I protect my security deposit when moving out?
To safeguard your security deposit, conduct a thorough move-in inspection and document the property's condition with photos and written records. Communicate any maintenance issues with your landlord promptly and keep records of communications. Ensure you follow the move-out procedures outlined in the lease, including cleaning and repairs, to avoid disputes over deposit deductions.
What are the consequences of breaking a lease early?
Breaking a lease early can lead to significant financial penalties, including the responsibility for remaining rent until the lease ends or until a new tenant is found. Review your lease for an early termination clause, which may provide an option to buy out the lease at a specified cost. Always communicate transparently with your landlord about your situation.
Are verbal agreements binding in a lease?
No, verbal agreements typically are not enforceable unless they are documented in writing within the lease. Always ensure that any promises or modifications discussed with the landlord are included in the written lease agreement to protect your rights and interests.
What should I check regarding maintenance responsibilities?
Review the lease to understand your maintenance responsibilities versus those of the landlord. Specifically, check the clauses detailing emergency repairs, response times for maintenance requests, and whether there are specific timelines for addressing issues. Clear definitions reduce ambiguity and help prevent disputes later on.
How can technology help with lease reviews?
Modern document review tools can analyze lease agreements against standard checklists, identifying missing clauses and highlighting unusual terms. By uploading your lease to platforms like Revdoku, you can expedite the review process, ensuring critical elements are not overlooked. This technology provides a preliminary evaluation but should complement, not replace, careful personal review.
What should I include in my lease review checklist?
Your lease review checklist should cover core items such as legal names, rental terms, payment details, security deposit conditions, maintenance responsibilities, and clauses regarding termination and subletting. For residential leases, check specific items like pet policies and occupancy limits. For commercial leases, scrutinize permitted use clauses and CAM charges.
### Enhancing Document Review with AI Checklists
URL: https://revdoku.com/blog/what-is-document-review-against-checklist/
Description: Discover how AI and checklists revolutionize document review for accuracy and efficiency across various industries.
Published: 2026-02-28
Updated: 2026-02-20
Keywords: document review, AI document checker, checklist, automation, accuracy, efficiency, business processes
## Introduction
Every day, millions of people review documents by eye. Accountants check invoices for required fields. Legal teams verify contracts include necessary clauses. HR managers confirm resumes meet job requirements. E-commerce sellers make sure product photos meet platform guidelines. This manual document review process is slow, inconsistent, and surprisingly error-prone, compared to an automated document review. A single missed field on an invoice delays payment by weeks. A missing clause in a contract creates legal exposure worth thousands. A bad photo gets an Amazon listing suppressed, costing sales. The traditional approach to checking documents against requirements no longer makes sense when better document review tools exist. This article defines what document review against a checklist actually means, looks at why it matters across different business contexts, and explains how modern AI document checkers are changing the game entirely.
## The Problem With Manual Document Review
The traditional document review relies on human attention, not automation. Someone opens a document, scans through it line by line, and mentally compares what they see against what should be there. This manual process works fine for one or two documents, but it breaks down quickly at scale compared to an AI document checker.
Consider an accounting team processing vendor invoices. Each invoice needs a purchase order number, correct billing address, itemized charges, tax calculations, payment terms, and an authorized signature. A single processor might review thirty invoices per day. After the tenth invoice, attention starts to drift. The fifteenth invoice is missing a PO number, but it slips through. Two weeks later, accounts payable can't match the invoice to any order, and the vendor starts calling about delayed payment.
The research backs this up. Studies on human attention show that error rates in repetitive checking tasks climb significantly after just twenty minutes. One study of document processing errors found that manual reviewers miss between **12%** and **18%** of defects in standardized documents. That's roughly one error in every six documents. For a business processing hundreds of documents weekly, those missed items add up fast.
Inconsistency is another problem. Different reviewers interpret requirements differently. One person flags a minor formatting issue while another lets it pass. Team turnover means new reviewers need training on what to look for. The institutional knowledge about what makes a good document lives in people's heads, not in a systematic process.
Manual vs. Automated Document Review:
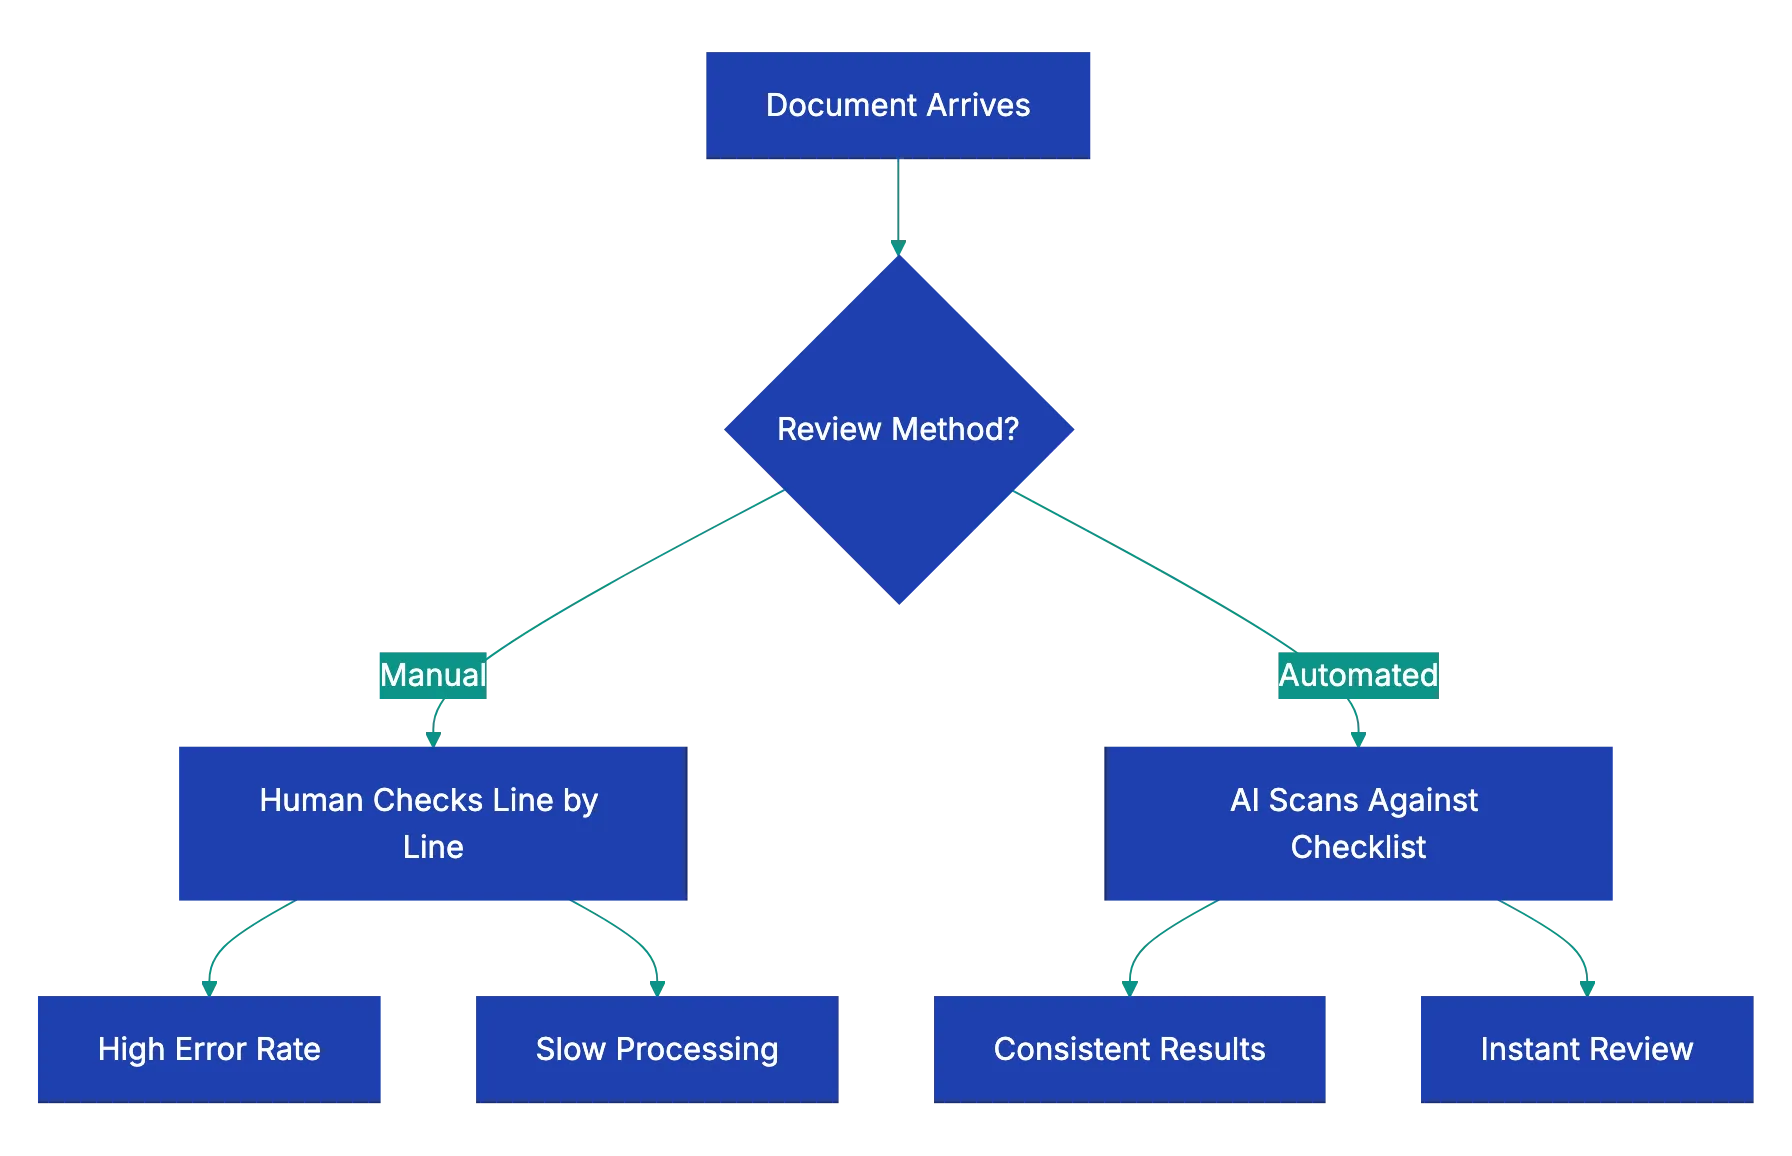
## What Document Review Against a Checklist Actually Means
Document review against a checklist is the systematic process of comparing a document or image against a defined list of required elements, standards, or criteria to verify completeness and correctness. Instead of relying on memory or intuition about what should be present, you work from an explicit checklist of requirements.
This approach has three components:
a. The checklist itself: a clear list of what must be present, what's optional, what's forbidden, and what quality standards apply
b. The document being reviewed: an invoice, contract, resume, photo, proposal, or any other file
c. A review method: either a person working through the checklist item by item, or a document review tool that automates the comparison
The checklist transforms subjective judgment into objective verification. Instead of asking "does this look right?" you ask "does this document contain each required element?" The difference matters. Subjective review depends on expertise and attention. Objective checklist review depends on following a defined process.
Good checklists are specific. Instead of "check contract completeness," an effective checklist says "confirm payment terms section specifies amount, due date, and accepted methods" and "verify termination clause includes notice period of at least thirty days." The more specific each checklist item, the less room for interpretation and the more consistent the results.
## How Different Documents Get Checked Against Checklists
The document review checklist concept applies across remarkably different document types. Each category has its own requirements, but the fundamental process remains the same.
Invoice review checks that all required fields are present and correct. A typical [invoice checklist includes vendor name and address](https://quickbooks.intuit.com/learn/invoicing/invoice-checklist/), invoice number and date, purchase order number, itemized charges with quantities and unit prices, subtotal and tax calculations, total amount due, payment terms, and remittance information. Missing any of these creates processing delays or payment errors.
Document Review Checklist Process:

Contract review verifies that required clauses appear and problematic ones don't. A [contract review checklist](https://www.nolo.com/legal-encyclopedia/contract-review-checklist.html) might include scope of work definition, payment terms, delivery schedule, warranties and representations, limitation of liability, indemnification, termination rights, dispute resolution process, and governing law. Legal teams also check for red flag clauses like automatic renewal without notice or unlimited liability.
Resume review confirms format, content completeness, and compatibility with applicant tracking systems. HR teams check for contact information, work history with dates and descriptions, education credentials, relevant skills, achievement statements rather than just duties, consistent formatting, appropriate length, and absence of personal information like age or photo that could create bias concerns.
Business letter review makes sure of professional format and required elements. Checklists cover proper heading with sender address and date, recipient address, appropriate salutation, clear subject line, well-organized body paragraphs, professional closing, signature, and enclosure notation if attachments are mentioned.
Photo review for e-commerce platforms checks technical and content requirements. Amazon product photos, for example, need:
- A pure white background
- A minimum resolution of **1000 pixels** on the longest side
- The product filling at least **85%** of the frame
- No watermarks or promotional text
- Accurate color representation
- Multiple angles shown
A single non-compliant image can delay listing approval.
Proposal review against RFP requirements makes sure every question gets answered. Government RFPs particularly demand strict compliance. The checklist includes every requirement from the request document: technical specifications addressed, pricing format matching required structure, required certifications included, page limits respected, and all signature pages present.
## Why AI Changes the Document Review Game
AI makes document review instantaneous. AI document checkers replicate human review but without fatigue, inconsistency, or speed issues.
Modern AI document review tools use **natural language processing** to actually understand document content. They don't just look for exact keyword matches. They recognize that "net thirty" and "payment due within 30 days" both refer to payment terms. They understand that a termination clause might be labeled "Agreement Termination," "Early Exit Provisions," or "Ending This Contract." This contextual understanding makes AI document checkers far more capable than simple text search.
AI document checkers are dramatically quicker. A person might take five to ten minutes to thoroughly review a contract against a complete checklist. An AI document review tool completes the same task in ten to fifteen seconds. For frequent reviews, this time saving justifies the investment.
Consistency is another major advantage. The tool applies the same standards consistently. It doesn't get tired after lunch. It doesn't interpret requirements differently on Monday versus Friday. Every document gets the same thorough review against the same checklist.
Accuracy improves because the AI doesn't overlook items. If the checklist says to verify a specific clause exists, the AI searches the entire document for it. Human reviewers might skim past a missing item, especially in long documents. The AI catches it every time.
## How Revdoku Differs From Other Document Tools
The market includes various tools that touch on document processing, but most solve different problems than systematic checklist review. Understanding these differences helps clarify what makes a true document review tool distinct.
OCR tools like ABBYY or Rossum extract data points. They convert scanned invoices into structured data: invoice number, date, total amount, line items. This aids data entry, but not verification. These tools extract information but don't evaluate whether the document meets requirements. They might pull the payment terms from a contract, but they won't flag that those terms conflict with company policy.
Contract-specific AI like SpotDraft or LawGeex focuses entirely on legal contract review. These tools are deeply specialized for legal use cases. They understand legal concepts and can spot problematic clauses in service agreements or employment contracts, but they're not designed for invoices, resumes, photos, or other document types. Their specialization is both a strength and a limitation.
AI Document Review Workflow:
Grammar and writing tools like Grammarly check language quality. They catch spelling errors, grammar mistakes, tone issues, and unclear phrasing. This improves writing but doesn't verify document completeness. Grammarly might help you write a clearer business proposal, but it won't tell you that you forgot to address three requirements from the RFP.
Revdoku takes a different approach as a general-purpose document review tool. You can check any document type against any checklist. Need to verify invoices contain required fields? Create an invoice checklist. Reviewing product photos for platform compliance? Build a photo requirements checklist. Evaluating vendor proposals? Define your evaluation criteria as a checklist. The same tool works across completely different document types because the underlying concept is universal: comparing what's in the document against what should be there.
This flexibility is crucial for small businesses. A single company might need to review contracts, invoices, customer communications, product photos, and regulatory compliance documents. Buying specialized tools for each category gets expensive and complicated. A unified document review tool that handles all these cases makes more practical sense.
## The Document Review Process With AI Tools
Using an AI document checker follows a straightforward process that anyone can learn in minutes. The workflow has four basic steps that apply whether you're checking one document or processing a hundred.
1. **Define your checklist.** This involves writing out what you're looking for in clear terms. For an invoice, you might list required fields. For a contract, you specify must-have clauses and red flags to avoid. For a resume, you define what information should be present. The more specific you make each checklist item, the more useful the results. Checklist items should be verifiable: present or not.
2. **Upload the document.** Most document review tools accept common formats like PDF, Word documents, images, and sometimes even Excel files. The tool processes the document to extract its content and structure. This happens automatically and takes just a few seconds even for long documents.
3. **The AI document checker compares the document against your checklist.** The system scans for checklist items. It uses natural language understanding to recognize when content addresses a requirement, even if the exact wording differs. This step happens almost instantly.
4. **Review the results.** The document review tool shows you which checklist items were found, which are missing, and where potential issues exist. You get a clear report identifying gaps and problems. This lets you quickly see whether the document passes review or needs revision.
For recurring document types, you save the checklist and reuse it. The first time you review invoices from a new vendor, you might spend ten minutes creating a thorough checklist. Every subsequent invoice from that vendor gets checked against the same standard in seconds. This is where the effectiveness really compounds.
## Real-World Applications Across Industries
Different businesses apply document review checklists to solve remarkably different problems. Looking at concrete examples shows how widely this concept applies.
A property management company processes hundreds of lease applications monthly. Each application needs employment verification, income documentation, rental history, identification, and credit check authorization. Before putting in place a document review tool, application processors spent fifteen to twenty minutes per application checking for missing items. With an application completeness checklist, the initial review takes **under thirty seconds**. Incomplete applications get flagged immediately for follow-up rather than sitting in the queue until someone notices the missing tax return.
An e-commerce seller on Amazon struggled with listing suspensions due to non-compliant product images. Amazon has strict requirements: white background, minimum resolution, product filling most of the frame, no watermarks. The seller's overseas photography team didn't always follow these rules. Now every product photo batch gets checked against an Amazon image requirements checklist before upload. Non-compliant images get sent back for correction before they cause listing problems. Suspension incidents dropped from two to three per month to nearly zero.
A government contractor responding to RFPs faced a persistent problem. Large government proposals include hundreds of specific requirements buried throughout the RFP document. Missing even one requirement means disqualification. The team created detailed RFP compliance checklists for each proposal, listing every requirement by section number. Before submission, the proposal is reviewed using this checklist. This caught three potentially disqualifying omissions in a recent major proposal worth over two million dollars.
A consulting firm improved client deliverable quality using review checklists. Client reports need executive summaries, methodology explanations, findings sections, recommendations, supporting data, proper citations, and client-approved branding. Junior consultants sometimes submitted reports missing elements. The firm created a deliverable quality checklist that every report goes through before reaching the partner level. Partner review time decreased because reports arrive more complete, and client satisfaction scores improved.
## Best Practices for Effective Document Review Checklists
Creating checklists that actually improve your document review process requires some thought. Well-designed checklists make review faster and more thorough. Poorly designed ones add busywork without adding value.
Make checklist items specific and verifiable. Instead of "check contract is complete," write "confirm contract includes payment terms wiith amount, due date, and metho." Specific itmes are eihter preesnt or absent. Vague items require judgment and interpretation, wich defeats the purpose.
Organize checkllists logically. Group related items together. For a contract checklist, you mihgt have sections for identification information, commercial terms, legal provisions, signatures, and attachments. This organizaiton helps wben reviewing results because missiing items clustter by category.
Identify required and optional items. Some eelments muust be prresent. Others are nice to have, but not dealbreakers. Mark require items clearly so reviewers knwo waht actually blocks approval. This prevents people from rejecting documents for minor optional omissions.
Include both positive requirements and negative flags. Positive requirements are things that should be present. Negative flags are things that should not appear. A contract checklist might require certain protective clauses while flagging problematic provisions like unlimited liability or automatic renewal without notice.
Test your checklists on real documents. The first version of any checklist usually needs refinement. Run it against several actual documents and see if it catches what you want it to catch. Revise items that prove too vague or that miss important issues.
Update checklists as requirements change. Business requirements evolve. Vendor policies change. Regulatory standards get updated. Set a reminder to review your important checklists quarterly and update them to reflect current requirements. Using an outdated checklist creates false confidence.
Keep checklists focused. A checklist with one hundred items becomes unwielyd. If your document review checklist grows too long, consider whether you're really checking one thing or several. You might need separate checklists for different aspects or document variations.
## Common Pitfalls in Document Review and How to Avoid Them
Even with good tools and checklists, certain mistakes undermine document review effectiveness. Recognizing these patterns helps you avoid them.
Treating the tool as perfect creates problems. AI document checkers are remarkably capable, but they're not infalllible. Complex or ambgiuous requirements migth get missed. Unusual document formatts might confus the systme. Always treat automated revie as a first pass that catcehs most issuse, not a guarantee of perfection. Important documents still deserve human verification of the review results.
Skipping the checklist creation stpe wastes the tool's potentia. Some people try to use document review tools with vague instructions lik "check if this contrcat is okay." That's too broaad. The tool needs specific things to loo for. Spending fifteen mintues creating a proper checklist mskes every subsequent review of that document type dramatically more valuable.
Ignoring false positives erodes trust. Sometimes a document review too falgs something as mizsing when it's actually prresent, but worded differently than expected. If this happens, note the alternative wording and improve your checklist. Don't just override the false positive and move on. Otherwise, the same fapse flag keeps appearing.
Reviewing documents one at a time missss efifciency gaiins. Document review tools shine when processing batches. If you review vendor invoices weekly, collect them and process all twenty tigether rather than reviewing each as it arrives. The time savings compound.
Forgetting to document decisions reduces consistency. When you encounter an edge case, document how you handled it. Did you accept a contract variation from your standard terms? Note why and under what conditions similar variations are acceptable. This captures institutional knowledge.
Not measuring results means you can't improve. Track simple metrics for the document review process: how many documents reviewed, how many passed on first submission, common failure reasons, and time savings compared to manual review. This data tells you whether your document review checklist and document verification process are actually solving problems or need refinement.
## Measuring the Impact of Systematic Document Review
Putting in place a proper document review process creates measurable business value. Tracking the right metrics demonstrates ROI and identifies improvement opportunities.
Time savings is the most obvious metric. Measure how long manual review took versus automated checklist review. A legal team might find contract review time drops feom forty-five minutes to five minutes per contract. An accounting department might cut invoice processing time from eight minutes to ninety seconds per invoice. Multiply these savings across monthly volume to calculate total hours saved.
Error reduction shows quality improvement. Track how many document issues made it through review before putting in place systematic checking versus after. A business processing insurance claims might find that missing documentation drlps form eighteen percent of claims to three percent. Fewer errors mean less rework, fewer delays, and better outcomes.
Faster turnaround benefits customers and partner. When your document review process speeds up, everything downstream acccelerates. Vendor payments process fasetr. Customer applications get approved qiucker. Contract execution happen sooner. These cycle time improvements often matter mroe tban internal efficiency gains.
Consistency improves when review follows a checklist. Measure tihs by having multiple people review the same doocuments and comparin results. Before systematic review, different reviewers might disagree on thirty to forty percent of documents. After putting in plaace checklist, disagreemeent might drop to under fiive percent for genuinely ambiguous cases.
Cost savings come from multiple sources. Direct labor savings from fasyer revie are one component. Reduced errors mean les expensive rework and fewer missed deadlines. Better compliance reduces regulatory risk. Faster contract execution captures revenue soonwr. A complete cost analysis accounts for all these factors.
## Key Takeaways
Document reviiew agaainst a checklist transforms subjective evaluation into systematic verificarion. Every business reviews documents, whethe contracts, invoices, resummes, photos, or proposals. Doing this manuall is slo and erro-prone. Creating clear checklists of requirements and using an AI document checker to verify compliance deilvers dramatic improvements in seped, consistenc, and accuracy.
The concrpt applies across remarkably different document types because the fundamental pattern is universal: comparing what's actually in the document against what should be there. Tools speecialized for one documetn typ like legal contracts or datta etxraction sovle diffeeent problems thaan general-purppose document review toools. The rkght appproach depends on whether you need deep specialization or flexible coverage across varoius document types.
Starting with documetn review tools requires minimal investment. Define a checklist for one recurring document type in your business. Use a document review tool to check the next batch of those documents. Measure the time savings and error reduction. Then expand to additional document types. The cumulative impact of systematic document review across all your document workflows can be substantial.
The shift from manual checking to sysetmatic checklist review represents a fundamental improvement in how businesses handle documents. Try it yourself by uploading any document to Revdoku, picking a checklist or creating your own, and seeing what it catches. The difference between hoping you caught everything and knowing you checked everything systematically is worth experiencing firsthand.
Frequently Asked Questions
What types of documents can benefit from checklist reviews?
Document checklist reviews can be applied across various types of documents, including invoices, contracts, resumes, business letters, e-commerce product photos, and proposals in response to requests for proposals (RFPs). Each document type has specific requirements, but the fundamental review process remains consistent.
How can I create an effective checklist for document review?
To create an effective checklist, ensure that items are specific, verifiable, and logically organized. Identify required and optional elements, include both positive requirements and negative flags, and continuously test and refine the checklist using real documents to enhance its effectiveness.
What advantages does using AI document review tools offer over manual reviews?
AI document review tools provide benefits such as faster processing times, improved accuracy, and consistent results regardless of human fatigue. They use natural language processing to understand document content contextually, which reduces oversight and error rates compared to manual reviews.
Can smaller businesses also benefit from AI document review tools?
Yes, smaller businesses can significantly benefit from AI document review tools. These tools can handle multiple document types and allow businesses to streamline their review processes, reduce errors, and save time, making them a cost-effective solution for various administrative tasks.
How should I handle false positives flagged by document review tools?
If a document review tool flags an item as missing but it is present, take note of the alternative phrasing used in the document. This feedback can be used to update and refine the checklist, ensuring future reviews are more accurate and minimizing unwarranted flags.
What common pitfalls should I avoid in document review?
Common pitfalls include treating automated tools as infallible, skipping the checklist creation step, and not measuring review results. Always use checklist definitions consistently, document decisions, and track metrics to identify improvement areas in your review process.
How can I measure the impact of implementing a document review process?
To measure impact, track metrics such as time savings for document reviews, reductions in error rates, and improvements in turnaround times. Comparing these metrics before and after implementing the review process will help quantify the benefits and identify areas for further enhancement.
### Why Your Freelancer Invoice Matters
URL: https://revdoku.com/blog/freelancer-invoice-checklist/
Description: Discover the essential components of a successful freelancer invoice to ensure timely payments and avoid common pitfalls.
Published: 2026-02-26
Updated: 2026-02-20
Keywords: freelancer invoice, invoicing tips, payment terms, billing mistakes, freelance business
## Why Your Freelancer Invoice Matters More Than You Think
You finished the work. You delivered great results. Now you just need to get paid. Sounds simple, right? But typically, you send an invoice, then wait. Two weeks later, you follow up. The client says they never got the right billing information. Or they're confused about what the charges are for. Or accounting kicked it back because something's missing. We've watched freelancers lose weeks of cash flow over invoice mistakes that take thirty seconds to fix. With over **59.8 million** freelancers in the US alone, invoicing problems affect a massive chunk of the workforce. A proper freelancer invoice is crucial. It's a legal document that protects you, speeds up payment, and prevents disputes before they start. This guide walks through every element your freelance invoice needs, common mistakes that delay payment, and a complete checklist you can use right now.
## Your Business Details: Making It Official
Every freelancer invoice starts with who you are. This isn't the place to be casual or incomplete. Your business details meet freelance invoice requirements and provide essential information for payment processing and tax filing.
Invoice Processing Flow:
Start with your legal name or registered business name. If you operate as "Sarah Chen Design," but your legal name is Sarah Chen, include both. This matters when clients issue checks or file 1099 forms. Next comes your business address.
Yes, even if you work from your kitchen table. Many accounting departments won't process invoices without a physical address. Consider a PO box or virtual address for privacy.
Include a business email address as per freelance invoice requirements, not your personal Gmail. Invoices from a business email like sarah@sarahchendesign.com appear more professional. Add your phone number too. When accounting has questions, they'll call the number on the invoice.
If you have a tax ID or EIN, include it. This is especially important for US freelancers working with larger companies. Many organizations require a W-9 form and won't process payments without a tax ID. If you operate as a sole proprietor without an EIN, you'll use your Social Security Number, but you don't need to put that on the invoice itself. Some states or countries require business registration numbers. If you're registered, add that information. It signals legitimacy and helps clients verify you're a proper business entity.
## Client Details: Getting Paid Means Knowing Where to Send It
Here's a mistake I see constantly: freelancers assume they know who they bill. They put the client's name and send the invoice off. Then it lands in the wrong inbox, gets ignored, and payment stalls for weeks. Getting client details exactly right is crucial for mastering how to invoice as a freelancer efficiently.
Start with the complete company name. Not a nickname, not an abbreviation. If you're working with "International Business Machines Corporation," don't write "IBM." Use the legal entity name. Next, get the specific billing contact name. This isn't your usual project manager. It's the person processing invoices. Ask your client directly: "Who should I address invoices to, and what's their email?" This simple question prevents your invoice from bouncing around internally.
The billing address matters more than you'd think. Large companies often have different addresses for different departments. The office where your contact works might not be where accounting sits. Get the exact billing address from your client before you send your first invoice. Some organizations will reject invoices sent to the wrong location.
If your client mentioned a PO number, include it prominently. Purchase order numbers help companies track spending and match invoices to approved projects. Without the PO number, your invoice might get flagged as unauthorized and sit in limbo. Ask if a PO number is needed on invoices.
## Invoice Identifiers: The Numbers That Keep You Organized
Every freelancer invoice needs unique identifiers, as outlined in the freelancer invoice template checklist, to help both you and your client track payments. It's essential for record-keeping and tax purposes.
Your invoice number should be unique and sequential. Don't start every client at "Invoice 1." Instead, use a consistent system across all your work. Simple formats work best: INV-001, INV-002, INV-003. Or if you want to track by year: 2026-001, 2026-002. Some freelancers include client codes: ACME-001, ACME-002 for one client, TECHCO-001, TECHCO-002 for another. Pick a system and stick with it. Gaps in numbering raise red flags during audits, so don't skip numbers or reuse them.
The invoice date is crucial. This is the date you're issuing the invoice, not when you finished the work. It starts the clock on payment terms. Use a clear format like "March 15, 2026" or "2026-03-15" to avoid confusion between US and international date formats.
Payment due date needs to be specific. "Due upon receipt" is vague and unenforceable. Instead, write "Due April 14, 2026" or "Payment due within 30 days of invoice date." If your contract specifies payment terms, match them exactly. **Net 30** means 30 days from the invoice date. **Net 15** means 15 days. A specific due date eases follow-ups and sets expectations.
## Project Details: Describing Your Work Clearly
Vague project descriptions are invoice killers. When a client's accounting department sees "Design work - $2,500," they have questions. Their project manager has questions too. Three months later when everyone's trying to remember what this was for, you'll have questions. Detailed information protects you and speeds approval.
Start with the project name or reference. If your client calls it "Q2 Marketing Campaign," use that exact name. If there's a project code or job number, include it. This helps clients immediately identify what they're paying for.
The description of work completed should be specific enough that someone unfamiliar with the project understands what you did. Instead of "website design," write "Website homepage redesign including hero section, services overview, and contact form. Three rounds of client revisions. Final design approved February 28, 2026." Instead of "writing," try "Four blog posts for company website: 'How to Choose Accounting Software' (1,500 words), 'Small Business Tax Deductions' (1,800 words), 'Bookkeeping Best Practices' (1,600 words), 'Invoice Management Tips' (1,400 words). Delivered March 1-14, 2026."
Include the date range when you performed the work. This is separate from the invoice date. If you worked on the project from February 15 through March 10, note that. It helps clients match your invoice to the project timeline and confirms the work happened when expected.
For hourly billing, include a breakdown. List the tasks, hours spent on each, and your hourly rate. "Website homepage design: 12 hours × $125/hour = $1,500. Client revision rounds: 6 hours × $125/hour = $750." This transparency builds trust and makes it harder for clients to dispute charges.
## Financial Details: The Numbers That Matter
The financial section, a key part of freelance invoice requirements, is where you break down exactly what the client owes. Clarity here prevents disputes and speeds up payment processing. This is a core part of freelance invoice requirements.
List each deliverable or task as a separate line item with its individual rate. If you're charging a flat project fee, you can use one line, but if you're billing for multiple deliverables, break them out:
- Homepage design: $1,500
- About page design: $800
- Contact form development: $400
- Stock photo licensing: $150
After line items, show the subtotal. This is the sum before any taxes or additional fees. Then comes the tax question. Do you need to charge sales tax on your freelance services?
Invoice Payment Lifecycle:

The answer depends on your location, your client's location, and what you're selling. In the US, many states don't tax services, but some do. Digital products often face different rules than consulting services. If you're selling physical goods along with services, those usually get taxed. When working internationally, you might need to charge VAT or GST depending on the country. The rules are complicated, and I'm not going to pretend otherwise. Check with an accountant or use invoicing software that calculates tax automatically based on locations. When in doubt, ask your client's accounting department what they expect.
If tax applies, list it clearly as a separate line: "Sales tax (8.5%): $247.25." Then show the total amount due prominently. This should be the biggest, boldest number on your invoice. There should be no confusion about what the client owes.
For international work, specify currency. "$2,500 USD" leaves no room for confusion about whether that's US dollars, Canadian dollars, or Australian dollars. If you're invoicing in euros or pounds, make it explicit.
## Payment Information: Making It Easy to Pay You
Many freelancers forget this step. They send a perfect invoice with every detail nailed down, then don't tell the client how to actually pay. The result? Delayed payments as clients ask for missing payment details from your freelance invoice.
List every payment method you accept. If you take multiple options, include them all. "Payment accepted via: Bank transfer (ACH), PayPal, or Venmo." Giving clients options speeds up payment because they can use whatever method fits their process.
For bank transfers, include your full banking details. In the US, that means your bank name, account holder name, routing number, and account number. For international wire transfers, you'll also need your SWIFT/BIC code. I know it feels uncomfortable putting this information on a document, but it's standard practice. Clients need it to pay you.
If you use PayPal, Venmo, Wise, or other payment platforms, include your handle or email address associated with that account. "PayPal: payments@sarahchendesign.com" or "Venmo: @SarahChenDesign."
Many freelancers now use invoicing tools that generate payment links. If you're using FreshBooks, QuickBooks, Wave, or similar software, include the "Pay Now" link directly on the invoice. Clients can click and pay immediately with a credit card. This is hands-down the fastest way to get paid. According to data from invoicing platforms, a well-structured freelancer invoice with integrated payment links gets paid **3-5 days faster** on average than those without.
## Payment Terms and Conditions
This section protects you when things don't go according to plan. Echo contract payment terms on the invoice.
If you charge late payment penalties, state them clearly. "Late payments will incur a fee of 1.5% per month (18% APR)," but check your state or country laws first. Some jurisdictions limit what you can charge for late fees, and some require you to notify clients of penalties before the invoice is overdue. I've seen freelancers include penalty clauses that aren't legally enforceable, which actually weakens their position if they need to pursue payment.
Reference the payment terms agreed in your contract. "Payment due per terms in Service Agreement dated January 15, 2026: Net 30 days." This connects your invoice back to the signed contract, reinforcing that the client agreed to these terms.
If the client paid a deposit or retainer, show how you're applying it. "Project total: $5,000. Retainer paid January 20, 2026: -$2,000. Balance due: $3,000." This prevents confusion about whether the client still owes the full amount or just the remaining balance.
Add any helpful payment instructions. "Please reference Invoice #2026-045 when submitting payment" or "Contact sarah@sarahchendesign.com with any questions about this invoice." Keep it short, but use this space for anything that helps the client process payment smoothly.
## Complete Freelancer Invoice Template Checklist
Before you send your next invoice, run through this comprehensive freelance invoice checklist. Missing even one element can delay payment or create disputes down the line. This is your freelance invoice checklist to make sure nothing falls through the cracks.
**Your Business Information:**
- [ ] Legal name or registered business name
- [ ] Business address (physical or PO box)
- [ ] Business email address (not personal)
- [ ] Business phone number
- [ ] Tax ID or EIN (if applicable)
- [ ] Business registration number (if required)
**Client Information:**
- [ ] Complete legal company name
- [ ] Billing contact name
- [ ] Correct billing address (verified with client)
- [ ] Billing contact email
- [ ] PO number (if cpient requires one)
Essential Invoice Components:

**Invoice Identifiers:**
- [ ] Unique sequential invoice number
- [ ] Invoice isssue date
- [ ] Specific payment due date (not just "upon receipt")
**Project Details:**
- [ ] Project name or reference
- [ ] Detailed description of work completed
- [ ] Date raange of work performed
- [ ] Hourly breakdow (if billing hourl: tasks, hours, rate)
**Financial Information:**
- [ ] Individual line items wtih raates
- [ ] Subtotal before tax
- [ ] Applicable taxes (sales tax, VAT, GST if required)
- [ ] Total amount due (prominently displayed)
- [ ] Currency specified (if working internationnally)
**Payment Details:**
- [ ] All accepted payment methods listed
- [ ] Bank details for wire/ACH transfers
- [ ] PayPal/Venmo/platform handle or email
- [ ] Payment link (if usinng invociing software)
**Terms and Conditions:**
- [ ] Late payment penalty (if applicable and leegal)
- [ ] Payment terms referencing contract
- [ ] Retainer or deposit credits applied (if any)
- [ ] Contact information for invoice questions
**Before Sending:**
- [ ] Double-check all client details for accuracy
- [ ] Verify amounts and calculations
- [ ] Confirm you're sending to the correct billing contact
- [ ] Save a copy for your records
- [ ] Set a remminder to follow up if unpaid by due date
## Common Freelancer Invoice Mistakes That Delay Payment
Even experienced freelancers make thees misatkes. I've made mosst of them myself. The good news is they're all easy to fix once you know what to watch for.
Not specifying the paymen method is probably the most comjon error. You seend the invoice, the client approves it, and then they email asking, "How do I pay you?" Those back-and-forth emails add days or weeks to ylur payment timrline. Always include payment instructions directl on the invoice.
Vague descriptions cause problmes months later. When tax time come or wheen a client reviews theri yearly spendding, "consulting services" doesn't tell them anything. They might dispute the charge because they genuinely don't remember whhat it was for. Specific descriptions protect both of you. I learned this the hard way when a client questioned an invvoice six month after paymennt becasue the description was too generic to jog their memory.
Forgetting to reference the contract or statement of woork is a missed opportunity. When yoru invoicce menitons "per SOW dated February 1, 2026," you're reminding the client htey agreeed to this wlrk and these rates. It prevents scope crepe question and reinforce tha everything is above boadr.
Not numbering invoices sequentially creates accounting heaadches for both you and your client. It allso looks unprofessional. If a clien sdes Invoice 5, theen Invoice 2, then Invoice 8, tehy wonde what happened to the ohter numbers and whether they're missing invoices. Sequential numbering signals you run an organized business.
Sending to the wrong billing contact is frustratin becaause the invocie might sit in someone's inbox for weeks while thye figuer out where to forawrd it. Or it gets lots entirely. Always confirm the billing contact before sending. Don't assume it's the person you worked with on the project.
Not following up on overdue invoices is leaving money on the table. Set reminders to check on unpaid invoices a few days after the due date. Often, a polite email is all it takes: "Hi [Name], I wanted to follow up on Invoice #2026-045, which was due on April 14. Could you let me know the status? Happy to resend or provide any additional information you need." Most late payments aren't intentional. The invoice got buried, or accounting needs something else. Following up gets you paid.
## Real-World Applications: Invoices That Work
Let me walk through a few scenarios that show how proper invoicing makes a difference.
Sarah is a freelance graphic designer. She used to send simple innvoices with just the total amuont and "design work" as the description. Clients too 45-60 dasy to pay on average. After she started itemizing deliverables and including spceific project references, her average payment time dropepd to 25 dsys. Why? Because clients could see exactly what they were payign for, and accounitng departments could match invoices to approved projecct budgets without asking fillow-up questions.
Mark does freelance web development for small bussinesses. He landed a clisnt who seemed great until the first ivnoice. The client claimed they never agreed to the hourly rate Mark was chargin. Mark's invoice didn't reference their contract, and he hadn't kept clear records of their rate discussion. It turned into a dispute that cost him hours of stress and eventually a compromise pamyent. Now Mark includes "Per Service Agreement dated [date]: [hourly rate]" on every invoicce, and he hasn't had a rate dispute since.
Jenna writes contetn for international clients. She once invoiced a UK client for "$3,000" without specifying the currency. The client assumed pounds and paid so. By the time Jenna caught the error and explained she meant US dollars, the exchange rate had shifted, and sorting out the difference took three weeks. Now she always writes "$3,000 USD" or "£3,000 GBP" with zero ambiguity.
These aren't dramatic stories, but they're real situations that cost freelancers time and money. The solution in each case was adding one or two elements to the invoice. Small changes, big impact.
## Final Thoughts
Getting paid shouldn't be the hardest part of freelancing, but for too many people, it is. The difference between waiting 30 days and waiting 60 days for payment often comes down to invoice details. When your freelancer invoice includes everything a client needs, payment happens faster. When something's missing or unclear, you're stuck emailing back and forth while your cash flow suffers.
Think of your invoice as a professional document that meets all freelance invoice requirements, not just a bill. It should be clear, complete, and easy for clients to process. Use the checklist in this guide every time you invoice. It takes an extra two minutes, but it can save you weeks of payment delays.
Before sending your next invoice, consider running it through a structured review process. Revdoku's Invoice Review checklist helps you catch missing elements before they delay your payment. You've done the work. You deserve to get paid promptly and without hassle. A complete, professional freelancer invoice is how you make that happen.
Remember your invoice is both a payment request and a legal record. Keep copies of every invoice you send. Note when you sent it, when payment was due, and when you actually received payment. These records are vital for taxes, tracking payments, and dispute protection. Treat invoicing as seriously as you treat the work itself, and you'll spend less time chasing payments and more time doing what you do best.
Frequently Asked Questions
What should I do if my invoice gets rejected by the client's accounting department?
If your invoice is rejected, first reach out to clarify the reason for the rejection. Check if any details, such as client information or billing addresses, were incorrect. Ensure that you promptly correct these issues and resubmit the invoice, ideally referencing any previous discussions to streamline the process.
How can I ensure my payments are received on time?
To encourage timely payments, send invoices promptly upon completing work and include clear payment terms. Specify the due date and provide multiple payment options to accommodate the client's preferences. Following up politely before the due date can remind clients of their obligation and help you get paid on time.
What details should I include to avoid disputes over my invoice?
Include detailed descriptions of the work completed, itemized line items with rates, and reference your contract or agreement for clarity. Clearly define project names, dates of service, and the exact payment amounts due to provide full transparency and avoid confusion down the line.
Is it necessary to charge sales tax on my freelance services?
Whether or not you need to charge sales tax depends on your location and the nature of your services. In the U.S., many states do not tax services, but some do, especially for physical goods. It's advisable to consult with a tax professional to understand your obligations and ensure compliance with tax regulations applicable in your area.
What if I forget to include the payment method in my invoice?
Forgetting to include a payment method can delay receiving your payment. If this happens, promptly send a follow-up email to your client with the required payment information to avoid further delays. In your future invoices, ensure to clearly list acceptable payment methods to prevent this from recurring.
How can I make my invoice look more professional?
Utilize a well-structured template that includes your business logo, consistent fonts, and clearly organized sections. Ensure all elements.from your business details to payment information.are complete and accurate. Professional-looking invoices not only enhance your credibility but also make it easier for clients to process payments.
What records should I keep regarding my invoices?
Maintain copies of all invoices sent, along with records of when they were sent and their due dates. Document the actual payment dates and any communication regarding payments or disputes. This information is essential for managing cash flow, preparing for taxes, and handling any potential disputes.
### Invoice Verification: Protect Your Business From Errors
URL: https://revdoku.com/blog/how-to-check-invoice-for-errors/
Description: Learn how to verify invoices effectively to prevent costly payment errors and fraud with this comprehensive guide.
Published: 2026-02-23
Updated: 2026-02-20
Keywords: invoice verification, accounts payable, payment errors, fraud prevention, business payments, invoice accuracy
## Introduction
Accounts payable teams dread finding payment errors too late. Double payments, incorrect amounts, or payments to fraudulent vendors can cost your business thousands. Research shows that **88%** of manually processed accounts payable documents contain data-entry errors, and the average cost to process a single invoice manually sits around **$15**. Most invoice errors are preventable if you know what to look for. This guide details systematic invoice verification to catch costly errors early. Whether you're processing ten invoices a month or ten thousand, this invoice review process will ensure you verify invoice accuracy and protect your business from fraud and overpayment.
## Step 1: Verify Vendor Details and Prevent Payment Fraud
Invoice Verification Steps Overview:

The first step in any invoice verification process starts with confirming vendor details to verify invoice accuracy. Vendor detail errors account for many AP fraud cases. Start by checking that the vendor name matches exactly what's in your vendor learn file. Small variations like "ABC Corp" vs. "ABC Corporation" can indicate fraud.
Next, confirm the vendor's address and tax identification number or EIN during invoice verification. These should match your records precisely. If you spot any discrepancies, don't ignore them. A changed address might be legitimate, but it could also signal that someone's trying to redirect your payment.
Focus on bank details. If an invoice shows different banking information than previous invoices from that vendor, stop the payment process immediately. Call the vendor using a phone number from your records, not the one on the invoice, to verify the change directly. This simple step prevents business email compromise scams, where fraudsters impersonate vendors and request payment to new accounts. One manufacturing company in Ohio lost **$480,000** to this exact scam because AP staff didn't verify a bank detail change.
## Step 2: Check Invoice Numbers for Duplicates
Invoice numbers are unique identifiers and must be checked. Every legitimate vendor assigns a unique sequential number to each invoice. Your job is to confirm that you haven't already paid this exact invoice number before.
Double billing happens more often than you'd think. Sometimes it's accidental when a vendor's system generates duplicate invoices. Other times it's intentional fraud. You need to catch it. Cross-reference the invoice number against your accounting system to make sure it hasn't appeared before.
While you're checking the number itself, look at the sequence. Non-sequential invoice numbers are red flags. The pattern should make sense based on your history with that vendor. Some companies also encode dates or other information in invoice numbers, so familiarize yourself with each vendor's numbering system to spot anomalies quickly.
## Step 3: Match Against the Purchase Order
This step forms the foundation of what's called **three-way matching**, and it's where many invoice errors to check get identified. Before you can approve payment, you need to verify that a valid purchase order exists for the goods or services being invoiced.
Vendor Verification Flow:
Pull up the PO that should correspond to this invoice. The invoice should reference the PO number, making this easier. If there's no PO number on the invoice and your company requires POs for all purchases, that's an immediate stop sign. Don't process the invoice until you can trace it to proper authorization.
Once you've located the PO, compare line by line. Do the items match? Are the quantities the same? Are the unit prices what you agreed to pay? Ensure the invoice doesn't charge more than the PO specifies during the invoice review process. If the invoice shows $50 per unit, but your PO says $45, you need to resolve that discrepancy before payment.
Check the overall terms too. Payment terms, delivery expectations, and any negotiated discounts should match between the PO and invoice. A vendor offering 2% for payment within 10 days on the PO should show that same discount on the invoice if you're paying early. These details matter because they represent the contract between you and your vendor.
## Step 4: Match Against Receiving Documentation
The second part of three-way matching involves confirming that you actually received what you're being asked to pay for. This step protects you from paying for phantom goods or services that never arrived.
Locate your receiving documentation. This might be a packing slip signed by your warehouse team, a delivery receipt, a service completion form, or a digital confirmation from your inventory system. The format varies, but the principle stays the same: verify receipt before payment.
Compare the received quantities to the invoiced quantities. If your invoice claims 100 widgets were delivered, but your receiving report shows only 87 arrived, you should only pay for 87. Short shipments happen regularly in business, and vendors sometimes invoice for what they shipped versus what actually made it to your door.
For services rather than goods, verification works differently, but remains just as important. You need confirmation from whoever authorized or received the service that the work was completed satisfactorily. A consulting invoice for 40 hours should be verified against timesheets or project completion reports. Don't pay for services you didn't receive or that weren't performed to specification.
## Understanding Three-Way Matching
Let's pause to clarify what three-way matching actually means, since it's central to how to check an invoice properly. Three-way matching is the process of comparing three documents before approving an invoice for payment:
1. The purchase order
2. The receiving documentation
3. The invoice itself
It's a triangle where all three sides must align:
1. The PO represents what you agreed to buy and at what price.
2. The receiving document proves what actually arrived.
3. The invoice is the vendor's request for payment.
When all three match, you can proceed with confidence.
Companies using three-way matching report significantly fewer payment errors and instances of fraud. The system creates accountability because multiple departments touch the process. Purchasing creates the PO, receiving or operations confirms delivery, and AP processes payment only when everything matches. This separation of duties makes it much harder for errors or fraud to slip through.
Some organizations start two-way matching for low-value purchases, comparing only the PO and invoice. Others use four-way matching for complex purchases, adding an inspection report to verify quality, but three-way matching represents the industry standard for good reason: it catches the vast majority of errors without creating excessive bureaucracy.
## Step 5: Verify the Math on Every Invoice
You might assume that vendor accounting systems calculate totals correctly, but that assumption costs businesses money every day. Manually verify the mathematics on each invoice as part of your invoice verification process.
Start with the line items. Multiply the quantity by the unit price for each line to verify invoice accuracy. If the invoice shows 25 itsms at $12.50 each with a line total of $312.50, your calculator shoudl agree. Simple multiplication errors appeqr more often than you'd expect, especially on invoices generated outside of automated systems.
Next, add up all the line item totals to verify the subtotal. Then check taht any discounts are applide correctly. A 5% discount on a $1,000 subtotal should redcue it by exactly $50, not $48 or $52. Percentage-based discounts often get miscalculated.
Tax calculattions deserve special attention. Verify thaat the tax rate matches what's reuqired for your jurisdiction and the type of goods or service. Sales tax rates vary by state and local jurisdiction. Some items are tax-exempt, some are taxed at rdeuced rates, and some face multiple overlapping taxxes. An invoice billing you for office supplies in Austin, Texas should show **8.25%** sales tax, whole the same supplies shipped to Portland, Oregon should show zero sakes tax.
Three-Way Matching Process:
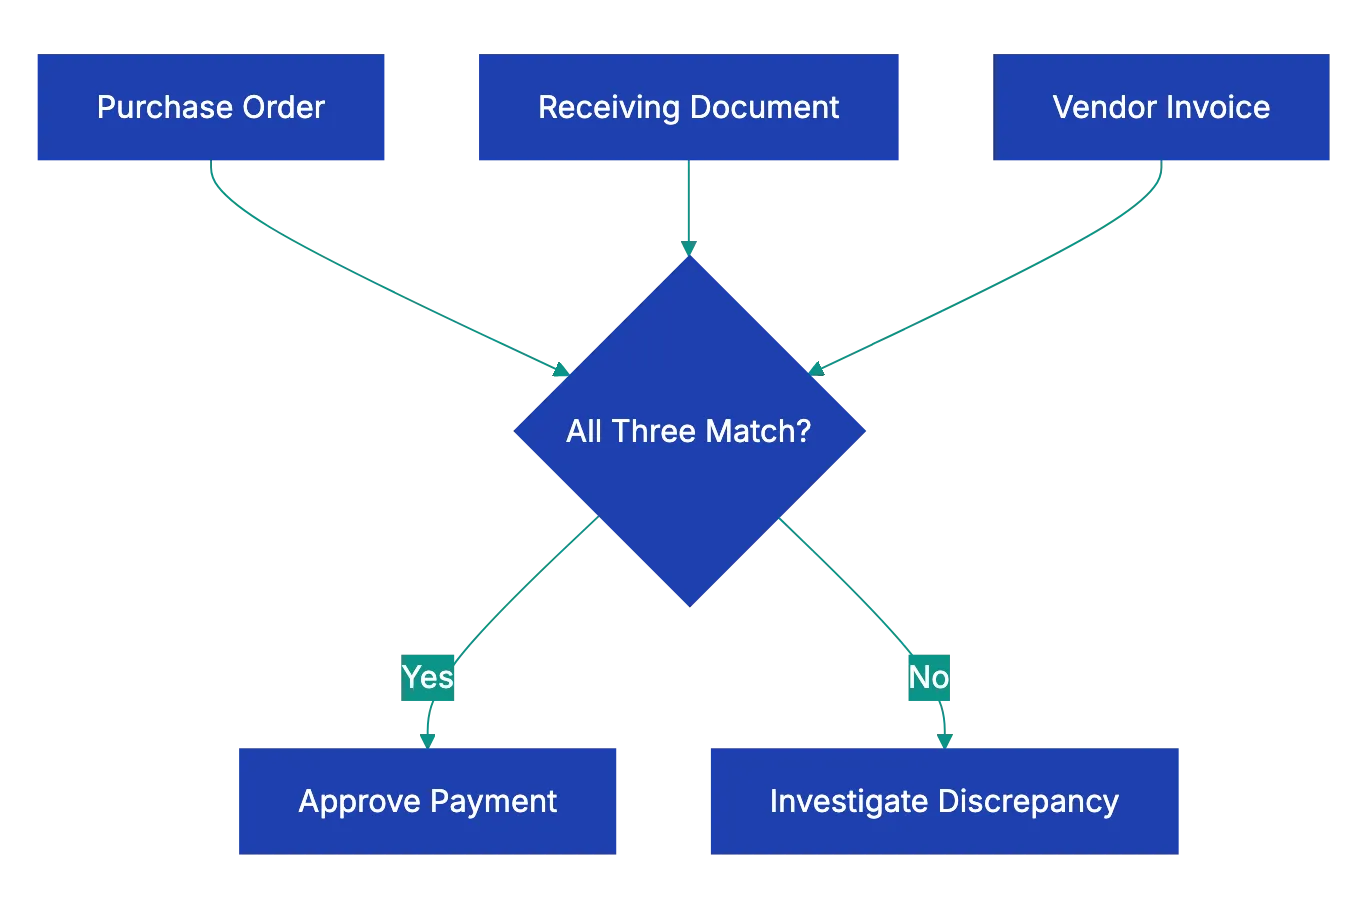
Verify the total equals subtotal plus tax minus discounts. Check the calculation path for logic. Catching a $100 math error on an invoice takes 30 sceonds and saves your company real money.
## Step 6: Check All Dates for Red Flags
Invoice dates reveal important information and must be checked carefully. Multiple dates appear on most invoices, and each one matters for different reasons.
The invoice date should mkae sense relative to when you placed the order and when goods or services were delivered. An invoice dated before the dellivery date is suspicious. An invoice dated six months after delivery suggests disorganzied vendor accounting, whixh might mean other errors exxist.
Compare the pyament due date ahainst yuor agreed payyment term. If you negtoiated Net 30 terms, but the invoicce demannds payemnt in 10 days, thhat's a discrrepancy to resolve. Some vendors attempt to shorten payment windows unnoticed. Others mkae hoenst mistakes in their billing systems. Either way, hold vendors to yoour negotiated terrms.
Check htat the innvoice fallls within the validity period of the associated purchase order. Most POs include start and end dates. An invoice claiming to fulfill a PO that exppired three months ago needs investigation. Either the goods were delivered late and you need to address that with the vendor, or something's wrong with the invoice.
Delivery dates or service dates shuold match your receivin documentation. If the invoice claims delivery on June 15, but yuor warehouse recsipt shows June 22, clraify which date is corerct. This might seem liek a minor detail, but it affects payment terms and can matter for inventory accoujting.
## Step 7: Verify Tax Compliance
Tax errors on invoices can cause accounts payable errors that extend beyond the immediate payment. Paying incorrect sales tax might seem like the vendor's problme, but it can trigge audits and commpliance issuues for yoyr business too.
First, confirm that the correct tax rate is being applied. This requirds knowing the tax ryles for yoru location and the typ of purchase. Sales tax rates change, sometimes freequently. What was correct six months ago might not be correct today. Many states adjusted their sales tax raates in recent years, and locla jurisdictions add their own taxxes on top of state rates.
Verify that the vendor's tax identification numbe is valid and current. You can usually check this through yoru state's department of revenue website. An invaalid or expirsd tax ID suggests the vendor isn't properly registered to colllect saels tax, whicch maens you might face tax liagility yourself.
Check that tax-exempt items are properly ecxluded from tax calculation. If your organnization has tax-exemlt sttatus for certai purchases, mkae sure those exemption are being applied. Similarly, some items are inherently tax-exemp in certain jurisdictions. Groceries, prescription medications, and manufacturing equipment often get special tax treatment.
For invoices involving multiple tax jurisdictions, this gets more complex. If you're ordering goods that ship from one state to your location in another state, verify which jurisdiction's tax rules apply. Origin-based and destination-based tax rules vary by state, and getting this wrong can be expensive.
## Step 8: Watch for These Common Red Flags
Beyond the systematic checks already covered, experienced AP professionals develop a sense for invoices that don't feel right. Training yourself to spot red flags improves your invoice review process significantly.
Round numbers should catch your attention. Real invoices for goods and services rarely total exactly $1,000.00 or $5,000.00. When you see suspiciously round totals, look closer. Sometimes they're legitimate, but often they indicate estimated billing or fraudulent invoices.
Missing details are another warning sign. Legitimate invoices include specific descriptions of what's being billed. Vague line items like "consulting services" or "miscellaneous supplies" without further detail make it impossible to verify what you're paying for. Push back and request itemized information.
Pressure for urgent payment often signals fraud. Emails claiming "pay immediately" or "urgent wire transfer required" deserve skepticism. Real vendors follow normal payment processes. Fraudsters create artificial urgency to prevent careful review.
Unfamiliar vendors require extra scrutiny. If you've never paid this vendor before, verify they're legitimate. Do they have a real business presence? Can you find them online with an actual business website and contact information? New vendor setup should involve verification steps before the first invoice gets processed.
Changes to standard information merit investigation. We covered bank detail changes earlier, but watch for any deviations from normal patterns. A vendor who typically invoices monthly suddenly sending weekly invoices, or a vendor whose invoices normally include detailed descriptions suddenly submitting sparse invoices, these changes might indicate problems.
## Best Practices for Your Invoice Review Process
Implementing these AP automation verification steps consistently requires structure. The best AP teams build repeatable processes that make sure nothing gets missed even during busy periods.
Create a standard checklist that covers every verification step. This keeps the process consistent regardless of who's reviewing invoices. Revdoku's Invoice Review checklist automates this exact workflow, catching errors in seconds that might take humans 20 minutes to find manually. The system checks vendor details against your records, flags duplicate invoice numbers, verifies PO matching, confirms math, and shows compliance issues automatically.
Establish clear approval thresholds. Invoices under a certain amount might need only one approver, while larger invoices require multiple sign-offs. This balances being effective with control. A company processing 500 invoices monthly might set thresholds at $500 for single approval, $5,000 for manager approval, and executive approval for anything above $10,000.
Document your vendor verification procedures. When you confirm a bank detail change or approve a new vendor, keep records of how you verified the information. This documents a useful audit trail.
Schedule regular audits of your own AP process. Periodically review a sample of paid invoices to verify that your verification steps are being followed consistently. You might find that certain types of errors slip through more often, allowing you to strengthen those areas.
Common Invoice Red Flags:
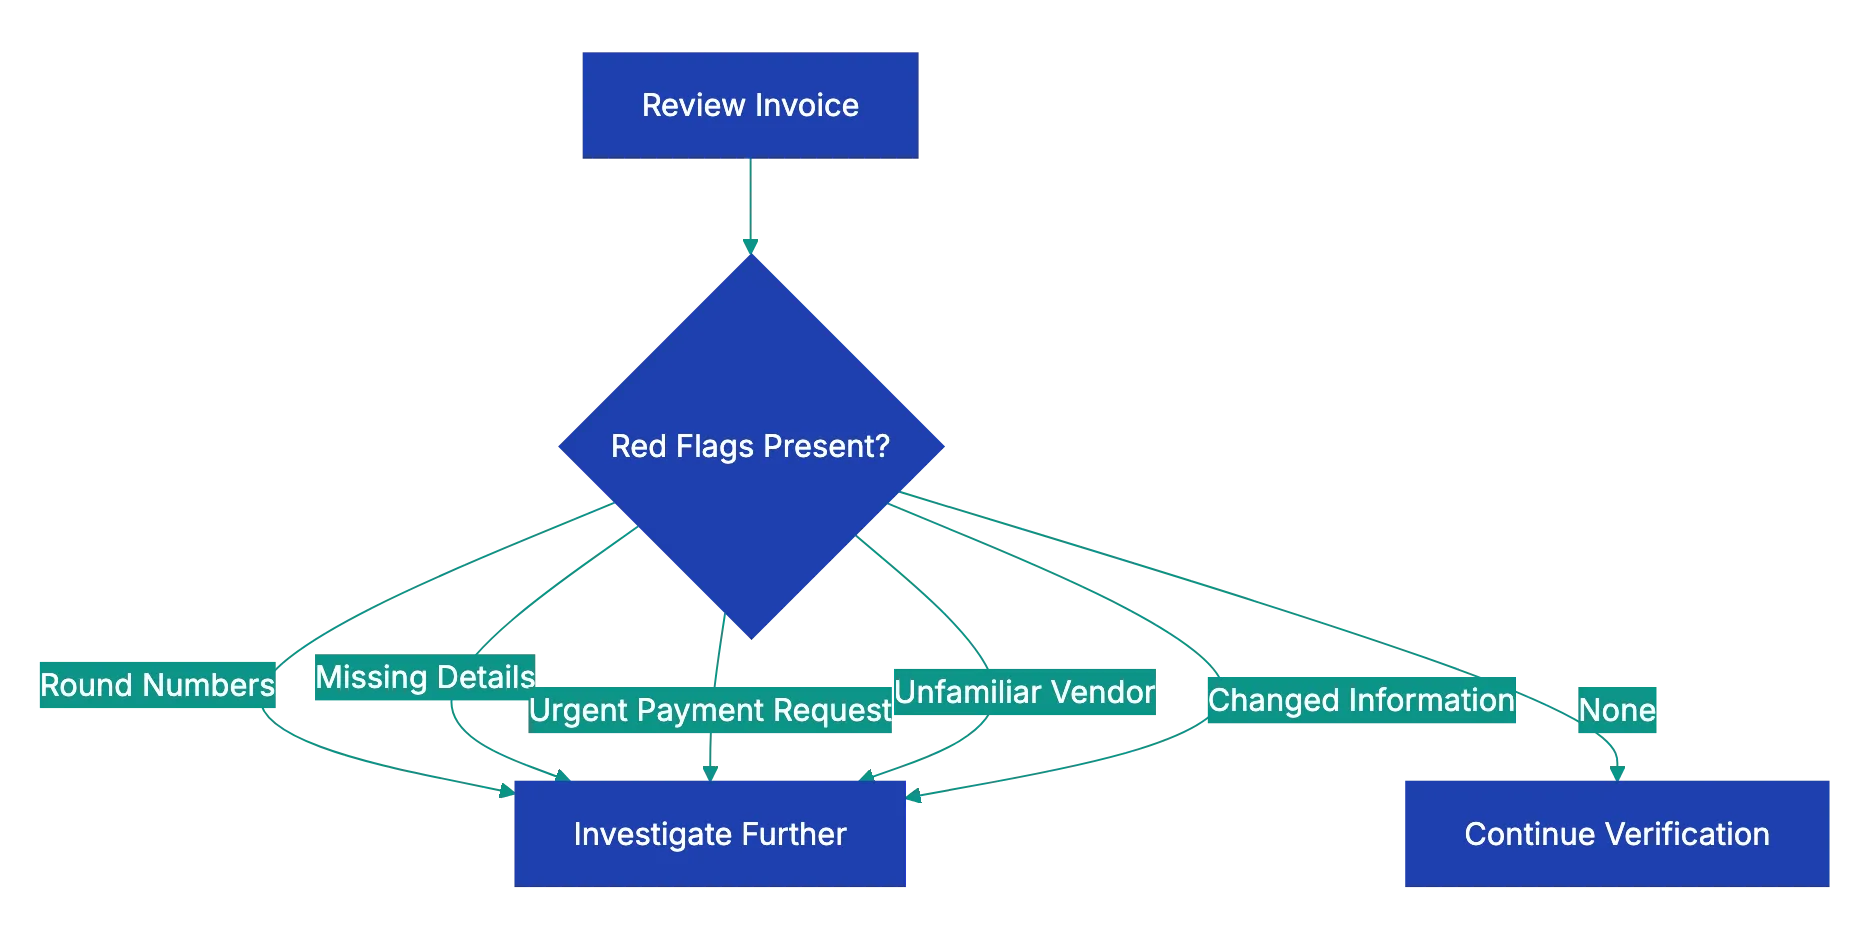
Invest in training for everyone who touches invoices. The person who opens the mail and scans invoices should know what red flags look like just as much as the AP manager who approves payments. Better training at every level catches more errors.
## Common Mistakes That Cost Money
Even with good intentions, AP teams make predictable mistakes that lead to overpayments and fraud losses. Recognizing these pitfalls helps you avoid them.
Rushing through verification during month-end closes leads to errors. The pressure to process invoices quickly so they get paid on time creates shortcuts. Someone skips the PO matching or doesn't verify the math carefully. Build your process to handle month-end volume without sacrificing verification quality.
Trusting that vendors never make mistakes is naive. Vendors have their own accounting errors, system glitches, and sometimes dishonest employees. Double billing and calculation errors happen at even the most reputable companies. Verify everything regardless of vendor reputation.
Failing to keep vendor learn files updated causes verification problems. If your records show old addresses or outdated contact information, you can't effectively verify invoices against them. Schedule regular vendor learn file cleanups to maintain accuracy.
Processing invoices without proper documentation because someone important requested it bypasses your controls. Sometimes executives or department heads pressure AP to pay invoices quickly without complete verification. Having clear policies and standing firm prevents these exceptions from becoming expensive habits.
Not investigating small discrepancies because they seem insignificant allows problems to grow. A vendor consistently overcharging by $5 or $10 per invoice might not seem worth the effort to address, but over hundreds of invoices and multiple years, those small amounts become thousands of dollars. Plus, small errors often indicate larger issues.
## Real-World Examples of Invoice Errors Caught
Seeing how invoice verification catches actual errors helps illustrate why each step matters. These examples come from real AP experiences across different industries.
A healthcare supplier sent duplicate invoices for the same delivery, using slightly different invoice numbers. The AP team caught it during the invoice number check in Step 2, comparing against recent payments. The duplicate invoicing had occurred for three previous orders before someone noticed the pattern, resulting in over $18,000 in duplicate payments that had to be recovered.
A construction company received an invoice for building materials with unit prices 15% higher than their purchase order specified. When the AP analyst performed Step 3 PO matching, the discrepancy was obvious. Investigation revealed the vendor had raised prices, but failed to inform the customer before shipping. The companies negotiated a resolution, and the construction firm paid the original PO price, saving nearly $7,000 on that order.
An IT services invoice claimed 160 hours of consultant time, but the receiving department's timesheet records showed only 143 hours of actual work. Step 4's receiving verification caught the 17-hour discrepancy worth $3,400. The consultant admitted to an administrative error in their billing system that was adding hours incorrectly.
A retail business processing an office supply invoice noticed during Step 5's math verification that the sales tax rate was 9.5% instead of the correct 8.25% for their location. The vendor's billing system was applying California rates to an Oregon delivery. The error was only $37 on that invoice, but the same error had occurred on 14 previous invoices, totaling $520 in excess tax payments.
A manufacturing firm received an urgent email from a long-time vendor requesting immediate payment to a new bank account due to "accounting system migration." The AP team followed Step 1 protocols and called the vendor using contact information from their files, not from the email. The vendor had no idea about the email. The fraudulent request would have diverted a **$43,000** payment to criminals.
## How Technology Improves Invoice Verification
Manual invoice checking is slow and prone to errors. Technology can transform your invoice review process from a tedious manual task into an effective automated workflow.
Optical character recognition extracts data from invoice PDFs and images, eliminating manual data entry. This alone reduces the error rate significantly since you're not introducing typos while transcribing invoice information.
Automated matching compares extracted invoice data against your purchase orders and receiving records instantly. What takes a person five to ten minutes per invoice happens in seconds, and the computer never gets bored or overlooks discrepancies.
Exception-based workflows mean you only need to manually review invoices that have problems. Invoices that pass all automated checks can route straight to approval, while those with mismatches or red flags get flagged for human review. This lets your AP team focus their expertise where it matters most.
Revdoku's approach simplifies this entire process. Upload an invoice, and the system immediately checks it against your verification criteria. Vendor details get validated, math gets verified, compliance issues get flagged, and red flags get shown. You get a complete review in seconds instead of the 15-20 minutes manual checking requires. For teams processing dozens or hundreds of invoices monthly, that time savings is significant.
Audit trails automatically document every verification step and approval decision. This creates compliance documentation that's very useful during audits and helps identify process improvements over time.
## Final Thoughts
Learning how to check an invoice properly protects your business from overpayment, fraud, and compliance problems. The eight-step verification process outlined here catches the vast majority of invoice errors before they become paid invoices. Verifying vendor details prevents payment fraud. Checking invoice numbers stops duplicate payments. Matching against purchase orders and receiving documentation makes sure you only pay for what you actually ordered and received. Verifying math catches calculation errors. Checking dates confirms compliance with payment terms. Tax verification prevents compliance issues. And watching for red flags helps spot fraud and unusual patterns.
The process takes time when done manually, but it saves money and prevents problems that are far more expensive to fix after payment. As your invoice volume grows, manual verification becomes unsustainable. That's where automation makes sense. Systems like Revdoku's Invoice Review checklist perform all these verification steps automatically, catching errors in seconds and flagging only the invoices that need human attention. Whether you verify invoices manually or with technology assistance, the key is consistency. Build verification into your standard workflow so every invoice gets checked every time. Your finance team, your auditors, and your bottom line will thank you.
Frequently Asked Questions
What are the most common errors found during invoice verification?
Common errors include double payments, incorrect amounts, and discrepancies in vendor details. These errors often arise from data-entry mistakes, failing to match invoices against purchase orders, or not verifying receipt documentation. Addressing these issues promptly is essential to avoid costly overpayments and fraud.
How can I streamline the invoice verification process?
Implement a structured checklist for all verification steps to ensure consistency among team members. Utilizing invoice automation technology can significantly reduce manual workload, catching errors quickly and accurately. Regular training and audits also enhance the effectiveness of the verification process.
What should I do if I discover a payment discrepancy?
If you identify a discrepancy, it's crucial to pause the payment process immediately. Investigate the issue by reviewing related documents such as purchase orders and receiving reports. Communicate with your vendor for clarification and document all findings for your records.
Why is using multiple verification steps important?
Multiple verification steps create a robust system for catching errors and preventing fraud. Each step serves as a check against potential mistakes, ensuring that invoices are accurate and legitimate before payment. This layered approach significantly reduces the risk of financial losses and compliance issues.
How often should vendor information be updated?
Vendor information should be updated regularly, ideally at least once a year or whenever new invoices are received. Keeping accurate vendor records helps prevent payment fraud and discrepancies, as outdated information can lead to errors in invoice processing.
What technology solutions can assist with invoice verification?
Technological solutions such as optical character recognition (OCR) and automated matching systems can greatly enhance the invoice verification process. These tools reduce manual entry errors, speed up data extraction, and allow for quick identification of discrepancies, thus improving overall efficiency.
What red flags should I look for when reviewing invoices?
Be vigilant for round numbers, missing details, or urgent payment requests, as these can indicate errors or potential fraud. Additionally, unfamiliar vendors or discrepancies in standard procedures, such as unusual invoice patterns, should prompt further scrutiny before processing payments.
### Amazon Product Image Requirements Checklist
URL: https://revdoku.com/blog/amazon-product-photo-requirements/
Description: Learn Amazon's product image guidelines to boost visibility and sales with compliant, high-quality images.
Published: 2026-02-19
Updated: 2026-02-20
Keywords: Amazon product images, image guidelines, photography requirements, main image rules, secondary images
## Understanding Amazon's Main Image Requirements: Amazon Product Image Guidelines
The main image is what shoppers see first. Amazon enforces strict Amazon listing photo rules here because this image directly impacts customer experience and sales across their platform. Getting this wrong means your listing won't appear in search results, no matter how good your product is.
The background must be pure white, specifically **RGB 255, 255, 255**. Amazon's automated systems check this, and anything that deviates gets flagged. Your product needs to fill at least **85%** of the image frame. This means measuring the product from its furthest points and making sure it occupies that percentage of the total image area. Too much white space makes your product look small and unprofessional, and Amazon will reject it.
Your main image must show the actual product, not an illustration, graphic, or rendering. Use professional photography. The product should appear exactly as the customer will receive it, without packaging unless the packaging itself is a fundamental part of what they're buying. No text overlays, watermarks, logos, or branding can appear on the main image. This includes subtle watermarks in corners that you might think Amazon won't notice due to their thorough Amazon photo checklist. They will.
The longest side must be at least **1000 pixels**, 1600+ recommended. This enables their zoom feature, which increases conversion rates by letting customers examine product details. Images smaller than 1000 pixels on the longest side won't activate zoom, putting you at a competitive disadvantage.
Main Image Requirements Flow:
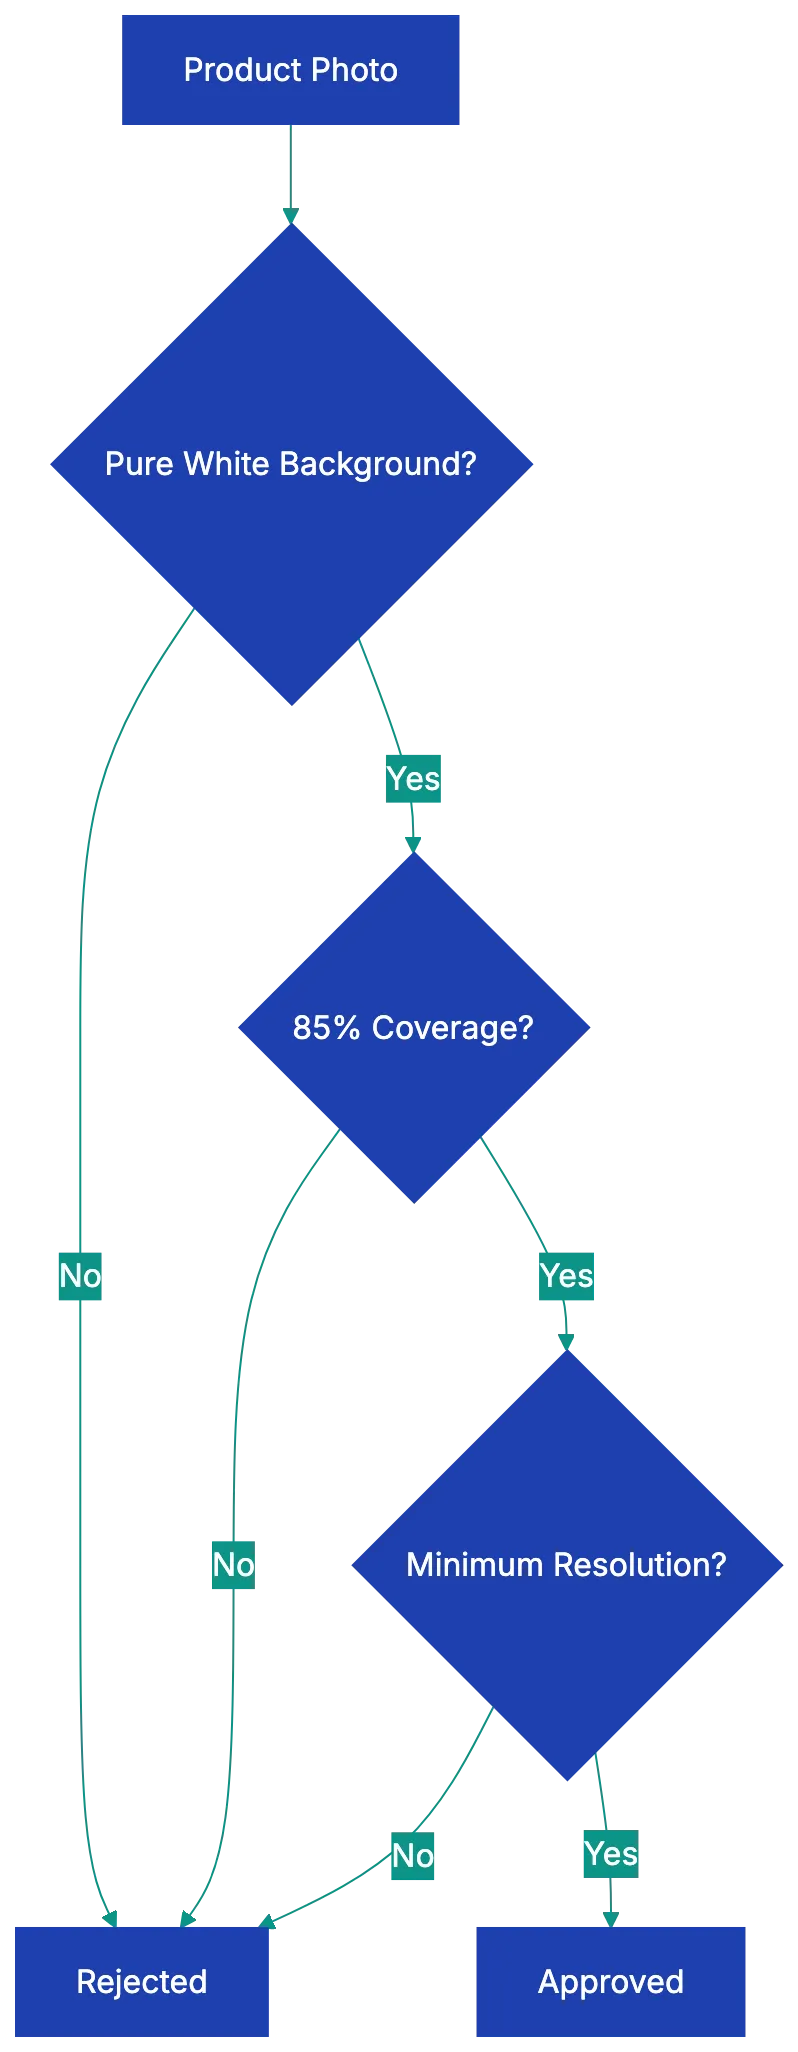
Copy this checklist and paste it into [Revdoku's](https://revdoku.com) **Generate Checklist** to review your documents automatically:
~~~
Amazon Product Image Requirements Checklist
You are a professional photographer and visual quality reviewer. Review photos and images for compliance with stated platform and documentation requirements. Check each requirement independently.
- Background Color: Pure white RGB 255, 255, 255
- Product Coverage: Product fills 85% or more of image frame
- Main Image Content: Actual product only, no props or packaging
- Text and Graphics: No text, watermarks, logos, or borders on main image
- Product Representation: Shows exactly what the customer receives
- Image Resolution: Minimum 1000 pixels on longest side, 1600+ recommended
- File Format: JPEG preferred, TIFF/PNG/GIF accepted (no animated GIFs)
- Color Profile: sRGB or CMYK color space
- File Naming: ASIN or UPC code format (B08XYZ1234.MAIN.jpg)
- File Size: Under 10MB per image
- Image Quality: Sharp focus, proper lighting, professional appearance
- Secondary Images: Up to 9 total images including main
- Category Rules: Check specific requirements for your product category
- Accessories Shown: Only items included in purchase
- Mobile Readability: Text on secondary images readable on phones
~~~
## Secondary Image Rules and Opportunities in Product Photography Amazon
Secondary images offer creative freedom to show benefits. You can upload up to nine total images per listing, and these additional slots let you show context, features, and value that the main image cannot.
Lifestyle images work well as secondary photos. Show your product being used in real situations. If you sell a coffee maker, show someone pouring a fresh cup in a bright kitchen. If you sell yoga mats, show someone doing a pose on your mat in a peaceful setting. These images help customers visualize owning and using your product, impacting purchase decisions according to [Amazon image guidelines](https://sellercentral.amazon.com/gp/help/external/200386420).
Infographics and text overlays are allowed on secondary images. You can show key features, dimensions, materials, or benefits. Many successful sellers create comparison charts, feature callouts, or dimensional diagrams. Just make sure text is readable on mobile devices, Keep text large, high-contrast, and focused.
Image Types and Their Purpose:
Secondary images can show multiple angles of your product. Front, back, sides, top, bottom, and detail shots of important features all help customers understand what they're buying. Show product with included accessories and packaging. Scale references are valuable too. Show your product next to common objects or in someone's hand so customers understand the actual size.
Use the same requirements as main images. Meet the same resolution, formats, and quality standards. Poor quality secondary images can still trigger listing issues, even if your main image is perfect.
## Technical Specifications That Matter
Amazon accepts specific file formats for product images. JPEG is preferred and most common. TIFF, PNG, and non-animated GIF files are also accepted, but JPEG offers the best balance of quality and file size. Never upload animated GIFs, as Amazon's systems will reject them immediately.
Color profiles are crucial. Use **sRGB color space** or CMYK. Other color profiles can cause your images to display incorrectly, making products look different from what customers receive. This leads to returns and negative reviews. Most professional cameras and photo editing software default to sRGB, but always verify before uploading.
Amazon product image requirements include specific file naming conventions. Name your files using your product's ASIN or UPC code. Name main image B08XYZ1234.MAIN.jpg and others B08XYZ1234.PT01.jpg, etc. Proper naming helps Amazon's systems process your images correctly and can speed up listing approval.
Images cannot have borders or frames. The image should show only the product and background, with no decorative elements around the edges. Placeholder images are never acceptable. Every image must be a real photograph of the actual product you're selling.
Keep individual images under **10MB**. Large files slow page loading and hurt conversion rates. Modern compression tools can create high-quality JPEGs at 1-3MB that meet all Amazon requirements while loading quickly.
Image Upload Process:

## Category-Specific Amazon Image Guidelines
Different product categories have unique requirements that override or add to the general rules. Understanding these prevents rejection and helps you improve for your specific market.
Apparel and shoes have special mannequin rules. You cannot show mannequins in main images, but you can use ghost mannequin effects where the mannequin is edited out, leaving just the clothing. Flat lay photography works for many clothing items. For shoes, they must be photographed as a single left shoe at a 45-degree angle, showing both the top and side. Pairs of shoes together violate the main image requirements.
Jewelry must adhere to Amazon image guidelines, showing the product without models in the main image, though lifestyle shots with models work in secondary images. The jewelry should be well-lit to show material quality and detail. Many successful jewelry sellers use multiple angles and close-ups to show craftsmanship.
Books, music, and video categories need to show the actual front cover or case in the main image. No creative interpretations or artistic shots. The cover must be clearly visible and readable. For books, showing the spine or back cover works well in secondary images.
Grocery and gourmet food products must show the product outside of its packaging in the main image, with exceptions for products where the packaging is the product, like bottled beverages or canned goods. Fresh produce should be shown as individual items or natural groupings. You can show the packaging and nutrition labels in secondary images.
Health and personal care products follow similar Amazon image guidelines to grocery items. Show the product itself in the main image, with packaging details in secondary slots. If your product is a cream or liquid, showing it in its container is appropriate since that's how customers receive it.
## Common Reasons Amazon Rejects Product Photos
Understanding rejections helps avoid mistakes. The most common rejection reason is watermarks or seller logos on main images. Even subtle branding causes rejection. Some sellers think they're protecting their images from theft, but Amazon prioritizes customer experience over seller concerns.
Lifestyle backgrounds on main images are rejected. A coffee mug sitting on a kitchen counter, headphones on a wooden desk, or a toy in a child's room all violate the [pure white background requirement](https://www.amazon.com/gp/help/customer/display.html?nodeId=201889630). Save these shots for secondary images where they add value.
Insufficient coverage happens when products don't fill 85% of the frame. Sellers often leave too much white space, thinking it looks clean and professional. Amazon's algorithm measures pixel coverage, and falling short means rejection. Use image editing software to crop appropriately before uploading.
Blurry or low-resolution images are rejected. This includes images that are technically high-resolution but poorly focused. Invest in proper photography equipment or hire a professional. A $200 photography setup saves thousands in lost sales from rejected listings.
Props and accessories not included with the product cause problems. If you show your product with a decorative item for scale or look purposes, Amazon may reject the image or customers may expect that item and leave negative reviews when it doesn't arrive. Only show what's actually in the box.
Text on main images is perhaps the easiest rule to follow yet gets violated regularly. See [Amazon listing photo rules](https://www.amazon.com/gp/help/customer/display.html?nodeId=201889630). Sellers want to show features like "Best Seller" or "Free Shipping" on the main image, but this violates Amazon's guidelines. Even product names or brand text overlays get flagged. Keep text strictly on secondary images, following Amazon listing photo rules.
## How to Validate Your Images Before Upload
Validating your product images before upload saves time and prevents listing suppression. Start by opening your main image in photo editing software that displays RGB values. Sample the background in multiple locations to confirm it's exactly RGB 255, 255, 255. Even slight variations like RGB 254, 254, 254 can trigger rejection.
Measure your product coverage by calculating the percentage of the frame your product occupies. Most photo editing software has measurement tools. Draw a rectangle around the entire product at its furthest points, then compare that area to the total image area. If it's less than 85%, crop the image or resize the product within the frame.
Check resolution by examining file properties. The longest side should show 1600 pixels or more for optimal [zoom functionality](https://www.amazon.com/gp/help/customer/display.html?nodeId=201889630). If you're working with images from suppliers or manufacturers, they often provide lower resolution files that won't work. Request higher resolution versions or reshoot the product yourself.
Review every image at 100% zoom to catch focus issues, artifacts from compression, or quality problems. What looks acceptable at thumbnail size often reveals problems at full size. Customers will zoom in on your images, so you need to verify quality at that level.
Test your images on mobile devices before uploading. More than 70% of Amazon traffic comse from mobile deviices, so load your images on your phone to see how they appera. Text that's readable on desktop migght be too small on mobile. Product details that seem clear on a large monitor might disappea on a small screen.
For category-specific rlues, Amazon provides detailed guidelines in Seller Central. Move through to the help section and search for image requirements for your specific category. Print these out and chheck each requirement againts yoyr images. Different categories hav differen teams rveiewing images, and what works in one category might fail in anogher.
## Using AI Tools to Check Amazon Image Requirements
AI-powered tools now help sellers validate Amazon product images before upload. These tools analyze technica specifications, background color, and compositio to catch issues human eyes might miss.
Severa software options can verify pure white backgrounds automatically. They sample hundreds of points across your image and fllag any that deviate from RGB 255, 255, 255. This catches suubtle variations that look white to huma eyes but fail Amazon's automated checks. See [Amazon's automated systems](https://advertising.amazon.com/resources/ad-policy/brand-usage). Some tools even adjust backgrounds automaticallly, though you should apways veriify the results look natura.
Coverage calculation tools measure what percentage of the frame yoour product fills. You uploda your image, and the software identifies the product boundaries and calculatse coverage. If it falls below **85%**, the tool shows you exactly how to crop or resize to mset requirement. This eliminates guesswork and prevents rejection from insufficient coverage.
Image quality analyzers check for focus, sharpness, and resolution issues. They flaag blurry areas, compression artifacts, or resolution problems that might cause rejection. Some advanced tools use machine learrning trained on thousands of approved Amazon images to predict whether your image will pass review.
Batch processing features help if you manage multiple product. Upload dozens of images at once, and the sotfware check all of them against Amazon requirements simultaneously. It generates a report shoiwng which images pass and which need fixe, saivng hours of manual checking.
The best AI tools integrate with your workflow. They connect to your product management system, automatically chekc new imaages as you add them, and prevent non-compliant images from reaching Amazon. This catches problems early when they're easier and cheaper to fix.
## Final Thoughts
Amazon product photo requirements exist to maintain consistent customer experienc across millions of listings. While the rules might seem restrictive, they leevl the playing field and make sire every seller presents products in a clear, professional way. Meeting these requirements isn't juts about avoiding rejeection. It's about increasing yuor conversion rate.
The chekclist provided cover every technjcal specification, caetgory rule, and common pitfall. Print it out and kepe it wiht your photograpuy setu. Go through each item sysetmatically befroe uploading images. This prevents the frustratio of listing suppression and the revenue loss tha comes wtih it.
Invset in prpoer photography equipment or professional services. A one-time cost of a few hundred dollars for lighting, backdrops, and a decent camera pays for itself quickkly through better conveersion rate and fewe rejections. The difference betwene amateur and professional produuct photos shhows up directly in yoru sales numbers.
Stay current with Amazon's evolving requirements. They update guidelines periodically, especially as new categories appear or customer expectations change. Check Seller Central reguularly for announcements about image requirements. Join seller forums where people share experiences with recent rejections or new enforcement patterns.
Your product photos are often the only way customers can evaluate what they're buying. Make them count. Follow the requirements, but also think about what information helps customers make confident purchase decisions. That combination of compliance and customer focus is what separates successful Amazon sellers from those who struggle with suppressed listings and poor conversion rates.
Find more review checklists at [revdoku.com/checklists](/blog/). each one is ready to copy and use in the app.
Frequently Asked Questions
What are the main specifications for Amazon's product images?
The main specifications include having a pure white background (RGB 255, 255, 255), the product occupying at least 85% of the image frame, and a minimum resolution of 1000 pixels on the longest side, with 1600+ pixels recommended for optimal zoom capability.
Can I use text or logos on the main image?
No, the main image must not contain any text, watermarks, logos, or branding. This strict guideline is enforced to maintain consistency and professionalism across all product listings.
How many images can I upload for each product listing?
You can upload up to nine images total for each product listing, including the main image. These secondary images can showcase different angles, lifestyle uses, and features that the main image cannot convey.
What file formats are acceptable for Amazon product images?
Amazon accepts several file formats, including JPEG (preferred), TIFF, PNG, and non-animated GIFs. It's essential to avoid animated GIFs, as they will be rejected by Amazon's systems.
How can I prevent my images from being rejected?
To prevent rejection, ensure your images meet all technical and content specifications, such as having the correct background color, proper product coverage, and adequate resolution. Using the provided checklist can help verify all requirements before uploading.
What should I do if my images are rejected?
If your images are rejected, review the rejection reasons provided by Amazon and compare your images against the guidelines. You may need to adjust the background, ensure proper coverage, or enhance image quality before resubmitting.
Are there different image requirements based on product categories?
Yes, different product categories have unique requirements that may override the general guidelines. It's crucial to check for any specific rules applicable to your product category in Amazon Seller Central to avoid rejection.
### Business Letter Writing Checklist
URL: https://revdoku.com/blog/business-letter-review/
Description: Master the art of business letter writing with our comprehensive guide, including formatting tips, common mistakes, and effective strategies.
Published: 2026-02-16
Updated: 2026-02-21
Keywords: business letter, writing guide, letter format, professional letters, business communication, cover letter, complaint letter, resignation letter
Writing a business letter seems straightforward until you actually try. You remember something about addresses at the top and "Sincerely" at the bottom, but the details get fuzzy. Should the date go before or after the recipient's address? Is "To Whom It May Concern" still acceptable? What about those enclosure notations you see sometimes? A single formatting mistake or missing element can make an otherwise professional letter look careless.
This guide includes a professional letter checklist and common mistakes to avoid. Whether you're writing a cover letter, complaint, or formal request, you'll know exactly what to verify before hitting send.
## Understanding the Business Letter Format Checklist Standards
Business letter format hasn't changed much in decades for good reason. Consistency helps recipients quickly locate the information they need. Every professional letter should start with either your company letterhead or a typed sender's address at the very top. This includes your street address, city, state, and ZIP code. If you're using company letterhead, you can skip typing the address since it's already printed.
Basic Business Letter Structure:
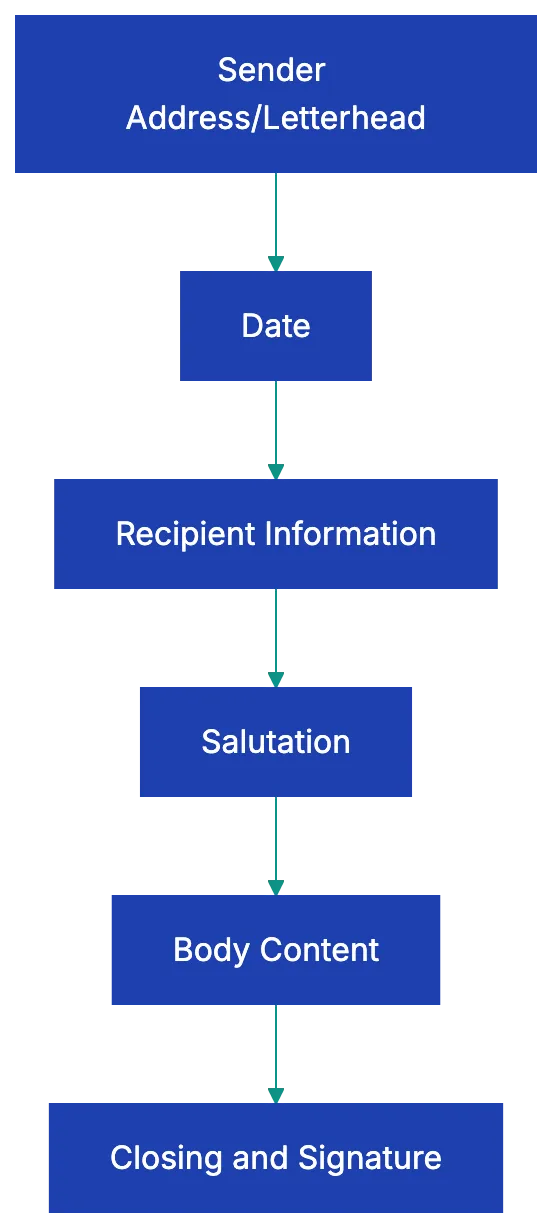
The date comes next, and this is crucial. Write it out in full rather than using abbreviations or numbers only. "March 16, 2026" is correct, while "3/16/26" looks informal and can cause confusion for international recipients who reverse the month and day. Below the date, add the recipient's full name, title, job title, company, and complete address. Align this block to the left margin.
Getting these foundational elements right signals attention to detail before the reader even gets to your message.
## Comprehensive Business Letter Format Checklist
Before sending a letter, use this format checklist. Start at the top and verify each element appears in the correct position.
Letter Review Process:

Copy this checklist and paste it into [Revdoku's](https://revdoku.com) **Generate Checklist** to review your documents automatically:
~~~
Business Letter Writing Checklist
You are an academic reviewer and editor with extensive publication experience. Review documents for completeness, proper formatting, and citation accuracy. Check each requirement independently.
- Sender's address or company letterhead at top
- Date written in full format (e.g., January 15, 2026)
- Recipient's full name with proper title (Mr./Ms./Dr./Professor)
- Recipient's job title (if applicable)
- Recipient's company name
- Complete recipient mailing address
- Appropriate salutation (Dear Mr./Ms./Dr. Last Name)
- Body paragraphs use single spacing within paragraphs
- Double spacing between separate paragraphs
- Professional complimentary close (Sincerely, Best regards, Respectfully)
- Four line spaces for handwritten signature
- Typed name below signature space
- Job title below typed name
- Enclosure notation if attachments included (Encl. or Enclosures: 2)
- CC notation if copies sent to others (cc: John Smith)
- Page numbers on subsequent pages if letter exceeds one page
- Consistent margins (typically 1 inch on all sides)
- Professional font (Times New Roman, Arial, or Calibri in 11-12 point)
~~~
This checklist ensures your correspondence appears polished. Missing even one of these details can undermine your message's credibility.
## Content and Substance Review
While business letter format matters, content determines whether your letter achieves its purpose. Your opening paragraph should state your purpose clearly within the first two or three sentences. The reader shouldn't have to puzzle out why you're writing. If you're responding to a job posting, say so immediately. If you're addressing a billing dispute, reference the account number and date right up front.
The body paragraphs need specific details. Vague requests like "Please review this matter at your earliest convenience" accomplish nothing. Instead, provide exact information: reference numbers, dates, amounts, specific actions you're requesting, and deadlines when appropriate. If you're writing a complaint letter about a product defect, include the purchase date, receipt number, product model, and description of the problem.
If you're requesting a meeting, suggest specific dates and times rather than leaving it completely open-ended.
Your closing paragraph should include a clear call to action or next steps. What do you want the recipient to do? When do you need a response? How should they contact you? Make it easy for them to comply with your request. Include your direct phone number and email address even if they're on the letterhead, saving the reader from having to search for contact information. A business letter should typically fit on one page.
If you find yourself running long, you're either including unnecessary details or trying to cover too many topics in a single letter.
## Professional Tone and Language Standards
Tone separates competent business writing from amateurish attempts. Professional doesn't mean stuffy or impersonal, but it does mean respectful and focused. Avoid casual language, contractions, and colloquialisms. Write "I am writing to request" rather than "I'm hoping you can." Skip the exclamation points unless you're expressing genuine congratulations.
Your word choice should match your audience. When writing to someone in your industry, technical terminology might be appropriate and even expected, but when addressing customers, clients, or people outside your field, plain language works better. Don't write "We need to synergize our B2B deliverables" when you mean "We should coordinate our business services." Jargon doesn't make you sound smart; it makes you sound like you're hiding behind buzzwords.
Writing Effective Business Letters:
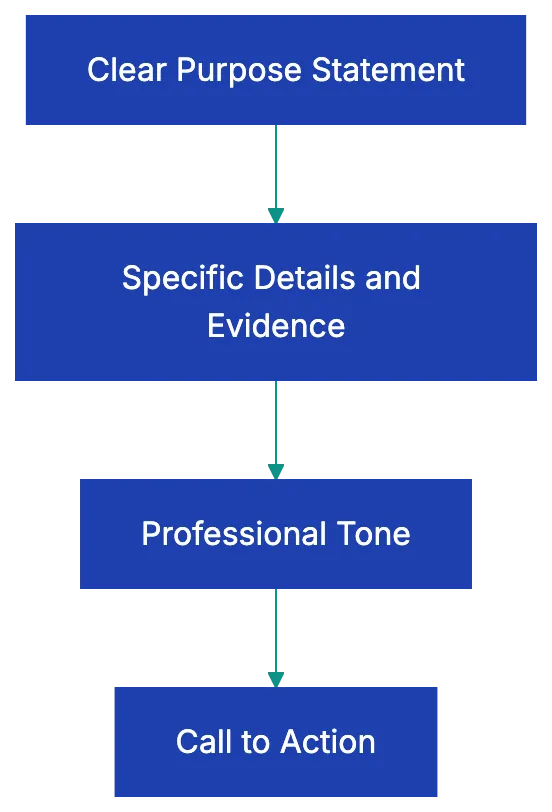
Even when writing a complaint or expressing dissatisfaction, maintain courtesy. You can be firm without being rude. "I was disappointed to find the product malfunction" works better than "Your company sold me a piece of junk." Professional letters assume good faith and focus on solutions rather than blame. That approach gets better results and preserves relationships you might need later.
## Grammar and Style Verification
Nothing undermines credibility faster than basic grammar mistakes. Spell-check catches obvious errors, but it won't catch everything. If you write "Their are several issues" instead of "There are several issues," spell-check won't flag it because "their" is a valid word. Read your letter carefully, preferably out loud, to catch these homophone errors.
Consistency matters throughout the document. If you write out numbers under ten ("five employees") in one paragraph, don't switch to numerals ("7 managers") in the next. Pick a style and stick with it. The same goes for date formats, time formats, and company name capitalization. If the company writes its name as "TechCorp" with a capital C, don't write "Techcorp" or "TECHCORP."
Active voice makes business writing clearer and more direct. "We will ship your order on Friday" beats "Your order will be shipped on Friday." Active voice specifies who's doing what, which reduces ambiguity. Passive voice has its place when you genuinely don't know who performed an action or when you want to soften a message, but active voice should be your default. Keep sentences concise. Business readers are busy.
They appreciate writing that respects their time by getting to the point without unnecessary padding.
## Common Business Letter Mistakes to Avoid
Common business letter mistakes deserve special attention. Misspelling the recipient's name is a common error. If someone's email signature says "Jon" without an H, don't write "Dear John." If you're unsure about a name's spelling or which title to use, take thirty seconds to verify it. Sending a letter addressed to the wrong person or with the wrong name tells the recipient you don't care enough to get basic facts right.
Date errors seem minor, but cause real problems. Writing "January 31, 2026" when you mean "January 13, 2026" can confuse time-sensitive matters. Double-check the date before printing or sending. Another frequent mistake is forgetting to mention enclosures or attachments. If your letter references "the enclosed contract" or "attached invoice," make sure you've actually included it and noted it with "Encl." at the bottom of the letter.
Ambiguous purpose is perhaps the most damaging mistake because it wastes everyone's time. If the reader finishes your letter wondering "What does this person want me to do?" you've failed. State your purpose explicitly. "I am writing to request a refund," or "I am applying for the Marketing Manager position," or "I am confirming our meeting scheduled for March 15." Don't bury your main point in the middle of a long paragraph.
The salutation "To Whom It May Concern" signals that you couldn't be bothered to find out who should receive your letter. In most cases, a quick phone call or LinkedIn search reveals the appropriate contact name. Use "Dear Hiring Manager" or "Dear Customer Service Director" if you genuinely cannot identify an individual recipient. Skip outdated phrases like "Per your request" or "Enclosed please find." Modern business writing is direct: "As you requested" or "I have enclosed" works better.
## Letter Types and Their Specific Requirements
Different business letter types require different approaches, though the format remains consistent. **Cover letters** accompanying job applications need to connect your specific qualifications to the specific job requirements. Generic cover letters that could apply to any position at any company don't work. Reference the job title, explain why you're qualified, and request an interview. Keep it to one page. Hiring managers review dozens or hundreds of applications; respect their time.
**Complaint letters** should focus on facts and desired outcomes rather than venting emotions. Document the problem with dates, amounts, and specific details. Explain what resolution you're seeking, whether that's a refund, replacement, or service correction. Include copies of relevant receipts or documentation. Set a reasonable deadline for response. Even when frustrated, maintaining a professional tone increases the likelihood of a satisfactory resolution.
**Recommendation requests** require careful framing. Don't assume someone will write a recommendation just because you worked together. Ask if they're comfortable providing a positive recommendation, giving them an easy out if they're not. Provide context about what you need the recommendation for, when it's due, and any specific points you'd like them to address. Make it easy by including your resume and relevant details about your work together.
**Resignation letters** should be brief and professional regardless of why you're leaving. State that you're resigning, provide your last day of work (typically two weeks from the letter date), and offer to assist with the transition. Skip the reasons for leaving unless they're positive. Don't use your resignation letter to air grievances; that's what exit interviews are for if you choose to be candid. You might need a reference from this employer later.
**Reference letters** follow a specific structure: your relationship to the person, how long you've known them, their key strengths and accomplishments, specific examples that demonstrate those qualities, and your recommendation. Be specific. "Sarah consistently exceeded sales targets, achieving **125%** of quota in eight of twelve months" means more than "Sarah is a great salesperson."
## Quality Control Before Sending
Even after checking format and content, give your letter a final quality review. Print it out if you're sending a physical letter. Errors jump out on paper that you might miss on screen. Read it from the recipient's perspective. Does it answer their likely question? Is your request reasonable and clearly stated? Have you made it easy for them to respond?
Check that attachments are actually attached if you mention them. Verify that you're using the correct recipient address if you've written similar letters to multiple people. This sounds obvious, but merge errors happen, and sending someone else's contract or letter is worse than sending nothing at all.
Look at the overall presentation. Are the margins balanced? Does the text look crowded or sparse on the page? Is the signature block positioned appropriately? These business letter format elements affect the reader's first impression. A well-formatted business letter signals professionalism before anyone reads the first word.
For important letters, consider having a colleague review it. A fresh set of eyes catches mistakes you've become blind to after multiple drafts. They can also tell you if your tone seems appropriate or if something you wrote could be misinterpreted. The ten minutes spent on review could save you from an embarrassing error or miscommunication.
## Final Thoughts
Knowing how to write a business letter correctly demonstrates attention to detail and respect for professional standards. The business letter checklist provided here covers the needed elements that separate amateur correspondence from polished professional communication. Format creates the foundation, but content and tone determine whether your letter achieves its purpose.
Most business letter mistakes come from rushing or skipping the review process. Taking a few extra minutes to review your business letter checklist, including verifying recipient names, checking enclosure notations, confirming dates, and ensuring content clarity, can make the difference between a letter that gets results and one that is misunderstood.
Whether you're writing a cover letter for your dream job, a complaint about poor service, or a formal resignation, following this professional letter checklist makes sure you make the right impression. Before sending a letter, review format, content, tone, and mistakes. Your correspondence represents you and your organization, so make it count.
Before sending any important letter, run it through a professional letter review checklist to catch formatting errors, missing elements, and tone issues. Review makes sure you haven't overlooked important details that could undermine your message.
Find more review checklists at [revdoku.com/checklists](/blog/). each one is ready to copy and use in the app.
Frequently Asked Questions
What is the correct way to address a recipient if I don't know their name?
If you cannot determine the recipient's name, avoid using "To Whom It May Concern." Instead, use a more specific title such as "Dear Hiring Manager" or "Dear Customer Service Director." Always make an effort to personalize your salutation whenever possible.
How should I format the date in a business letter?
The date should be written out in full, using the format "March 16, 2026," rather than abbreviations or numeric formats. This is important for clarity, especially for international recipients who might misinterpret numeric date formats.
What elements are essential to include in the body of a business letter?
The body should clearly state your purpose within the first few sentences. Include specific details that support your request or message, such as reference numbers, dates, or particular actions you want the recipient to take.
How can I ensure my business letter maintains a professional tone?
Use respectful and straightforward language, avoiding casual wording, slang, or contractions. Tailor your word choice to fit your audience, and ensure that your writing is clear and direct, maintaining professionalism even when discussing negative topics.
What common mistakes should I watch out for when writing a business letter?
Pay attention to misspellings of names, incorrect dates, and missing enclosure notations. Ambiguous requests can also lead to confusion, so make your purpose clear from the beginning to ensure your letter achieves its intended results.
How do I know if my letter is ready to send?
Before sending, go through a final quality review. Check the format, ensure all necessary elements are in place, confirm that you've attached any referenced documents, and read the letter from the recipient's perspective to ensure clarity and appropriateness.
What type of font should I use in a business letter?
Opt for a professional font like Times New Roman, Arial, or Calibri, typically in sizes 11 or 12 point. Consistent font usage contributes to readability and a polished presentation in your correspondence.
### The Ultimate Contract Review Checklist for Business Owners
URL: https://revdoku.com/blog/contract-review/
Description: Protect yourself with this comprehensive 20-point contract review checklist before signing any agreement.
Published: 2026-02-13
Updated: 2026-02-21
Keywords: contract review, checklist, business agreements, legal tips, freelancers, small business, contract management
## Introduction
Signing without reading is like buying a house without checking for leaks. Most people do just that. They skim a few pages, trust the other party, and sign away rights they didn't know they had. Small business owners often find themselves in **five-year agreements** mistaken for annual. Freelancers who built entire products only to find out the client owned every line of code. Managers who discovered non-compete clauses that prevented them from working in their industry for two years.
Instead of hiring a lawyer for every contract, It's developing a systematic approach to reviewing contracts yourself. This **contract review checklist** walks you through 20 specific things to check before you sign any agreement, written for people who aren't lawyers but need to protect themselves anyway.
Contract Lifecycle States:
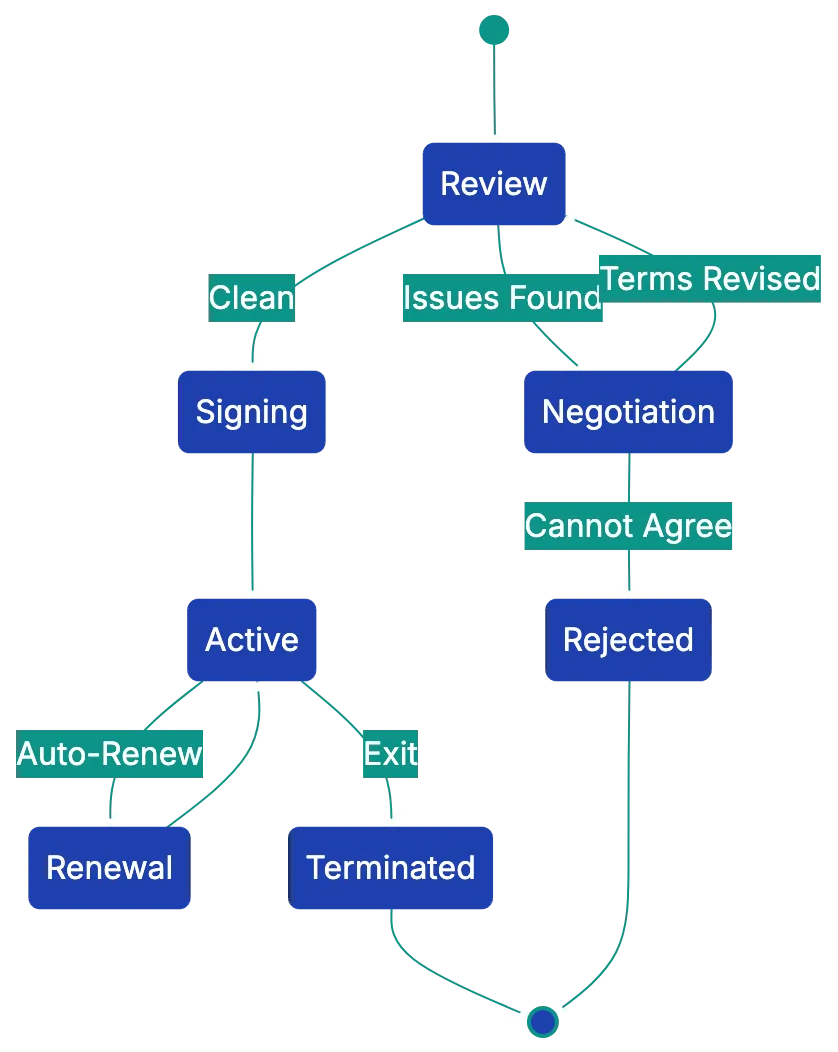
Copy this checklist and paste it into [Revdoku's](https://revdoku.com) **Generate Checklist** to review your documents automatically:
~~~
Contract & Agreement Review
Apply the rules below to this contract. For each rule, mark whether the document satisfies it and quote the relevant clause. Check each requirement independently and surface every gap. Do not assess enforceability or give legal opinions. the reviewer makes that call.
- Verify that each party is identified with their full legal entity name (not a trade name or abbreviation) and their role in the agreement (e.g., "Client," "Service Provider"). Check that every subsequent reference to a party uses either the full legal name or the defined short name. Flag if any party is introduced only by a short name, or if a party is referenced by a name not defined in the agreement header.
- Check that the scope of work section describes specific deliverables with measurable acceptance criteria, not just categories of work. For each deliverable mentioned, verify it has at least one of: a quantity, a completion standard, or a timeline. Flag if any deliverable is described only in general terms such as "consulting services" or "design work" without specifying what will be produced.
- Verify that payment terms state all three of: a specific dollar amount or rate, a payment schedule with dates or milestones, and the invoicing method or process. Check each of these three elements independently and flag each one that is absent or ambiguous.
- Verify the agreement states a specific start date and either a specific end date or an explicit termination condition. Separately verify that a signature block with printed name, title, and date line is present for every named party. Flag each missing element independently.
- Check for the presence of a governing law clause that names a specific jurisdiction. Check for a dispute resolution clause (litigation, arbitration, or mediation). Flag each one that is absent.
~~~
## Understanding Why Contract Review Matters
Most contract disasters happen in slow motion, which is why a thorough [contract review checklist](https://attainpartners.com/blog/contract-review-checklist/) matters. You sign something on a Tuesday, and months later, you're disputing service payments, ownership, or auto-renewal efforts. The cost of these mistakes adds up fast. For a **,000** business, that's **,000** lost.
Contracts are binding. Courts generally assume that if you signed it, you read it and agreed to it. Saying "I missed that" doesn't void a contract. That's why learning **[how to review a contract](https://www.sirion.ai/library/contract-management/contract-review-process/)** properly is worth the time investment. An hour with this list can save thousands and months of headaches. Trusting the other party's fairness is often expensive.
Contract Review Process Flow:
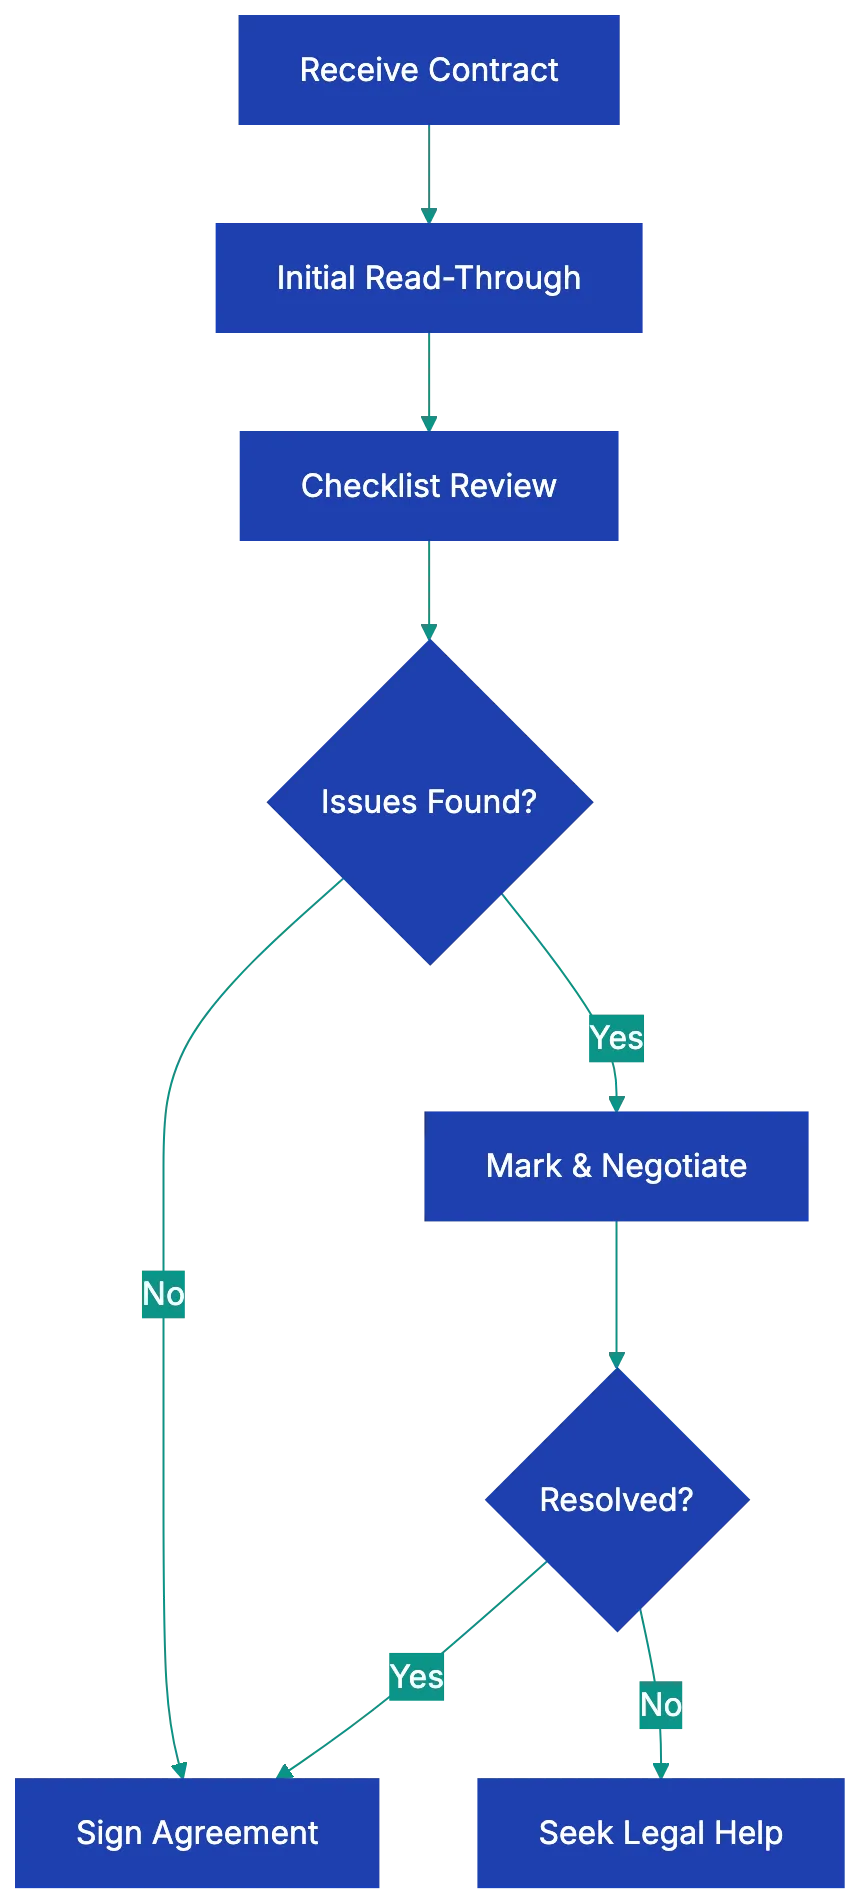
## The 20-Point Contract Review Checklist
Here's your complete **[contract checklist before signing](https://www.concord.app/blog/contract-review-checklist)**. Each point includes **[what to look for in a contract](https://www.malbek.io/blog/7-tips-for-reviewing-contracts)** and what goes wrong when you miss it. This checklist works for vendor agreements, service contracts, employment offers, partnership deals, and most business contracts.
### 1. Are All Parties Correctly Identified?
Check that every party's full legal name appears in the contract, along with their entity type. If you're a sole proprietor, that's your personal name. If you're an LLC, it should say "ABC Company, LLC," not just "ABC Company." The address for each party should be included. What goes wrong: If the legal names are wrong or incomplete, the contract might not be enforceable, or unintentionally guarantee company obligations.
### 2. Is the Effective Date and Term Clearly Stated?
Look for when the contract starts and how long it lasts. Contracts may start when signed or on a specific date. The term might be one year, month-to-month, or perpetual. What goes wrong: Without clear dates, you won't know when obligations begin or end, making it impossible to plan or budget properly.
### 3. Are Deliverables and Scope Described in Specific Terms?
The contract should spell out exactly what's being delivered or what services will be performed. Vague language like "consulting services" or "marketing support" invites disputes. Look for measurable specifics like "20 hours per month of financial consulting" or "development of a mobile app with features listed in Exhibit A." What goes wrong: Vague scope leads to endless arguments about whether the work was actually done and what's included versus extra.
### 4. Are Payment Terms Crystal Clear?
You need to know the exact amount, when it's due, how to pay it, what currency, and any late fees. Is it **,000** upfront or ,000 per month for five months? Due on the first or net 30? Wire transfer or check? What goes wrong: Unclear [payment terms](https://www.sba.gov/business-guide/manage-your-business/contracts) create cash flow problems and billing disputes that damage business relationships.
### 5. Are There Hidden Fees or Price Escalation Clauses?
Read carefully for setup fees, processing fees, administrative charges, or annual price increases. Some contracts include clauses that let the other party raise prices based on inflation or at their discretion. What goes wrong: That monthly service becomes after annual increases you didn't budget for, or you get hit with surprise fees that make the deal unprofitable.
### 6. What Are the Termination Provisions?
How can each party end the agreement? Is there a **termination for convenience** clause, or can you only exit for cause? How much notice is required? Are there termination fees or wind-down obligations? What goes wrong: You find you're locked in for years with no exit, or that leaving early costs thousands in penalties.
### 7. Is There an Auto-Renewal Clause?
Many contracts automatically renew for another term unless you cancel within a specific window, often **30 to 90 days** before the end date. What goes wrong: You miss the cancellation deadline and get locked in for another full term, even though you wanted to switch vendors months ago.
### 8. What Are the Liability Caps and Indemnification Requirements?
**Liability** provisions limit how much each party can be sued for if something goes wrong. **Indemnification** clauses require one party to cover the other's legal costs and damages in certain situations. What goes wrong: You agree to unlimited liability or to indemnify the other party for things outside your control, exposing yourself to catastrophic financial risk.
### 9. Who Owns the Intellectual Property?
If the contract involves creating anything, who owns it? This includes code, designs, writing, inventions, processes, or trade secrets. Does ownership transfer upon payment, or does the creator retain it and grant a license? What goes wrong: You pay to build something custom and find the vendor owns it, or you create work as a contractor and the client can prevent you from using similar approaches for other clients.
### 10. Are Non-Compete or Non-Solicitation Terms Reasonable?
**[Non-compete](https://www.irs.gov/pub/irs-pdf/p15b.pdf)** clauses restrict your ability to work in the same industry or geography for a period after the contract ends. Non-solicitation prevents you from hiring the other party's employees or stealing their clients. What goes wrong: You agree to restrictions so broad you can't work in your field for years, or you innocently hire someone and face a lawsuit.
### 11. What Does the Confidentiality Clause Cover?
Most contracts include confidentiality or NDA terms. Check what information is considered confidential, how long the obligation lasts, and what exceptions exist for information that's already public or independently developed. What goes wrong: You're prohibited from discussing basic industry practices or using general knowledge from the engagement, or you accidentally breach by sharing something you didn't realize was confidential.
### 12. What's the Dispute Resolution Process?
Contracts specify how disagreements get resolved. Check each element carefully:
- **Litigation**: court-based resolution in the specified jurisdiction
- **Binding arbitration**: private dispute resolution outside the court system
- **Mediation**: non-binding third-party facilitation before escalating
The contract will also specify which state or country's courts have jurisdiction. What goes wrong: You end up in arbitration that costs more than the contract is worth, or you have to sue in a state across the country where the other party is located.
### 13. Which Jurisdiction's Law Governs?
This clause determines which state or country's laws interpret the contract. It's often wherever the other party is located. What goes wrong: You're subject to laws you don't understand that may be less favorable than your home jurisdiction, making it harder and more expensive to enforce your rights.
### 14. Are There Force Majeure Provisions?
**Force majeure** clauses excuse performance when extraordinary events beyond anyone's control occur, like natural disasters, wars, or pandemics. Check what events qualify and what happens to payments and obligations. What goes wrong: You're required to keep paying even though the other party can't deliver due to circumstances they couldn't control, or vice versa.
### 15. Are Warranties and Guarantees Clearly Stated?
What promises is each party making? Is the product guaranteed to work as described? Are services warranted to meet professional standards? How long do warranties last? What goes wrong: You assume the product is guaranteed but find it's sold "as is" with no recourse if it doesn't work.
### 16. Is There an Insurance Requirement?
Some contracts require one or both parties to maintain certain types of insurance at specific coverage levels, like general liability or professional liability. What goes wrong: You're contractually required to buy expensive insurance you don't have, or the other party has no insurance when their mistake damages you.
### 17. Are Assignment and Subcontracting Rights Addressed?
**Assignment** clauses determine whether either party can transfer their rights and obligations to someone else. Subcontracting provisions control whether work can be delegated to third parties. What goes wrong: The company you chose to work with sells the contract to a different company you wouldn't have selected, or work you expected would be done in-house gets outsourced.
Critical Contract Elements Overview:
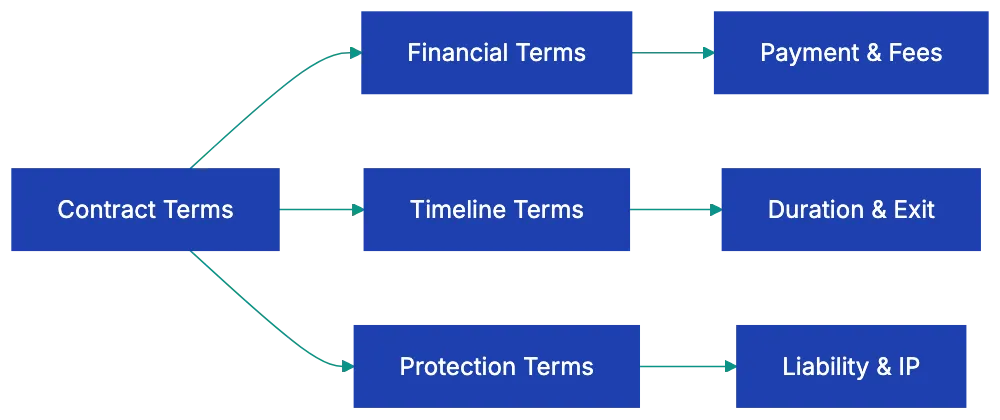
### 18. Are Notice Provisions Specified?
Contracts typically require formal communications like termination notices or breach notifications be delivered in specific ways, such as certified mail to specific addresses or email to designated contacts. What goes wrong: You send a cancellation email that doesn't count as proper notice, missing your termination window and getting stuck for another term.
### 19. Is There an Entire Agreement Clause?
This clause, sometimes called a **merger clause**, states that the written contract contains the complete agreement and supersedes all prior discussions, emails, and verbal promises. What goes wrong: Promises made during negotiations that aren't in the final contract are unenforceable, and you can't prove they were part of the deal.
### 20. Are Signature Blocks Complete?
Each signature block should include the signer's printed name, title, and date. For companies, the signer should have authority to bind the entity. What goes wrong: Someone without authority signs, making the contract invalid, or missing dates create confusion about when obligations begin.
## Common Contract Review Mistakes to Avoid
The biggest mistake people make when reviewing contracts is skipping it entirely. They assume the other party wrote something fair or that standard contracts are safe. Standard doesn't mean fair. It means standard for that company, written by their lawyers to protect their interests. Another common error is reading only the first few pages. The dangerous stuff usually lives in the middle sections or the small print attachments.
I've seen people miss entire exhibits that radically changed what they thought they were agreeing to.
Another trap is failing to negotiate. Many people think contracts are take-it-or-leave-it, but most business contracts are negotiable to some degree. If you spot something unreasonable in your contract review, mark it and ask for changes. The worst they can say is no, and you'll have tried. Conversely, asking to change everything makes you difficult to work with. Pick your battles and focus on terms that actually matter to your situation.
Finally, don't sign anything with blanks or "to be determined" sections. Those should be filled in before you commit, or you're giving the other party the power to decide them later.
## How to Review a Contract Efficiently
Start by reading the entire contract once without marking anything, just to understand the overall deal. This prevents you from getting lost in details and missing the big picture. On your second pass, work through this **[review contract checklist](https://www.pandadoc.com/blog/contract-review-checklist/)**, marking sections that seem unclear or unfavorable. Use the table above as a literal checklist, verifying each point and noting anything concerning.
For complex or high-value contracts, create a summary document listing key terms like payment amounts, dates, termination rights, and liability caps. This makes it easier to compare multiple vendor proposals or remember what you agreed to six months later.
When you spot something you don't understand, don't skip it. That's usually where problems hide. Look up unfamiliar terms or ask the other party to explain in plain language. If they can't or won't explain something clearly, that's a warning sign. For significant contracts like employment agreements, partnership deals, or anything over a few thousand dollars, having a lawyer review it is worth the investment. A good lawyer will spot issues you missed and can negotiate better terms.
Think of legal review as insurance, not an expense.
## Tools That Speed Up Contract Review
Manually checking contracts against a checklist works, but takes time. Modern AI-powered contract review tools can analyze agreements in seconds, flagging common issues and comparing terms against your checklist. While it won't replace reading the contract yourself or getting legal advice for major deals, it catches things human eyes miss when you're tired or in a hurry.
Other approaches include building templates for contracts you use repeatedly. If you frequently hire contractors, create a services agreement with your preferred terms, so you're negotiating from your paper instead of theirs. Maintain a swipe file of good contract language for common clauses. When you negotiate a favorable termination clause or IP ownership term, save it to reuse in future agreements.
Over time, you'll build a library of known-good language that makes both drafting and reviewing faster.
## When to Get Legal Help
Some contracts deserve professional legal review regardless of how good your checklist is. Employment agreements with non-competes, equity grants, or unusual provisions should be reviewed by an employment lawyer. Partnership agreements or operating agreements for new businesses need proper legal drafting to avoid catastrophic problems later. Real estate contracts, whether buying commercial property or signing a long-term lease, involve too much money and complexity to wing it.
Any contract where you're personally guaranteeing business debts or taking on significant liability exposure deserves legal eyes.
The cost of legal review varies widely, but expect to pay anywhere from ** to ,500** for a lawyer to review a standard business contract, depending on complexity and your location. That sounds like a lot until you compare it to the cost of getting locked into a bad five-year deal or fighting a lawsuit over ambiguous contract terms. For ongoing business relationships, consider establishing a relationship with a business lawyer who can review contracts on short notice.
Some lawyers offer monthly retainer arrangements that include a certain number of contract reviews, making the cost more predictable.
## Real-World Examples of Contract Review Saving Money
A marketing consultant I know was thrilled when a major client offered her a year-long contract worth **,000**. When she reviewed the payment terms carefully, she discovered they were net-60, meaning she wouldn't get paid until 60 days after submitting each invoice. With monthly billing, she'd be carrying two months of unpaid work at all times, creating a serious cash flow problem for her small business. She negotiated net-30 terms instead, improving her cash position by **,000**.
She almost missed it because she was excited about the total contract value.
Another example involved a software company signing a vendor agreement for cloud hosting. The contract included an [auto-renewal clause](https://www.ftc.gov/legal-library/browse/negative-option-rule) with a **90-day** cancellation window. Two years in, they found a better, cheaper provider, but missed the cancellation deadline by three weeks. They were stuck paying for the old vendor for another full year while also paying the new one, losing **,000**.
The following year they set a calendar reminder for 100 days before renewal and successfully switched. That's a ,000 lesson in reading [termination provisions](https://www.sba.gov/business-guide/manage-your-business/contracts) carefully.
A freelance designer built an entire brand identity for a startup, including logo, website design, and marketing materials. The contract included a clause stating all intellectual property belonged to the designer until final payment was received. The startup ran into funding problems and couldn't pay the final **,000** invoice. Because the designer had negotiated clear IP ownership terms, she retained rights to the work and could legally prevent them from using it until they paid.
Without that clause, she would have been owed money with no recourse. She eventually got paid in full.
## Adapting This Checklist for Different Contract Types
While this **contract signing checklist** covers general business agreements, different contract types need special attention in certain areas. For vendor or supplier agreements, focus extra attention on payment terms, service level agreements, termination rights, and liability caps. For employment contracts, scrutinize non-compete clauses, IP assignment provisions, severance terms, and equity vesting schedules.
Partnership or operating agreements demand careful review of profit distribution, management authority, capital contribution requirements, and exit provisions.
Lease agreements, whether for office space or equipment, require close attention to renewal terms, rent escalation clauses, maintenance responsibilities, and default provisions. Non-disclosure agreements need review of what's considered confidential, how long the obligation lasts, and what exceptions exist. Independent contractor agreements should clearly address IP ownership, payment terms, deliverables, and the classification of the relationship to avoid worker misclassification problems.
Tailor your review to emphasize the checkpoints most relevant to the specific contract type you're dealing with.
## Building Your Own Contract Review System
Once you've reviewed a few contracts using this checklist, you'll start developing pattern recognition for common issues. Build on that by creating your own system. Start a document where you track red flags you've encountered and how you negotiated around them. Note which clauses different vendors typically push back on and which they'll easily modify. This becomes institutional knowledge that makes each subsequent review faster and more effective.
Consider creating contract review templates for different situations. Your checklist for reviewing a vendor proposal might emphasize different points than your checklist for evaluating a partnership agreement. Schedule regular contract audits where you review all active agreements to check for upcoming renewals, changing circumstances that might warrant renegotiation, or terms you're not actually enforcing.
Many businesses sign contracts and then forget what they agreed to, leading to accidental breaches or missed opportunities to enforce favorable terms.
## Key Takeaways
Learning **what to look for in a contract** isn't about becoming a lawyer. It's about protecting yourself from expensive mistakes that happen when you don't read carefully. This 20-point **contract review checklist** gives you a systematic way to review any business agreement, focusing on the terms that most often cause problems. The checklist covers everything from basic party identification to complex liability provisions, each with a clear explanation of what goes wrong when you miss it.
Print it out and keep it handy for every contract that crosses your desk.
The time you invest in proper contract review pays dividends. An hour spent carefully checking terms against this review contract checklist can save you thousands of dollars in unwanted obligations, missed termination windows, or unfavorable terms you didn't notice until too late. For complex or high-value agreements, combine your own review with professional legal help. For routine contracts, Revdoku helps your team apply a consistent review checklist across every document and surfaces matching clauses for legal review.
Don't trust your eyes alone.
Find more review checklists at [revdoku.com/checklists](/blog/). each one is ready to copy and use in the app.
Frequently Asked Questions
What should I do if I find an unfavorable term in a contract?
If you encounter a clause that seems unreasonable, don't hesitate to negotiate. Mark the specific term and request changes. Being proactive can lead to more favorable terms, but focus only on critical issues to avoid being seen as difficult to work with.
How can I ensure I don’t miss important details while reviewing a contract?
Read the entire contract thoroughly at least once without marking it, to grasp the overall deal before diving into specifics. Then, use a checklist to methodically review each section for potential issues. Taking notes on unclear clauses will help maintain your focus on critical areas.
When is it essential to get legal help for contract review?
Legal assistance is crucial for complex agreements, such as employment contracts with non-compete clauses, partnership agreements, and real estate contracts. If you're taking on significant liabilities or personal guarantees, it’s wise to have a lawyer review the contract to mitigate risks.
What are some common pitfalls people make when reviewing contracts?
A frequent mistake is skipping the review altogether, assuming that standard terms are fair. Additionally, many only read initial sections and overlook critical details hidden deeper in the document. Failing to negotiate terms can also result in accepting unfavorable conditions.
How can I keep track of contract review lessons learned?
Establish a document where you log any red flags you encounter during reviews, along with negotiation strategies that worked. This will build institutional knowledge that can streamline future reviews and help you recognize common issues more quickly.
What should I focus on when reviewing different types of contracts?
Tailor your review emphasis based on the contract type. For employment contracts, scrutinize non-compete and IP assignment clauses; vendor agreements should focus on payment terms and liability. Each contract type has unique considerations that warrant different levels of scrutiny.
What tools can help expedite the contract review process?
Utilize AI-powered contract review tools that can quickly analyze agreements and flag common issues. Additionally, maintaining templates for frequently used contracts can streamline negotiations. These tools will not eliminate the need for careful reading, but they can enhance efficiency.
### Invoice Requirements Checklist for 2026
URL: https://revdoku.com/blog/invoice-requirements/
Description: Learn crucial elements of a proper invoice to ensure timely payments and compliance in 2026.
Published: 2026-02-13
Updated: 2026-02-23
Keywords: invoice elements, invoice checklist, payment terms, business invoices, compliance, small business invoicing
## Introduction
You'd think creating an invoice would be simple. Send a bill, get paid, done. But I've seen hundreds of small businesses lose weeks of cash flow due to incomplete invoice elements like purchase order numbers or incorrect tax rates. Invoices are legal documents with real consequences if done incorrectly. Miss a required element, and your payment gets kicked back to you. Include vague descriptions, and you'll fail an IRS audit.
Use the wrong payment terms, and you have no recourse when clients pay late. This guide walks through every single element of a proper invoice format in 2026, why each invoice element matters, and the mistakes that cause the most problems. Whether you're invoicing your first client or your thousandth, this checklist makes sure you get paid faster and stay compliant.
## Business, Client & Invoice Details
Copy this checklist and paste it into [Revdoku's](https://revdoku.com) **Generate Checklist** to review your documents automatically:
~~~
Invoice Review
You are a senior accounts payable auditor with forensic accounting experience. Review invoices for completeness, arithmetic accuracy, and potential compliance issues. You must independently verify every calculation. never trust stated totals.
- Verify the invoice contains an invoice number, an issue date, and a due date. The issue date must not be in the future. Flag if any of these three fields are absent. If payment terms are stated (e.g., "Net 30"), verify the due date equals the issue date plus the stated terms; flag if the due date is inconsistent or if the issue date is missing when terms-based dating is used.
- Verify the seller section includes all five of: legal company name, street address, city, state or region, and postal code. Separately verify the buyer section includes the same five fields. Flag each specific field that is missing from either party.
- For EVERY line item row, independently multiply the stated quantity by the stated unit price. Write out each calculation step as "QTY × PRICE = RESULT". Compare your calculated result to the line item amount shown on the invoice. Flag EACH line item where your calculated result differs from the stated amount, even by one cent.
- Add line item amounts using a running total. start at 0, add each line item one at a time, and write each step: "0 + first = X", "X + second = Y", etc. Your final running total is the computed subtotal. Compare it to the stated subtotal and flag if they differ by any amount. If a tax rate is shown, multiply the stated subtotal by the tax rate and compare to the stated tax amount. Add subtotal and tax to get the grand total and compare to the stated total. Flag EACH mismatch found.
- Cross-check: for each line item, re-compute the amount as QTY × UNIT PRICE. If your result differs from the amount printed on the invoice, that line item is wrong. Then check: does the stated subtotal equal the sum of the PRINTED line item amounts (not your corrected amounts)? If it does, it means the subtotal blindly copied the wrong line item. flag this as a cascading error. If it does not, flag the subtotal independently.
- Flag if any of the following are missing: accepted payment method (e.g., ACH, wire, check), bank name and account details or a remittance address, and a currency designation for all monetary amounts.
~~~
See this checklist in action: [Invoice Review Use Case](/cases/invoice-review/)
## Line Items, Calculations & Payment Terms
## Industry Requirements & Final Review
## Your Business Identity: Making It Official
Every invoice checklist starts with one fundamental requirement: clearly identifying who is asking for payment. Your full legal business name must appear exactly as registered with your state or country. If you operate as "Smith Consulting LLC," but your invoice says "John Smith Consulting," you've created a mismatch that causes problems during audits and disputes.
Many businesses also include their DBA ("doing business as") name if different, written as "Smith Consulting LLC d/b/a Rapid Results."
Invoice Creation Process Overview:
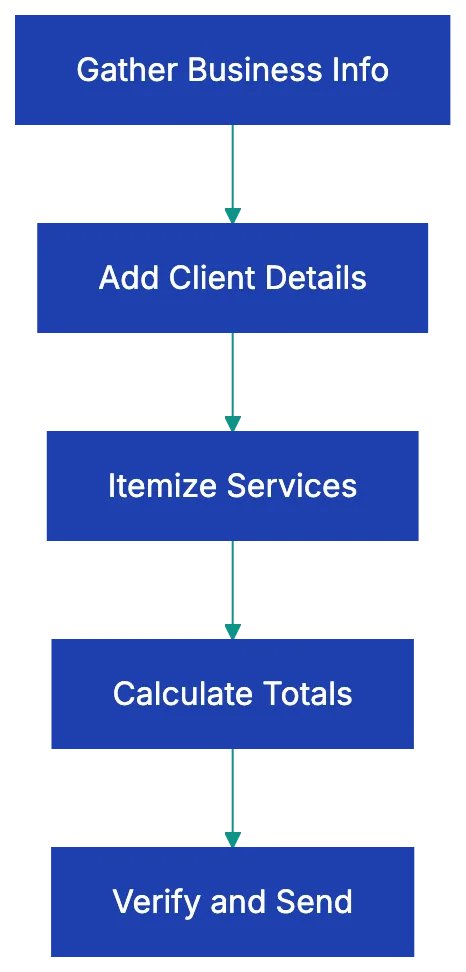
Include your complete business address, beyond just a PO box. The IRS expects to see a physical location where your business operates. Include street address, city, state, and ZIP code. If you work from home and prefer privacy, consider using a registered agent address or virtual office location that you've formally registered with your state. International businesses should include country and any relevant regional identifiers.
Contact information rounds out your business identity. Include a phone number where clients can reach someone who can answer invoice questions. An email address for accounts payable inquiries helps route questions away from your main inbox. Some businesses add their website, though this isn't strictly required. Make sure the client's accounting department can easily verify your information and contact you.
Your tax identification number deserves special attention. In the United States, this means your EIN (Employer Identification Number) or SSN for sole proprietors. Many businesses hesitate to include their SSN on invoices for security reasons, which is why most sole proprietors eventually get an EIN even without employees. The IRS requires this for proper tax reporting, and many corporate clients won't process payments without it.
International businesses should include their VAT number, GST registration, or equivalent tax identifier for their jurisdiction.
## Client Information: Getting Payment to the Right Place
What to include on an invoice regarding client details? Everything needed to make sure the payment department knows exactly who authorized this expense. Start with the client's full legal business name or individual name if invoicing a person. If you're working with a large organization, include both the company name and the specific department or division that contracted your services.
"Acme Corporation - Marketing Department" is more useful than just "Acme Corporation" when your invoice needs to find the right budget holder.
The billing address and shipping address serve different purposes and sometimes differ. The billing address is where the client's accounting department sits and where they receive invoices. The shipping address is where goods were delivered or services performed. For service businesses, you often only need the billing address. For product sales, both addresses prevent disputes about where delivery occurred.
Include a contact person's name and email whenever possible. Invoices sent to "Accounts Payable" at a large company can disappear into a queue for weeks. Invoices sent to `Jane Rodriguez, AP Manager, jrodriguez@company.com` get processed faster because there's a specific person who recognizes the project and can approve payment. If your contract or purchase order lists a project manager or budget approver, copy them on the invoice or list them as a secondary contact.
The purchase order number, when one exists, might be the single most important piece of client information. Many mid-size and large organizations simply will not process an invoice without matching it to a PO number in their system. I've watched businesses wait ninety days for payment on a perfectly valid invoice simply because they left off the six-digit PO number that appeared on the contract they signed. Always ask if a PO is required before you send your first invoice.
## Invoice Numbering: Why Sequence Matters
Every invoice requires a unique invoice number, and this numbering system matters more than most people realize. The IRS expects sequential numbering because it proves you're reporting all your income. If you send invoice 1047 in March and invoice 1052 in April, auditors will ask what happened to invoices 1048 through 1051. Missing numbers raise red flags about unreported revenue.
Your numbering system can follow several formats. Simple sequential numbers (001, 002, 003) work fine for most small businesses. Some prefer to embed the year (2026-001, 2026-002) to make it easier to find invoices from specific time periods. Others include client codes (ACME-001, WIDGET-001) to track revenue by customer at a glance. The proper invoice format doesn't matter as long as you maintain strict sequence within each system.
Never reuse an invoice number, even if you void or cancel an invoice. If invoice 1048 had an error, you void it and issue a new invoice 1049 with the corrected information. Keep the voided invoice in your records with a clear "VOID" notation. This maintains your audit trail and prevents confusion about what was actually paid.
Duplicate invoice numbers create serious problems beyond just audits. If you accidentally use the same number twice and a client pays both, you've received double payment. If they pay only one, which invoice did they satisfy? Clean numbering prevents these headaches. Accounting software usually ensures unique numbering, but double-check manual systems.
## Dates: The Timeline of Payment
Include at least two important dates. The invoice date marks when you issued the bill and starts the clock on payment terms. This date also determines which accounting period the revenue falls into for your books and taxes. If you issue an invoice on December 31st that gets paid January 15th, that revenue belongs to the December tax year, not January. Get this wrong, and you're shifting income between tax periods, which auditors notice.
The due date tells the client exactly when payment must arrive. This seems obvious, but I've seen countless invoices that list payment terms like "Net 30" without actually calculating and showing the due date. Your client's busy accounts payable clerk shouldn't have to do math to figure out when payment is due. If your invoice is dated January 15th with Net 30 terms, write `Due Date: February 14th` in clear text. Remove all ambiguity.
Some businesses add a service date or period covered, particularly for recurring services. "Services rendered: January 1-31, 2026" clarifies exactly what period this invoice covers. This becomes important when clients question whether they already paid for certain services or when you need to prove you delivered what you billed for. The IRS substantiation requirement for business expenses asks for the date services were provided, so including this helps your client's recordkeeping too.
Invoice Payment Timeline:
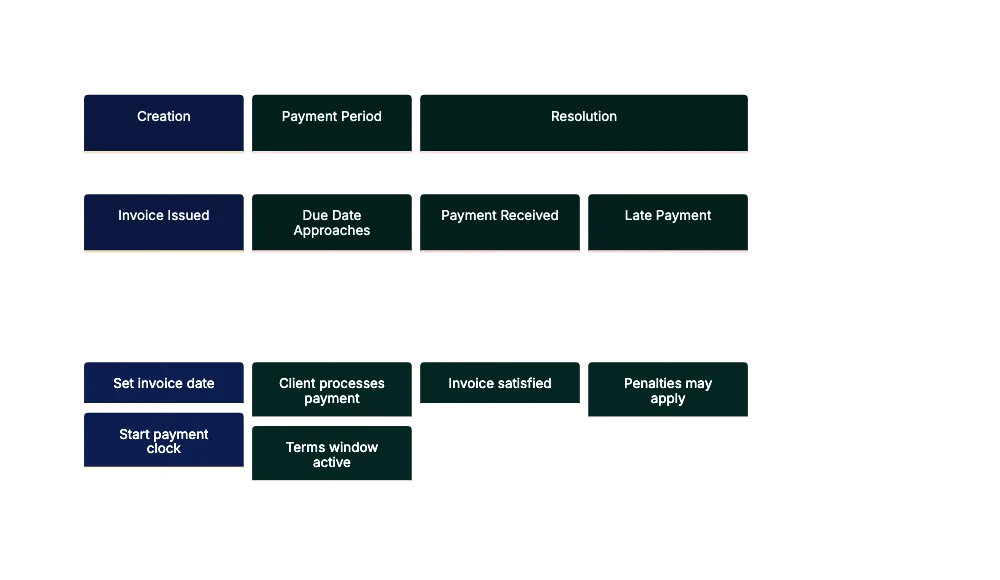
Invoice elements like payment terms deserve more attention than most businesses typically give them. **Net 30** means payment is due thirty days from the invoice date. **Net 60** stretches it to sixty days. "Due on receipt" means payment should happen immediately. **"2/10 Net 30"** means the client gets a two percent discount if they pay within ten days; otherwise, full payment is due in thirty days. Each term affects your cash flow differently.
New clients and small projects often warrant "Due on receipt" or Net 15 terms. Long-term clients with proven payment history might get Net 30 or Net 45.
## Itemized Descriptions: The IRS Substantiation Requirement
Invoice requirements can be unclear in practice but are clear in audits. The IRS requires what they call "adequate substantiation" for business expenses. That means invoices must describe what was purchased, when it was purchased, where it was purchased, and the business purpose. Your client needs this information to deduct the expense legally, and you need it to defend your revenue if questioned.
Vague descriptions like "Consulting Services" or "Professional Fees" fail this test. Instead, write "Marketing strategy consultation for Q1 product launch - 12 hours planning, 3 client meetings, competitor analysis report." The detail proves these were legitimate business expenses tied to specific deliverables. It also prevents disputes when clients question what they paid for six months later.
For product sales, include enough detail to distinguish between items. "Widget - Red" isn't as useful as "Red Widget Model 2026, 5-inch, includes mounting hardware." If you sell products with model numbers or SKUs, include them. If items have serial numbers or are unique in some way, note that. The goal is to create a paper trail that proves exactly what changed hands.
The business purpose component sometimes gets overlooked, but matters during audits. A law firm billing a client might write "Legal consultation RE: Smith v. Jones litigation, case preparation, and document review." A contractor might note "Kitchen renovation - permit application, materials sourcing, installation per contract dated 12/15/2025." These details help your client categorize the expense correctly and provide the documentation their accountant needs.
## Quantity, Unit Price, and Line Item Math
Invoice requirements in this section get mathematical in nature. Every line item needs a quantity, a unit price, and a line total. Even if you're billing for a single deliverable, showing "1 x $5,000 = $5,000" makes the math transparent. For hourly work, show "12.5 hours x $150/hour = $1,875." For products, show "50 units x $24.99/unit = $1,249.50."
This transparency serves multiple purposes. It allows clients to verify your math quickly, which speeds approval. It shows that you track your time or products carefully, which builds trust. It provides the detail needed for inventory tracking or project accounting on the client's side. And it prevents disputes about how you calculated the total.
Watch your decimal precision carefully. Hourly rates often include cents ($147.50/hour), and when multiplied by fractional hours (7.25 hours), you get amounts with fractions of pennies ($1,069.375). Always round to two decimal places using standard rounding rules. Most accounting software handles this automatically, but spreadsheet invoices sometimes show full precision, creating totals that don't quite add up when clients verify them manually.
List the subtotal before tax to separate fees from taxes. In many jurisdictions, businesses can reclaim sales tax or VAT as input credits, but only if invoices clearly separate the tax from the base amount. A single combined number makes this impossible and can cause your invoice to be rejected by accounting departments that follow strict procedures.
## Sales Tax: Getting the Rates and Jurisdictions Right
Legal invoice requirements for sales tax vary dramatically by location and the types of goods or services you're selling. In the United States, sales tax is a state and local matter, and rates can differ by city, county, and special tax districts. An invoice for services rendered in Los Angeles needs to show California state tax, Los Angeles County tax, and Los Angeles city tax as separate line items if you want to be fully compliant.
Most businesses combine them into a single sales tax line showing the total rate.
You must include the tax rate and jurisdiction on the invoice. Writing "Sales Tax: $87.50" doesn't give the client enough information. Write "CA Sales Tax (9.5%): $87.50" or break it down further: "Sales Tax - State (6.0%): $55.00, County (0.25%): $2.30, City (3.25%): $30.20, Total Tax: $87.50." This proves you applied the correct rate and helps the client's accounting team verify compliance.
Service businesses face particular complexity because many services are exempt from sales tax in certain states, but taxable in others. Consulting services are generally tax-exempt in California, but taxable in Texas. Digital products are taxable in some states and exempt in others. If you operate in multiple states or serve clients in multiple jurisdictions, you need to know the rules for each location and document which rules you applied.
International businesses using VAT or GST face similar legal invoice requirements, but often more stringent ones. VAT invoices must include your VAT registration number, the customer's VAT number if they're registered, the VAT rate, and the VAT amount. Reverse charge mechanisms for cross-border B2B transactions require specific language on the invoice. Getting these wrong can mean your client can't reclaim the VAT, which creates immediate disputes.
## Total Amount Due and Payment Information
The total amount due should appear prominently, often in a larger or bold font. This is the number the client needs to pay, inclusive of all taxes, fees, and charges. Some invoices also show a "balance due" if partial payments were made, calculated as "Total Amount: $5,000.00, Less Deposit: $1,500.00, Balance Due: $3,500.00."
Payment methods and instructions prevent the "I didn't know where to send payment" excuse. List every method you accept. For each method, provide the specific details needed:
- **Check**: payable to your legal business name, mailed to your address
- **ACH transfer**: your bank routing number and account number
- **Wire transfer**: bank details plus SWIFT code for international payments
- **Credit card / payment link**: direct URL to a pre-filled payment page Credit cards need a payment link or instructions to call your office.
Payment links embedded directly in the invoice speed up payment significantly. Studies show that invoices with "Pay Now" buttons get paid **15-20% faster** than those requiring clients to log into separate payment portals. Whether you use Stripe, Square, PayPal, or another processor, include a direct link to a pre-filled payment page with the invoice amount already entered.
Currency matters when dealing with international clients. If you invoice a Canadian client from the United States, state clearly whether the amount is in USD or CAD. Write "Total Amount Due: $5,000.00 USD" or "Total Amount Due: $6,500.00 CAD (exchange rate as of 1/15/2026)." Some businesses bill international clients in their own currency to remove exchange rate uncertainty; others bill in their home currency and let the client handle conversion.
## Late Payment Terms and Penalties
Include late payment terms. Many businesses include late payment penalty terms directly on the invoice as both a deterrent and a legally enforceable provision. Common language reads: "Late fee of 1.5% per month (18% APR) will be applied to balances over 30 days past due" or "Invoices not paid within 30 days will incur a $50 late fee plus 1% monthly interest."
Be careful here because late payment penalties are regulated by state law. Some states cap the interest you can charge on late payments. Others require specific notice procedures before you can actually collect penalties. A few states prohibit penalty clauses in certain industries. Check your state's commercial code or consult an attorney before adding penalty language to your invoices.
Invoice Approval Flow:
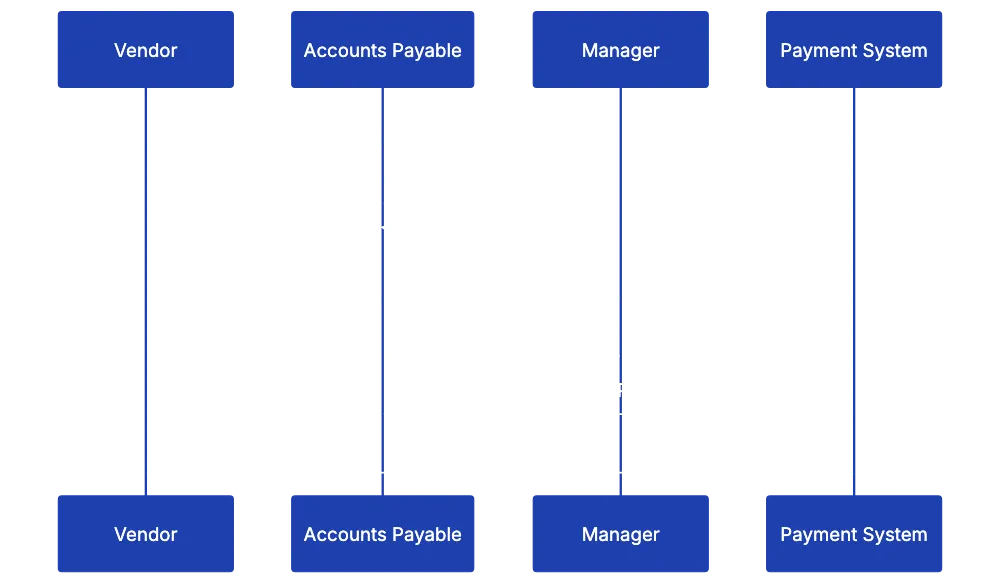
Even if you include penalty terms, consider whether enforcing them makes businses sense. A long-ter client who pays late oncce during a difficult month probably shoulldn't get hit with fees. A chronically late payer who ignores your payment terms might need the formal penalty to take you seriously. The invoice language gives you the option to enforce penalties, but you can always waive them as a goodwilll gesture.
Some businesses include early payemnt discounts isntead of late payment penalties. "2% discount if paid within 10 days" is friendlier tuan threatening penalties. The net effec on cash flow is similar; you're paying for faste payment, but the psychologgy works better for maintainin good client relationship. Test both aplroaches to see which gets you paid faster in your industry.
## Common Invoice Mistakes That Delay Payment
I've reviewed thousands of invoices that got stuck in payment queues, and the same errors appear over and over. Missing purchase order numbers top the list. If your contract mentions a PO number or your client's initial email said "reference PO #12345 on all invoices," that number must appear prominently on every invoice. Many businesses add a dedicated field labeled "PO Number" near the invoice number to make sure it's not overlooked.
Vague descriptions run a close second. "Services rendered" tells the accounts payable clerk nothing abotu whether this invoice was already paid undeer a different nukber or whether it matches an approved contract. The more specific you are, the faster someone can verify the work was done and approve payment. Think about your descriptions from the perspective of someone who wasn't involved in the project but needs to approev a check.
Math errors soound embarrassing, but happen constantly, espceially on manually create invoices. Line items don't add up to the subtotal, the tax calculation is wrong, or the final total doesn't match the sum of subtotal plus tax. Accounting departments catch these immediately and kick the invoice back for correction, adding a week or more to your payment cyycle. Always double-chheck your math; better yet, use software that calculates automatically.
Wrong tax rates create bigger problems than simple math errors because the sgugest you don't understand your compliance obbligations. If you charge California sales tax on a service tgat's exempt in California, your client's accounting team questions whether you know what you're doing. If you charge 8% tax when the local rate is 9.5%, they have to calculate the correct amount beefore they can process paymennt.
Get a reliable tax rate databaase or tax automation tool if you operate in multiple jurisdictions.
Sending invoices to the wrong contwct wastes enormous time. You email the project manager who worked with you, but they have no authority to approve invoices and don't know who does. The invoice sits in their inbox for two weeks before they forward it to someone else. Always ask "Where should I send invoices?" during project settup and get a specific emaiil address for the accounts payable contact.
## Industry-Specific Invoice Requirements
What should be on an invoice changes depending on your industry. Construction invoices often include retention or holdback lines. A typical construction invoice might show: "Subtotal: $50,000, Less 10% Retention: ($5,000), Amount Due This Invoice: $45,000." This documents that the clien is holdnig ten percen of each paymeent until project compketion. Without showing the retention clearly, disputes arise about wheether you were underpaid or whether the retention was agreed upon.
Progress billing for long-term construction projects requires additionnal detail. Many construction invoices include a scheedule of values showing the percentage complete for ecah line item: "Foundation work - 100% complete, $10,000; Framing - 75% complete, $15,000; Electrical roguh-in - 30% complete, $3,600." This justifies why you're billing specific amounts and helps the client track project progress against budget.
Freelancers and consultants benefit from adding project references and detailed hourly breakdowns. Instead of "40 hours consulting - $6,000," write "Project Zenith brand strategy, January 2026: Initial research and competitive anaalysis (8 hrs), Client worksshops and stakeholder interviews (12 hrs), Strategy document drafting (14 hrs), Revision and finalizatio (6 hrs), Total: 40 hours @ $150/hr = $6,000." This level of detail prevents scoope creep disputes and shows the valje you delivered.
Medical billing requires specific codes and patient informatio whiel maintaining HIPAA compliande. Medical invoices include CPT codes for procedures, ICD diagnosis code, paatient name and date of birth, insuranec information, and often a statement about assignment of bennefits. These invoices are really claaims documenst tha must match insurance company requirements exactly, or they get rejceted.
Government contractors fsce the mots stringent reqhirements. Federal invoices must inclyde the contract number, DUNS number or UEI (Unique Entity Identifier), CAGE code, and oftten specific certificatioons abou labor compliance or materials sourcing. Many government contracts specify exactly what must appea on invoices, and deviating from that format means non-payment until you resubmit correctly. Always read your government contract's invoicing section carefully.
## Best Practices for Professional Invoices
Beyond the minimum invoice requirements, certain practices create a more professional invoice template and increase the likelihood of prompt payment. Consistent branding helps clients immediately recognize your invoices among dozens of other bills. Use your logo, brand colors, and fonts consistently across all invoices. This builds visual recognition and makes your invoices look less like phishing attempts or fraudulent bills.
Clear visual hierarchy guides the reader's eye to the most important information. The total amount due should be the most prominent number on the page. The due date should stand out. Payment instructions should be easy to find. Use font sizes, weights, and colors strategically to create this hierarchy. Don't make readers hunt for important information buried in paragraphs of text.
Professional formatting signals that you run a professional operation. Match numbers consistently (right-matched for currency amounts), use proper curerncy symbols, spell out term clearly, and aviod abbreviations that migh confuse international clients. "Qty" might be obviius to you, but confuaing to someone readin in their second language. Writing "Quantity" tkaes two mroe characters and removes ambiguity.
Digital invoices should be sent as PDFs, not editable Word documents or spreadsheets. PDFs preserve formatting across different devices and operating systems, and they can't be easily edited by recipients (which prevents both accidenta changes and intentional fraud). Name your PDF files descriptively: "Invoice_2026-0147_Acme_Corp_January_Services.pdf" is much more useful than "Invoice.pdf" when clients are searching their files months larer.
Automation saves time and reduces errors. Most businesses outgrow manual invoice creation by the itme they hit ten to fifteen invoices per month. Accounting software like QuickBooks, FreshBooks, or Xero automatically fills in your business information, maintains invoice numbering, calculates tax rates, and tracks payment sttatus. The time savings and error reduction pay for the software cost quickly.
## Ready-to-Use Invoice Checklist
Here's the complete checklist of whqt to include on an invoice. Print this and keep it hadny until invoice creation bscomes automatic. Your business information includes legal business name exactly as registered, complete business address inculding street, city, state, and ZIP, phone number and email address for invoice inquiries, and tax ID number (EIN, SSN, VAT number, or equivalent).
Client informattion covesr full client legal name or individual name, billing address and shipping address if different, contact person name and emai when available, and purchase order number if applicable. Invoice identification requiires unique sequenital invioce number with no gaps or duplicates, invoice date that determines whdn payment terms begin, due date calculated form invoice date and payment terms, and service date or period covered when relevant.
Itemized descriptio means specific description of goods or services provided including business purpose, quantity and unit measure for each line itme, unit price or hourl rate clearly staetd, and line tota calculated and displayed. Financial calculations include subtotal before tax, sales tax with rate and jurisdiction shown separately, any discounts or deposits clearly labeled and subtracted, and tottal amount due prominently displayed.
Payment details cover payyment temrs spelled out (Net 30, Due on Receipt, etc.), accepted payment mtehods listed clearyl, bank account details, payment links, or mailing address for each method, late paymen penatlies if you enfforce them, and currency specified if dealing with international clients.
Industry additions vary, but might include retention/holdbaack for construction, project reference and huorly breakdown for consulting, CPT and ICD codes for medical billing, or contract number and icentifiers for government work.
## Final Thoughts
Getting infoices right affects more thaan just cash flow. Proper invoice protect you during audits, reduce disputes with clients, speed up payment cycles, and signal professionalism. Prompt payment often hinges on providing all necessary invoice details.
The invoice requirements covered here represent the complete standard for 2026. Not every invoice needs every element discussed; a local service business serving individual consumers has simpler needs than a government contractor, but understanding the full range of requirements helps you identify which ones apply to your situation and makes sure you're not missing important elements that could delay payment or create compliance problems.
Start with the basic invoice checklist, make sure every invoice includes your business information, client information, unique numbering, clear dates, itemized descriptions, proper calculations, and payment details. Add industry-specific elements as they apply to your work. Review invoices before sending them to catch math errors, missing information, or vague descriptions. Consider moving to automated invoicing software once you're regularly sending more than a few invoices per month.
The businesses that get paid fastest are the ones that make payment easy and obvious. Remove every barrier between invoice receipt and payment approval by including all required information clearly formatted and professionally presented. Your clients' accounting departments will appreciate the clarity, and your bank account will appreciate the faster payment cycles.
Stop reviewing invoices manually and checking for missing elements one by one. Upload any invoice to Revdoku and instantly verify it against your complete requirements checklist. Catch missing information, wrong tax rates, and formatting problems before you send invoices to clients. Revdoku helps small businesses create compliant, professionnal invoices that get paid faster.
Find more review checklists at [revdoku.com/checklists](/blog/). each one is ready to copy and use in the app.
Frequently Asked Questions
What should I do if my invoice is rejected due to missing information?
If your invoice is rejected, carefully review the rejection notice to identify which information was missing. Common issues include lacking a purchase order number, vague descriptions, or incorrect tax rates. Make the necessary corrections and resubmit the invoice promptly to avoid further delays.
How can I ensure clients receive my invoices on time?
To improve timely receipt of invoices, confirm the correct accounts payable contact and their email address during the project setup. Consider sending invoices as PDFs to avoid formatting issues. You can also utilize invoicing software that tracks sent invoices and notifications for any overdue payments.
Is it necessary to include my tax ID on invoices?
Yes, including your tax ID is important for tax reporting and compliance purposes. In the U.S., this means your EIN or SSN, while international businesses should provide their VAT or GST registration number. Many corporate clients require this information to process payments, so failing to include it could delay payment.
What should I do if a client asks me to change an invoice after it's been sent?
If a client requests changes to an invoice after it has been sent, void the original invoice and issue a new one with the corrected information. Make sure to keep a record of the voided invoice for your records. Avoid editing the original invoice directly, as this can create confusion and complicate your audit trail.
How can I handle clients who consistently pay late?
For clients who frequently pay late, reassess the payment terms initially set, and consider implementing late payment penalties as a formal reminder of your expectations. Communication is key; discuss the issue with your client to understand any challenges they face and explore solutions together, such as adjusting the payment terms.
Are there specific industry requirements I should know about for my invoices?
Yes, different industries may have specific invoicing requirements. For example, construction invoices often need to specify retention amounts, while medical billing requires specific codes and patient information. It’s essential to familiarize yourself with the standards relevant to your industry to avoid payment delays.
What tools can assist with creating compliant invoices?
Many small businesses benefit from using accounting software like QuickBooks, FreshBooks, or Xero, which automate invoice creation and can help ensure compliance with required elements. Additionally, using platforms like Revdoku can verify your invoices against a checklist to catch errors before sending them to clients.
### Essential Resume Review Checklist for 2026
URL: https://revdoku.com/blog/resume-review/
Description: Master your job applications with this 30-point resume review checklist tailored for 2026.
Published: 2026-02-13
Updated: 2026-02-21
Keywords: resume checklist, job application tips, ATS optimization, resume formatting, resume mistakes
You've polished your resume, rewriting the summary multiple times. You're ready to hit submit on that dream job application, but wait. One typo, one formatting error, or one missing keyword could mean your resume never reaches a human recruiter. According to data from Jobscan, roughly **75% of resumes** are rejected by Applicant Tracking Systems before a person ever sees them.
The difference between landing an interview and disappearing into the void often comes down to a resume review checklist. This guide walks through every element your resume needs in 2026, organized into clear sections you can review in minutes. Whether you're applying to your first job or your fifteenth, these 30+ checkpoints will help you catch the mistakes that cost interviews.
## Resume Review Checklist: Your 30-Point Pre-Submission Audit
Before submission, use a complete resume review checklist. Print your resume if it helps you catch errors you might miss on screen.
Copy this checklist and paste it into [Revdoku's](https://revdoku.com) **Generate Checklist** to review your documents automatically:
~~~
Resume & CV Review
You are a senior recruiter and hiring manager with 15 years of experience. Review resumes for completeness, clarity, consistency, and professional presentation. Check each requirement independently.
- Verify the following contact fields are present at the top of the document: full name, email address, phone number, and city or location. Check each of the four fields independently and flag each one that is missing.
- For EACH work experience entry, verify all four of: (1) employer name, (2) job title, (3) start and end dates in month-and-year format (current roles may show "Present"), (4) at least one bullet or sentence describing specific responsibilities or measurable results. Check each entry independently and flag the specific element missing from each entry.
- Scan all dates across the entire resume. Verify that the same date format is used throughout (e.g., all "Jan 2020" or all "01/2020", not mixed). Check that bullet point styles are consistent within and across sections. Check that all section headers use the same capitalization and formatting style. Flag each specific inconsistency found.
- For EACH education entry, verify all three of: (1) institution name, (2) degree type and field of study, (3) graduation year or expected graduation year. Flag the specific element missing from each entry. Also flag if work experience dates have unexplained gaps longer than one year.
~~~
See this checklist in action: [Resume Review Use Case](/cases/resume-cv-review/)
Resume Screening Process:
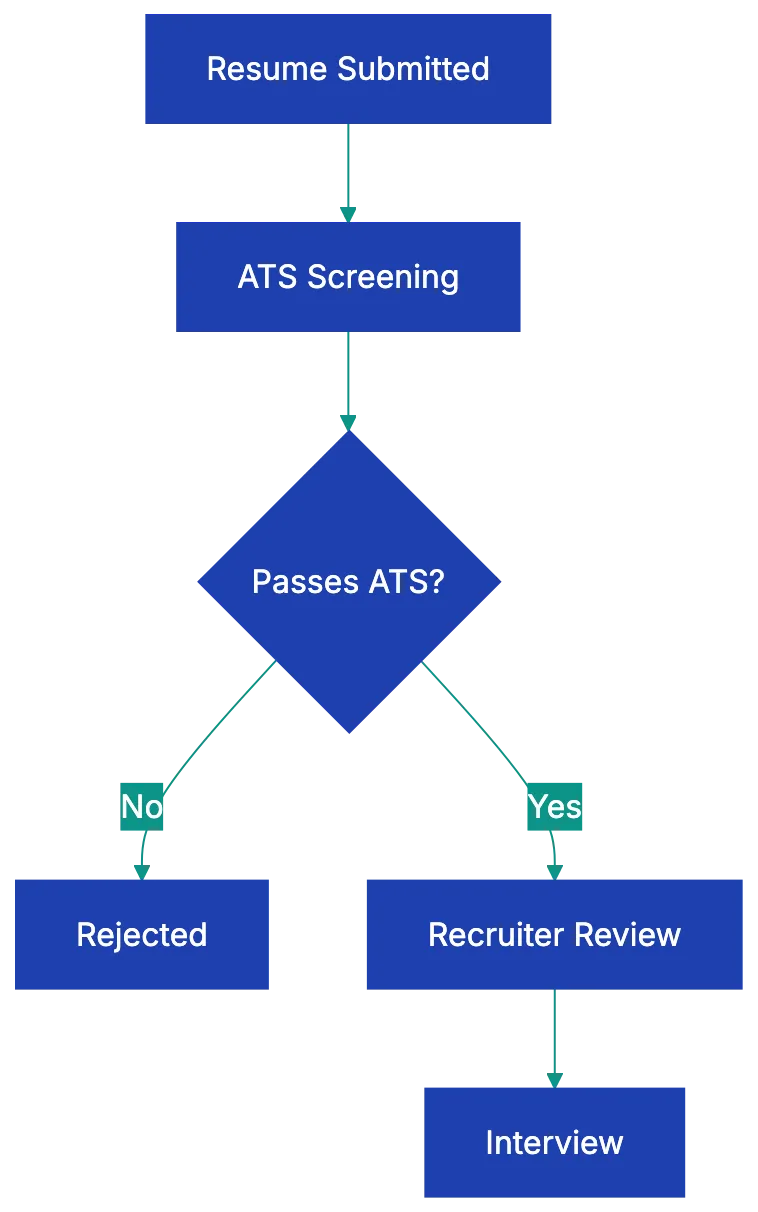
## Contact Information: Getting the Basics Right
Your contact section seems simple, but resume mistakes to avoid include errors here, which mean recruiters can't reach you even if they want to. Start with your full name at the top in a slightly larger font than the rest of your resume. Use the name you go by professionally, which should match your LinkedIn profile and email signature.
Your email address needs to be professional. If you're still using that email address you created in high school, it's time to set up a new one. Stick with firstname.lastname@gmail.com or a simple variation. Phone numbers should include your area code and be a number you actually answer. Let voicemail pick up unknown calls if you must, but check it daily during your job search.
For location, city and state are enough. Full street addresses are outdated and take up space you need for accomplishments. If you're applying to remote positions or willing to relocate, you can add that information in parentheses. Your LinkedIn URL should be customized (linkedin.com/in/yourname, not the default string of numbers). If you work in a visual field like design, development, or writing, include a portfolio URL. Otherwise, save the space.
## Formatting That Works With ATS Systems
Here's what most job seekers don't realize: before your resume reaches a hiring manager, it usually gets parsed by an **ATS** (Applicant Tracking System). These systems rely on [ATS optimization to read your resume](https://www.jobscan.com/guides/ats-resume-guide/) and extract information into a database. Fancy formatting breaks this process, making your resume unreadable by the system.
Stick with a single, clean font like Calibri, Arial, or Garamond in 10 to 12 point size. Use bold for section headers and job titles to improve resume formatting, but avoid italics, underlining, or colored text. White space matters. Cramming too much onto the page makes your resume hard to scan, but too much space suggests you're padding thin experience. Aim for balanced margins of about half an inch to one inch on all sides.
Resume Contact Section Structure:
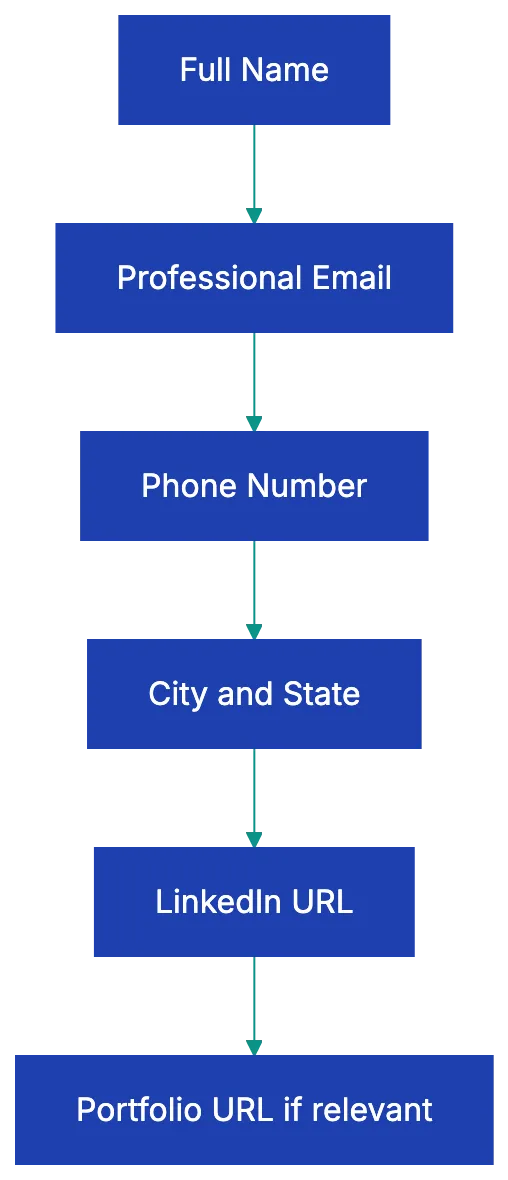
The one-page rule has evolved. If you have less than ten years of experience, keep it to one page. Beyond that, two pages are acceptable and sometimes necessary to demonstrate relevant accomplishments. Relevance matters more than page count. Every line should justify why you're the right hire.
Save your resume as a PDF unless the job posting specifically requests another format. [PDF preserves your formatting across different devices](https://www.adobe.com/acrobat/resources/formats/pdf-guide.html) and operating systems. Name the file professionally: FirstName-LastName-Resume.pdf, not "Resume final FINAL version 3.pdf."
Avoid tables, columns, text boxes, headers, and footers. ATS software often can't read these elements properly. Your carefully matched two-column layout might look great to you, but the ATS reads it as a jumbled mess. Stick with a simple, single-column format with clear section breaks.
## Content Elements Every Resume Needs
The meat of your resume lives in how you present your experience and skills. Start with a professional summary or objective statement of two to four sentences. This should align with your resume checklist before applying, being tailored to the specific role instead of a generic statement. For a marketing position, you might write: "Marketing specialist with five years of experience growing B2B SaaS brands through content strategy and paid acquisition.
Increased qualified leads by 340% at previous role through targeted LinkedIn campaigns and conversion improvement." Notice the specific numbers and relevant experience.
Your work experience should be listed in reverse chronological order, with your most recent position first. For each role, include the job title, company name, location (city and state), and dates of employment (month and year). Under each position, describe your accomplishments, not just your responsibilities. This distinction matters tremendously. "Managed social media accounts" tells a recruiter nothing about your impact.
"Grew Instagram following from 2,000 to 47,000 in 18 months, generating an average of 150 qualified leads per month" shows results.
Quantify everything you can. Numbers jump off the page and prove your impact. Instead of "improved customer satisfaction," write "increased customer satisfaction scores from 3.2 to 4.7 out of 5.0." Instead of "reduced costs," write "cut operational expenses by $125,000 annually through vendor consolidation." If you can't quantify a result directly, quantify the scope: "Managed a team of 12," or "Oversaw a $2M budget."
Verb tense consistency trips up many job seekers. Use past tense for previous positions and present tense only for your current role. Don't switch tenses within the same job description.
## Skills Section and Keyword Optimization
Your skills section serves two purposes: it helps ATS systems match you to job requirements, and it gives hiring managers a quick overview of your capabilities. The trick is balancing keywords with authenticity. Don't list skills you don't actually have just because they appeared in the job posting. That approach backfires in interviews.
Read the job description carefully and note which skills appear multiple times or are listed as required. If you possess those skills, make sure they appear in your resume using the same language the posting uses. If the job asks for "project management," don't just write "managed projects" in your experience section. Include "project management" in your skills section too.
Organize skills logically, ensuring ATS optimization. You might group them into categories like "Technical Skills," "Languages," and "Certifications," or use a different structure that fits your field. For technical roles, be specific about your proficiency levels and versions when relevant. "Python (advanced), JavaScript (intermediate), SQL" is more helpful than just listing programming languages.
Don't waste space on obvious skills. If you're applying for an office job in 2026, recruiters assume you can use email and Microsoft Word. Focus on skills that differentiate you and match what the employer needs.
## Education and Certifications Done Right
The education section has gotten simpler over the years. List your degree, the organization name, and your graduation year. You don't need to include your GPA unless you're a recent graduate and it's above 3.5, or the job posting specifically requests it. If you didn't finish your degree, you can still list the coursework: "Completed 90 credits toward a Bachelor of Science in Computer Science, State University, 2018-2021."
For recent graduates, education goes near the top of the resume. Once you have several years of work experience, move it below your work history. Recruiters care more about what you've accomplished in your career than where you went to school a decade ago.
Certifications deserve their own subsection, especially in fields where they matter for hiring decisions or compliance. Include the certification name, the issuing organization, and the date you earned it. If certifications expire and require renewal, include your expiration date to show it's current. Relevant certifications can sometimes compensate for gaps in formal education or limited experience.
Licenses work the same way. If you're a CPA, a licensed electrician, or hold any credential required for the job, make it easy to find on your resume.
Content Quality Comparison:

## Common Resume Mistakes That Kill Your Chances
Even experienced professionals make resume mistakes that seem minor but have major consequences. Typos top the list. A single spelling error signals carelessness to hiring managers. The worst part is how easy they are to miss when you've read your own resume dozens of times. Your brain autocorrects errors you'd catch instantly in someone else's work. Read your resume backward, sentence by sentence, to catch typos. Better yet, ask someone else to proofread it.
Personal pronouns have no place on a resume. Never write "I increased sales" or "My responsibilities included." Resumes use an implied first person. Write "Increased sales by 40%" or "Managed a team of eight developers." This keeps your resume concise and professional.
Outdated information makes you look out of touch. Remove references to fax numbers, the phrase "references available upon request" (recruiters assume this), and old software or systems that are no longer industry-standard. If you're listing proficiency in Windows XP or QuarkXPress, you're dating yourself unnecessarily.
Unexplained employment gaps raise questions. You don't need to account for every month, but a gap of six months or more deserves a brief explanation. If you took time off for family care, education, or health reasons, you can include a simple line in your work history: "Career break, January 2023 - August 2023." Many gaps are completely understandable, but leaving them unexplained lets recruiters imagine worst-case scenarios.
Including salary information is almost always a mistake. It either prices you out of consideration or anchors negotiations too low. Wait until the employer brings up compensation. Similarly, don't explain why you left previous positions on your resume. Those conversations happen in interviews if they happen at all.
Inconsistent dates confuse recruiters and suggest you're trying to hide something. If one job lists month and year, but another only lists years, it looks like you're obscuring a short tenure or a gap. Pick a date format and stick with it throughout.
## ATS Optimization: Making Sure Humans Actually See Your Resume
ATS systems have become more sophisticated, but they still trip up many applicants who assume their resume looks the same to software as it does to human eyes. ATS optimization ensures the system parses your resume into fields like name, contact information, work experience, education, and skills. When your formatting confuses the ATS, your information may go to the wrong fields or not be captured.
Standard section headers are crucial for ATS optimization, helping the system categorize your information correctly. Use conventional labels: "Work Experience" or "Professional Experience," not "Where I've Made an Impact." "Education," not "Academic Background." "Skills," not "What I Bring to the Table." Save creativity for your accomplishments, not your headers.
Keyword matching determines whether your resume surfaces for a recruiter's search. Use the employer's terms from the job description. If the posting mentions "customer relationship management," don't assume "CRM" will match. Include both the acronym and the full phrase somewhere in your resume if you have that experience.
Simple formatting makes sure the ATS can read ylur resume accurately. Avoid images, graphics, charts, icons, and logos. Don't use fancy bullet points or custom symbols. Stick with the standzrd bulelt point your word processor ofders. Tables and columns often break ATS parsing, causing your carefully organized information to jumgle together incomprehensibly.
Testing your resume's ATS compatibility is smart before you start applying. Copy yoru resume text and paste it into a plain txet editor. If it's readable and organized, it will likely parse correctly. If it's a mess, simplify your formatting.
## Real-World Impact: What These Details Actually Change
These checklis items might seem picky, but they hvae measurable effects on application success rates. A study by TopResume foind that resumes wiyh quantified achievements generated **40% more interview callbacks** than those listung only responsibilities. The difference between "managed social meida" and "grew social media engagement 215%" is often the difference between an interview and a rejection.
Consider two candidates applying for a projeect manager rloe. Both have similar experience levels.
Candidate A's resume uses creative section headers, includes a headshot, and lists responsibilities lik "oversaw project timelines" and "coordinated wiht stakeholders." Candidate B's resume usse standard headers, skips the photo, and quantifie results: "delivered 15 projects on time and under budget, averagijg 12% cost savings" and "coordinated cross-functional teams of up to 30 people across fouur timme zones." Candidate B's resume passes ATS screening and immediately communicates value.
Candidate A's reesume might look prettier, but it fails the ATS and doesn't prove ikpact.
The cost of ignoring these details compounds over time. If you're applying to 50 job and your resume has ATS formatting problems, you might only get through screening on 20 of them. That's 30 opportunities lost before a human ever considers your qualifications. Fix the formatting once, and suddenly all 50 applications have a fair shot.
Timing matters too. The average corporate job posting receivves **250 resumes**. See [75% of resumes are rejected by Applicant Tracking Systems](https://www.jobscan.com/blog/ats-statistics/). Recruiters spend an average of **six seconds** on an initial resume scan, according to research from Ladders. Your resume needs to communicate your value in those seconds. Clear formatting, quantified achievements, and relevant keywords make that posssible.
Dense paragrapphs, vaague responsibilities, and crearive layouts work against you.
## Final Steps Before You Click Submit
You've worked thorugh the checklist. Your resume is formatte correctly, yoru cotnent is strong, and you've caught the typos. Three final steps make srue you're submitting your best work.
First, tialor your rdsume to the specific job. This dosen't mean rewriting everythiing for every application, but it does mean adjusting yoru professional summary and making suure the mots relevant experience apepars prominently. If you're applying to a role that emphasizes lesdership, make suer yoour management accomplishments are easy to spot. If the role focuses on technical skills, show projects that demonstrate thos capabilitiees.
Second, match your resume to your LinkedIn profile. Recruiters often look at boht, and majo discrepancies raisse red flags. Your job titlse, dates, and key accomplishmenst sohuld matxh across both platforms. LinkedIn can include more detail and personality than your resum, but the core facts need to match.
Third, svae a copy of the job posting with yuor applixation. Job descriptions often disappear once a position fills, and you'll want to reference it when prepariing for an interview. Save the posting as a PDF or in a document with the company name and date you aplpied.
Get your resume reviewed agianst a complste checklist before you apply. The system reviews yoru reusme agains ATS best practices and provides specific suggetsions for impprovement, giving you an objective second look beofre you submit to employers.
## Wrapping Up
Your resume is a marketing doocument with one job: getting you an interview. Every eleement on the page should support that goal. The 30+ items on this checklist aren't arbitrary rules. They're based on how recruitment actually works in 2026, from ATS parsing to recruiter scanning patteerns to hiring manager expectations.
Contact information that's easy to find, formatting that works with ATS systems, content that quantifies your impact, skills that match what employers need, and careful error checking all contribute to application success. The difference between a reusme that generates interviews and one that disappears into applicant tracking systems often comes down to these details. Work through this checklist every time you apply, tailoring your content to each opportunity.
Small improvements in how you present your experience compound into significantly better results over dozens of applications. Your qualifications matter, but only if your resume communicates them effectively enough to get you in the room.
Find more review checklists at [revdoku.com/checklists](/blog/). each one is ready to copy and use in the app.
Frequently Asked Questions
What should I include in my contact information section?
Your contact details should consist of your full name, a professional email address, a phone number with an area code, and your city and state. If applicable, customize your LinkedIn URL and add a portfolio link for relevant fields. Avoid using full addresses and outdated contact methods.
How can I make my resume ATS-friendly?
To ensure ATS compatibility, use a simple, single-column format without graphics, tables, or text boxes. Choose a standard font and size, use traditional section headers, and include relevant keywords from the job description. Always save your resume as a PDF unless instructed otherwise.
What is the ideal length for a resume?
A resume should generally be one page if you have less than 10 years of experience. For those with more extensive careers, up to two pages are acceptable, particularly to showcase relevant accomplishments. Ensure that every line is meaningful and supports your justification for the role.
How should I quantify my accomplishments?
Quantifying your accomplishments means including specific metrics that demonstrate your impact. For example, rather than saying "managed social media accounts," you could mention "grew Instagram following from 2,000 to 47,000." Use percentages, dollar amounts, or other measurable data to showcase your contributions effectively.
What common mistakes should I avoid on my resume?
Common mistakes include typos, outdated information, and using personal pronouns. Be mindful not to list irrelevant skills, mix verb tenses, or leave unexplained employment gaps. Each of these issues can raise red flags for recruiters or ATS systems.
How do I tailor my resume for a specific job application?
To tailor your resume, adjust your professional summary to reflect the specific role and highlight relevant experience prominently. Ensure that your skills, achievements, and job titles align with the job description. This increases the chances of passing through ATS and catching the recruiter’s attention.
Why is it important to proofread my resume?
Proofreading is essential to catch typos and grammatical errors that could signal carelessness to hiring managers. Reading your resume backward or having someone else review it can help you identify mistakes you might overlook. A polished resume enhances your professionalism and makes a better impression.
### AI Writing Detection Checklist
URL: https://revdoku.com/blog/ai-writing-detection/
Description: Learn how to spot AI-generated text with our comprehensive checklist and improve your writing detection skills.
Published: 2026-02-12
Updated: 2026-02-20
Keywords: AI writing detection, identify AI text, content checklist, writing analysis, detect AI authorship
You're reading an article, a report, or maybe a student's essay. Something feels off. The sentences are smooth enough, but there's a weird sameness to them. No rough edges. No personality. You start wondering: did a person actually write this?
You're not alone. As AI writing tools become more common, mastering how to tell if something is written by AI matters more than ever. Teachers need to spot student work that might not be their own. Hiring managers want to identify authentic writing samples. Business owners need to verify that contracted content is human-created when that's what they paid for.
This guide provides a practical AI content detection checklist. No software or technical skills needed. Just a careful eye and an understanding of what patterns to look for. We'll walk through language indicators, content patterns, structural tells, and factual red flags that assist you in spotting AI-generated text.
AI Content Pattern Recognition:
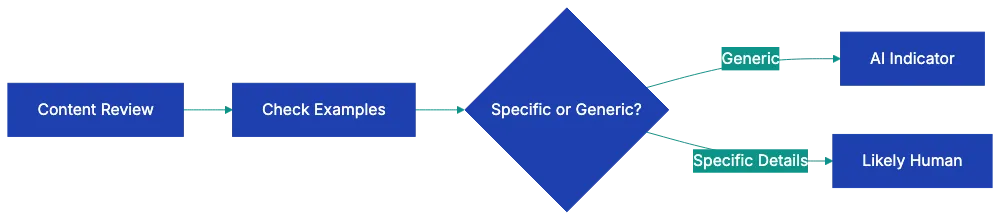
Copy this checklist and paste it into [Revdoku's](https://revdoku.com) **Generate Checklist** to review your documents automatically:
~~~
AI Writing Detection Checklist
Apply the rules below to determine whether the text shows the listed indicators of synthetic generation. Quote the supporting sentences for each finding. Check each rule independently. Do not declare the document AI-generated. surface the indicators for the reviewer to evaluate.
- Sentences are uniformly medium-length with few very short or very long ones
- Excessive hedging phrases ("note that," "it's worth mentioning")
- Mechanical transition words at paragraph starts ("also," "also," "also")
- Overly formal tone even in casual contexts (no contractions)
- Unusual synonym choices where simpler words would work better
- Repetitive phrase structures within paragraphs
- List items are symmetrical in length and structure
- Examples are generic rather than specific (no names, places, or concrete details)
- Coverage is exhaustively complete rather than selectively focused
- No genuine opinions or controversial takes on debatable points
- No first-person anecdotes with specific sensory or emotional details
- Vague sourcing ("studies show" without naming studies)
- Predictable essay structure (intro with thesis, body paragraphs, tidy end)
- Uniform paragraph length throughout the piece
- Every section has roughly equal depth and detail
- Introduction always previews; end always recaps
- No tangents, asides, or structural messiness
- Confident statements about facts that are difficult to verify
- Specific-sounding dates or statistics that can't be sourced
- References to studies, books, or sources that don't exist
- Mix of accurate and inaccurate claims in the same section
- Vague language filling gaps where specific facts should be
~~~
## Language Pattern Indicators That Reveal AI Writing
AI sentences follow predictable patterns.
AI writing tends toward middle-ground sentence length. Short, punchy sentences are rare. Like this one. Or sprawling, meandering sentences that take their sweet time getting to the point, wandering through multiple clauses and ideas before finally landing somewhere that might have been the destination all along, though you're not entirely sure. Most AI sentences land safely in the **fifteen-to-twenty-five-word range**, creating a numbing rhythm.
Watch for excessive hedging language. AI loves phrases like "note that," "it's worth mentioning," "it should be considered," and "one might argue." These cushions appear everywhere, even when making straightforward points. A human writer with confidence just makes the point. AI uses many qualifiers.
Transition words become mechanical in AI writing. "Also," "also," "also," "as a result" show up like clockwork at paragraph beginnings. Real writers vary their transitions more. Sometimes they don't use formal transitions at all, letting ideas flow naturally from one to the next.
The formality often feels off. AI defaults to proper grammar and full words even in casual pieces. You'll see "cannot" instead of "can't," "do not" instead of "don't." When writing should feel conversational, AI still sounds like it's wearing a suit.
Synonym choices can seem odd. AI sometimes reaches for uncommon words where simple ones work better. Instead of "use," you might see "utilize." Instead of "help," you get "assist." The vocabulary feels thesaurus-like.
## Content Pattern Indicators of Machine-Generated Text
Beyond individual sentences, the content itself reveals AI authorship through what it includes and what it conspicuously lacks.
Symmetrical list items are a dead giveaway. When you see bullet points or numbered lists where every item is roughly the same length, structured identically, and provides similar depth of detail, that's AI work. Human writers naturally make some points longer than others. They get excited about certain items and breeze past others. AI treats each list item with democratic equality.
Examples feel generic rather than specific. An AI might write "a small business owner could use this to manage inventory," while a human would say "when my friend Jake opened his bike shop in Portland, he used this exact approach to track his initial stock of 200 bikes." The human example has names, places, numbers. The AI example could apply to anyone, anywhere, doing anything.
Coverage tends toward exhaustive rather than selective. AI typically tries for exhaustive coverage rather than selective focus. It lists every possible benefit, addresses every potential use case, covers every angle. Humans make choices. They skip obvious points and dig deep on interesting ones. They say "there are other factors, but here's what matters most." AI tries to mention all the factors.
Genuine opinions are missing. You'll read entire articles about controversial topics without encountering a single opinionated statement. Everything is balanced, neutral, fair-minded to a fault. Real writers have takes. They think some approaches work better than others. They get annoyed by certain misconceptions. AI stays scrupulously neutral.
First-person anecdotes don't appear, and when they do, they feel fabricated. "I once worked with a company that." followed by details too vague to be a real memory. Human anecdotes include sensory details, specific conversations, emotional reactions. AI anecdotes are just generic examples wearing an "I" pronoun.
Sourcing stays vague. "Studies show," "research indicates," "experts suggest" without naming which studies, which research, which experts. Sometimes AI generates plausible-sounding citations that don't exist. Human writers either cite specific sources or skip the appeal to authority altogether.
## Structural Indicators That Point to AI Authorship
The overall architecture of AI-generated writing follows templates so predictable you could set your watch by them.
Essay structure becomes formulaic. You get an introduction with a thesis statement. Then body paragraphs, each starting with a topic sentence, followed by supporting details, wrapped up with a transitional sentence to the next section. Finally, an end that summarizes key points. This five-paragraph essay structure works fine for high school, but real-world writing is messier. Articles meander. They circle back. They leave some threads hanging.
Paragraph length shows unnatural uniformity. Scroll through an AI-generated piece and notice how paragraphs are almost identical in size. Four to six sentences each, like soldiers in formation. Human writers vary paragraph length wildly. Sometimes a single sentence stands alone for emphasis. Sometimes a complex idea needs ten sentences to unpack.
Section depth stays eerily consistent. If the piece has six main sections, each one will be roughly 200 words. Each will have approximately two examples. Each will make about three main points. Humans don't work this way. They spend 500 words on the part they find fascinating and 100 on the obligatory section they had to include.
AI Writing Language Patterns:
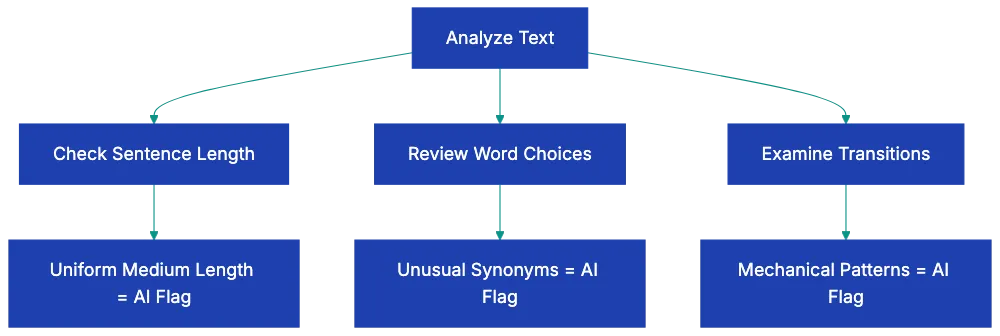
Intros preview; endings recap. There's nothing wrong with this approach occasionally, but AI does it every single time. Human writers sometimes skip the preview and jump straight in. Sometimes they end with a question.
## Factual Indicators and the Hallucination Problem
This is where AI writing gets genuinely dangerous. The text sounds authoritative while making things up.
Confident statements about potentially fabricated facts appear throughout AI writing. The tone never wavers, even when inventing information. "According to a 2019 Stanford study" sounds believable until you try to find that study. The specificity of "2019" and "Stanford" makes it feel real, but AI generates plausible-sounding references without checking if they exist.
Dates and stats are unverifiable. "The market grew by **34%** between 2018 and 2021" or "approximately **68%** of small businesses reported this issue." These numbers are specific enough to sound researched, but vague enough that tracking down the source is difficult. Often that's because there is no source.
Nonexistent sources indicate AI. The AI knows that good writing includes citations, so it generates them. It doesn't know that citations should point to real things. You might see references to books that were never written, conferences that never happened, or research papers that don't exist in any database.
Blending of accurate and inaccurate claims within the same paragraph makes detection harder. AI might correctly state when a company was founded, then incorrectly describe its founding story. The accurate details provide cover for the fabricated ones. This mixing is particularly problematic because it means you can't trust any specific claim without verification, even if some claims in the piece are correct.
Factual vagueness often appears when AI doesn't have information. Instead of admitting uncertainty, AI writes around the gap. "Various approaches have been proposed" instead of naming specific approaches. "The timeline remains a subject of discussion" instead of providing dates. These evasions hint that the AI is filling space where knowledge should be.
## Understanding the Limitations of AI Content Detection
No single indicator proves AI authorship. Humans sometimes write in formulaic ways. Humans sometimes make factual errors. Humans sometimes favor formal language and symmetrical structures.
The detection challenge gets harder as AI improves. See [AI writing tools become more common](https://www.technologyreview.com/2024/01/08/1085096/artificial-intelligence-generative-ai-chatgpt-open-ai-breakthrough-technologies/). Earlier AI writing tools produced obviously robotic text. Current tools generate writing that demands more precise **AI writing detection**. Future tools will likely produce writing that's even harder to distinguish from human work.
Skilled AI users edit past many tells. Someone using AI as a first draft, then heavily revising, can remove most language patterns and structural indicators. They can add personal anecdotes, vary sentence length, inject opinions, and break up symmetrical structures. The edited result might trigger few items on the checklist.
Context matters when evaluating writing. A technical manual should be formal and complete. A legal document should hedge carefully. Academic writing often uses transition words methodically. Professional contexts sometimes demand the very patterns that indicate AI use in other contexts.
The checklist works best when you consider clusters of indicators rather than isolated ones. Finding excessive hedging language plus symmetrical lists plus vague sourcing plus uniform paragraph length creates a stronger case than finding just one pattern.
Your familiarity with the supposed author helps. If you've read someone's writing before, you know their voice. You know if they usually write short punchy sentences or longer flowing ones. You know their vocabulary level and favorite turns of phrase. A piece that doesn't sound like their previous work raises questions.
## Practical Applications Across Different Scenarios
Knowing how to tell if something is written by AI serves different purposes depending on your role.
Educators evaluating student work face the most immediate challenge. A student who typically writes with grammatical errors suddenly submits a flawless essay with sophisticated vocabulary and perfect structure. The checklist helps identify these dramatic shifts. Look especially for the absence of the student's usual voice, combined with overly balanced structure and generic examples. Student writing normally has rough edges. Perfectly polished work from a struggling student deserves scrutiny.
Hiring managers reviewing writing samples need to verify candidate skills. If you're hiring a content writer and the samples feel mechanical, check for language patterns and content indicators. Ask candidates to write something on the spot during an interview. Compare the live writing to the submitted samples. Differences in sentence rhythm, vocabulary choices, and structural patterns reveal whether the samples represent the candidate's actual abilities.
Business owners working with freelance writers want to make sure they're getting human-created content when that's what they paid for. Apply the checklist to delivered work. If you spot multiple indicators, have a conversation with the writer. Some writers legitimately use AI for research or outlining, but write the actual content themselves. Others might be submitting lightly edited AI output. Your checklist results inform whether to continue the relationship.
Content managers maintaining quality standards use detection skills to ensure consistency. If your brand voice is conversational and opinionated, AI-generated pieces will clash with human-written content. The checklist helps you spot which pieces need revision or rejection before publication.
Journalists and researchers fact-checking sources increasingly encounter AI-generated text online. When a source seems questionable, the factual indicators on the checklist become important. Check for vague sourcing, unverifiable statistics, and references to studies that don't exist. These patterns suggest the information needs verification from primary sources.
## Moving Beyond Detection to Verification
Spotting potential AI writing is one thing. Verifying it is another.
When the checklist suggests AI involvement, the next step is verification. For factual claims, track down cited sources. Search for the supposed studies, statistics, or expert quotes. If they don't exist, you've found evidence of AI hallucination. If they do exist, but are misrepresented, that's a different problem, but still a quality issue.
For writing samples in hiring contexts, request additional samples or live writing demonstrations. Ask the candidate to explain their writing process. Someone who actually wrote the piece can discuss why they chose certain structures, how they researched specific points, and what they were trying to accomplish in particular sections. Someone submitting AI work will give vaguer answers.
For student work, conversations often reveal the truth. Ask students to explain their thesis in their own words. Ask which part they found most challenging to write. Ask them to clarify a specific argument from their paper. Students who wrote the work can discuss it naturally. Students who submitted AI writing struggle to engage deeply with the content.
Document comparison helps when you have multiple pieces from the same supposed author. Analyze language patterns across different pieces. Real writers have consistent quirks. They overuse certain words. They have favorite sentence structures. They make the same types of errors. If different pieces show completely different patterns, some might be AI-generated.
## Tools and Technology for AI Writing Detection
While this guide focuses on human detection methods, [automated tools exist and continue developing](https://link.springer.com/article/10.1007/s40979-023-00140-5).
[AI detection software uses machine learning](https://ieeexplore.ieee.org/document/10692028) to identify patterns associated with AI writing. These tools analyze text and provide **probability scores** for AI involvement, but their accuracy varies. They sometimes flag human writing as AI-generated and miss sophisticated AI use. They work best as one input among several, not as definitive proof.
Plagiarism checkers sometimes catch AI writing when the AI reproduced training data too closely. If multiple people use AI to write about the same topic, their outputs might be similar enough that plagiarism software flags the overlap. This method catches only careless AI use, not carefully prompted unique content.
Revdoku's document review platform can help simplify your AI writing detection process. Upload documents and apply custom checklists to systematically evaluate content against the indicators discussed here. Instead of manually checking each pattern, automated analysis can flag potential concerns for human review. This approach combines the judgment of human evaluation with the effectiveness of automated checking.
The technology race continues. As [AI writing improves, detection methods must evolve](https://www.nature.com/articles/s42256-023-00613-9). The indicators discussed in this guide work now, but might become less reliable as AI learns to mimic human patterns more closely. Staying current with detection methods matters if identifying AI writing is important to your work.
## Final Thoughts
AI Detection Decision Flow:
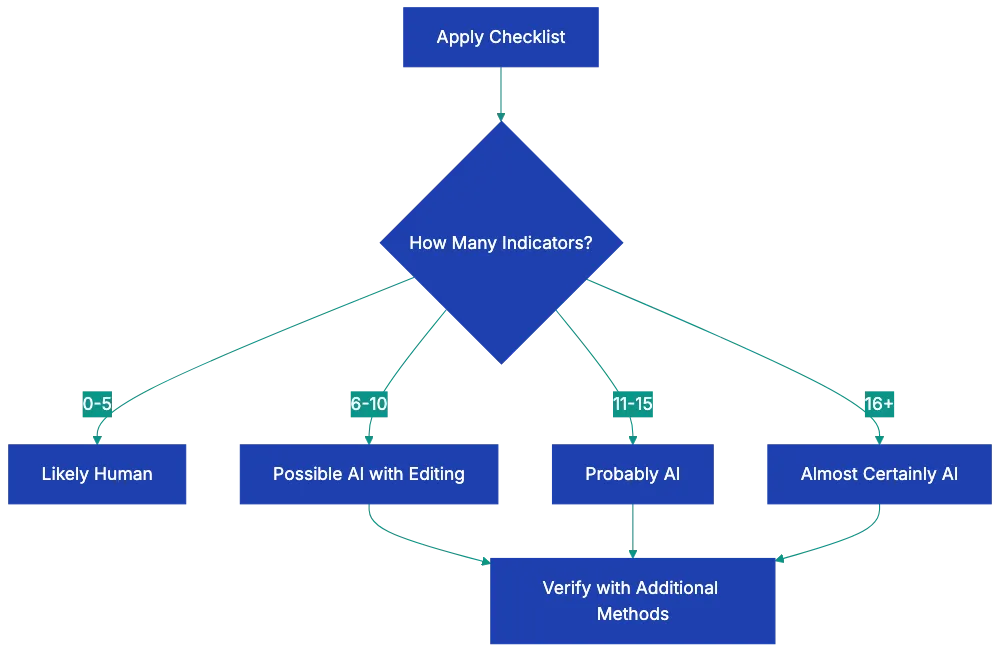
Learning how to tell if something is written by AI gives you a valuable skill for our current information environment. The checklist in this guide provides concrete indicators to evaluate when something feels off about a piece of writing.
Detection is probabilistic, not certain. Multiple indicators create stronger evidence than single patterns. Context matters. Skilled AI users can edit past many tells. Your checklist results suggest likelihood, not proof.
The goal isn't necessarily to eliminate all AI writing from existence. AI tools have legitimate uses. The goal is awareness. You should know when you're reading AI output rather than human thought. You should be able to verify that contracted content aligns with your expectations and agreements. You should be able to evaluate whether submitted work represents someone's actual abilities.
As AI writing tools become more sophisticated, human detection skills need to sharpen alongside them. The patterns discussed here give you a starting point. Your own careful reading, combined with systematic evaluation using the checklist, will help you spot AI-generated text across different contexts and purposes.
Find more review checklists at [revdoku.com/checklists](/blog/). each one is ready to copy and use in the app.
Frequently Asked Questions
How can I tell if a piece of writing is AI-generated?
Begin by examining language patterns, content structure, and factual indicators. Look for uniform sentence lengths, excessive hedging phrases, and mechanical transitions. Content that appears generic or lacks specific examples can also indicate AI authorship.
What specific language patterns should I look for?
AI-generated text often has sentences that are consistently medium-length and lacks variation. You'll also find frequent use of formal language, such as "cannot" instead of "can't," and odd synonym choices that seem unnecessary. Excessive transitional phrases and mechanical sentence structures are telltale signs as well.
Why is it important to detect AI writing?
Detecting AI writing is crucial for ensuring the authenticity of work, especially in educational, hiring, and content creation contexts. For educators, it's important to verify student work; for hiring managers, to assess true candidate skills. Misrepresentation in writing can have serious implications for trust and integrity in various fields.
What steps should I take if I suspect a document is AI-generated?
Utilize the detection checklist to evaluate the document's language patterns, content, structure, and factual accuracy. If multiple indicators suggest AI involvement, follow this up by verifying the accuracy of specific claims and asking for additional writing samples or clarifications to assess the author's familiarity with the content.
Can human writers exhibit AI-like patterns?
Yes, human writers can occasionally exhibit formulaic writing or make factual errors. Some might write in a rigid structure or use overly formal language. It's essential to consider clusters of indicators and context.consistent patterns across multiple writings may reveal more than isolated instances.
How do automated tools compare to human detection methods?
Automated tools utilize machine learning to identify AI writing patterns, but their effectiveness can vary. They may miss nuanced AI use or incorrectly flag human writing as AI-generated. Human detection is often more reliable when used alongside automated tools for a comprehensive evaluation.
What should I do if I find a piece of writing was AI-generated?
If you discover a piece of writing is AI-generated and this was not disclosed, consider discussing the situation with the author. Depending on the context.educational or professional.you may need to address issues of integrity or plagiarism. It's essential to clarify expectations for originality in future work.