Food Delivery Photo Requirements for Restaurants
Table of Contents
- Why Food Delivery Photo Requirements Matter for Your Restaurant
- Technical, Lighting, and Composition Requirements
- Technical Requirements
- Lighting and Color
- Composition and Angle
- Content, Prohibited Items, and Final Review
- Content and Accuracy
- Prohibited Elements
- Final Checks
- DoorDash Photo Requirements: The Technical Specifications
- Uber Eats Photo Requirements: Platform-Specific Standards
- Common Rejection Reasons Across Both Platforms
- Practical Tips for Getting Photos Approved First Time
- Workflow for High-Volume Menu Photo Updates
- How AI Tools Can Help With Photo Compliance Checking
- Dealing With Rejections and Resubmissions
- Key Takeaways
- Why Food Delivery Photo Requirements Matter for Your Restaurant
- DoorDash Photo Requirements: The Technical Specifications
- Uber Eats Photo Requirements: Platform-Specific Standards
- Common Rejection Reasons Across Both Platforms
- Your Complete Food Delivery Photo Requirements Checklist
- Practical Tips for Getting Photos Approved First Time
- Workflow for High-Volume Menu Photo Updates
- How AI Tools Can Help With Photo Compliance Checking
- Dealing With Rejections and Resubmissions
- Key Takeaways
Why Food Delivery Photo Requirements Matter for Your Restaurant
Quality photos drive 44% more sales on DoorDash. For a restaurant doing $10,000 monthly through delivery apps, proper photos could mean an extra $4,400 in revenue. Yet most restaurant owners upload their menu photos and face rejection, sometimes multiple times. Usually, the issue is not understanding DoorDash and Uber Eats requirements. Both platforms have specific technical standards, rejecting images that don’t meet them. This guide explains exactly what each platform requires, why photos get rejected, and how to get your menu photos approved on the first try.
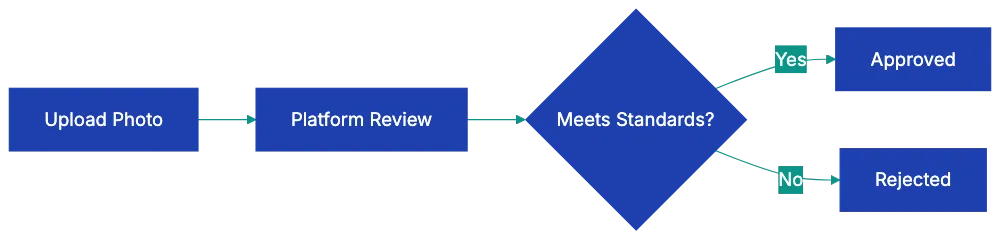
Photo Approval Process Comparison:
Technical, Lighting, and Composition Requirements
Before uploading any menu photo to DoorDash or Uber Eats, run through this checklist. Each item addresses a common rejection reason.
Technical Requirements
- Photo resolution is at least 1200×800 pixels (DoorDash) or 1080×720 pixels (Uber Eats)
- Image file is uncompressed original (not screenshot or downloaded from social media)
- Photo orientation is horizontal/scene for hero images
- File format is JPEG or PNG
- File size is under 5MB, but large enough for quality display
Lighting and Color
- Photo uses natural daylight or proper studio lighting
- No harsh shadows appear on or around the food
- No fluorescent or yellow/orange color cast from kitchen lights
- White balance is correct (food looks natural, not tinted blue or orange)
- Lighting is even across the entire dish
Composition and Angle
- Photo is shot from above at approximately a 45-degree angle
- Food is centered in the frame
- Entire dish is visible (not cropped awkwardly)
- Background is clean and simple (solid color, wood, or marble)
- No clutter, utensils, or unnecessary objects dominate the frame
Content, Prohibited Items, and Final Review
Content and Accuracy
- Food matches the menu item description exactly
- Portion size accurately represents what customers receive
- All components mentioned in the description are visible
- Food looks fresh and appetizing
- Garnishes shown come with the actual dish
Prohibited Elements
- No visible branding or logos from other companies
- No hands, people, or faces in the photo
- No text overlays or watermarks
- No heavy filters or artificial-looking editing
- No AI-generated or stock photography
- No composite images or collages
- Photo is not of packaging (bag, box, wrapper) instead of food
Final Checks
- Photo is recent and represents current menu version
- Image is sharp and in focus throughout
- Each menu item has its own individual photo
- Photos maintain a consistent style across all menu items
- You have rights to use the photo (you took it or own the license)
DoorDash Photo Requirements: The Technical Specifications
DoorDash maintains strict standards for restaurant menu photos. Understanding the 14 specific rejection categories saves time and frustration. See DoorDash. The minimum resolution stands at 1200×800 pixels. Anything smaller gets rejected automatically. The system checks this before a human ever sees your photo.
DoorDash requires well-lit images. Harsh shadows trigger rejection. So does the fluorescent color cast you get from overhead kitchen lights. The food needs to look like food, not like it’s sitting under a greenish office bulb.
Shooting angle is crucial. DoorDash wants photos shot from above at a 45-degree angle. This isn’t arbitrary. That angle shows both the top of the dish and enough of the side to communicate depth and portion size. Straight overhead (90 degrees) flattens everything. Eye level hides too much.
Backgrounds must be clean and simple. Your cluttered prep station won’t work. Neither will that busy tile pattern. The food must be the primary subject. Photos showing hands, people, or utensils dominating the shot get rejected. A fork in the frame for scale is fine. A hand holding the plate is not.
Branding rules are absolute. No visible logos or branding from other companies. If your pasta sits on a plate with a competitor’s logo, that’s a rejection. No AI-generated images, filters, stock photos, or text overlays. DoorDash wants real photos of real food.
Uber Eats Photo Requirements: Platform-Specific Standards
Uber Eats shares similar core principles. The minimum resolution drops to 1080×720 pixels, which is more forgiving than DoorDash, but there’s a catch: hero images (the main photos customers see first) should be horizontal or scene orientation. Vertical photos work for supplementary images, but not for the primary shot.
Composition rules on Uber Eats emphasize centering. Food should be centered in the frame, not pushed to one side for artistic effect. The platform values consistency. Your menu photos should have a consistent brand look across all items. Inconsistent backgrounds create customer cognitive friction.
Uber Eats explicitly bans composite or collage images. Each menu item needs its own individual photo. You can’t create a grid showing four different tacos in one image. The food needs to look natural, not overly processed or styled. This trips up restaurants that hire food photographers used to magazine work. Those heavily styled shots with tweezers-placed microgreens often look too artificial for Uber Eats approval.
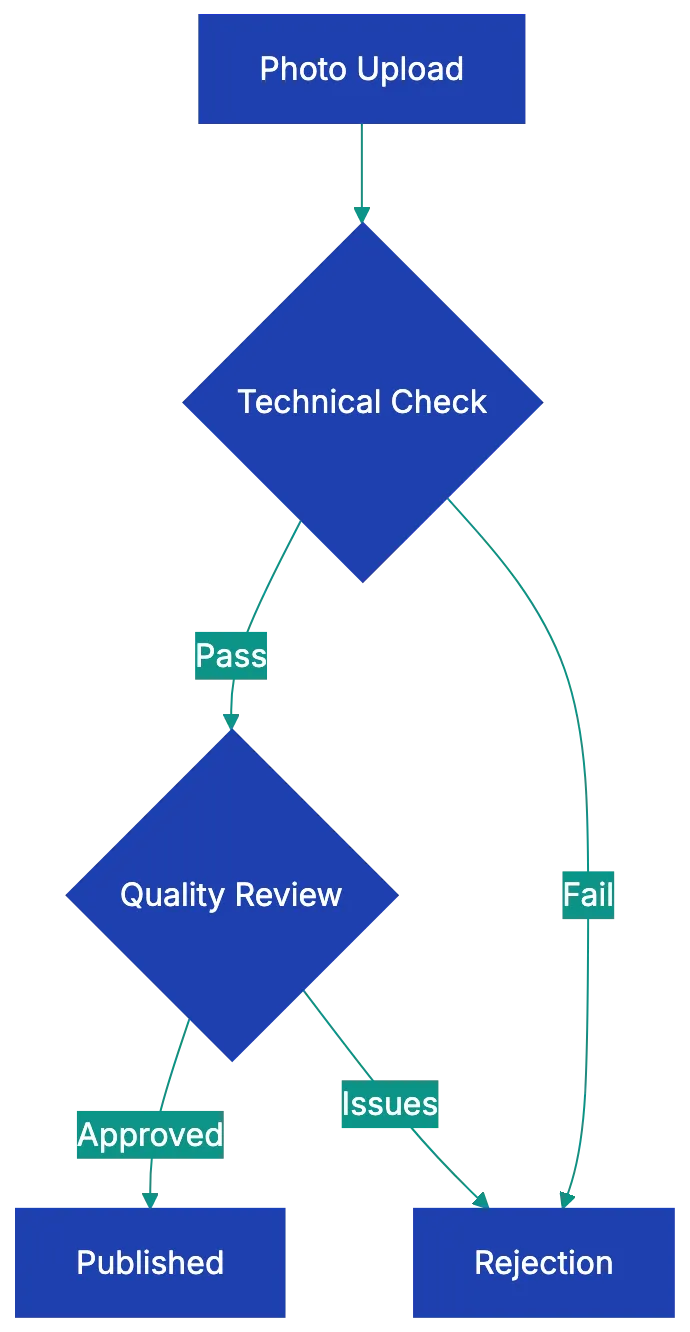
DoorDash Photo Requirements Overview:
Portion accuracy carries weight. The photo must accurately represent what the customer receives. If your photo shows a towering burger, but customers get something half that size, you’ll face rejection and potentially customer complaints. Uber Eats reviews photos against typical portion expectations for each cuisine type.
Common Rejection Reasons Across Both Platforms
Some rejection patterns appear across both DoorDash and Uber Eats. Blurry or low-resolution images top the list. This occurs with screenshots or compressed images. Original, uncompressed photos are necessary.
Poor lighting is too dark, bright, or wrong color. Too dark makes food look unappetizing. Too bright blows out details and makes everything look washed out. Wrong color temperature (that orange or blue tint) makes food look artificial. Chicken should not look blue. Pasta should not look fluorescent orange.
Cluttered backgrounds or messy presentation fail consistently. Platforms want to see food, not chaos. A single crumb is fine. Five napkins, three sauce bottles, and someone’s phone in the background is not. Mismatched images and descriptions confuse. If the menu says “Grilled Chicken Salad,” but the photo shows fried chicken, that’s a rejection.
Heavy filters or excessive editing make photos look fake. Instagram filters that work for personal photos often destroy food photos for commercial use. Zooming creates problems in both directions. Too close and customers can’t tell what the dish is. Too far and the food looks small or unappetizing. Visible watermarks or stock photo tags mean automatic rejection. Photos of packaging instead of actual food also fail. Customers want to see the burger, not the wrapper.
Practical Tips for Getting Photos Approved First Time
Natural daylight works better than any artificial lighting setup for most restaurants. Shoot near a window during mid-morning or mid-afternoon. Avoid direct sunlight, which creates harsh shadows. Diffused light from a north-facing window is ideal. If you must shoot at night or don’t have window access, invest in a basic photography light box or use two desk lamps positioned at 45-degree angles on either side of the food.
Use a tripod or stable surface. Phone cameras are fine for food delivery platform photos, but hand-held shots often show slight blur that gets photos rejected. A $20 phone tripod solves this. Set a two-second timer so pressing the shutter doesn’t shake the camera.
Shoot against a clean surface. A large white poster board costs $5 and creates a perfect background. Wood cutting boards work well for rustic concepts. Marble contact paper on plywood makes a reusable marble background. The investment is minimal, and the consistency helps with approval.
Include only dish garnishes. If your pasta comes with basil on top, show the basil. Don’t add rose petals and gold leaf for the photo if the real dish doesn’t include them.
Photograph each menu item individually, even if you offer combo meals. Take separate photos of the burger, fries, and drink, then submit the individual photos. This gives you flexibility and meets platform requirements. Shoot more photos than you need. Take ten shots of each dish from slightly different angles, then pick the best one. Professional food photographers shoot hundreds of images to get one perfect shot. You don’t need to go that far, but having options helps.
Make sure photos are current and match current menu portions. If you’ve changed your plating or portion sizes in the past six months, reshoot. Using outdated photos creates customer disappointment and increases refund requests.
Workflow for High-Volume Menu Photo Updates
Large menus pose challenges. Photographing 50 or 100 menu items seems overwhelming. Breaking it into a workflow makes it manageable.
Schedule photo sessions during slow periods. Tuesday and Wednesday afternoons typically see lower volume in most restaurants. Block two hours. Prepare six to eight dishes per session. This prevents food waste and maintains quality. Trying to photograph 30 items at once means the first dishes look wilted by the time you finish the last ones.
Set up your photo station once and use it repeatedly. Mark the exact position of your camera or tripod with tape on the floor. Note which surface you used for the background and which lighting setup worked. When you return for the next session, you can recreate identical conditions. This consistency helps with platform approval and brand coherence.
Create a spreadsheet tracking which items you’ve photographed, which photos are uploaded, and which are approved. Include columns for resolution check, file name, upload date, and approval status. This sounds tedious, but saves enormous time when you’re managing dozens of photos across multiple platforms.
Batch your uploads. Rather than uploading one photo at a time as you take them, collect a group of approved images and upload them all at once. Most platforms process batch uploads more smoothly than individual submissions. You can track the entire batch’s progress together.
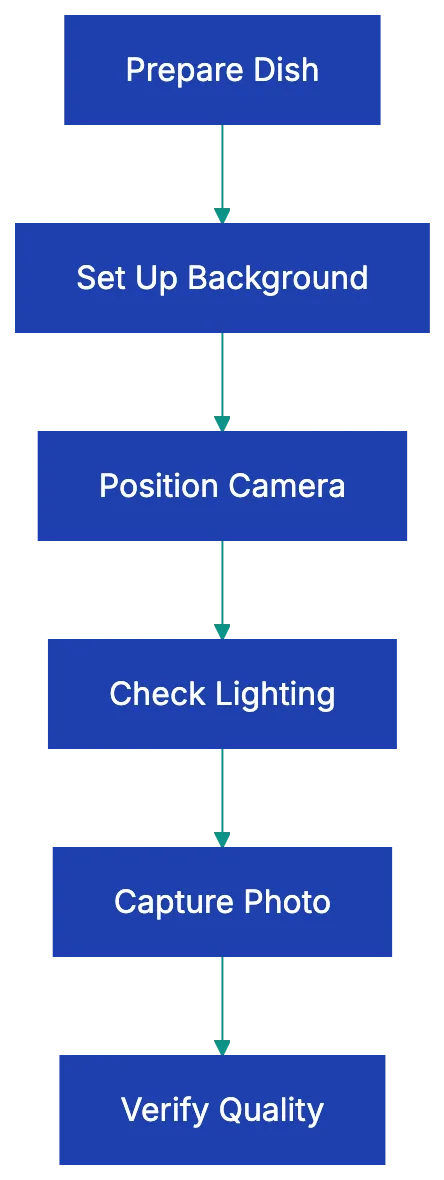
Photo Preparation Workflow:
 Consider hiring a food photographer for a one-day intensive session if your menu is stable. Professional photographers who specialize in restaurant work can photograph 40-60 items in a full day. It costs $800-1500 but ensures compliance. If your menu changes quarterly or less, this makes financial sense.
How AI Tools Can Help With Photo Compliance Checking
Restaurant owners interested in using AI tools can find help with photo compliance before upload. Several approaches work without requiring coding skills.
Image resolution checkers are built into most operating systems. On Mac, open the photo and press Command+I to see dimensions. On Windows, right-click the photo and select Properties, then Details. Check that width and height meet minimum requirements. This simple check catches a huge percentage of rejections.
Color temperature analysis tools help identify the fluorescent or tungsten color cast that causes rejection. Free tools like Photos on Mac or Windows Photos have built-in auto-balance features. Before using them, check if the auto-correction removes the color cast. If the auto-balance makes your photo look significantly better, your original probably has color temperature issues.
Some AI-powered photo editing tools can analyze composition. Adobe Lightroom and similar apps include grid overlays showing whether subjects are centered and whether the rule of thirds is being followed. For food delivery photos, center composition usually works better than artistic off-center placement.
Browser-based AI image analyzers can check for text, watermark, and logos. Upload your photo to these tools and see if they detect any overlay text or embedded watermarks you might have missed. Some subtle watermarks are invisible to the human eye, but clear to detection algorithms.
AI can’t judge food appeal. That’s still a human judgment call. Use AI for technical compliance checking. Use human review for image quality.
Dealing With Rejections and Resubmissions
Some photos still get rejected. Both platforms provide rejection reasons, but they’re sometimes generic. “Does not meet quality standards” doesn’t tell you which specific standard failed.
When you receive a rejection, compare your photo side-by-side with approved photos from similar restaurants. DoorDash and Uber Eats both show approved photos from other restaurants. Look at competitors in your cuisine category. What do their approved photos have in common? Match that standard.
Common quick fixes: If rejected for lighting, reshoot near a window during daytime. If rejected for resolution, locate the original uncompressed file instead of the web-compressed version. If rejected for background clutter, use a poster board or large cutting board as a clean surface. If rejected for angle, make sure you’re shooting from above at 45 degrees, not straight down or at eye level.
Resubmissions usually process faster than initial submissions. The platforms don’t penalize you for failed attempts. Submit the corrected version as soon as you have it ready. Don’t wait or batch it with other photos.
If a photo gets rejected twice and you believe it meets all requirements, contact platform support with specific questions. “My photo was rejected for quality standards. I’ve verified it meets the 1200×800 resolution requirement, uses natural lighting, has a clean background, and shows only the food. Can you provide specific guidance on what needs to change?” This often gets you a human reviewer who can give actionable feedback.
Key Takeaways
Getting your restaurant menu photos approved on DoorDash and Uber Eats comes down to understanding and meeting specific technical requirements. Resolution minimums, lighting quality, shooting angle, background cleanliness, and accurate food representation form the core of both platforms’ standards. The 44% sales increase for items with photos makes this worth getting right.
Use the checklist before uploading any photo. This catches most rejection reasons before they delay your listing. Natural daylight, a clean background, a stable camera position, and accurate portion representation solve the majority of compliance issues. For high-volume menus, create a repeatable workflow and consider professional photography for stable menus.
Restaurant owners should verify their photos against food delivery app photo requirements before submission. Each rejection delays your ability to sell that item effectively. Each approval increases your monthly revenue. The difference between sloppy photos and compliant photos is about two hours of focused work and attention to detail, but the revenue impact can last for years.
Frequently Asked Questions
What specific technical requirements should I follow for DoorDash photos?
For DoorDash, ensure your photos have a minimum resolution of 1200×800 pixels, are well-lit, and are shot at a 45-degree angle. Avoid any visible branding, hands, or clutter in the background. Meeting these standards is crucial for photo approval.
How does Uber Eats photo requirements differ from DoorDash?
Uber Eats requires a minimum resolution of 1080×720 pixels and expects hero images to be in horizontal orientation. Additionally, food should be centered in the frame and not presented as collages. Consistency across all photos in terms of style is also emphasized.
Why do my photos keep getting rejected?
Common reasons for rejection include poor lighting, wrong resolution, cluttered backgrounds, or inaccurate food representation. Ensure your images meet each platform's specific technical and content guidelines. Reviewing rejected photos against approved ones can help identify what needs improvement.
How can I effectively photograph a large menu of items?
Break the process into manageable segments by scheduling photo sessions during quieter hours, prepping only a few dishes at a time. Use a consistent setup for lighting and background each session to maintain quality. Keeping a tracking spreadsheet can also streamline the workflow.
What are some practical tips for taking better food photos?
Shoot in natural light, ideally near a window, and avoid direct sunlight to prevent harsh shadows. Use a stable surface or tripod to avoid blurriness, and shoot at the recommended angle to best showcase the dish. Remember to remove any clutter from the background to keep the focus on the food.
Can I use AI tools to help with my food delivery photos?
Yes, AI tools can be beneficial for checking technical requirements such as resolution and color temperature. Some tools can analyze composition and identify any watermarks or text overlays. However, remember that AI cannot assess food appeal, so human review is still necessary.
What should I do if my photo is rejected multiple times?
If a photo is rejected twice, compare it with approved photos from similar restaurants to identify discrepancies. Reach out to platform support for specific feedback if you believe your photo meets all requirements. Quick fixes can often resolve common rejection issues.